Hummer H1 (2006+). Manual - part 311
 

  Index      Hummer     Hummer H1 DMAX - service repair manual 2006 year


Search            


Content   ..  309  310  311  312   ..


Hummer H1 (2006+). Manual - part 311


10-106 Body

____________________________________________________________________

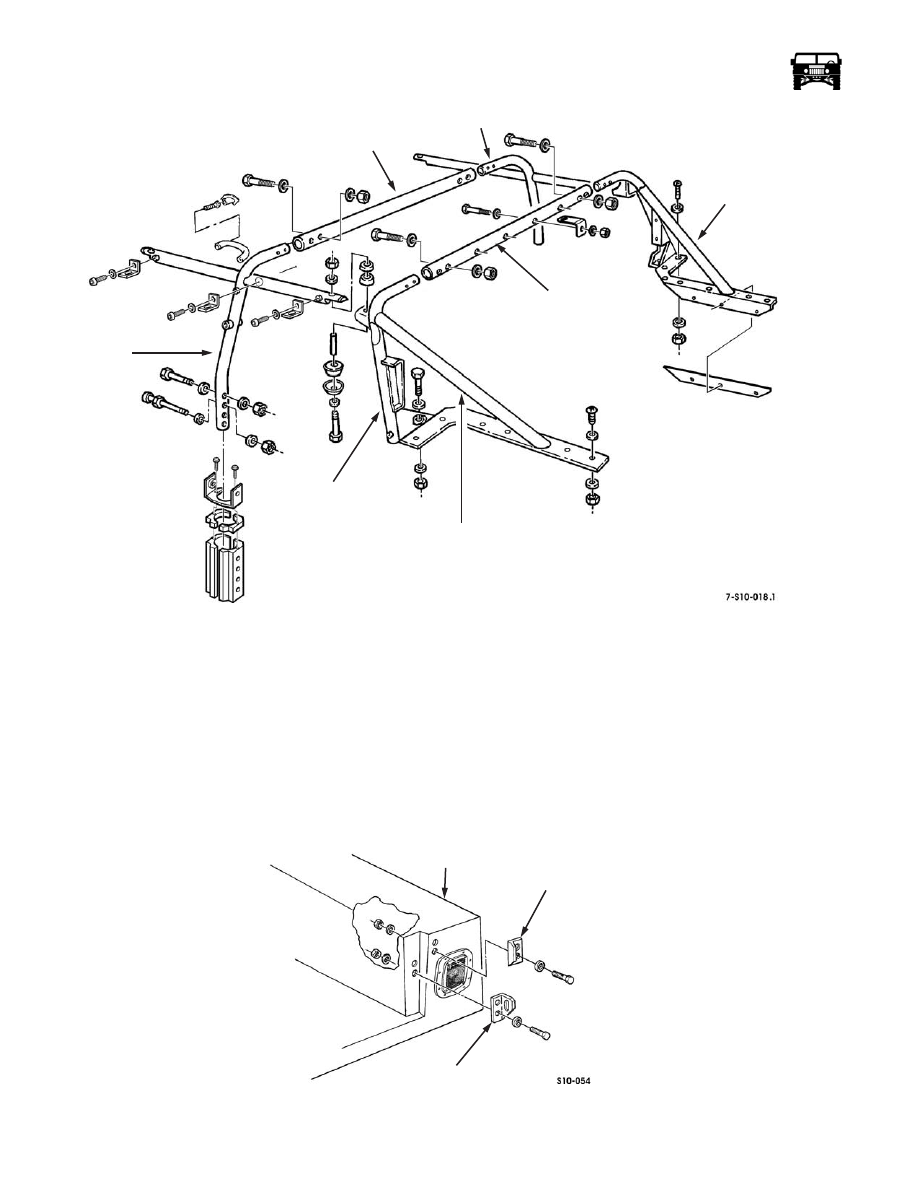
Figure 10-127:   Support Structure Assembly

TAILGATE 

Tailgate Chain and Latch Brackets Replacement

Removal

Remove the four locknuts, eight washers, four bolts, chain bracket and the latch bracket from the body (Figure  10-128).

Installation

Secure the chain bracket and the latch bracket to the body with the four bolts, eight washers and the four locknuts. Tighten the bolts
to 15 lb-ft (20 N•m) (Figure  10-128).

Figure 10-128:   Tailgate Bracket Installation

C PILLAR

B PILLAR

B BAR

B PILLAR

C PILLAR

C PILLAR

REAR SUPPORT

C PILLAR

REAR SUPPORT

 CENTER

BODY

CHAIN BRACKET

LATCH BRACKET

___________________________________________________________________

 Body  10-107

Cargo Tiedown Replacement

NOTE: Cargo tiedown replacement shown represents the three tie downs across the rear at the D-beam. All other tie downs are se-
cured into nut inserts in the body and do not require the nut and washer.

Removal

Remove the locknut, washer, screw and the cargo tiedown from the cargo floor (Figure  10-129).

Installation

Install the cargo tiedown on the cargo floor with the screw, washer and the locknut. Tighten the fasteners to 65 lb-ft (88
N•m) (Figure  10-129).

Figure 10-129:   Cargo Tiedown Replacement (rear at D-beam shown)

Tailgate and Seals Replacement

Removal

1.

Remove the six locknuts, washers and the bolts securing the tailgate to the body (Figure  10-130).

2.

Disconnect the two chains from the tailgate and remove the tailgate and shims from the body.

NOTE: Perform step 3 for open top models. Perform step 4 and 5 for station wagon models.

3.

Remove the two vertical seals from the tailgate. Discard the seals.

4.

Remove the two vertical and the horizontal seals from the body and the four vertical seals and the one horizontal seal from the
tailgate. Remove the two corner seals (station wagon model only). Discard the seals (Figure  10-131).

5.

Remove the two corner seals from the tailgate (station wagon model only). 

6.

Remove the two grommets from the tailgate.

7.

Clean the adhesive from the tailgate and the body.

CARGO FLOOR

SCREW

CARGO

TIEDOWN

10-108 Body

____________________________________________________________________

Figure 10-130:   Tailgate and Seals Replacement

Installation

1.

Install the two grommets on the tailgate (Figure  10-131).

NOTE: Perform steps 2 through 4 for station wagon and open body models. Perform step 5 for two- and four-door models.

2.

Remove the paper backing and install the four vertical seals and the one horizontal seal on the tailgate. Ensure the upper
vertical seals overlap the lower seals.

3.

Remove the paper backing from the two horizontal and the vertical seals and install on the body.

4.

Remove the paper backing from the two corner seals and install on the tailgate (station wagon model only).

5.

Remove the paper backing from the two vertical seals and install the seals on the tailgate (Figure  10-130).

6.

Secure the tailgate to the body with the six bolts, washers and the locknuts. Shim the hinges as needed to align the tailgate with
the body. When aligned, tighten the bolts to 26 lb-ft (35 N•m).

7.

Attach the two tailgate chains bracketed to the body and to the tailgate.

Figure 10-131:   Tailgate Mounting Bracketry and Seal Location

VERTICAL SEAL

BODY

CHAIN

SHIM

TAILGATE

HORIZONTAL

VERTICAL

TAILGATE

CORNER SEAL

GROMMET

VERTICAL

VERTICAL

HORIZONTAL SEAL

BODY

SEAL

(LOWER)

 SEAL (UPPER)

SEAL

 SEAL

___________________________________________________________________

 Body  10-109

Tailgate Chain Replacement

Removal

1.

Lower the tailgate.

2.

Open the chain cap link and disconnect the chain from the bracket (Figure  10-132).

3.

Unhook the chain from the chain bracket.

Installation

1.

Hook the chain to the chain bracket (Figure  10-132).

2.

Connect the chain to the bracket.

3.

Raise the tailgate.

Figure 10-132:   Tailgate Chain Replacement

TAILGATE HINGE REPLACEMENT

NOTE: To facilitate alignment when replacing hinges, place a small strip of masking tape along each side and bottom of hinge be-
fore removal.

Removal

Remove the tailgate by removing the six locknuts, washers and the bolts from the tailgate while still closed. Note the number of
shims under each hinge and set them aside. Remove the tailgate by releasing the tailgate chains (Figure  10-133).

Figure 10-133:   Tailgate Hinge Replacement

BRACKET

CHAIN BRACKET

CHAIN

CAP LINK

SHIM

LOWER

UPPER

LOWER

 HINGE

RETAINER

 RIVET

RETAINER

 RIVET

UPPER

HINGE

CHAIN


Content   ..  309  310  311  312   ..