Honda Pilot (2022 year). Manual in english - page 14
 

  Index      Manuals     Honda Pilot (2022 year). Manual in english


Search            copyright infringement  


Content      ..     12      13      14      15     ..


Honda Pilot (2022 year). Manual in english - page 14


221

uu

Climate Control System

u

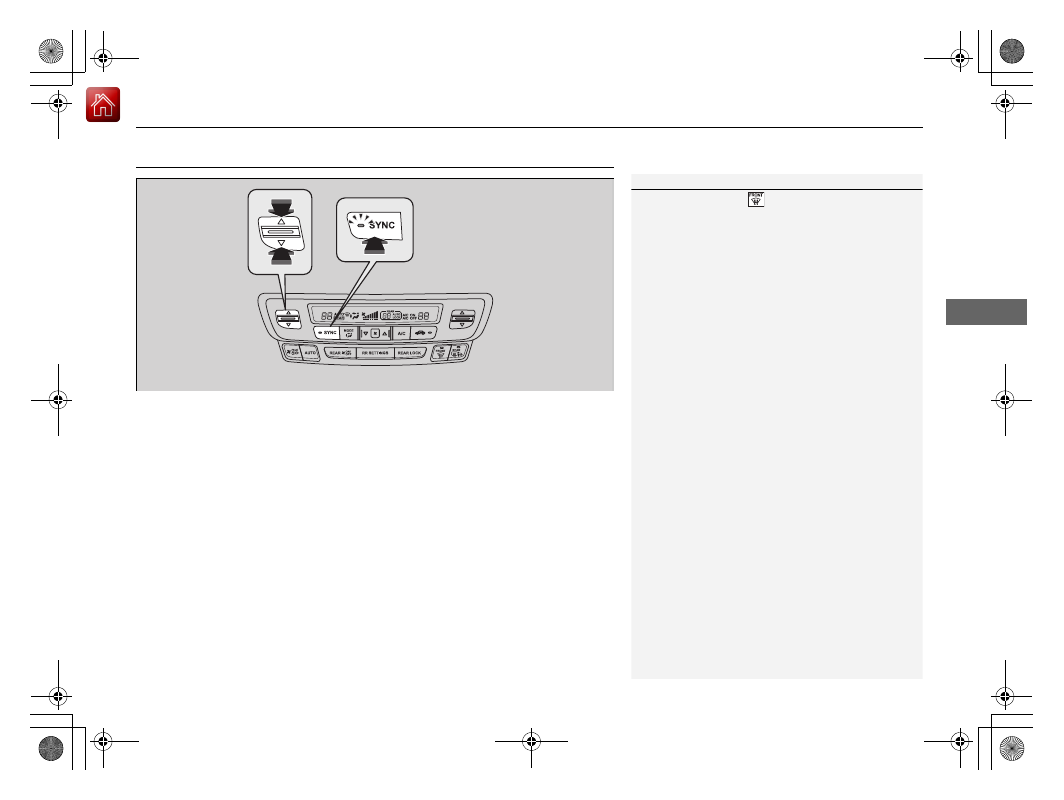
Synchronization Mode

Co
ntrols

Synchronization Mode

You can set the temperature synchronously for the driver side, front passenger side 
and rear seats in synchronization mode.

1.

Press the 

SYNC

 button.

u

The system will switch to synchronization mode.

2.

Adjust the temperature using driver’s side temperature control switch.

Press the 

SYNC

 button to return to synchronization mode off.

1

Synchronization Mode

When you press the 

 button, the system changes 

to synchronization mode.

When the system is in synchronization mode off, the 
temperature for the driver, front passenger, and rear 
seats can be set separately.

222

uu

Climate Control System

u

Rear Climate Control System

Co
ntrols

Rear Climate Control System

Use the system when the engine is running and the climate control system is 
operating.

1.

Press the 

REAR


 (Rear On/Off) button.

2.

Press the 

RR SETTINGS

 button.

u

The system switches to the rear control mode for 10 seconds. The 

REAR


indicator appears on the display.

Using the Rear Climate Control System From the Front Panel

1

Rear Climate Control System

LOCK

 appears on the rear control panel while the 

rear lock is on.
If the rear lock is on while in SYNC mode, the rear 
control panel is disabled. 

LOCK SYNC

 appears on the 

rear control panel.

1

Using the Rear Climate Control System From the Front Panel

Press the 

REAR LOCK

 button to turn the rear lock 

mode on and off.
While the rear lock mode is on, the rear control panel 
is disabled.

u

REAR LOCK

 appears on the display.

When the rear fan is set to maximum speed, Auto 
Idle Stop does not activate.

u

Auto Idle Stop may not activate under other 

conditions when the rear climate control system is 
in use.

REAR LOCK


Button

(Rear On/Off) Button

RR SETTINGS

 Button

223

uu

Climate Control System

u

Rear Climate Control System

Co
ntrols

3.

Press the 

AUTO

 button.

u

The rear system changes to AUTO mode.

u

The system automatically adjusts the fan speed and airflow levels to maintain 
the set rear temperature. Change the temperature if necessary.

4.

To turn off the rear climate control system, press the 

 (Rear On/Off) button.

Use the system when the engine is running and the climate control system is 
operating.

1.

Press the 

 (Rear On/Off) button.

2.

Press the Rear 

AUTO

 button.

3.

Adjust the interior temperature using the rear temperature control button.

4.

To turn off the rear climate control system, press the 

 button.

Using the Rear Climate Control System From the Rear Panel

1

Using the Rear Climate Control System From the Rear Panel

When the 

REAR LOCK

 button on the front control 

panel is off, the temperature of the rear passenger 
compartment can be controlled independently.

Rear floor 
vents

Rear console 
vents and 
floor vents

Rear console 
vents

 / 


(Rear Fan 
Control) Buttons

 (Rear On/Off) Button

Rear Temperature 
Control Buttons

Rear 

AUTO

 Button

224

uu

Climate Control System

u

Automatic Climate Control Sensors

Co
ntrols

Automatic Climate Control Sensors

The automatic climate control system is 
equipped with sensors. Do not cover or spill 
any liquid on them.

Sensor

Sensor

226

Features

Audio System

About Your Audio System

The audio system features AM/FM radio and SiriusXM

®

 Radio

*

 service. It can also 

play audio CDs

*

, WMA/MP3/AAC files

*

, USB flash drives, and iPod, iPhone, iPad and 

Bluetooth

®

 devices.

You can operate the audio system from the knobs on the panel, the remote controls 
on the steering wheel, or the icons on the touchscreen interface.

1

About Your Audio System

SiriusXM

®

 Radio is available on a subscription basis 

only. For more information on SiriusXM

®

 Radio, 

contact a dealer.

*

2

General Information on the Audio System


P. 313

SiriusXM

®

 Radio is available in the United States and 

Canada, except Hawaii, Alaska, and Puerto Rico.

*

SiriusXM

®

 is a registered trademark of SiriusXM 

Radio, Inc.

*

Video CDs and 3-inch (8-cm) mini CDs are not 
supported.

iPod

®

, iPad

®

, iPhone

®

 and iTunes

®

 are trademarks of 

Apple Inc.

State or local laws may prohibit the operation of 
handheld electronic devices while operating a 
vehicle.

After you set the power mode to VEHICLE OFF, you 
can use the audio system for up to 30 minutes per 
driving cycle, or until opening the driver's door.
However, whether you can continue using the audio 
system depends on the battery condition. Repeatedly 
using this feature may drain the battery.

Models with Blu-ray

TM

 player

Remote Controls

iPod

USB Flash Drive

* Not available on all models

227

uu

Audio System

u

USB Ports

Continued

Features

USB Ports

On the console panel

The USB port (2.5A) is for charging devices, 
playing audio files and connecting compatible 
phones with Apple CarPlay or Android Auto.

u

To prevent any potential issues, be sure 
to use an Apple MFi Certified Lightning 
Connector for Apple CarPlay, and for 
Android Auto, the USB cables should be 
certified by USB-IF to be compliant with 
USB 2.0 Standard.

In the console compartment

The USB port (2.5A) is only for charging 
devices.

1

USB Ports

Do not leave the iPod or USB flash drive in the 
vehicle. Direct sunlight and high temperatures may 
damage it.

We recommend that you use a USB cable if you are 
attaching a USB flash drive to the USB port.

Do not connect the iPod or USB flash drive using a hub.

Do not use a device such as a card reader or hard disk 
drive, as the device or your files may be damaged.

We recommend backing up your data before using 
the device in your vehicle.

Displayed messages may vary depending on the 
device model and software version.

The USB port can supply up to 2.5A of power. It does 
not output 2.5A unless requested by the device.
For amperage details, read the operating manual of 
the device that needs to be charged.

This port is for battery charge only. You cannot play 
music even if you have connected a music player to it.

USB charge

In the console compartment

On the console panel

In the console compartment

uu

Audio System

u

Auxiliary Input Jack

228

Features

On the back of the console 
compartment

*

The USB ports (2.5A) are only for charging 
devices.

Auxiliary Input Jack

Use the jack to connect devices.

1.

Open the cover.

2.

Connect a device to the input jack using a 
1/8 inch (3.5 mm) stereo miniplug.

u

The audio system automatically switches 
to the AUX mode.

1

USB Ports

These ports are for battery charge only. You cannot 
play music even if you have connected a music player 
to them.

Under certain conditions, a device connected to the port 
may generate noise in the radio you are listening to.

On the back of the console compartment

On the back of the console 
compartment

USB Ports

1

Auxiliary Input Jack

To switch to another mode or return to the AUX 
mode, select the audio source icon.

You cannot use the auxiliary input jack if you replace 
the audio system.

* Not available on all models

229

uu

Audio System

u

Audio System Theft Protection

Features

Audio System Theft Protection

The audio system is disabled when it is disconnected from the power source, such as 
when the battery is disconnected or goes dead. In certain conditions, the system 
may display a code entry screen. If this occurs, reactivate the audio system.

Reactivating the audio system

1.

Set the power mode to ON.

2.

Turn on the audio system.

3.

Press and hold the audio system power button for more than two seconds.

u

The audio system is reactivated when the audio control unit establishes a 
connection with the vehicle control unit. If the control unit fails to recognize 
the audio unit, you must go to a dealer and have the audio unit checked.

230

uu

Audio System

u

Audio Remote Controls

Features

Audio Remote Controls

Allow you to operate the audio system while driving. The information is shown on 
the driver information interface.

(

+

/

(

-

 (Volume) Bar

Press 

(

+

To increase the volume.

Press 

(

-

To decrease the volume.

/

/

/

/ENTER Buttons

When selecting the audio mode
Press 

 or 

 to select 

Now Playing

 on the home screen of the driver 

information interface, and then press the 

ENTER

 button.

Press  

or : 

To cycles through the audio modes as follows:

Android Auto/Apple CarPlay

SiriusXM

®

*

Rear Entertainment

*

AUX 

Input

AM

Bluetooth

®

 Audio

Social Playlist

FM

My Honda Music

USB/

iPod

CD

*

When listening to the radio

Press : 

To select the next preset radio station.

Press : 

To select the previous preset radio station.

When listening to a CD

*

, iPod, USB flash drive, My Honda Music, or 

Bluetooth

®


Audio

Press : 

To skip to the next song.

Press : 

To go back to the beginning of the current or previous song.

1

Audio Remote Controls

Some modes appear only when an appropriate 
device or medium is used.

Depending on the 

Bluetooth

®

 device you connect, 

some functions may not be available.

Press the 

 (back) button to go back to the 

previous screen or cancel a command.

Press the 

 (home) button to go back to the home 

screen of the driver information interface.

You can show or hide the audio mode icons, or 
change the order of the icons.

2

Show/Hide Apps

 P. 120

2

Arrange Apps

 P. 121

ENTER

 Button

(

+

/

(

-


Bar

/

/

/


Buttons

3 4

3 4

3

4

3

4

* Not available on all models

231

Features

Audio System Basic Operation

To use the audio system function, the power mode must be in ACCESSORY or ON.

: Select to go to the home screen.

2

Switching the Display

 P. 232

: Select to go back to the previous display 

when it is displayed.

: Select to change the audio/information 

screen brightness.
Select 

 once and select 

 or 

 to make 

an adjustment.

u

Each time you select 

, the mode 

switches among the daytime mode, 
nighttime mode and off mode.

 (Day/Night) Icon

 (Home) Icon

 (Back) Icon

232

uu

Audio System Basic Operation

u

Audio/Information Screen

Features

Audio/Information Screen

Displays the audio status and wallpaper. From this display, you can go to various 
setup options.

Using the audio/information screen

Select 

 to go to the home screen.

Select the following icons on the home screen or after selecting 


All Apps

.

Switching the Display

1

Audio/Information Screen

Touchscreen Operation

Use simple gestures - including touching, swiping, 
and scrolling - to operate certain audio functions.

Some items may be grayed out during driving to 
reduce the potential for distraction.

You can select them when the vehicle is stopped or 
use voice commands.

Wearing gloves may limit or prevent touchscreen 
response.

You can change the touchscreen sensitivity setting.

2

Customized Features

 P. 385

Home Screen

Models without 
navigation system

Models with 
navigation system

 (Home) Icon


All Apps

233

uu

Audio System Basic Operation

u

Audio/Information Screen

Continued

Features

Phone

Displays the HFL information.

2

Bluetooth

®

 HandsFreeLink

®

 P. 407

Trip Computer

Displays the trip computer information.

Current Drive

 tab: Displays the current trip information.

Trip A

/

Trip B

 tab: Displays information for the current and three previous drives. 

The information is stored every time you reset Trip A/B.
To reset Trip A/B, select 

Reset

.

To change the setting of how to reset Trip A/B, select 

Settings

, then select 

Trip 

A Reset Method

 or 

Trip B Reset Method

.

Clock

Displays the clock.

System Updates

Updates the software version of the audio system.

2

System Updates

 P. 246

FM/AM/Sirius XM

*

/CD

*

/USB/Bluetooth Audio/AUX Input/My Honda 

Music/Social Playlist

Displays the audio information.

Settings

Enters the customizing menu screen.

2

Customized Features

 P. 385

* Not available on all models

234

uu

Audio System Basic Operation

u

Audio/Information Screen

Features

Navigation

*

Displays the navigation screen.

2

Refer to the Navigation System Manual

HondaLink

Displays the HondaLink

®

 screen.

2

HondaLink

®

 P. 294

Apple CarPlay/Android Auto

Displays the 

Apple CarPlay

 or 

Android Auto

.

2

Apple CarPlay

 P. 302

2

Android Auto

 P. 305

Messages

Displays the text message screen.

2

Bluetooth

®

 HandsFreeLink

®

 P. 407

CabinTalk

*

Displays the 

CabinTalk

 screen.

2

CabinTalk

TM

*

 P. 433

* Not available on all models

235

uu

Audio System Basic Operation

u

Audio/Information Screen

Continued

Features

Rear Entertainment

*

Displays the rear audio screen.

2

Blu-ray/DVD Rear Entertainment System

*

 P. 337

AT&T Hotspot

*

Displays the AT&T Hotspot screen.

2

AT&T Hotspot

*

 P. 300

File Manager

Displays the file manager screen.

2

File Manager

 P. 252

* Not available on all models

uu

Audio System Basic Operation

u

Audio/Information Screen

236

Features

You can change, store, and delete the wallpaper on the audio/information screen.

Import wallpaper

1.

Connect the USB flash drive to the front 
USB port.

2

USB Ports

 P. 227

2.

Select 

Clock

.

3.

Select 

Settings

.

4.

Select 

Clock Faces

.

5.

Select 

Add More

.

u

The 

File Manager

 screen is displayed.

6.

Import a desired picture.

2

How to Transfer a File

 P. 252

u

The display will return to the 

Clock Faces


screen.

Wallpaper Setup

1

Wallpaper Setup

The wallpaper you set up on 

Clock Faces

 cannot be 

displayed on the driver information interface.

The file name must be fewer than 255 characters.

The file format of the image that can be imported 
is BMP, GIF, JPEG, PNG, or WebP.

If the USB flash drive does not have any pictures, 
the 

No Data

 message appears.


Content      ..     12      13      14      15     ..