Honda Passport (2022 year). Manual in english - page 12
 

  Index      Manuals     Honda Passport (2022 year). Manual in english


Search            copyright infringement  


Content      ..     10      11      12      13     ..


Honda Passport (2022 year). Manual in english - page 12


188

uu

Adjusting the Seats

u

Head Restraints

Co
ntrols

Head Restraints

Your vehicle is equipped with head restraints in all seating positions.

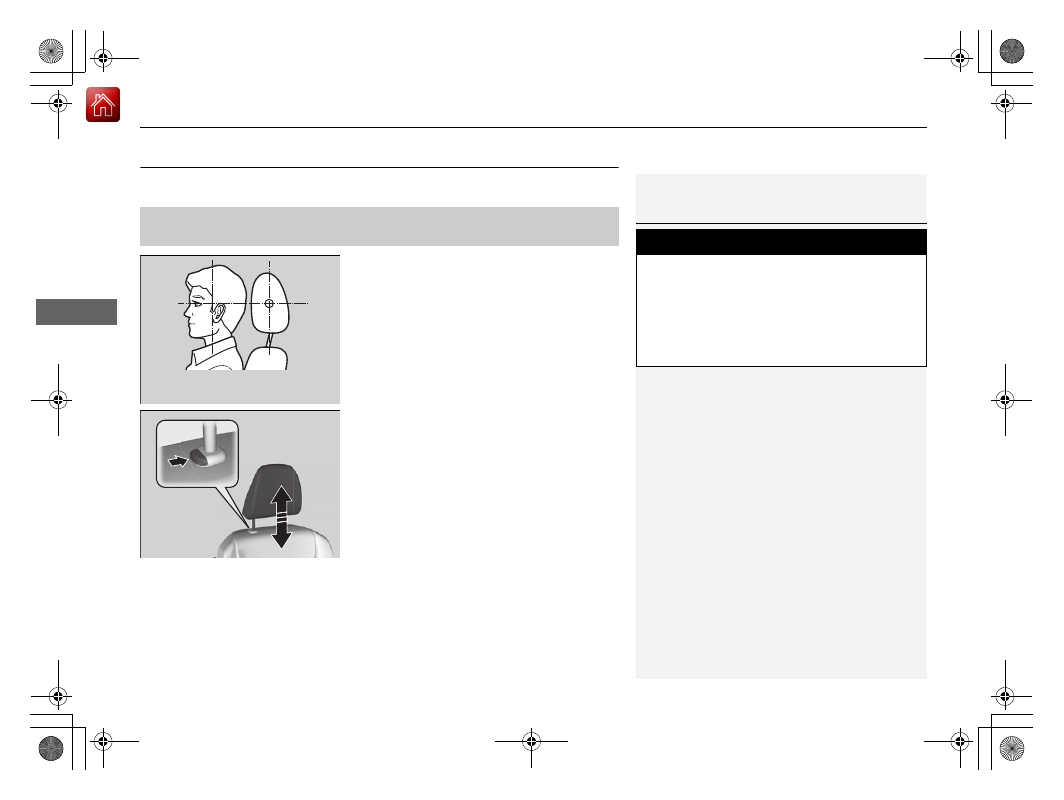
Head restraints are most effective for 
protection against whiplash and other rear-
impact crash injuries when the center of the 
back of the occupant’s head rests against the 
center of the restraint. The tops of the 
occupant’s ears should be level with the 
center height of the restraint.

To raise the head restraint:

 Pull it upward.

To lower the head restraint:

 Push it down 

while pressing the release button.

Adjusting the Front and Rear Outer Seat Head Restraint 

Positions

1

Adjusting the Front and Rear Outer Seat Head Restraint Positions

In order for the head restraint system to work 
properly:

Do not hang any items on the head restraints, or 
from the restraint legs.

Do not place any objects between an occupant and 
the seat-back.

Install each restraint in its proper location.

3

WARNING

Improperly positioning head restraints 
reduces their effectiveness and increases 
the likelihood of serious injury in a crash.

Make sure head restraints are in place and 
positioned properly before driving.

Position head in the center 
of the head restraint.

189

uu

Adjusting the Seats

u

Head Restraints

Co
ntrols

A passenger sitting in the rear center seating 
position should adjust the height of their head 
restraint to an appropriate position before the 
vehicle begins moving.

To raise the head restraint:

Pull it upward.

To lower the head restraint:

Push it down while pressing the release 
button(s).

Head restraints can be removed for cleaning or repair.

To remove a head restraint:

Pull the restraint up as far as it will go. Then, push the release button and pull the 
restraint up and out.

Pull the restraint up as far as it will go. Then, push the release buttons which are 
located on the both legs at the same time, and pull the restraint up and out.

To reinstall a head restraint:

Insert the legs back in place, then adjust the head restraint to an appropriate height 
while pressing the release button(s). Pull up on the restraint to make sure it is locked 
in position.

Changing the Rear Center Seat Head Restraint Position

Removing and Reinstalling the Head Restraints

1

Removing and Reinstalling the Head Restraints

3

WARNING

Failure to reinstall, or correctly reinstall, the 
head restraints can result in severe injury 
during a crash.

Always replace the head restraints before 
driving.

Front and rear outer seat head restraint

Rear center seat head restraint

190

uu

Adjusting the Seats

u

Maintain a Proper Sitting Position

Co
ntrols

Maintain a Proper Sitting Position

After all occupants have adjusted their seats and head restraints, and put on their 
seat belts, it is very important that they continue to sit upright, well back in their 
seats, with their feet on the floor until the vehicle is safely parked and the engine is 
off.

Sitting improperly can increase the chance of injury during a crash. For example, if 
an occupant slouches, lies down, turns sideways, sits forward, leans forward or 
sideways, or puts one or both feet up, the chance of injury during a crash is greatly 
increased.

In addition, an occupant who is out of position in the front seat can be seriously or 
fatally injured in a crash by striking interior parts of the vehicle or being struck by an 
inflating front airbag.

1

Maintain a Proper Sitting Position

3

WARNING

Sitting improperly or out of position can 
result in serious injury or death in a crash.

Always sit upright, well back in the seat, 
with your feet on the floor.

191

uu

Adjusting the Seats

u

Armrest

Co
ntrols

Armrest

Pull down the armrest.

pull the armrest all the way down, then pull it 
up to the desired angle.

Pull down the armrest of the center backrest.

Using the Front Seat Armrest

Models with adjustable armrest

Using the Rear Seat Armrest

192

Co
ntrols

Interior Lights/Interior Convenience Items

Interior Lights

ON

The interior lights come on regardless of 
whether the tailgate and doors are open or 
closed.

Door activated

The interior lights come on in the following 
situations:

When tailgate or any doors are opened.

You unlock the driver’s door.

When the power mode is set to VEHICLE 
OFF.

OFF

The interior lights remain off regardless of 
whether the tailgate or the doors are open or 
closed.

Interior Light Switches

1

Interior Light Switches

In the door activated position, the interior lights fade 
out and go off about 30 seconds after the doors are 
closed.

The lights go off after about 30 seconds in the 
following situations:

When you unlock the driver’s door but do not open 
it.

When you set the power mode to VEHICLE OFF but 
do not open a door.

You can change the interior lights dimming time.

2

Customized Features

 P. 327

The interior lights go off immediately in the following 
situations:

When you lock the driver’s door.

When you close the driver’s door in ACCESSORY 
mode.

When you set the power mode to ON.

If you leave the tailgate or doors open in VEHICLE OFF 
mode, the interior lights go off after about 15 
minutes.

To avoid draining the battery, do not leave the 
interior light on for an extended length of time when 
the engine or power system is off.

Door Activated Position

Off

On

Continued

193

uu

Interior Lights/Interior Convenience Items

u

Interior Lights

Co
ntrols

Front

The map lights can be turned on and off by 
pressing the lenses.

Rear

The map lights can be turned on and off by 
pressing the lenses when the front interior 
light switch is in the door activated position.

Map Lights

1

Map Lights

When the front interior light switch is in the door 
activated position and any door is open, the map 
light will not go off when you press the lens.

194

uu

Interior Lights/Interior Convenience Items

u

Interior Lights

Co
ntrols

ON

The light comes on regardless of whether the 
tailgate is open or closed.

Tailgate activated

The light comes on when you open the 
tailgate, and goes off when closed.

OFF

The light stays off with or without opening the 
tailgate.

Cargo Area Light

Off

On

Tailgate Activated Position

195

uu

Interior Lights/Interior Convenience Items

u

Interior Convenience Items

Continued

Co
ntrols

Interior Convenience Items

Pull the lever to open the glove box. You can 
lock the glove box with the built-in key.

To open the console compartment, press the 
button to unlock the lid, and then slide it 
rearward.

Glove Box

1

Glove Box

3

WARNING

An open glove box can cause serious injury 
to your passenger in a crash, even if the 
passenger is wearing the seat belt.

Always keep the glove box closed while 
driving.

Glove Box

To Lock

Console Compartment

Button

196

uu

Interior Lights/Interior Convenience Items

u

Interior Convenience Items

Co
ntrols

Console Tray

Slide the tray when you use the console 
compartment.

Continued

197

uu

Interior Lights/Interior Convenience Items

u

Interior Convenience Items

Co
ntrols

Front seat beverage holders

Are located in the console between the front 
seats.

Door side beverage holders

Are located on the both of front and rear door 
side pockets.

Beverage Holders

1

Beverage Holders

NOTICE

Spilled liquids damage the upholstery, carpeting, and 
electrical components in the interior.

Be careful when you are using the beverage holders. 
Hot liquid can scald you.

Front

Rear

198

uu

Interior Lights/Interior Convenience Items

u

Interior Convenience Items

Co
ntrols

Rear seat beverage holders

Fold the armrest down to use the rear seat 
beverage holders.

Continued

199

uu

Interior Lights/Interior Convenience Items

u

Interior Convenience Items

Co
ntrols

The accessory power sockets can be used when the power mode is in ACCESSORY 
or ON.

Console panel

Open the lid and the cover to use it.

Console compartment

Pull the handle and open the cover to use it.

Accessory Power Sockets

1

Accessory Power Sockets

Do not insert an automotive type cigarette lighter 
element.
This can overheat the power socket.

The accessory power socket is designed to supply 
power for 12-volt DC accessories that are rated 180 
watts (15 amps) or less.

To prevent battery drain, only use the power socket 
with the engine running.

When the accessory power socket is not in use, close 
the cover to prevent any small foreign objects from 
getting into the accessory power socket.

uu

Interior Lights/Interior Convenience Items

u

Interior Convenience Items

200

Co
ntrols

Cargo area

*

Open the cover to use it.

The AC power outlet can be used when the engine is running.

Open the cover to use it. Plug in the appliance 
slightly, turn it 90° clockwise, then push it all 
the way.

AC Power Outlet

*

1

AC Power Outlet

*

NOTICE

Do not use the AC power outlet for electric 
appliances that require high initial peak wattage, 
such as cathode-ray tube type televisions, 
refrigerators, electric pumps, etc. It is not suitable for 
devices that process precise data, such as medical 
equipment, and that require an extremely stable 
power supply, such as microcomputer-controlled 
electric blankets, touch sensor lamps, etc.

The AC power outlet is designed to supply power for 
up to 115 volt appliances that are rated 150 watts or 
less.

Continued use of any electric appliance/device 
exceeding these ratings may result in damage to the 
appliance/device.

When the AC power outlet is not in use, close the 
cover to prevent any small foreign objects from 
getting into the AC power outlet.

* Not available on all models

Continued

201

uu

Interior Lights/Interior Convenience Items

u

Interior Convenience Items

Co
ntrols

To use the wireless charger, the power mode must be in ACCESSORY or ON.
Charge a compatible device on the area indicated by the 

 mark as follows:

1.

Place the device you want to charge on the 
charging area.

u

The system will automatically start 
charging the device and the green 
indicator light will come on.

u

Make sure that the device is compatible 
with the system and placed with the 
chargeable side in the center of the 
charging area.

2.

When charging is completed, the green 
indicator light will go off.

u

If the device is not located on the charge 
area correctly, the green indicator light 
will blink.

Wireless Charger

*

1

Wireless Charger

*

FCC statement

This product complies with the appropriate 
requirements or the required standards of FCC 
(Federal Communication Commission), described 
below:
This device complies with Part 18 of the FCC 
rules.This equipment generates, uses, and can radiate 
radio frequency energy and, if not installed and used 
per the instructions, may cause harmful interference 
to radio communications.

In order to use safely:

Remove any metal objects from the charge pad 
before charging a device.

Do not open the charger case.

Do not use the charger if it malfunctions. Contact a 
dealer.

If the charger interferes with radio communications, 
attempt to correct the interference:

Press and hold the switch on the charger for a few 
seconds to turn off the charger.

In order to use safely:

Remove any metal objects from the charge pad 
before charging a device.

Do not open the charger case.

Do not use the charger if it malfunctions. Contact a 
dealer.

Green 
Indicator

Charging Area

* Not available on all models

uu

Interior Lights/Interior Convenience Items

u

Interior Convenience Items

202

Co
ntrols

When charging does not start

Perform one of the solutions in the following table.

Indicator

Cause

Solution

Slow Blink

There is an obstacle(s) between 
the charging area and the 
device.

Remove the 
obstacle(s).

The device is not within the 
charging area.

Move the device to the 
center of the charging 
area where 

 is 

located.

Fast Blink

The wireless charger is faulty.

Turn the vehicle off 
and back on. If the 
indicator still blinks, 
contact a dealer.

1

Wireless Charger

*

Using the audio/information screen, you can disable 
the wireless charger function.

2

Customized Features

 P. 327

3

CAUTION

Metal objects between the charge pad 
and the device to be charged will get 
hot and can burn you.

Always remove foreign objects from 
the charge pad before charging the 
device.

Be sure the surface is clear of dust and 
other debris before charging.

Do not spill liquids (i. e. water, drinks, 
etc.) on the charger and the device.

Do not use oil, grease, alcohol, 
benzine or thinner for cleaning the 
charge pad.

Do not cover the system with towels, 
clothing, or other objects while 
charging etc.

Avoid spraying aerosols which may 
come in contact with the charge pad 
surface.

* Not available on all models

Continued

203

uu

Interior Lights/Interior Convenience Items

u

Interior Convenience Items

Co
ntrols

1

Wireless Charger

*

This system consumes a lot of power. Do not use the 
system for a long time when the engine is not 
running. This may weaken the battery, making it 
difficult to start the engine.

When using the wireless charger, check the user’s 
manual that came with the compatible device you 
want to charge.

NOTICE

Do not place any magnetic recording media or 
precision machines within the charging area while 
charging.
The data on your cards such as credit cards can be 
lost because of the magnetic effect. Also precision 
machines such as watches can be affected.

“Qi” and 

 marks are the registered trademarks 

owned by Wireless Power Consortium (WPC).

In the following cases, charging may stop or not start:

The device is already fully charged.

The temperature of the device is extremely high 
while charging.

You are at a place that emits strong 
electromagnetic waves or noises, such as a TV 
station, electric power plant, or gas station.

A device may not charge if the size or shape of its 
chargeable side is not appropriate for use with the 
charging area.

* Not available on all models


Content      ..     10      11      12      13     ..