Honda HR-V eHEV (2022 year). Manual in english - page 24
 

  Index      Manuals     Honda HR-V eHEV (2022 year). Manual in english


Search            copyright infringement  


Content      ..     22      23      24      25     ..


Honda HR-V eHEV (2022 year). Manual in english - page 24


Continued

385

uu

When Driving

u

Intelligent Speed Limiter

Driving

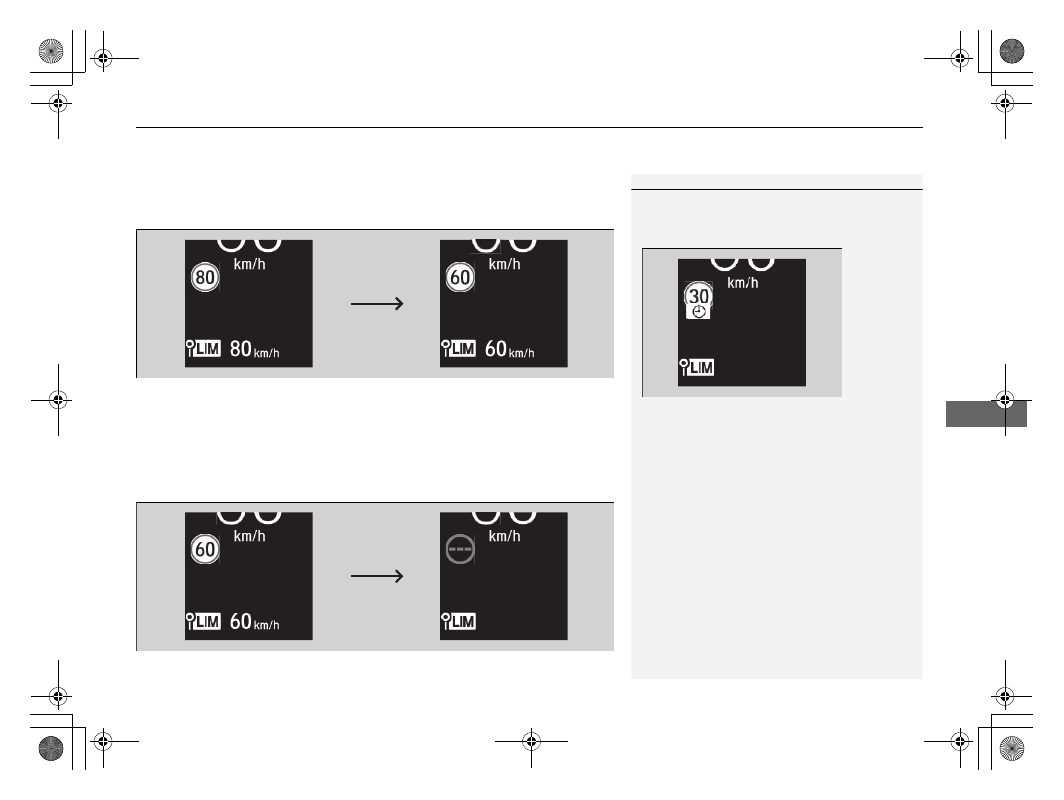
When the traffic sign recognition system detects the new speed limit sign

The intelligent speed limiter is set to the new speed limit that the traffic sign 
recognition system detects.

The speed limitation function and warning function may switch to pause 
if there is no speed limit sign in the screen of the traffic sign recognition 
system when:

The end of speed limit or other designated limit is detected.

Your vehicle enters/exits motorway or highway.

You make a turn with a turn signal to change direction at an intersection.

1

To Set the Speed Limit

The intelligent speed limiter may also switch to pause 
when the traffic sign recognition system detects only 
additional speed limit signs.

386

uu

When Driving

u

Intelligent Speed Limiter

Driving

When the traffic sign recognition system detects the speed limit sign 
while the intelligent speed limiter is paused

The speed limitation function and warning function will be resumed automatically.

When the traffic sign recognition system does not detect the speed limit 
sign for a time while the intelligent speed limiter is activated

While driving, in addition to when the traffic sign recognition system detects no 
speed limit sign, the traffic sign recognition system may display no speed limit.
But, intelligent speed limiter functions continue.

60

Continued

387

uu

When Driving

u

Intelligent Speed Limiter

Driving

Increase or decrease the speed limit by using the 

RES/+

 or 

SET/−

 button on the 

steering wheel.

Each time you press the button, the speed limit is increased or decreased by about 
1 km/h or 1 mph accordingly.

You can increase the speed limit until +10 km/h or +5 mph on the basis of the 
speed limit that the traffic sign recognition system detects.

You can decrease the speed limit until -10 km/h or -5 mph on the basis of the 
speed limit that the traffic sign recognition system detects.

You can accelerate until the set speed is reached. If your vehicle speed is higher 
than the speed limit that the traffic sign recognition system detects, your vehicle 
decelerates slowly to the speed limit.

To Adjust the Speed Limit

1

To Adjust the Speed Limit

A negative or positive offset with respect to the 
speed limit will be reset automatically when the 
traffic sign recognition system detects the new speed 
limit sign.

You cannot decrease the speed limit less than 30 km/
h (18 mph).

a

To increase speed

b

To decrease speed

uu

When Driving

u

Intelligent Speed Limiter

388

Driving

The speed limit can be exceeded by depressing the accelerator pedal fully.

u

The displayed speed limit blinks.
The beeper sounds once the speed limit has been exceeded.

To cancel the intelligent speed limiter, do any 
of the following:

Press the 

CANCEL

 button.

Press the 

 button.

Press the 

LIM

 button.

Exceeding the Speed Limit Temporarily

To Cancel

1

Exceeding the Speed Limit Temporarily

The beeper sounds when the vehicle speed goes 
higher than the set speed limit with the acceleration 
pedal depressed completely.

The intelligent speed limiter resumes working once 
the vehicle speed goes lower than the set speed limit.

1

To Cancel

The intelligent speed limiter changes into adaptive 
cruise control (ACC) with Low Speed Follow or 
adjustable speed limiter if the 

LIM

 button is pressed.

If there is a problem with the system or traffic sign 
recognition system when you are using the intelligent 
speed limiter, the beeper sounds and 

OFF

 comes on. 

The intelligent speed limiter will be turned off.

2

Traffic Sign Recognition System

 P. 461

a

Intelligent Speed Limiter Indicator 
(White)

a

LIM

 Button

b

CANCEL

 Button

c

 Button

389

uu

When Driving

u

Vehicle Stability Assist (VSA) System

Continued

Driving

Vehicle Stability Assist (VSA) System

VSA helps to stabilise the vehicle during cornering if the vehicle turns more or less 
than what was intended. It also assists in maintaining traction on slippery surfaces. 
It does so by regulating engine and motor output and selectively applying the 
brakes.

When VSA activates, you may notice that the 
engine and motor do not respond to the 
accelerator. You may also notice some noise 
from the hydraulic brake system. You will also 
see the indicator blink.

VSA Operation

1

Vehicle Stability Assist (VSA) System

The VSA may not function properly if tyre type and 
size are mixed. Make sure to use the same size and 
type of tyre, and the air pressures as specified.

When the VSA system indicator comes on and stays 
on while driving, there may be a problem with the 
system. While this may not interfere with normal 
driving, have your vehicle checked by a dealer 
immediately.

VSA cannot enhance stability in all driving situations 
and does not control the entire braking system. You 
still need to drive and corner at speeds appropriate 
for the conditions and always leave a sufficient 
margin of safety.

The main function of the VSA system is generally 
known as Electronic Stability Control (ESC). The 
system also includes a traction control function.

The indicators for the adaptive cruise control (ACC) 
with low speed follow (amber), vehicle stability assist 
(VSA) system, vehicle stability assist (VSA) OFF, low 
tyre pressure/deflation warning system, and safety 
support (amber) may come on after reconnecting the 
battery.
Drive a short distance at more than 20 km/h (12 
mph). The indicator should go off. If it does not, have 
your vehicle checked by a dealer.

a

VSA System Indicator

uu

When Driving

u

Vehicle Stability Assist (VSA) System

390

Driving

This button is on the driver side control panel. 
To partially disable VSA functionality/features, 
press and hold it until you hear a beep.

Your vehicle will have normal braking and 
cornering ability, but traction control function 
will be less effective.

To restore VSA functionality/features, press 
the   button until you hear a beep.

VSA is turned on every time you turn the 
power system on, even if you turned it off the 
last time you drove the vehicle.

VSA On and Off

1

Vehicle Stability Assist (VSA) System

In certain unusual conditions when your vehicle gets 
stuck in shallow mud or fresh snow, it may be easier 
to free it with the VSA temporarily switched off.

When the   button is pressed, the traction control 
function becomes less effective. This allows for the 
wheels to spin more freely at low speed. You should 
only attempt to free your vehicle with the VSA off if 
you are not able to free it when the VSA is on.

Immediately after freeing your vehicle, be sure to 
switch VSA on again. We do not recommend driving 
your vehicle with the VSA system switched off.

You may hear a motor sound coming from the 
engine compartment while system checks are being 
performed immediately after turning the power 
system on or while driving. This is normal.

a

VSA 

OFF

 Indicator

391

uu

When Driving

u

Agile Handling Assist

Driving

Agile Handling Assist

Lightly brakes the front wheels, as needed, when you turn the steering wheel, and 
helps to support the vehicle’s stability and performance during cornering.

1

Agile Handling Assist

The agile handling assist cannot enhance stability in 
all driving situations. You still need to drive and 
corner at speeds appropriate for the conditions and 
always leave a sufficient margin of safety.

When the VSA system indicator comes on and stays 
on while driving, the agile handling assist does not 
activate.

You may hear a sound coming from the engine 
compartment while the agile handling assist is 
activated. This is normal.

392

uu

When Driving

u

Deflation Warning System

Driving

Deflation Warning System

Instead of directly measuring the pressure in each tyre, the deflation warning system 
on this vehicle monitors and compares the rolling radius and rotational 
characteristics of each wheel and tyre while you are driving to determine if one or 
more tyres are significantly under-inflated. 

This will cause the low tyre pressure/deflation 
warning system indicator to come on and a 
message to appear on the gauge.

You must start deflation warning system calibration every time you:

Adjust the pressure in one or more tyres.

Rotate the tyres.

Replace one or more tyres.

Before calibrating the deflation warning system:

Set the cold tyre pressure in all four tyres.

2

Checking Tyres

 P. 541

Make sure:

The vehicle is at a complete stop.

The transmission is in 

(

P

.

The power mode is in ON.

1

Deflation Warning System

The system does not monitor the tyres when driving 
at low speed.

Conditions such as low ambient temperature and 
altitude change directly affect tyre pressure and can 
trigger the low tyre pressure/deflation warning 
system indicator to come on.

Tyre pressure checked and inflated in:

Warm weather can become under-inflated in 
colder weather.

Cold weather can become overinflated in warmer 
weather.

The low tyre pressure/deflation warning system 
indicator will not come on as a result of overinflation.

The deflation warning system may not function 
properly if tyre type and size are mixed. 
Make sure to use the same size and type of tyre.

2

Checking and Maintaining Tyres

 P. 541

The indicators for the adaptive cruise control (ACC) 
with low speed follow (amber), vehicle stability assist 
(VSA) system, vehicle stability assist (VSA) OFF, low 
tyre pressure/deflation warning system, and safety 
support (amber) may come on along with a message 
in the gauge after reconnecting the battery. Drive a 
short distance at more than 20 km/h (12 mph). The 
indicator should go off. If it does not, have your 
vehicle checked by a dealer.

a

Low Tyre Pressure/Deflation Warning System Indicator

Deflation Warning System Calibration

393

uu

When Driving

u

Deflation Warning System

Driving

You can calibrate the system from the 
customized feature on the audio/information 
screen.

1.

Set the power mode to ON.

2.

Press the 

 button.

3.

Select 

Vehicle Settings

.

4.

Select 

Deflation Warning System

.

5.

Select 

Calibrate

 or 

Cancel

.

If the 

Calibration Failed to Start.

 message 

appears, repeat step 5.

The calibration process finishes 
automatically.

1

Deflation Warning System

The low tyre pressure/deflation warning system 
indicator may come on with a delay or may not come 
on at all when:

You rapidly accelerate, decelerate, or turn the 
steering wheel.

You drive on snowy or slippery roads.

Tyre chains are used.

The low tyre pressure/deflation warning system 
indicator may come on under the following 
conditions:

There is a heavier and uneven load on the tyres 
than the condition at initialisation.

Tyre chains are used.

1

Deflation Warning System Calibration

The calibration process requires approximately 30 
minutes of cumulative driving at speeds between 40-
100 km/h (25-62 mph).
During this period, if the power mode is set to on and 
the vehicle is not moved within 45 seconds, you may 
notice the low tyre pressure indicator comes on 
briefly. This is normal and indicates that the 
calibration process is not yet complete.

If the tyre chains are installed, remove them before 
calibrating the deflation warning system.

If the low tyre pressure/deflation warning system 
indicator comes on even when the properly inflated 
specified regular tyres are installed, have your vehicle 
checked by a dealer.

We recommend that the tyres be replaced with the 
same brand, model, and size as the originals. Ask a 
dealer for details.

394

uu

When Driving

u

Blind spot information System

*

Driving

Blind spot information System

*

When the system detects vehicles approaching from behind in adjacent lanes, the 
appropriate indicator comes on, providing assistance when you change lanes.

1

Blind spot information System

*

Important Safety Reminder

Like all assistance systems, the Blind Spot Information 
System has limitations. Always look in your mirrors, 
to either side of your vehicle, and behind you for 
other vehicles before changing lanes. Overreliance on 
the Blind Spot Information System may result in a 
collision.

Have your vehicle checked by a dealer in the 
following situations:

The rear bumper or area around the radar sensors 
is strongly impacted.

The indicator does not come on even if a vehicle in 
the alert zone should have been detected.

The rear bumper or any system components need 
to be repaired.

If the rear bumper or any system components are 
repaired, the system will revert to alert zone 1 only 
until it is able to adapt and expand to alert zone 1 
and 2.

* Not available on all models

395

uu

When Driving

u

Blind spot information System

*

Continued

Driving

The system activates when your vehicle is moving forward at about 32km/h (20mph) 
or above.

The initially set alert zone is alert zone 1. Over time, after the vehicle has been driven 
on straight roads with traffic and roadside objects, the system will adapt and expand 
the alert zone (alert zone 1 and 2).

How the System Works

a

Radar Sensors: underneath the rear bumper corners

b

Alert Zone 1

c

Alert Zone 2

Alert zone range

d

Approx. 0.5 ~ 3 m (1.6 ~ 10 ft.) from vehicle side.

e

Approx. 3 m (10 ft.) from rear bumper.

f

Approx. 3 ~ 25 m (10 ~ 82 ft.) behind from rear bumper. (The faster the 
approaching vehicle, the further away it will be detected.)

uu

When Driving

u

Blind spot information System

*

396

Driving

When the system detects a vehicle

Blind spot information System Alert Indicator:
Located on the outside rearview mirror on 
both sides.

Comes on when:

A vehicle approaches you from behind to 
overtake you at a speed difference of no 
more than about 50 km/h (31 mph).

You pass a vehicle at a speed difference of 
no more than about 20 km/h (12 mph).

Blinks and a beeper sounds when:

You use the turn signal lever to signal a turn in 
the direction of the detected vehicle while the 
Blind spot information indicator is on.

u

The beeper sounds three times.

1

Blind spot information System

*

For proper Blind Spot Information System operation:

Always keep the rear bumper and area around the 
radar sensors clean.

Do not cover the rear bumper corner area with 
labels or stickers of any kind.

The system is for your convenience only. Even if an 
object is within the alert zone, the following 
situations may occur:

The Blind Spot Information System alert indicator 
does not come and the 


Blind Spot 

Information Not Available

 appears on the driver 

information interface.

The Blind Spot Information System alert indicator 
may come on even with the message displayed.

a

Comes On

b

Blinks

* Not available on all models

Continued

397

uu

When Driving

u

Blind spot information System

*

Driving

When you turn the blind spot information 
system on and off, do the following.

1.

Press the safety support switch.

2.

Roll the left selector wheel to the 


symbol and push it.

u

A message appears on the driver 
information interface when the system 
turns on or off.

u

A check mark appears in the box and the 
colour of the 

 symbol changes to 

green when the system is on. The check 
mark disappear and the colour of the 


symbol changes to grey when the system 
is off.

The Blind Spot Information System will stay on 
in the previously selected on (checked) or off 
(unchecked) setting each time you start the 
engine.

Blind spot information System On and Off

1

Blind spot information System

*

You can also select the safety support content from 
the driver information interface.

2

Driver Information Interface

 P. 135

You can change the setting for the blind spot 
information system.

2

Customized Features

 P. 305

a

Safety Support Switch

b

Left Selector Wheel

* Not available on all models

398

uu

When Driving

u

Blind spot information System

*

Driving

The Blind Spot Information System alert indicator may not come on under the 
following conditions:

There is a large speed difference between your vehicle and the vehicle in the 
adjacent lane.

A vehicle is parked in a side lane.

An object not detected by the radar sensors approaches or passes your vehicle.

The vehicle driving in the adjacent lane is a motorcycle or other small vehicle.

The Blind Spot Information System may not operate correctly under the following 
conditions:

Making a turn at an intersection.

Objects (guard rails, poles, trees, etc.) are detected.

An object that does not reflect radio waves well or a motorcycle is in the alert 
zone.

Driving on a curved road.

A vehicle is moving from a far lane to the adjacent lane.

The system picks up signal interference such as other radar sensors from another 
vehicle or strong radio wave transmitted from a facility nearby.

The rear bumper or the area around the radar sensors is covered by dirt, mud, 
snow, ice, etc.

The rear bumper or the area around the radar sensors has been damaged or 
deformed.

In bad weather (heavy rain, snow, and fog).

Making a short turn or driving on a bumpy road that slightly tilts the vehicle.

Blind Spot Information System Conditions and Limitations

399

uu

When Driving

u

High Voltage Battery

Driving

High Voltage Battery

The High Voltage battery gradually discharges even if the vehicle is not in use. As a 
result, if your vehicle is parked for an extended period of time, the battery charge 
level will become low. Extended periods of time at a low state of charge will shorten 
battery life. To maintain the battery state of charge, drive your vehicle for more than 
30 minutes at least once every three months.
Extreme high temperatures can affect the battery life. You can minimise the effects 
by parking the vehicle in the shade during the summer.

1

High Voltage Battery

Be careful not to let the High Voltage battery drain 
too much. If the battery level becomes close to zero, 
it will make it impossible to start the power system.

400

uu

When Driving

u

Adjusting Headlight Distribution

Driving

Adjusting Headlight Distribution

Driving the right-hand type vehicle in right-hand traffic, or the left-hand type vehicle 
in left-hand traffic causes headlight glare to oncoming vehicles. You need to alter 
the headlight beam distribution using masking tape.

1

Adjusting Headlight Distribution

Be careful not to adhere the tape to an incorrect 
location. If the headlight beam is distributed 
incorrectly, it may not comply with your country’s 
legal requirements. Ask your dealer for details.

Left-hand drive models

a

Centre Point

b

43 mm

c

45 mm

d

23 mm

e

74 mm

f

53 mm

g

45 mm

h

23 mm

i

44 mm


Content      ..     22      23      24      25     ..