Honda CR-V Hybrid (2022 year). Manual in english - page 9
 

  Index      Manuals     Honda CR-V Hybrid (2022 year). Manual in english


Search            copyright infringement  


Content      ..     7      8      9      10     ..


Honda CR-V Hybrid (2022 year). Manual in english - page 9


uu

Gauges and Driver Information Interface

u

Driver Information Interface

140

In

strum

ent Pa

nel

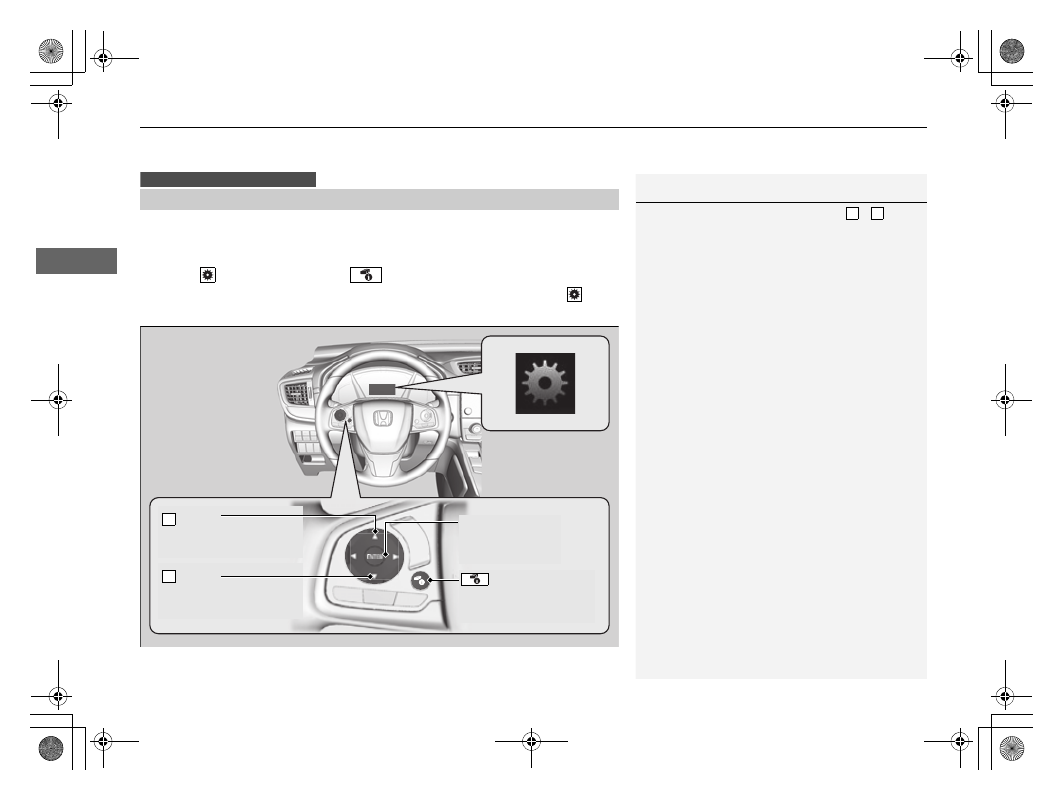
Use the driver information interface to customize certain features.

How to customize

Select the 

 screen by pressing the 

 button while the power mode is in ON, 

and the vehicle is at a complete stop, and the shift position is in 

(

P

. Select 

, then 

press the 

ENTER

 button.

Customized Features

Models with color audio system

1

Customized Features

To customize other features, press the 

 / 


button.

2

List of customizable options

 P. 143

2

Example of customization settings

 P. 147

Put the transmission into 

(

P

 before you attempt to 

change any customized setting.

3

4

ENTER

 Button

Press to set your 

selection.

 Button

Press to go to Vehicle 

Settings.

 Button

Press to go to the next 

display.

4

 Button

Press to go back to the 

previous display.

3

141

uu

Gauges and Driver Information Interface

u

Driver Information Interface

Continued

In

strum

ent Pa

nel

Customization flow

Press the 

 button.

ENTER

TPMS Calibration

Vehicle Settings

Lane Keeping Assist Suspend Beep

Forward Collision Warning Distance

Road Departure Mitigation Setting

Driver Attention Monitor

Driver Assist System Setup

ENTER

ACC Forward Vehicle Detect Beep

“Trip B” Reset Timing

Language Selection

“Trip A” Reset Timing

Adjust Alarm Volume

Speed/Distance Units

Reverse Alert Tone

Meter Setup

ENTER

Adjust Outside Temp. Display

3
4

3
4

3
4

3
4

3
4

3
4

ENTER

Fuel Efficiency Backlight

142

uu

Gauges and Driver Information Interface

u

Driver Information Interface

In

strum

ent Pa

nel

Exit

Default All

Auto Door Lock

Walk Away Auto Lock

Security Relock Timer

Headlight Auto OFF Timer

Auto Headlight ON With Wiper ON

ENTER

ENTER

Lighting Setup

Door Setup

ENTER

Auto Interior Illumination Sensitivity

Door Unlock Mode

Remote Start System ON/OFF

ENTER

Keyless Access Setup

Keyless Access Light Flash

Keyless Access Beep

3
4

3
4

3
4

3
4

3
4

3
4

3
4

Interior Light Dimming Time

Auto Light Sensitivity

Key And Remote Unlock Mode

Keyless Lock Answer Back

Auto Door Unlock

Maintenance Reset

3
4

3
4

3
4

143

uu

Gauges and Driver Information Interface

u

Driver Information Interface

Continued

In

strum

ent Pa

nel

List of customizable options

*1:Default Setting

Setup Group

Customizable Features

Description

Selectable Settings

TPMS 
Calibration

Calibrates the TPMS.

Cancel

/

Calibrate

Driver Assist 
System 
Setup

Forward Collision 
Warning Distance

Changes the distance at which CMBS

TM

 alerts.

Long

/

Normal

*1

/

Short

ACC Forward Vehicle 
Detect Beep

Causes the system to beep when the system detects 
a vehicle, or when the vehicle goes out of ACC 
range.

ON

/

OFF

*1

Road Departure 
Mitigation Setting

Changes the setting for the road departure 
mitigation system.

Narrow

/

Normal

*1

/

Wide

/

Warning Only

Lane Keeping Assist 
Suspend Beep

Causes the system to beep when the LKAS is 
suspended.

ON

/

OFF

*1

Driver Attention Monitor

Changes the setting for the driver attention monitor.

Tactile And Audible Alert

*1

/

Tactile Alert

/

OFF

144

uu

Gauges and Driver Information Interface

u

Driver Information Interface

In

strum

ent Pa

nel

*1:Default Setting

Setup Group

Customizable Features

Description

Selectable Settings

Meter Setup

Language Selection

Changes the displayed language.

English

*1

/

Français

/

Español

Adjust Outside Temp. 
Display

Adjusts the temperature reading by a few 
degrees.

-5°F

 ~ 

±0°F

*1

 ~ 

+5°F

“Trip A” Reset Timing

Changes the setting of how to reset trip meter 
A, average fuel economy A, average speed A, 
and elapsed time A.

When Fully Refueled

/

IGN OFF

/

Manually Reset

*1

“Trip B” Reset Timing

Changes the setting of how to reset trip meter 
B, average fuel economy B, average speed B, 
and elapsed time B.

When Fully Refueled

/

IGN OFF

/

Manually Reset

*1

Adjust Alarm Volume

Changes the alarm volume, such as buzzers, 
warnings, turn signal sound, and so on.

High

/

Mid

*1

/

Low

Reverse Alert Tone

Causes the beeper to sound once when the  
shift position is changed to 

(

R

.

ON

*1

/

OFF

Fuel Efficiency Backlight

Turns the ambient meter feature on and off.

ON

*1

/

OFF

Speed/Distance Units

Selects the trip computer units.

km/h∙km

/

mph∙miles

*1

145

uu

Gauges and Driver Information Interface

u

Driver Information Interface

Continued

In

strum

ent Pa

nel

*1: Default Setting

Setup Group

Customizable Features

Description

Selectable Settings

Keyless 
Access 
Setup

Door Unlock Mode

Changes which doors unlock when you grab the 
driver’s door handle.

Driver Door Only

*1

/

All Doors

Keyless Access Light 
Flash

Causes some exterior lights to flash when you 
unlock/lock the doors.

ON

*1

/

OFF

Keyless Access Beep

Sets the beeper sound or not when you grab either 
front door handle.

ON

*1

/

OFF

Remote Start System 
ON/OFF

Turns the remote engine start feature on and off.

ON

*1

/

OFF

Lighting 
Setup

Interior Light Dimming 
Time

Changes the length of time the interior lights stay on 
after you close the doors.

60sec

/

30sec

*1

/

15sec

Headlight Auto OFF 
Timer

Changes the length of time the exterior lights stay 
on after you close the driver’s door.

60sec

/

30sec

/

15sec

*1

/

0sec

Auto Light Sensitivity

Changes the timing for the headlights to come on.

Max

/

High

/

Mid

*1

/

Low

/

Min

Auto Interior 
Illumination Sensitivity

Changes the sensitivity of the brightness of the 
instrument panel when the headlight switch is in the 

AUTO

 position.

Max

/

High

/

Mid

*1

/

Low

/

Min

Auto Headlight ON With 
Wiper ON

Changes the settings for the wiper operation when 
the headlights automatically come on while the 
headlight switch is in the 

AUTO

 position.

ON

*1

/

OFF

146

uu

Gauges and Driver Information Interface

u

Driver Information Interface

In

strum

ent Pa

nel

*1: Default Setting

Setup Group

Customizable Features

Description

Selectable Settings

Door Setup

Auto Door Lock

Changes the setting for when the doors and the 
tailgate automatically lock.

With Vehicle Speed

*1

/

Shift 

From P

/

OFF

Auto Door Unlock

Changes the setting for when the doors and the 
tailgate automatically unlock.

When Driver’s Door Opens

*1

/

When Shifting Into Park

/

When Ignition Switched 
OFF

/

OFF

Key And Remote Unlock 
Mode

Sets up either the driver’s door or all doors to unlock 
on the first operation of the keyless remote.

Driver Door

*1

/

All Doors

Walk Away Auto Lock

Changes the settings for the automatic locking the 
doors when you walk away from the vehicle while 
carrying the keyless remote.

ON

/

OFF

*1

Keyless Lock Answer 
Back

LOCK/UNLOCK- The exterior lights flash.
LOCK (2nd push)- The beeper sounds.

ON

*1

/

OFF

Security Relock Timer

Changes the time it takes for the doors to relock and 
the security system to set after you unlock the 
vehicle without opening any door.

90sec

/

60sec

/

30sec

*1

Maintenance 
Reset

Resets the Maintenance Minder

TM

  display when you 

have performed the maintenance service.

Cancel

/

All Due Items

Default All

Cancels customized changes you have made or 
restores them to their default setting.

Cancel

/

Set

147

uu

Gauges and Driver Information Interface

u

Driver Information Interface

Continued

In

strum

ent Pa

nel

Example of customization settings

The steps for changing the 

“Trip A” Reset Timing

 setting to 

When Fully Refueled


are shown below. The default setting for 

“Trip A” Reset Timing

 is 

Manually 

Reset

.

1.

Press the 

 button to select 

, then 

press the 

ENTER

 button.

2.

Press the 

 / 

 button until 

Meter Setup


appears on the display.

3.

Press the 

ENTER

 button.

u

Language Selection

 appears first in the 

display.

3

4

148

uu

Gauges and Driver Information Interface

u

Driver Information Interface

In

strum

ent Pa

nel

4.

Press the 

 / 

 button until 

“Trip A” 

Reset Timing 

appears on the display, then 

press the 

ENTER

 button.

u

The display switches to the 
customization setup screen, where you 
can select 

When Fully Refueled

IGN 

OFF

Manually Reset

, or 

Exit

.

5.

Press the 

 / 

 button and select 

When 

Fully Refueled

, then press the 

ENTER


button.

u

The 

When Fully Refueled Setup

 screen 

appears, then the display returns to the 
customization menu screen.

6.

Press the 

 / 

 button until 

Exit

 appears 

on the display, then press the 

ENTER


button.

7.

Repeat Step 6 until you return to the 
normal screen.

3

4

3

4

3

4

149

Controls

This chapter explains how to operate the various controls necessary for driving.

Clock

.................................................. 150

Locking and Unlocking the Doors

Key .................................................. 152
Low Keyless Remote Signal Strength ...154
Locking/Unlocking the Doors from the 

Outside .......................................... 155

Locking/Unlocking the Doors from the 

Inside ............................................. 163

Childproof Door Locks ..................... 165
Auto Door Locking/Unlocking .......... 166

Tailgate

.............................................. 167

Security System

Immobilizer System .......................... 178
Security System Alarm

*

.................... 178

Windows

............................................... 181

Moonroof

*

........................................ 185

Operating the Switches Around the 

Steering Wheel

POWER Button................................. 186
Turn Signals ..................................... 189
Light Switches.................................. 190
Fog Lights

*

...................................... 194

Daytime Running Lights ................... 194
Auto High-Beam .............................. 195
Wipers and Washers ........................ 198

Rear Defogger/Heated Door Mirror

Button ........................................... 201

Brightness Control ........................... 202
Driving Position Memory System

*

.... 203

Adjusting the Steering Wheel .......... 205

Mirrors

............................................... 206

Seats

.................................................. 208

Interior Convenience Items

.............. 218

Climate Control System

Using Automatic Climate Control .... 235

Automatic Climate Control Sensors ......241

* Not available on all models

150

Co
ntrols

Clock

Adjusting the Clock

The clock is automatically updated through the audio system.

You can adjust the time manually in the audio/information screen, with the power 
mode is in ON.

Using the MENU/CLOCK button

1.

Press and hold the 

MENU/CLOCK

 button.

u

Adjust Clock

 is selected.

2.

Rotate 

 to change hour, then press 

.

3.

Rotate 

 to change minute, then press 

.

4.

To enter the selection, rotate 

 and select 

Set

, then press 

.

Adjusting the Time

1

Adjusting the Clock

The clock in the driver information interface is 
automatically adjusted along with the audio system’s 
clock display.

Models with Display Audio

All models

1

Using the MENU/CLOCK button

These indications are used to show how to operate 
the selector knob.
Rotate 

 to select.

Press 

 to enter.

You can customize the clock display to show the 12 
hour clock or 24 hour clock.

2

Customized Features

 P. 362

Selector Knob

MENU/CLOCK

 Button

Models with color audio system

151

uu

Clock

u

Adjusting the Clock

Co
ntrols

Using the Settings menu on the audio/
information screen

1.

Select 

Settings

.

2.

Select 

Clock

.

3.

Select 

Clock Adjustment

.

4.

Select  

or  

to 

change 

hour.

5.

Select 

 or 

 to change minute, then 

select 

OK

.

Models with Display Audio

1

Using the 

Settings

 menu on the audio/information screen

You can customize the clock display to show the 12 
hour clock or 24 hour clock and turn the clock display 
on and off.

2

Customized Features

 P. 369

You can also adjust the clock by touching the clock 
displayed on the upper right corner of the display.
1. Touch the clock on the display for a few seconds.
2. Select 

Settings

.

3. Select 

Clock

.

4. Select 

Clock Adjustment

.

5. Select 

 or 

 to change hour.

6. Select 

 or 

 to change minute, then select 

OK

.

You cannot adjust the time while the vehicle is 
moving.

3

4

3

4

3

4

3

4

152

Co
ntrols

Locking and Unlocking the Doors

Key

This vehicle comes with the following keys:

Use the keys to turn on and off the power 
system, and to lock and unlock the doors and 
tailgate.

The built-in key can be used to lock/unlock the 
doors when the keyless remote battery 
becomes weak and the power door lock/ 
unlock operation is disabled.

To remove the built-in key, slide the release 
knob and then pull out the key. To reinstall 
the built-in key, push the built-in key into the 
keyless remote until it clicks.

1

Key

All the keys have an immobilizer system. The 
immobilizer system helps protect against vehicle 
theft.

2

Immobilizer System

 P. 178

Follow the advice below to prevent damage to the 
keys:

Do not leave the keys in direct sunlight, or in 
locations with high temperature or high humidity.

Do not drop the keys or set heavy objects on them.

Keep the keys away from liquids.

Do not take the keys apart except for replacing the 
battery.

If the circuits in the keys are damaged, the power 
system may not activate, and the remote transmitter 
may not work.
If the keys do not work properly, have them 
inspected by a dealer.

You can remotely turn the power system on using the 
remote engine start.

2

Remote Engine Start

 P. 471

Built-in Key

Built-in Key

Release Knob

153

uu

Locking and Unlocking the Doors

u

Key

Co
ntrols

Contains a number that you will need if you 
purchase a replacement key.

Key Number Tag

1

Key Number Tag

Keep the key number tag separate from the key in a 
safe place outside of your vehicle.
If you wish to purchase an additional key, contact a 
dealer.
If you lose your key and you cannot activate the 
power system, contact a dealer.

154

uu

Locking and Unlocking the Doors

u

Low Keyless Remote Signal Strength

Co
ntrols

Low Keyless Remote Signal Strength

The vehicle transmits radio waves to locate the keyless remote when locking/
unlocking the doors, opening the tailgate, or to activate the power system.

In the following cases, locking/unlocking the doors, opening the tailgate, or 
activating the power system may be inhibited or operation may be unstable:

Strong radio waves are being transmitted by nearby equipment.

You are carrying the keyless remote together with telecommunications 
equipment, laptop computers, cell phones, or wireless devices.

A metallic object is touching or covering the keyless remote.

1

Low Keyless Remote Signal Strength

Communication between the keyless remote and the 
vehicle consumes the keyless remote’s battery.
Battery life is about two years, but this varies 
depending on regularity of use.
The battery is consumed whenever the keyless 
remote is receiving strong radio waves. Avoid placing 
it near electrical appliances such as televisions and 
personal computers.

155

uu

Locking and Unlocking the Doors

u

Locking/Unlocking the Doors from the Outside

Continued

Co
ntrols

Locking/Unlocking the Doors from the Outside

When you carry the keyless remote, you can 
lock/unlock the doors and open the tailgate.
You can lock/unlock the doors within a radius 
of about 32 inches (80 cm) of the outside door 
handle or tailgate outer handle.

Using the Keyless Access System

1

Locking/Unlocking the Doors from the Outside

If the interior light switch is in the door activated 
position, the interior light comes on when you unlock 
the doors and tailgate.
No doors opened: The light fades out after 30 
seconds.
Doors and tailgate relocked: The light goes off 
immediately.

2

Interior Lights

 P. 218


Content      ..     7      8      9      10     ..