Honda CR-V (2022 year). Manual in english - page 44
 

  Index      Manuals     Honda CR-V (2022 year). Manual in english


Search            copyright infringement  


Content      ..     42      43      44      45     ..


Honda CR-V (2022 year). Manual in english - page 44


703

uu

Checking and Maintaining Wiper Blades

u

Changing the Rear Wiper Blade Rubber

Continued

Main

tenan

ce

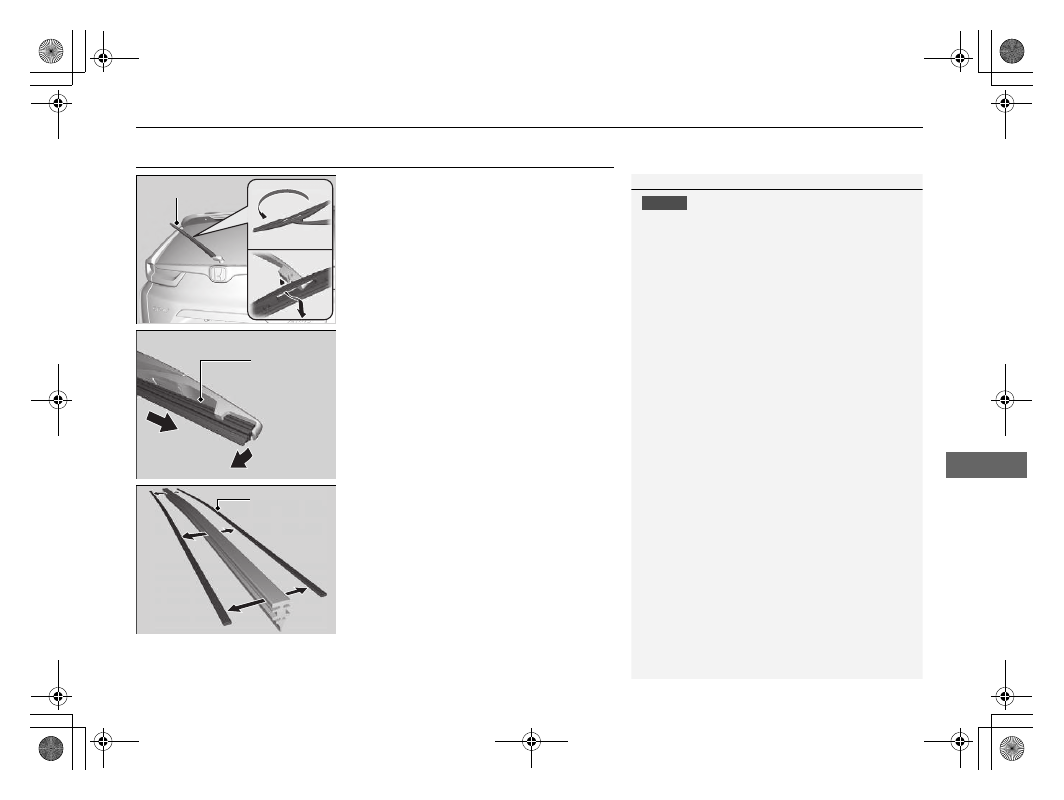
Changing the Rear Wiper Blade Rubber

1.

Raise the wiper arm off.

2.

Pivot the bottom end of the wiper blade up 
until it comes off from the wiper arm.

3.

Slide the blade out of the wiper.

4.

Remove the retainers from wiper blade and 
mount to a new rubber blade.

1

Changing the Rear Wiper Blade Rubber

NOTICE

Avoid dropping the wiper arm; it may damage the 
rear window.

Wiper Arm

Blade

Retainer

704

uu

Checking and Maintaining Wiper Blades

u

Changing the Rear Wiper Blade Rubber

Main

tenan

ce

5.

Slide the new wiper blade onto the holder.

u

Make sure it is engaged correctly, then 
install the wiper blade assembly onto the 
wiper arm.

Holder

705

Main

tenan

ce

Checking and Maintaining Tyres

Checking Tyres

To safely operate your vehicle, your tyres must be of the proper type and size, in 
good condition with adequate tread, and properly inflated.

Inflation guidelines

Properly inflated tyres provide the best combination of handling, tread life, and 
comfort. Refer to the driver’s doorjamb label for the specified pressure.

Underinflated tyres wear unevenly, adversely affect handling and fuel economy, and 
are more likely to fail from overheating.

Overinflated tyres make your vehicle ride harshly, are more prone to road hazards, 
and wear unevenly.

Every day before you drive, look at each of the tyres. If one looks lower than the 
others, check the pressure with a tyre gauge.

At least once a month or before long trips, use a gauge to measure the pressure in 
all tyres, including the spare. Even tyres in good condition can lose 10–20 kPa (0.1–
0.2 bar, 1–2 psi) per month.

Inspection guidelines

Every time you check inflation, also examine the tyres and valve stems.
Look for:

Bumps or bulges on the side or in the tread. Replace the tyre if you find any cuts, 
splits, or cracks in the side of the tyre. Replace it if you see fabric or cord.

Remove any foreign objects and inspect for air leaks.

Uneven tread wear. Have a dealer check the wheel alignment.

Excessive tread wear.

2

Wear Indicators

 P. 706

Cracks or other damage around valve stem.

1

Checking Tyres

Measure the air pressure when tyres are cold. This 
means the vehicle has been parked for at least three 
hours, or driven less than 1.6 km (1 mile). If 
necessary, add or release air until the specified 
pressure is reached.

If checked when hot, tyre pressure can be as much as 
30–40 kPa (0.3–0.4 bar, 4–6 psi) higher than if 
checked when cold.

Whenever tyre pressure is adjusted, you must 
initialise the deflation warning system.

2

Deflation Warning System

 P. 547

3

WARNING

Using tyres that are excessively worn or 
improperly inflated can cause a crash in 
which you can be seriously hurt or killed.

Follow all instructions in this owner’s 
manual regarding tyre inflation and 
maintenance.

706

uu

Checking and Maintaining Tyres

u

Wear Indicators

Main

tenan

ce

Wear Indicators

The groove where the wear indicator is 
located is about 1.6 mm (about 1/16 inch) 
shallower than elsewhere on the tyre. If the 
tread has worn so that the indicator is 
exposed, replace the tyre.

Worn out tyres have poor traction on wet 
roads.

Tyre Service Life

The life of your tyres is dependent on many factors, including driving habits, road 
conditions, vehicle loading, inflation pressure, maintenance history, speed, and 
environmental conditions (even when the tyres are not in use).

In addition to regular inspections and inflation pressure maintenance, it is 
recommended that you have annual inspections performed once the tyres reach five 
years old. All tyres, including the spare, should be removed from service after 10 
years from the date of manufacture, regardless of their condition or state of wear.

1

Checking Tyres

Have a dealer check the tyres if you feel a consistent 
vibration while driving. New tyres and any that have 
been removed and reinstalled should be properly 
balanced.

Example of a Wear 
Indicator mark

707

uu

Checking and Maintaining Tyres

u

Tyre and Wheel Replacement

Main

tenan

ce

Tyre and Wheel Replacement

Replace your tyres with radials of the same size, load range, speed rating, and 
maximum cold tyre pressure rating (as shown on the tyre’s sidewall). Using tyres of 
a different size or construction can cause certain vehicle systems such as the ABS 
and Vehicle Stability Assist (VSA) system to work incorrectly.

It is best to replace all four tyres at the same time. If that isn’t possible, replace the 
front or rear tyres in pairs.

Make sure that the wheel’s specifications match those of the original wheels.

1

Tyre and Wheel Replacement

3

WARNING

Installing improper tyres on your vehicle 
can affect handling and stability. This can 
cause a crash in which you can be seriously 
hurt or killed.

Always use the size and type of tyres 
recommended in the tyre information label 
on your vehicle.

708

uu

Checking and Maintaining Tyres

u

Tyre Rotation

Main

tenan

ce

Tyre Rotation

Rotating tyres according to the maintenance schedule helps to distribute wear more 
evenly and increase tyre life.

Tyres without rotation marks

Rotate the tyres as shown here.

Tyres with rotation marks

Rotate the tyres as shown here.

1

Tyre Rotation

Tyres with directional tread patterns should only be 
rotated front to back (not from one side to the other).
Directional tyres should be mounted with the 
rotation indication mark facing forward, as shown 
below.

When the tyres are rotated, make sure the air 
pressures are checked.

Whenever tyres are rotated, you must initialise the 
deflation warning system.

2

Deflation Warning System

 P. 547

Front

Rotation Mark

Front

Front

709

uu

Checking and Maintaining Tyres

u

Snow Traction Devices

Main

tenan

ce

Snow Traction Devices

If driving on snowy or frozen roads, mount winter tyres, or tyre chains; reduce 
speed; and maintain sufficient distance between vehicles when driving.

Be particularly careful when operating the steering wheel or brakes to prevent 
skidding.

Use tyre chains, winter tyres, or all season tyres when necessary or according to the 
law.

When mounting, refer to the following points.

For winter tyres:

Select the size and load ranges that are the same as the original tyres.

Mount the tyres to all four wheels.

For tyre chains:

Consult a dealer before purchasing any type of chains for your vehicle.

Install them on the front tyres only.

Because your vehicle has limited tyre clearance, we strongly recommend using the 
chains listed below:

*1:Original tyre size is mentioned on the tyre information label on the driver’s 

doorjamb.

Follow the chain manufacturer’s instruction when installing. Mount them as 
tightly as you can.

Check that the chains do not touch the brake lines or suspension.

Drive slowly.

Original Tyre Size

*1

Chain Type

235/65R17 104H

RUD-matic classic 4716134

235/60R18 103H

RUD-matic classic 4716134

235/55R19 101Y

RUD-matic classic V 19642

1

Snow Traction Devices

NOTICE

Traction devices that are the wrong size or improperly installed 
can damage your vehicle’s brake lines, suspension, body, and 
wheels. Stop driving if they are hitting any part of the vehicle.

According to the EU legislation for tyres, when winter tyres are 
used, it is necessary to affix a sticker with the allowable max. 
speed of the winter tyres clearly in the field of view of the 
driver, if the designed max. speed of vehicle is higher than the 
allowed max. speed of winter tyre. A sticker is obtainable from 
your tyre dealer. If you have any question, consult a dealer.

When tyre chains are mounted, follow the chain manufacturer’s 
instructions regarding vehicle operational limits.

Use tyre chains only in an emergency or when they 
are legally required for driving through a certain area.

Use greater caution when driving with tyre chains on snow or ice. They 
may have less-predictable handling than good winter tyres without chains.

If your vehicle is equipped with summer tyres, be aware 
that these tyres are not designed for winter driving 
conditions. For more information, contact a dealer.

3

WARNING

Using the wrong chains, or not properly 
installing chains, can damage the brake 
lines and cause a crash in which you can be 
seriously injured or killed.

Follow all instructions in this owner’s 
manual regarding the selection and use of 
tyre chains.

710

Main

tenan

ce

Battery

Checking the Battery

The condition of the battery is monitored by a 
sensor located on the negative terminal of the 
battery. If there is a problem with this sensor, 
the driver information interface will display a 
warning message. If this happens, have you 
vehicle inspected by a dealer.

Check the battery terminals for corrosion 
monthly.

If your vehicle’s battery is disconnected or goes dead:

The audio system is disabled.

2

Reactivating the audio system

 P. 301

The clock resets.

2

Clock

 P. 174

The immobilizer system needs to be reset.

2

Immobilizer System Indicator

 P. 110

1

Battery

3

WARNING

The battery gives off explosive hydrogen 
gas during normal operation.

A spark or open flame can cause the 
battery to explode with enough force to 
kill or seriously hurt you.

Keep all sparks, open flames, and smoking 
materials away from the battery.

Wear protective clothing and a face shield, 
or have a skilled technician do any battery 
maintenance.

3

WARNING

The battery contains sulfuric acid 
(electrolyte) which is highly corrosive and 
poisonous.

Getting electrolyte in your eyes or on your 
skin can cause serious burns. Wear 
protective clothing and eye protection 
when working on or near the battery.

Swallowing electrolyte can cause fatal 
poisoning if immediate action is not taken.

KEEP OUT OF THE REACH OF CHILDREN

Right-hand drive type

711

uu

Battery

u

Checking the Battery

Main

tenan

ce

1

Battery

Emergency Procedures

Eyes: Flush with water from a cup or other container 
for at least 15 minutes. (Water under pressure can 
damage the eye.) Call a physician immediately.
Skin: Remove contaminated clothing. Flush the skin 
with large quantities of water. Call a physician 
immediately.
Swallowing: Drink water or milk. Call a physician 
immediately.

When you find corrosion, clean the battery terminals 
by applying a baking powder and water solution. 
Clean the terminals with a damp towel. Cloth/towel 
dry the battery. Coat the terminals with grease to 
help prevent future corrosion.

When replacing the battery, the replacement must be 
of the same specifications.
Consult a dealer for more information.

712

uu

Battery

u

Charging the Battery

Main

tenan

ce

Charging the Battery

Disconnect both battery cables to prevent damaging your vehicle’s electrical system. 
Always disconnect the negative (-) cable first, and reconnect it last.

*1: Models with the keyless access system have an 

ENGINE START/STOP

 button instead of an 

ignition switch.

1

Battery

The battery installed in this vehicle is specifically 
designed for a model with Auto Idle Stop.
Using a battery other than this specified type may 
shorten the battery life, and prevent Auto Idle Stop 
from activating. If you need to replace the battery, 
make sure to select the specified type. Ask a dealer 
for more details.

2

Specifications

 P. 768

The indicators for the Adaptive Cruise Control 
(ACC)

*

, Adaptive Cruise Control (ACC) with Low 

Speed Follow (LSF)

*

, Road Departure Mitigation, 

Vehicle Stability Assist (VSA) system, VSA OFF, 
Collision Mitigation Braking System (CMBS), Low 
Tyre Pressure/Deflation Warning System, and Parking 
Brake and Brake System (Amber) may come on along 
with a message in the Driver Information Interface 
when you turn the ignition switch to ON 

(

w

*1

 after 

reconnecting the battery.
Drive a short distance at more than 20 km/h (12 
mph). The indicator should go off. If it does not, have 
your vehicle checked by a dealer.

Models with Auto Idle Stop

* Not available on all models

713

uu

Battery

u

Replacing the Battery

Continued

Main

tenan

ce

Replacing the Battery

When you remove and replace the battery, always follow the maintenance safety 
and the warnings for when checking the battery to prevent potential hazards.

2

Maintenance Safety

 P. 657

2

Checking the Battery

 P. 710

1.

Turn the ignition switch to LOCK 

(

0

*1

Open the bonnet.

2.

Loosen the nut on the negative battery 
cable, then disconnect the cable from the 
negative (–) terminal.

3.

Open the positive battery terminal cover. 
Loosen the nut on the positive battery 
cable, then disconnect the cable from the 
positive (+) terminal.

4.

Loosen the nut on each side of the battery 
bracket with a wrench.

5.

Pull the bottom end of each battery stay out 
of the hole on the battery base, and remove 
the combination of the battery bracket and 
the stays.

6.

Remove the battery cover.

*1: Models with the keyless access system have an 

ENGINE START/STOP

 button instead of an 

ignition switch.

1

Replacing the Battery

NOTICE

An improperly disposed of battery can be harmful to 
the environment and human health. Always confirm 
local regulations for battery disposal.

This symbol on the battery means that this product 
must not be treated as household waste.

To install a new battery, reverse this procedure.

Always disconnect the negative (–) cable first, and 
reconnect it last.

Cover

Nuts

Nut

Stay

Nut

Stay

Battery Cover

714

uu

Battery

u

Replacing the Battery

Main

tenan

ce

7.

Take out the battery carefully.

715

uu

Battery

u

Battery Label

Main

tenan

ce

Battery Label

Example

1

Battery Label

DANGER

Keep flames and sparks away from the battery. The 
battery produces explosive gas that can cause an 
explosion.

Wear eye protection and rubber gloves when 
handling the battery to avoid risk of burns or loss of 
eyesight if exposed to battery electrolyte.

Do not allow children to handle the battery, under 
any circumstance. Ensure that anyone handling the 
battery has a proper understanding of the hazards 
and correct handling procedures involved.

Handle battery electrolyte with extreme care, as it 
contains dilute sulfuric acid. Exposure to eyes or 
skin can cause burns or loss of eyesight.

Read this manual carefully, and understand it 
before handling the battery. Failure to do so can 
cause personal injury and damage to the vehicle.

Do not use the battery if the level of electrolyte is at 
or below the recommended level. Using the battery 
with low electrolyte can cause it to explode, 
causing serious injury.

716

Main

tenan

ce

Remote Transmitter Care

Replacing the Button Battery

If the indicator does not come on when the button is pressed, replace the battery.

1.

Remove the upper half of the cover by 
carefully prying on the edge with a coin.

u

Wrap a coin with a cloth to prevent 
scratching the retractable key.

2.

Remove the button battery with the small 
flat-tip screwdriver.

3.

Make sure to replace the battery with the 
correct polarity.

Retractable Key

*

1

Replacing the Button Battery

A warning mark is located adjacent to the button 
battery

*

.

NOTICE

An improperly disposed of battery can damage the 
environment. Always confirm local regulations for 
battery disposal.

This symbol on the battery means that this product 
must not be treated as household waste.

Replacement batteries are commercially available or 
at a dealer.

4 3

WARNING

CHEMICAL BURN HAZARD

The battery that powers the remote 
transmitter can cause severe internal burns 
and can even lead to death if swallowed.
Keep new and used batteries away from 
children.
If you suspect that a child has swallowed 
the battery, seek medical attention 
immediately.

Battery type: CR2032

Battery

* Not available on all models

717

uu

Remote Transmitter Care

u

Replacing the Button Battery

Main

tenan

ce

1.

Remove the built-in key.

2.

Remove the upper half by carefully prying 
on the edge with a coin.

u

Wrap a coin with a cloth to prevent 
scratching the keyless remote.

u

Remove carefully to avoid losing the 
buttons.

3.

Make sure to replace the battery with the 
correct polarity.

Keyless Remote

*

Battery type: CR2032

Battery

* Not available on all models

718

Main

tenan

ce

Climate Control System Maintenance

Air Conditioning

For proper and safe operation of the climate control system, the refrigerant system 
should only be served by a qualified technician.

Never repair or replace the air conditioning evaporator (cooling coil) with one 
removed from a used or salvaged vehicle.

1

Climate Control System Maintenance

NOTICE

Vented refrigerant is harmful to the environment.
To avoid refrigerant from venting, never replace the 
evaporator with one removed from a used or 
salvaged vehicle.

Refrigerant in your vehicle’s air conditioning system is 
flammable and can be ignited during servicing if 
proper procedures are not followed.

The air conditioner label is found under the bonnet:

2

Safety Labels

 P. 95

2

Specifications

 P. 768

: Caution

: Flammable Refrigerant

: Requires Registered 
Technician to Service

: Air Conditioning 
System


Content      ..     42      43      44      45     ..