Geely FC. Manual part - 15


  Главная      Geely     Geely FC. Workshop Manual year 2008


поиск по сайту            


содержание   ..  10  11  12  13  14  15  16  ..


Geely FC. Manual part - 15


Engine mechanism - Camshaft

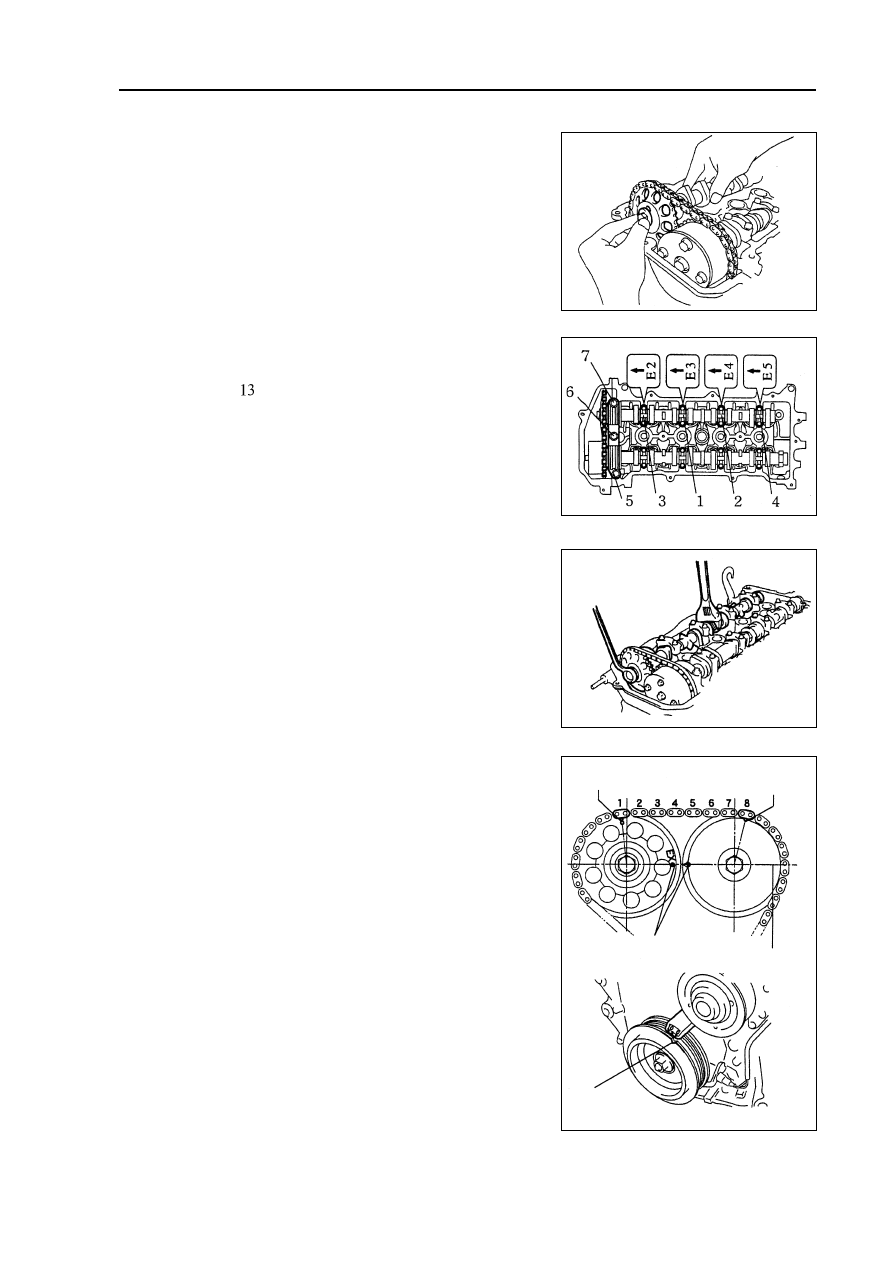
(i) Temporarily tighten fixed bolts.

(j) Check forward mark and figure, and tighten bolts as

sequences shown in the diagram.

Torque:  

±0.78N.m

(k) Install camshaft front bearing cover.

Torque:  23 ±1.38N.m

(l) Fix camshaft with variable wrench and then tighten the

fixed bolts of exhaust camshaft timing sprocket.

Torque:  54 ±10.8N.m

Note:  be careful not to damage valve lifter.

(m)Check the alignment marks on timing chain and cam-

shaft timing sprocket, and then align the groove of damp-

ing pulley with the timing mark on timing chain hood as

shown in the diagram.

Fixing

Tightening

57

Mark

Mark

Mark

Timing chain hood

Groove

Engine mechanism - Camshaft

(n) Install chain tensioner components.

(1) Check o-ring is clean, and buckle on the hook as

shown in the diagram.

(2) Coat engine oil on the chain tensioner, and then

install it.

Torque:  9 ±1.8N.m

Note: when installing the chain temsioner,

buckle on the hook again if plunger has

ejected.

(3) Turn crankshaft counterclockwise to separate the

hook from lock pin on the plunger.

(4) Turn crankshaft clockwise, and check the sliding

parts are blocked by plunger.

Hint: if the plunger does not eject, press the ten-

sion rail toward chain tensioner with

screwdriver or fingers to separate the hook

from lock pin and make the plunger eject.

Pushing into

Turning

Plunger

Pushing into

58

Lifting

Hook

Pressing

in

Pin

Pin

Hook

Sepa-

rate

Engine mechanism - Camshaft

14.

Adjust valve clearance.

15.

Install cylinder head cover components.

(a) Install gasket to cylinder head cover.

(b) Eliminate all old sealant (FIPG) materials.

(c) Coat sealant on position shown in the diagram.

Sealant: silicon rubber flange sealant 1596 (Kesaixin

1596).

Notes:

Eliminate all oil on contact surface.

After coating sealant, finish installation of cylinder

head cover within 3 minutes.

After installing, do not refill engine oil within 2

minutes.

(d) Install cylinder head cover and harness bracket with 9

bolts, 2 oil seal washers and 2 nuts.

Evenly tighten bolts and nuts at several times.

Torque:  nut:  29 ±5.8N.m

Bolt:  69 ±13.8N.m

16.

Install drive belt tensioner device.

Torque:  nut:  29 ±5.8N.m

Bolt:  69 ±13.8N.m

17.

Install right engine mounting assembly.

Torque:  52N.m

18.

Check there is oil leakage.

59

Engine mechanism - Crankshaft front oil seal assembly

Replacement

1. Remove engine right bottom shield.

2. Remove drive belt.

Slowly turn drive belt tensioner clockwise to loosen it. Then

remove drive belt and put back drive belt tensioner slowly and

gently.

3. Remove right engine mounting assembly.

(a) Remove PS oil pump reservoir and put it aside.

(b) Place wooden block between jack and engine, properly

place the jack, and then remove right engine mounting

assembly.

4. remove damping pulley.

(a) Remove pulley bolts with special tool.

(b) Remove damping pulley with special tool.

Special

tool

Special

tool

60

Crankshaft front oil seal assembly


содержание   ..  10  11  12  13  14  15  16  ..