Freightliner FLA/FLB/FLC/FLD/FLL. Manual - part 27


  Index      Freightliner     Freightliner FLA/FLB/FLC/FLD/FLL - service manual 2009 year


Search            


Content   ..  25  26  27  28   ..


Freightliner FLA/FLB/FLC/FLD/FLL. Manual - part 27


er’s manual. Meritor’s experience shows that the fol-
lowing additives (friction modifiers) perform ad-
equately:

A. For all GL–5 gear oils (mineral oil or synthetic)

other than Mobil, add any of the following (1.6
ounces [35 mL] of additive for each pint [0.5 L] of
lube capacity):

Elco No. 2 Friction Modifier (Elco Corpora-
tion).

Lubrizol No. 6178 (Lubrizol Corporation).

Hi–Tec E–336 (Edwin Cooper, Inc.).

Equa–Torque No. 2411 (Sta–Lube Corpora-
tion).

Equa–Torque No. 2414 (Sta–Lube Corpora-
tion).

B. For Mobilube HD (mineral oil) and Mobilube SHC

(synthetic) use Mobil No. 204 (Mobil Oil Corpora-
tion). Add 1.1 ounces [23 mL] of additive for
each pint [0.5 L] of lube capacity.

IMPORTANT: These friction modifiers generally
deteriorate faster than conventional extreme-
pressure additives, so the lubricant change
schedule must be shortened when using these
additives. The traction equalizer additive (and
recommended drive axle lubricant) must be
changed at the Maintenance 2 (M2) interval,
instead of the Maintenance 3 (M3) interval rec-
ommended in the Maintenance Operation Chart
for axles that require only those lubricants rec-
ommended in

Table 2

.

Axle Lubricant and Oil Filter
Replacement Procedure

1.

With the vehicle parked on level ground, apply
the parking brakes, and chock the tires.

2.

Remove the axle carrier fill plug (

Fig. 4

), then

remove the drain plug at the bottom of the hous-
ing and completely drain the lubricant while the
unit is warm. Allow sufficient time for all old lubri-
cant to drain. On tandem drive axles, it is also
necessary to remove the plug at the bottom of
the interaxle differential housing to drain the lu-
bricant.

3.

If so equipped, replace the axle oil filter.

IMPORTANT: When the drive unit is
equipped with an oil filter, the filter should be
replaced every time the oil is changed.
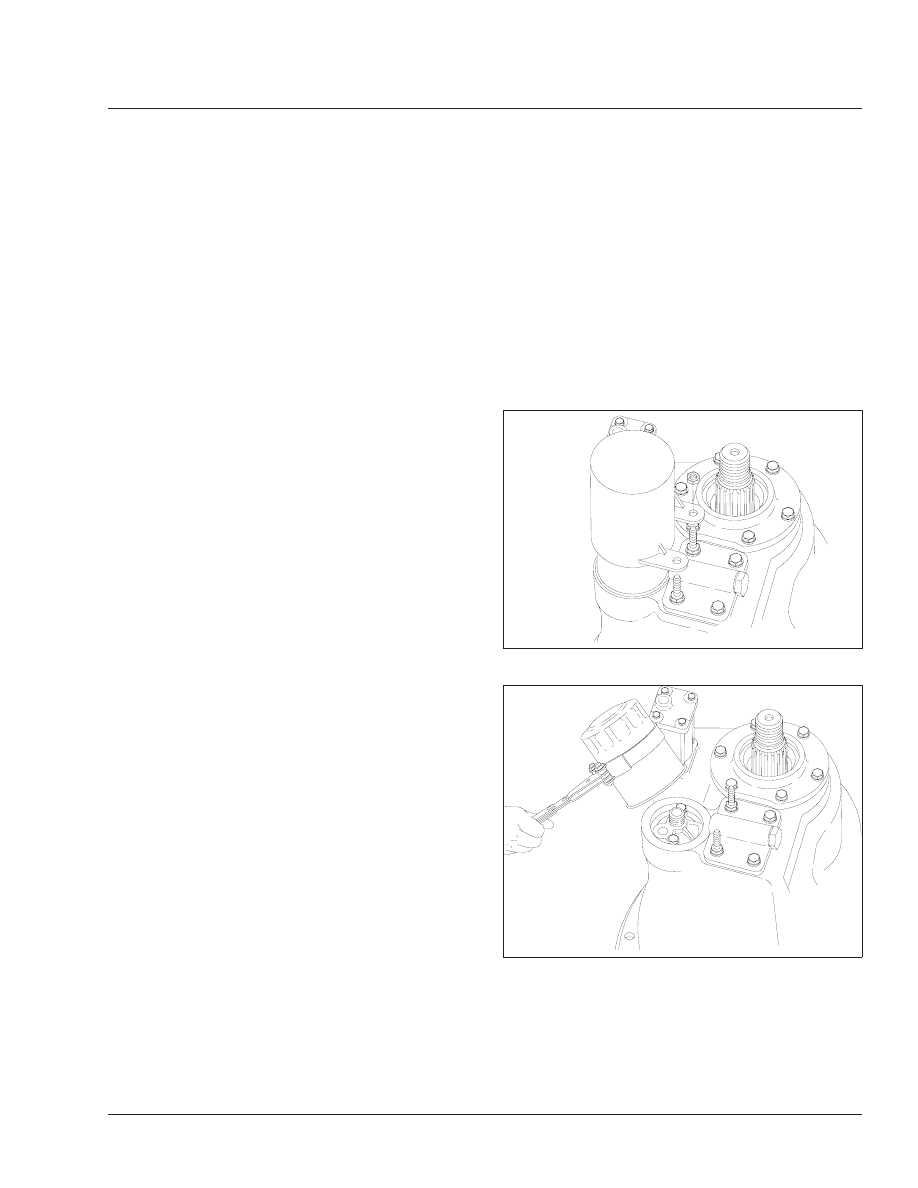
3.1

To remove the filter from the helical gear
cover, remove only the two relief valve
cover stud nuts and washers, then lift off
the filter cover. Do not remove the cap-
screws. See

Fig. 8

.

3.2

Remove the oil filter, using a suitable filter
strap wrench. See

Fig. 9

Discard the

filter.

NOTE: There may be about one pint (0.5 L)
of lubricant remaining in the filter. Be careful
not to spill it when removing the filter.

f350090a

05/27/93

Fig. 8, Axle Oil Filter Cover Removal and Installation

f350119a

05/27/93

Fig. 9, Axle Oil Filter Removal

Rear Axle

35

Heavy-Duty Trucks Maintenance Manual, January 1997

35/7

3.3

Remove the capscrews, washers, and oil
filter adapter from the gear cover; then
inspect the threads of the filter mounting
tube and adapter casting. See

Fig. 10

If

the threads are stripped or the casting is
cracked, replace the damaged
component.

3.4

Place the oil filter adapter in its bore. In-
stall the washers and capscrews, then
tighten the capscrews 20 to 30 lbf·ft (27
to 41 N·m).

3.5

Using the specified drive axle lubricant,
coat the face of the gasket on a new oil
filter. Install the filter over the adapter,
tighten the filter one full turn after the
gasket contacts the base; do not over-
tighten the filter.

3.6

Assemble the filter cover over the filter
and shouldered studs, and secure it with
two nuts and washers. Tighten the nuts
10 to 15 lbf·ft (14 to 20 N·m).

4.

For a new or reconditioned axle, flush the axle
with clean flushing oil, then drain it thoroughly. It
is necessary to flush the axle the first time (only)
that the axle lubricant is changed.

IMPORTANT: Axles should not be flushed with
any solvent, such as kerosene.

5.

Clean the fill and drain plugs. For magnetic
plugs, a piece of key stock or any other conve-
nient steel slug may be used to short the two
magnetic poles and divert the magnetic field.

NOTE: Meritor recommends plugs with ele-
ments having a minimum pickup capacity of
1-1/2 pounds (0.7 kg) of low-carbon steel, in
plate or bar form. Magnets will rapidly lose ef-
fectiveness as collected material bridges the
gap between the two poles. Clean or change
the plugs before this occurs. It may be neces-
sary to clean or change the plugs one or more
times between lubrication change intervals.

6.

After cleaning the drain plug(s), install and
tighten it 35 lbf·ft (47 N·m).

7.

With the vehicle on a level surface, fill the axle
housings to the bottom of the fill hole, using
specified lubricant. See

Table 2

for recom-

mended axle lubricants, and

Table 5

or

Table 6

for drive axle lubricant capacities.

NOTE: Some Meritor axles have a small tapped
and plugged hole near and below the housing
lubricant fill hole. This smaller hole is for a lubri-
cant temperature indicator only, and should not
be used as a fill or level hole.

8.

Install and tighten the fill plug 35 lbf·ft (47 N·m).

9.

Whenever the interaxle differential housing has
been drained, add an additional 2 pints (1 L) of
specified lubricant directly into the interaxle differ-
ential housing.

10. Remove the chocks, then drive the vehicle, un-

loaded, for 1 or 2 miles (2 or 3 km) at speeds
not to exceed 25 mph (40 km/h), to thoroughly
circulate lubricant throughout the carrier and
housing assemblies.

Meritor Single Drive Axle Lubricant Capacities

Axle Type

Axle Model

Capacity

*

:

pints (liters)

Single Reduction

RS–23–160

39.5 (18.7)

RS–23–161

37.2 (17.6)

RS–23–180

47.3 (22.4)

RS–26–180

46.6 (22.0)

RS–30–180

46.6 (22.0)

05/27/93

f350118a

Fig. 10, Axle Oil Filter Adapter Removal and Installation

Rear Axle

35

Heavy-Duty Trucks Maintenance Manual, January 1997

35/8

Meritor Single Drive Axle Lubricant Capacities

Axle Type

Axle Model

Capacity

*

:

pints (liters)

Double Reduction

RS–26–380

58.2 (27.5)

RS–30–380

46.6 (22.0)

RS–38–380

58.2 (27.5)

*

Quantities listed are approximate. Fill axle until lubricant is level with bot-

tom of fill hole with vehicle on level ground.

Table 5, Meritor Single Drive Axle Lubricant

Capacities

Meritor Tandem Drive Axle Lubricant Capacities

Axle Type

Axle Model

Capacity

*

:

pints (liters)

Axle Type

Axle Model

Capacity

*

:

pints (liters)

Single

Reduction

Q–100

Forward 40.0 (18.9)
Rear 37.0 (17.5)

Single

Reduction

SQ–100P

Forward 42.0 (19.9)
Rear 37.0 (17.5)

RT–40–140

Forward 30.2 (14.3)
Rear 22.8 (10.8)

SQR–100

Forward 36.0 (17.0)
Rear 33.0 (15.6)

RT–40–145 and –145P

Forward 30.2 (14.3)
Rear 25.8 (12.2)

SQR–100P

Forward 38.0 (18.0)
Rear 33.0 (15.6)

RT–44–145 and –145P

Forward 29.3 (13.9)
Rear 25.1 (11.9)

SR–170

Forward 55.0 (26.0)
Rear 43.0 (23.3)

RT–46–160 and –160P

Forward 39.1 (18.5)
Rear 34.4 (16.3)

SSHD

Forward 34.0 (16.0)
Rear 28.0 (13.0)

RT–48–180

Forward 61.1 (28.9)
Rear 38.8 (17.4)

Double

Reduction

RT–48–380

Forward 61.1 (28.9)
Rear 63.6 (30.1)

RT–52–160 and –160P

Forward 44.1 (20.9)
Rear 41.2 (19.5)

RT–52–380

Forward 56.1 (26.5)
Rear 58.2 (27.5)

RT–52–180

Forward 56.1 (26.5)
Rear 41.2 (19.5)

RT–58–380

Forward 56.1 (26.5)
Rear 58.2 (27.5)

RT–58–180

Forward 56.1 (26.5)
Rear 36.1 (17.1)

RT–70–380

Forward 54.4 (25.7)
Rear 53.1 (25.1)

SQ–100A

Forward 40.0 (18.9)
Rear 37.0 (17.5)

*

Quantities listed are approximate. Fill axle until lubricant is level with bottom of fill hole with vehicle on level ground.

Table 6, Meritor Tandem Drive Axle Lubricant Capacities

Rear Axle

35

Heavy-Duty Trucks Maintenance Manual, January 1997

35/9

Title of Maintenance Operation (MOP)

MOP Number

Wheel Nut and Rim Nut Checking. . . . . . . . . . . . . . . . . . . . . . . . . . . . . . . . . . . . . . . . . . . . . . . . . . . . . . 40–01

Wheels and Tires

40

Index, Alphabetical

Heavy-Duty Trucks Maintenance Manual, January 1997


Content   ..  25  26  27  28   ..