Ford Escape (2024 year). Manual in english - page 8
 

  Index      Manuals     Ford Escape (2024 year). Manual in english


Search            copyright infringement  


Content      ..     6      7      8      9     ..


Ford Escape (2024 year). Manual in english - page 8


E306774

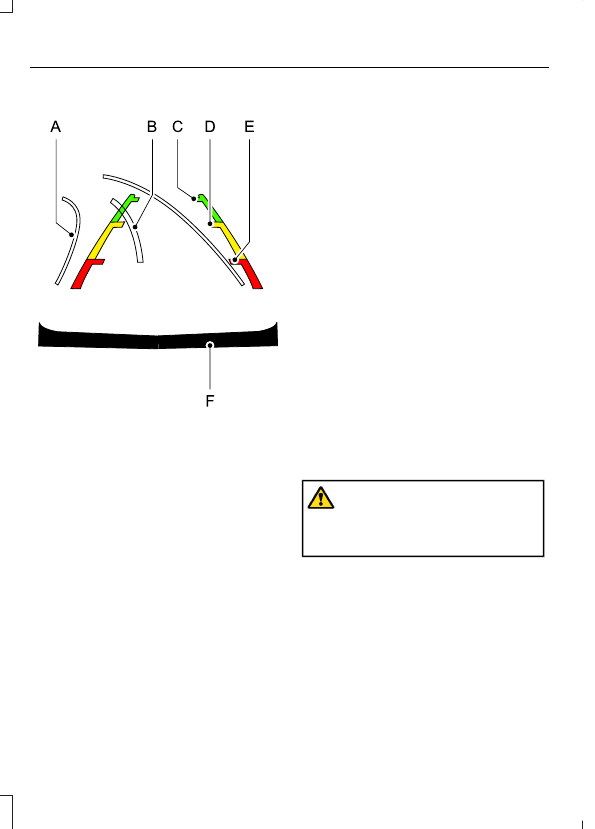
Active guide lines.

A

Centerline.

B

Fixed guide line: Green zone.

C

Fixed guide line: Yellow zone.

D

Fixed guide line: Red zone.

E

Rear bumper.

F

Active guide lines only show with fixed
guide lines. To use active guide lines, turn
the steering wheel to point the guide lines
toward an intended path. If the steering
wheel position changes while reversing,
your vehicle might deviate from the
intended path.

The fixed and active guide lines fade in and
out depending on the steering wheel
position. The active guide lines do not
display when the steering wheel position
is straight.

Use caution while reversing. Objects in the
red zone are closest to your vehicle and
objects in the green zone are farther away.
Objects get closer to your vehicle as they
move from the green zone to the yellow or
red zones. Use the side view mirrors and
rear view mirror to get better coverage on
both sides and rear of your vehicle.

If the vehicle battery is disconnected, the
guidelines are not fully functional directly
after the battery is reconnected. The
guidelines become fully functional after
you drive your vehicle forward as straight
as possible for five minutes at a minimum
speed of 31 mph (50 km/h).

REAR VIEW CAMERA
SETTINGS

ZOOMING THE REAR VIEW
CAMERA IN AND OUT

WARNING: 

When manual zoom is

on, the full area behind your vehicle may
not show. Be aware of your surroundings
when using the manual zoom feature.

Selectable settings for this feature are
zoom in (+) and zoom out (-). Press the
symbol on the camera screen to change
the view. The default setting is zoom off.

This allows you to get a closer view of an
object behind your vehicle.  The zoomed
image keeps the bumper in the image to
provide a reference.  The zoom is only
active while the transmission is in reverse
(R).

248

Rear View Camera

Note:

Manual zoom is only available when

the transmission is in reverse (R).

Note:

Only the centerline shows when you

enable manual zoom.

SWITCHING REAR VIEW CAMERA
OBJECT DISTANCE INDICATOR
ON AND OFF

E190459

You can switch this feature on or off in the
settings.

When the system detects an object, it
displays red, yellow and green distance
indicators on the information display.

SWITCHING REAR VIEW CAMERA
DELAY ON AND OFF

1.

Press 

Features

 on the touchscreen.

2. Press 

Driver Assistance

.

3. Press 

Rear View Camera

.

4. Switch 

Rear View Camera Delay

 on or

off.

If you switch this feature on, the image
continues to display when you shift from
reverse (R) until:

You shift to a forward gear and the
vehicle speed sufficiently increases.

You shift in to park (P).

249

Rear View Camera

HOW DOES THE 360 DEGREE
CAMERA WORK

The 360 degree camera system consists
of front, side and rear cameras.

The 360 Degree Camera system:

Allows you to see what is directly in
front of or behind your vehicle.

Provides a cross traffic view in front of
and behind your vehicle.

Allows you to see a top-down view of
the area outside your vehicle, including
the blind spots and obstacles near your
vehicle.

360 DEGREE CAMERA
PRECAUTIONS

WARNING: 

The 360 degree

camera system still requires the driver
to use it in conjunction with looking out
of the windows, and checking the interior
and exterior mirrors for maximum
coverage.

WARNING: 

Objects that are close

to either corner of the bumper or under
the bumper, might not be seen on the
screen due to the limited coverage of the
camera system.

WARNING: 

When manual zoom is

on, the full area behind your vehicle may
not show. Be aware of your surroundings
when using the manual zoom feature.

WARNING: 

Do not switch the

camera features on or off when your
vehicle is moving.

WARNING: 

You are responsible for

controlling your vehicle at all times. The
system is designed to be an aid and does
not relieve you of your responsibility to
drive with due care and attention. Failure
to follow this instruction could result in
the loss of control of your vehicle,
personal injury or death.

360 DEGREE CAMERA
LIMITATIONS

Note:

Use caution if a door is ajar. The

camera could be out of position and the
image could be incorrect.

LOCATING THE 360 DEGREE
CAMERAS

Rear View Camera

The rear view camera is on the liftgate. It
provides a video image of the area behind
your vehicle.

Front View Camera

The front view camera is in the grille. It
provides a video image of the area in front
of your vehicle.

Side View Camera

The side view camera is on the outside
mirror. It provides a video image of the area
on the sides of your vehicle to aid you when
parking.

360 DEGREE CAMERA GUIDE
LINES

Note:

Active guide lines are only available

when the transmission is in reverse (R).

250

360 Degree Camera

E306774

Active guide lines.

A

Centerline.

B

Fixed guide line: Green zone.

C

Fixed guide line: Yellow zone.

D

Fixed guide line: Red zone.

E

Rear bumper.

F

Active guide lines only show with fixed
guide lines. Turn the steering wheel to
point the guide lines toward an intended
path. If the steering wheel position changes
when reversing, your vehicle could deviate
from the intended path.

The fixed and active guide lines fade in and
out depending on the steering wheel
position. The active guide lines do not
display when the steering wheel position
is straight.

Objects in the red zone are closest to your
vehicle and objects in the green zone are
farther away. Objects get closer to your
vehicle as they move from the green zone
to the yellow or red zones. Use the side
view mirrors and rear view mirror to get
better coverage on both sides and rear of
your vehicle.

Keep Out Zone

E310341

The keep out zone is represented by the
yellow dotted lines running parallel to your
vehicle.

SWITCHING THE 360 DEGREE
CAMERA ON AND OFF

E332186

The 360 degree camera system
button is on the instrument
panel. The front and rear

cameras have multiple screens which
consist of:

Normal view.

Normal view with 360.

Split view.

Note:

The rear view camera activates when

you switch into reverse (R). Additional views
are then accessible on the touchscreen.

When in park (P), neutral (N) or drive (D),
the front and 360 degree views display
when the button is pressed.

251

360 Degree Camera

When in reverse (R), the rear and the 360
degree views display.

Note:

The 360 degree camera view turns

off when the vehicle speed increases, except
when in reverse (R).

SWITCHING THE 360 DEGREE
CAMERA VIEW

E337002

Press to access the different
camera views.

E336516

Front normal view provides an
image of what is directly in front
of your vehicle.

E336517

Front split view provides an
extended view of what is in front
of your vehicle.

E310996

Normal + 360 degree view
contains the normal camera
view next to a 360 degree

camera view.

E310967

Rear normal view provides an
image of what is directly behind
your vehicle.

E310974

Rear split view provides an
extended view of what is behind
your vehicle.

E337359

Zooms in on the 360 degree
image.

252

360 Degree Camera

WHAT IS ACTIVE PARK
ASSIST

Assists you with parking in and out of
parking spaces.

ACTIVE PARK ASSIST
PRECAUTIONS

WARNING: 

You must remain in

your vehicle when the system turns on.
The system is designed to be an aid and
does not relieve you of your responsibility
to drive with due care and attention. At
all times, you are responsible for
controlling your vehicle, supervising the
system and intervening if required.
Failure to follow this instruction could
result in the loss of control of your
vehicle, personal injury or death.

WARNING: 

The sensors may not

detect objects in heavy rain or other
conditions that cause interference.

WARNING: 

Do not use the system

with accessories that extend beyond the
front or rear of your vehicle, for example
a trailer hitch or bike rack. The system is
not able to make corrections for the
additional length of the accessories.

SWITCHING ACTIVE PARK
ASSIST ON AND OFF

E326188

P

Press the parking aid button,
then press the active park assist
icon on the touchscreen to bring

up full screen notifications.

Press the soft keys on the touchscreen to
switch between the parallel park in,
perpendicular park in, or parallel park out
parking modes.

Cancelling Active Park Assist

To cancel parking assistance at any time,
shift out of neutral (N).

Pausing Active Park Assist

To pause parking assistance at any time,
release the parking aid button.

If you open the passenger or rear doors,
active park assist pauses.

To resume parking, press and hold the
parking aid button again.

ENTERING A PARALLEL
PARKING SPACE

1.

E402255

 Press the parking button.

Note:

The system detects other vehicles

and curbs to find a parking space.

2.

E402256

 Press the active park assist

icon on the touchscreen.

3. Use the turn signal lever to search for

a parking space on the driver or
passenger side of your vehicle.

Note:

If you do not use the turn signal lever,

the system searches for a parking space on
the passenger side of your vehicle.

4. Drive your vehicle approximately 3 ft

(1 m) away from and parallel to the
other parked vehicles when searching
for a parking space.

Note:

A tone sounds and a message

appears in the information and
entertainment display when active park
assist finds a suitable parking space.

5. Press and hold the brake pedal.

6. Release the steering wheel and shift

into neutral (N).

253

Active Park Assist

7.

E402255

 Press and hold the parking

button.

8. Release the brake pedal to allow your

vehicle to park.

Note:

You can slow down your vehicle at

any time by pressing the brake pedal.

Note:

When parallel parking between

objects, the system parks closer to the
object in front of your vehicle to allow easier
access to the luggage compartment.

Note:

When parking is complete, your

vehicle shifts into park (P).

ENTERING A PERPENDICULAR
PARKING SPACE

1.

E402255

 Press the parking button.

Note:

Active park assist does not recognize

parking space lines and centers your vehicle
between objects.

2.

E402256

 Press the active park assist

icon on the touchscreen.

3. Select perpendicular parking.

4. Use the turn signal lever to search for

a parking space on the driver or
passenger side of your vehicle.

Note:

If you do not use the turn signal lever,

the system searches for a parking space on
the passenger side of your vehicle.

5. Drive your vehicle approximately 3 ft

(1 m) away from and perpendicular to
the other parked vehicles when
searching for a parking space.

Note:

A tone sounds and a message

appears in the information and
entertainment display when active park
assist finds a parking space.

6. Press and hold the brake pedal.

7.

Release the steering wheel and shift
into neutral (N).

8.

E402255

 Press and hold the parking

button.

9. Release the brake pedal to allow the

vehicle to park.

Note:

Active park assist backs your vehicle

into parking spaces.

Note:

Active park assist aligns the front end

of your vehicle with the lane side of the
object next to it.

Note:

When the system detects only one

object, it allows enough distance to open
the door on either side.

Note:

You can slow down your vehicle at

any time by pressing the brake pedal.

Note:

When parking is complete, your

vehicle shifts into park (P).

EXITING A PARKING SPACE

1.

E402255

 Press the parking button.

2.

E402256

 Press the active park assist

icon on the touchscreen.

3. Select parallel park exit.

4. Use the turn signal to choose the

direction to exit the parking space.

5. Press and hold the brake pedal.

6. Release the parking brake.

7.

Release the steering wheel and shift
into neutral (N).

8.

E402255

 Press and hold the parking

button.

254

Active Park Assist

9. Release the brake pedal to allow your

vehicle to move.

Note:

After active park assist drives your

vehicle to a position where you can exit the
parking space in a forward movement, a
message appears instructing you to take full
control of your vehicle.

10.

Take control of your vehicle.

Note:

You can slow down your vehicle at

any time by pressing the brake pedal.

ACTIVE PARK ASSIST –
TROUBLESHOOTING

ACTIVE PARK ASSIST –
INFORMATION MESSAGES

Details

Message

The system

requires service.

Have your vehicle

checked as soon as

possible.

Active Park Fault

ACTIVE PARK ASSIST –
FREQUENTLY ASKED QUESTIONS

Why does active park assist not
operate correctly?

The system is unable to detect a
vehicle, curb or object to park next to
or in between. The system needs
boundary objects to operate correctly.

Why does active park assist not
search for a parking space?

You have switched traction control off.

The transmission is in reverse (R). Your
vehicle must be moving forward to be
able to detect a parking space.

Why does active park assist not
offer a parking space?

The sensors could be blocked. For
example, snow, ice or large
accumulations of dirt. Blocked sensors
can affect how the system functions.

The sensors in the front or rear bumper
could be damaged.

There is not enough room in the parking
space for your vehicle to safely park.

There is not enough space for the
parking maneuver on the opposite side
of the parking space.

The parking space is more than 1.6 yd
(1.5 m) or less than 0.5 yd (0.5 m)
away from your vehicle.

Your vehicle's speed is greater than
21.7 mph (35 km/h) for parallel parking
or greater than 11.8 mph (19 km/h) for
perpendicular parking.

You recently disconnected or replaced
the battery. After you reconnect the
battery you must drive your vehicle on
a straight road for a short period of
time.

Why does active park assist not
correctly position the vehicle into
a parking space?

An irregular curb along the parking
space prevents the system from
correctly aligning your vehicle.

Vehicles or objects bordering the space
could not be correctly parked.

Your vehicle stopped too far past the
parking space.

The tires are not correctly installed or
maintained. For example, using a spare
tire, not inflated correctly, improper
size, or of different sizes.

A repair or alteration changed the
detection capabilities.

255

Active Park Assist

A parked vehicle has a high
attachment. For example, a salt
sprayer, snowplow or moving truck bed.

The parking space length or position of
parked objects changes after your
vehicle passes the space.

The temperature around your vehicle
quickly changes. For example, driving
from a heated garage into a cold
outside temperature, or after leaving a
car wash.

256

Active Park Assist

WHAT IS CRUISE CONTROL

Cruise control lets you maintain a set
speed without keeping your foot on the
accelerator pedal.

Requirements

Use cruise control when the vehicle speed
is greater than 20 mph (30 km/h).

SWITCHING CRUISE CONTROL
ON AND OFF

WARNING: 

Do not use cruise

control on winding roads, in heavy traffic
or when the road surface is slippery. This
could result in loss of vehicle control,
serious injury or death.

The cruise controls are on the steering
wheel.

Switching Cruise Control On

E71340

Press the button to put the
system in standby mode.

Switching Cruise Control Off

E71340

Press the button when in
standby mode or switch the
ignition off.

Note:

When you switch cruise control off

the set speed clears.

SETTING THE CRUISE
CONTROL SPEED

WARNING: 

When you are going

downhill, your vehicle speed could
increase above the set speed. The
system does not apply the brakes.

Drive to the speed you prefer.

E246884

E246885

Press the toggle button upward
or downward to set the current
speed.

Take your foot off the accelerator pedal.

Note:

The indicator changes color in the

information display.

Changing the Set Speed

E246884

Press and release the toggle
button upward to increase the
set speed in small increments.

Press and hold the toggle button upward
to accelerate. Release the button when
you have reached your preferred speed.

E246885

Press and release the toggle
button downward to decrease
the set speed in small

increments.

Press and hold the toggle button
downward to decelerate. Release the
button when you have reached your
preferred speed.

Note:

 If you accelerate by pressing the

accelerator pedal, the set speed does not
change.  When you release the accelerator
pedal, your vehicle returns to the speed that
you previously set.

257

Cruise Control

CANCELING THE SET SPEED

E402396

Press the button or tap the brake
pedal to cancel the set speed.

Note:

The system remembers the set

speed.

Note:

The system cancels if the vehicle

speed drops below 10 mph (16 km/h) under
the set speed when driving uphill.

RESUMING THE SET SPEED

Press the button.

CRUISE CONTROL
INDICATORS

E71340

Illuminates when you switch the
system on.

258

Cruise Control

HOW DOES ADAPTIVE CRUISE
CONTROL WITH STOP AND GO
WORK

Adaptive cruise control with stop and go
uses radar and camera sensors to maintain
a set gap between your vehicle and the
vehicle in front of you while following it to
a complete stop. Stop and go can also be
set to follow a vehicle directly in front of
you and adjust the set speed, while you are
at a complete stop.

ADAPTIVE CRUISE CONTROL
PRECAUTIONS

WARNING: 

You are responsible for

controlling your vehicle at all times. The
system is designed to be an aid and does
not relieve you of your responsibility to
drive with due care and attention. Failure
to follow this instruction could result in
the loss of control of your vehicle,
personal injury or death.

WARNING: 

Do not use adaptive

cruise control on winding roads, in heavy
traffic or when the road surface is
slippery. This could result in loss of
vehicle control, serious injury or death.

WARNING: 

Pay close attention to

changing road conditions such as
entering or leaving a highway, on roads
with intersections or roundabouts, roads
without visible lanes of travel, roads that
are unpaved, or steep slopes. Failure to
follow this instruction could result in the
loss of control of your vehicle, personal
injury or death.

WARNING: 

The system is not a

crash warning or avoidance system.

WARNING: 

Do not use the system

when towing a trailer that has
aftermarket electronic trailer brake
controls. Failure to follow this instruction
could result in the loss of control of your
vehicle, personal injury or death.

WARNING: 

Do not use tire sizes

other than those recommended because
this can affect the normal operation of
the system. Failure to do so may result
in a loss of vehicle control, which could
result in serious injury.

WARNING: 

Do not use the system

with a snow plow blade installed.

WARNING: 

In situations with poor

visibility, such as fog, heavy rain or other
inclement weather, you may need to
override or completely switch off the
system.

When Following a Vehicle

WARNING: 

When following a

vehicle that is braking, your vehicle does
not always decelerate quickly enough to
avoid a crash without driver intervention.
Apply the brakes when necessary. Failure
to follow this instruction could result in
personal injury or death.

Hilly Condition Usage

Select a lower gear when the system is
active in situations such as prolonged
downhill driving on steep slopes, for
example in mountainous areas.

259

Adaptive Cruise Control

ADAPTIVE CRUISE CONTROL
LIMITATIONS

Sensor Limitations

WARNING: 

On rare occasions,

detection issues can occur due to the
road infrastructures, for example bridges,
tunnels and safety barriers. In these
cases, the system may brake late or
unexpectedly. At all times, you are
responsible for controlling your vehicle,
supervising the system and intervening,
if required.

WARNING: 

If the system

malfunctions, have your vehicle checked
as soon as possible.

WARNING: 

Large contrasts in

outside lighting can limit sensor
performance.

WARNING: 

The system only warns

of vehicles detected by the radar sensor.
In some cases there may be no warning
or a delayed warning. Apply the brakes
when necessary. Failure to follow this
instruction could result in personal injury
or death.

WARNING: 

The system may not

detect stationary or slow moving
vehicles below 6 mph (10 km/h).

WARNING: 

The system does not

detect pedestrians or objects in the road.

WARNING: 

The system does not

detect oncoming vehicles in the same
lane.

WARNING: 

The system may not

operate properly if the sensor is blocked.
Keep the windshield free from
obstruction.

WARNING: 

The sensor may

incorrectly track lane markings as other
structures or objects. This can result in
a false or missed warning.

E243054

The camera is mounted behind the interior
mirror.

E413784

The radar is behind the front grille below
the license plate.

Note:

You cannot see the sensor. It is

behind a fascia panel.

Note:

Keep the front of your vehicle free of

dirt, metal badges or objects. Vehicle front
protectors, aftermarket lights, additional
paint or plastic coatings could also degrade
sensor performance.

A message displays if something obstructs
the camera or the sensor. When something
blocks the sensor, the system cannot
detect a vehicle ahead and does not
function.

260

Adaptive Cruise Control

The radar sensor has a limited field of view.
It may not detect vehicles at all or detect
a vehicle later than expected in some
situations. The lead vehicle image does
not illuminate if the system does not
detect a vehicle in front of you.

Detection Issues Can Occur:

E71621

When driving on a different lane
than the vehicle in front.

A

With vehicles that edge into your
lane. The system can only detect
these vehicles once they move
fully into your lane.

B

There may be issues with the
detection of vehicles in front
when driving into and coming out
of a bend or curve in the road.

C

In these cases, the system may brake late
or unexpectedly.

If something hits the front end of your
vehicle or damage occurs, the
radar-sensing zone may change. This could
cause missed or false vehicle detection.

Optimal system performance requires a
clear view of the road by the windshield
camera.

Optimal performance may not occur if:

The camera is blocked.

There is poor visibility or lighting
conditions.

There are bad weather conditions.

SWITCHING ADAPTIVE
CRUISE CONTROL ON AND OFF

The cruise controls are on the steering
wheel.  See 

What Is Cruise Control

(page 257).

Switching Adaptive Cruise Control
On

E144529

Press the button to set the
system in standby mode.

The indicator, current gap setting and set
speed appear in the information display.

Switching Adaptive Cruise Control
Off

E144529

Press the button when the
system is in standby mode, or
switch the ignition off.

Note:

You erase the set speed when you

switch the system off.

261

Adaptive Cruise Control

ADAPTIVE CRUISE CONTROL
AUTOMATIC CANCELLATION

The system could cancel if any of the
following occur:

The tires lose traction.

You apply the parking brake.

Automatic parking brake application and
cancellation occurs if any of the following
occur:

You unfasten the seatbelt and open
the door after you stop your vehicle.

Your vehicle remains stationary for
longer than three minutes.

The system could deactivate or prevent
activating when requested if:

The vehicle has a blocked sensor.

The brake temperature is too high.

There is a failure in the system.

SETTING THE ADAPTIVE
CRUISE CONTROL SPEED

Drive to the required speed.

E246884

Press the toggle button upward
to set the current speed.

Take your foot off the accelerator pedal.

The indicator, current gap setting and set
speed appear in the instrument cluster
display.

E249552

A vehicle graphic appears in the instrument
cluster display if the system detects a
vehicle in front of you.

Note:

When adaptive cruise control is

active, the speedometer could vary slightly
from the set speed displayed in the
instrument cluster display.

Setting the Adaptive Cruise Speed
When Your Vehicle is Stationary

1.

Follow a vehicle to a complete stop.

2. Keep the brake pedal fully pressed.

3. Press and release 

SET+

 or 

SET-

.

The set speed adjusts to 20 mph
(30 km/h).

The indicator, current gap setting and set
speed appear in the instrument cluster
display.

Changing the Set Speed

E246884

Press the toggle button upward
to increase the set speed.

E246885

Press the toggle button
downward to decrease the set
speed.

You can adjust the set speed in small or
large increments. Press the toggle button
upward or downward once to adjust the
set speed in small increments. Press and
hold the toggle button upward or
downward to adjust the set speed in large
increments.

The system could apply the brakes to slow
your vehicle to the new set speed. The set
speed continuously displays in the
instrument cluster display when the
system is active.

262

Adaptive Cruise Control

SETTING THE ADAPTIVE
CRUISE CONTROL GAP

You can decrease or increase the
distance between your vehicle
and the vehicle in front by
pressing the gap control.

Note:

It is your responsibility to select a gap

appropriate to the driving conditions.

E249552

The selected gap appears in the
instrument cluster display as shown by the
bars in the image.  You can select four gap
settings.

Adaptive Cruise Control Gap Settings

Dynamic

Behavior

Gap Distance

Graphic

Display,

Bars Indic-

ated

Between

Vehicles

Sport.

Closest.

1

Normal.

Close.

2

Normal.

Medium.

3

Comfort.

Far.

4

When you switch the ignition on, the
system automatically selects the last
chosen gap setting.

Following a Vehicle

When a vehicle ahead of you enters the
same lane or a slower vehicle is ahead in
the same lane, the vehicle speed adjusts
to maintain a preset gap distance.  A
vehicle graphic appears in the instrument
cluster display.

Note:

When you are following a vehicle and

you switch on a direction indicator, adaptive
cruise control may provide a small
temporary acceleration to help you pass.

Your vehicle maintains a consistent gap
from the vehicle ahead until:

The vehicle in front of you accelerates
to a speed above the set speed.

The vehicle in front of you moves out
of the lane you are in.

You set a new gap distance.

The system applies the brakes to slow your
vehicle to maintain a safe gap distance
from the vehicle in front.  The system only
applies limited braking.  You can override
the system by applying the brakes.

If the system determines that its maximum
braking level will not be sufficient, an
audible warning sounds when the system
continues to brake.  Take immediate
action.

Following a Vehicle to a Complete
Stop

If your vehicle follows a vehicle to a
complete stop and remains stationary for
less than three seconds, your vehicle
accelerates from a stationary position to
follow the vehicle ahead.

If your vehicle follows a vehicle
to a complete stop and remains
stationary for more than three

seconds, press and release the button or
press the accelerator pedal to follow the
vehicle ahead.

263

Adaptive Cruise Control

Note:

The brakes may emit noise when

applied by the system.

CANCELING THE SET SPEED

E402315

Press the button or tap the brake
pedal to cancel the set speed.

Note:

The system remembers the set

speed.

Note:

The system cancels if the vehicle

speed drops below 10 mph (16 km/h) under
the set speed when driving uphill.

RESUMING THE SET SPEED

Press the button.

Your vehicle speed returns to the
previously set speed and gap setting.  The
set speed displays continuously in the
information display when the system is
active.

Note:

Only use resume if you are aware of

the set speed and intend to return to it.

OVERRIDING THE SET SPEED

WARNING: 

If you override the

system by pressing the accelerator
pedal, it does not automatically apply
the brakes to maintain a gap from any
vehicle ahead.

When you press the accelerator pedal, you
override the set speed and gap distance.

Use the accelerator pedal to intentionally
exceed the set speed limit.

When you override the system, the green
indicator illuminates and the vehicle icon
does not appear in the instrument cluster
display.

The system resumes operation when you
release the accelerator pedal. The vehicle
speed decreases to the set speed, or a
lower speed if following a slower vehicle.

ADAPTIVE CRUISE CONTROL
INDICATORS

E144529

Illuminates when you switch
adaptive cruise control on. The
color of the indicator changes to

indicate the system status.

White indicates the system is on but
inactive.

Green indicates that you set the speed and
the system is active.

SWITCHING FROM ADAPTIVE
CRUISE CONTROL TO CRUISE
CONTROL

WARNING: 

Normal cruise control

will not brake when your vehicle is
approaching slower vehicles. Always be
aware of which mode you have selected
and apply the brakes when necessary.

1.

Press 

Features

 on the touchscreen.

2. Press 

Driver Assistance

.

3. Press 

Cruise Control

.

4. Press 

Normal

.

LANE CENTERING

HOW DOES LANE CENTERING
WORK

Adaptive cruise control with lane centering
uses the vehicle's front radar sensor and
front windshield camera sensor, together
with the steering sensor to operate.

264

Adaptive Cruise Control

Using these sensors, the system applies
continuous steering assistance towards
driving in the middle of the lane you choose
on highway roads.

Note:

The gap setting for adaptive cruise

control with lane centering, operates in the
same way as normal adaptive cruise control.

LANE CENTERING PRECAUTIONS

WARNING: 

Do not use the system

when towing a trailer. Failure to follow
this instruction could result in the loss of
control of your vehicle, personal injury or
death.

WARNING: 

Do not use the system

if any changes or modifications to the
steering wheel have been made. Any
changes or modifications to the steering
wheel could affect the functionality or
performance of the system. Failure to
follow this instruction could result in the
loss of control of your vehicle, personal
injury or death.

Adaptive cruise control precautions apply
to lane centering unless stated otherwise
or contradicted by a lane centering
precaution.  See 

Adaptive Cruise Control

Precautions

 (page 259).

LANE CENTERING
REQUIREMENTS

You must keep your hands on the steering
wheel at all times.

Lane centering only activates when all of
the following occur:

Adaptive cruise control with lane
centering is enabled in your information
and entertainment screen.  See

Switching Lane Centering On and
Off

 (page 266).

You have adaptive cruise control with
stop and go enabled and set.

The steering sensor detects your hands
on the steering wheel.

The system detects both lane markings
when driving on a straight road.

Your vehicle is initially centered in the
lane between two visible line markings.

Note:

If the system does not detect valid

lane line markings, the system will remain
in standby until valid line markings are
availables.

LANE CENTERING LIMITATIONS

Adaptive cruise control limitations apply
to lane centering unless stated otherwise
or contradicted by a lane centering
limitation.  See 

Adaptive Cruise Control

Limitations

 (page 260).

Lane centering may not correctly operate
in any of the following conditions:

The lane width is too narrow or wide.

The curve in the road is too tight.

The system does not detect the
minimum required lane markings or
when lanes merge or split.

When the required steering effort to
maintain lane center exceeds the lane
centering system limit.

When driving in areas that are under
construction or when road work is in
progress.

If the front windshield camera and/or
the front radar are blocked.

When using a spare tire.

265

Adaptive Cruise Control

Inclement weather conditions
including, but not limited to, high wind,
heavy rain, and fog.

Driving into direct sunlight.

When modification to the steering
system has been made, including
alterations to the steering wheel.

When towing a trailer.

See 

Lane Centering Precautions

 (page

265).

Note:

The system steering assistance is

limited and may not have sufficient effort
for all driving situations and/or conditions,
such as driving through tight curves or
driving through curves at high speeds.

Note:

In exceptional conditions, the system

may deviate from the lane center.

SWITCHING LANE CENTERING ON
AND OFF

You must keep your hands on the steering
wheel at all times.

The controls are on the steering wheel.

E362891

Press the button.

The indicator appears in the instrument
cluster. When the lane centering system is
on, the color of the indicator changes to
indicate the system status.

You can override the system at any time
by steering your vehicle.

Note:

The lane centering requirements

must be met before you can enable the
feature.  See 

Lane Centering

Requirements

 (page 265).

Enabling and Disabling Lane
Centering

1.

Press 

Features

 on the touchscreen.

2. Press 

Driver Assistance

.

3. Press 

Cruise Control

.

4. Press 

Adaptive Cruise Control

.

5. Switch Lane Centering on or off.

LANE CENTERING ALERTS

You must keep your hands on the steering
wheel at all times.

When the system is active and detects no
steering activity for a period of time, the
system alerts you to put your hands on the
steering wheel. If you do not react
appropriately to the warnings the adaptive
cruise control with lane centering system
cancels and slows your vehicle down to
idle speeds while maintaining steering
control. See 

Lane Centering Automatic

Cancellation

 (page 266).

The system also alerts you if your vehicle
crosses lane line markings without
detected steering activity.

Note:

The system could detect a light grip

or light touch on the steering wheel as
hands-off driving.

LANE CENTERING AUTOMATIC
CANCELLATION

When an external condition cancels the
system, and your hands are on the steering
wheel, a tone sounds and a message
appears in the instrument cluster display.

When an external condition cancels the
system, and your hands are not on the
steering wheel, the system immediately
alerts you to take control of the vehicle. If
this alert is ignored, the system slows the
vehicle while maintaining steering
assistance when lane markings are
available. When no lane markings are
available, the vehicle comes to a stop.

266

Adaptive Cruise Control

E308130

If your vehicle starts to slow
down after system cancellation,
you must take full control of the

vehicle. To re-enable adaptive cruise
control with lane centering after
cancellation, press and release the resume
button.

Automatic cancellation can also occur if:

The lane becomes too wide or narrow.

The system cannot detect valid lane
markings.

Lane markings cross over one another.

The curve of the road is too sharp.

Note:

If your vehicle slows down due to your

inactivity twice within a key cycle, the
system disables. To reset the system, when
the vehicle is stationary, return the gear
selector to park (P) and turn the vehicle off.
Then, restart the vehicle with your foot on
the brake pedal.

LANE CENTERING MANUAL
CANCELLATION

When you perform the following actions,
adaptive cruise control with lane centering
will cancel:

The brake pedal is pressed.

Adaptive cruise control button on the
steering wheel is switched off.

The lane centering system is momentarily
suppressed when either of the following
actions are performed:

Turn signal indicator is latched or
tapped.

You steer the vehicle out of lane.

LANE CENTERING INDICATORS

E297977

Illuminates when you switch
lane centering on. The color of
the indicator changes to indicate

the system status.

Gray status indicates the system is on but
in standby mode.

Green status indicates the system is
enabled and applying steering assistance
to keep the vehicle in the center of the lane.

Amber status with an audible tone, that
then changes to gray status, indicates a
system automatic cancellation.

LANE CENTERING –
TROUBLESHOOTING

LANE CENTERING –
INFORMATION MESSAGES

Note:

Depending on your vehicle options

and instrument cluster type, not all
messages display or are available.

267

Adaptive Cruise Control

Action

Message

You must return your hands to the steering wheel and provide

steering input to cancel the message.

Keep Hands on Steering

Wheel

Lane centering is currently not available, due to conditions

that prevent the system from becoming active. To reset the

system, when the vehicle is stationary, return the gear selector

to park (P) and turn the vehicle off. Then, restart the vehicle

with your foot on the brake pedal.

Lane Centering Assist

Not Available

Adaptive cruise control with lane centering is about to cancel.

You must immediately take full control of the vehicle.

Resume Control

Adaptive cruise control with lane centering is in standby mode.

When safe to do so, you can resume adaptive cruise control

with lane centering by applying pressure on the accelerator
pedal. Alternatively, you can also re-enable adaptive cruise

control with lane centering by pressing the resume button on

the steering wheel.

Press Accelerator Pedal

to Resume

PREDICTIVE SPEED ASSIST

HOW DOES PREDICTIVE SPEED
ASSIST WORK

Predictive Speed Assist works with
adaptive cruise control and adjusts the
vehicle speed to the road geometry and to
the speed limit detected by the speed sign
recognition system. As the system
identifies curves and highway exits, the
vehicle speed temporarily decreases ahead
of and during the changing road geometry.
When passing new speed signs, the set
speed updates.  See 

Predictive Speed

Assist Precautions

 (page 268).

There are limitations that affect the
accuracy of the speed sign recognition
system and its ability to determine the
current speed limit. Predictive speed assist
and its ability to determine the current
speed limit shares these limitations.  See

Speed Sign Recognition

 (page 303).

Note:

The adaptive cruise control gap

setting operates normally when the feature
is enabled.

PREDICTIVE SPEED ASSIST
PRECAUTIONS

WARNING: 

You are responsible for

controlling your vehicle at all times. The
system is designed to be an aid and does
not relieve you of your responsibility to
drive with due care and attention. Failure
to follow this instruction could result in
the loss of control of your vehicle,
personal injury or death.

WARNING: 

Pay close attention to

changing road conditions. You may need
to override the system by pressing the
brake or accelerator pedal if the adjusted
speed becomes higher or lower than
necessary.

268

Adaptive Cruise Control

WARNING: 

The system only

provides limited braking. Your vehicle
may not always decelerate quickly
enough to avoid a crash without driver
intervention. Apply the brakes when
necessary.

WARNING: 

The system does not

activate the turn signal.

Adaptive cruise control precautions apply
to predictive speed assist unless stated
otherwise or contradicted by a predictive
speed assist precaution.  See 

Adaptive

Cruise Control Precautions

 (page 259).

The system only applies limited braking.
You can override the system with the
accelerator pedal or cancel the system by
applying the brakes.

The system may adapt to various factors
such as time of day, lane width. This could
influence speed adjustments and
accelerations.

The system may adapt to various drive
modes.  See 

Drive Mode Control

 (page

273). This could influence speed
adjustments and accelerations.

Note:

The system does not activate the

turn signal automatically.

PREDICTIVE SPEED ASSIST
LIMITATIONS

WARNING: 

The system may not

always adjust vehicle speed in certain
road or weather conditions such as
crossing traffic, yield or stop signs, right
of way, traffic lights, speed bumps, rain,
snow, fog. You must always apply the
brake or accelerator pedal when
necessary.

The road geometry and speed limit
information provided by the navigation
map data could be inaccurate or out of
date.

The system may not detect and read
speed limit signs with conditional
information, for example, when a sign is
flashing, during specific time ranges, or
when children are present.

Note:

The system does not set the vehicle

speed to speed limits shown with a
supplementary traffic sign.

Under certain conditions, the system may
not adjust the vehicle speed until after your
vehicle passes the speed limit.

Detection of road geometry operates only
where related information is available.
Road geometry information may not be
available in some areas.

SWITCHING PREDICTIVE SPEED
ASSIST MODE ON AND OFF

1.

Press 

Features

 on the touchscreen.

2. Press 

Driver Assistance

.

3. Press 

Cruise Control

.

4. Press 

Adaptive Cruise Control

.

5. Switch 

Predictive Speed Assist

 on or

off.

ADJUSTING THE SET SPEED
TOLERANCE

1.

Press 

Features

 on the touchscreen.

2. Press 

Driver Assistance

.

3. Press 

Cruise Control

.

4. Press 

Adaptive Cruise Control

.

5. Switch 

Predictive Speed Assist

 on.

6. Press 

Tolerance

.

7.

Adjust the slider to set the tolerance.

269

Adaptive Cruise Control

Note:

You can set tolerance for vehicle

speed adjustment based on speed sign
recognition only.

PREDICTIVE SPEED ASSIST
ALERTS

If the speed sign recognition system
detects a speed limit below the minimum
adaptive cruise control set speed, a tone
sounds and the system returns to standby
mode.

PREDICTIVE SPEED ASSIST
INDICATORS - VEHICLES WITH: 8
INCH INSTRUMENT CLUSTER
DISPLAY SCREEN

A blue marker around the speed sign and
a blue arrow next to the set speed
indicates that the system is active.

Speed sign indicator

E381946

E381947

When the system detects a new speed
sign, a gray indicator appears above the
set speed while the system adjusts the
vehicle speed to the speed limit. When the
speed limit is reached, the set speed
updates and the gray indicator disappears.

Road geometry indicator

E381944

When the system detects a curve or
highway exit, the vehicle starts to
decelerate, and the indicator appears and
changes color.

Road geometry indicator symbols

E379737

Left curve.

E379738

Right curve.

270

Adaptive Cruise Control

PREDICTIVE SPEED ASSIST
INDICATORS - VEHICLES WITH:
12.3 INCH INSTRUMENT CLUSTER
DISPLAY SCREEN

A blue marker around the speed sign and
a blue arrow next to the set speed
indicates that the system is active.

Speed sign indicator

E386358

E386359

When the system detects a new speed
sign, a gray indicator appears above the
set speed while the system adjusts the
vehicle speed to the speed limit. When the
speed limit is reached, the set speed
updates and the gray indicator disappears.

Road geometry indicator

E386360

When the system detects a curve or
highway exit, the vehicle starts to
decelerate, and the indicator appears and
changes color.

Road geometry indicator symbols

E379737

Left curve.

E379738

Right curve.

271

Adaptive Cruise Control

PREDICTIVE SPEED ASSIST – TROUBLESHOOTING

PREDICTIVE SPEED ASSIST – INFORMATION MESSAGES

Details

Message

Navigation system based speed limit information is not

available. If the message continues to appear, have your

vehicle checked as soon as possible.

Adaptive Cruise Control

Speed Sign Recognition

Not Available

The system is going to cancel and you must take control.

Driver Resume Control

272

Adaptive Cruise Control

WHAT IS DRIVE MODE
CONTROL - 1.5L ECOBOOST™/
2.0L ECOBOOST™

Drive mode control delivers a driving
experience through a suite of sophisticated
electronic vehicle systems. These systems
optimize steering, handling and powertrain
response in the selected mode. The drive
mode control provides a single location to
control performance settings for multiple
systems.

Changing the drive mode changes the
functionality of the following:

Electric power-assisted steering
adjusts steering effort and feel based
on the mode you select.  See 

Electric

Power Steering Precautions

 (page

238).

Electronic stability control and traction
control assist your vehicle control in
adverse conditions or high performance
driving.  See 

Stability Control

 (page

237).

Electronic throttle control enhances
the powertrain response to your driving
inputs.

Engine sounds change based on each
mode.

Transmission controls become
optimized with shift schedules tuned
to each mode.

Four-wheel drive settings are optimized
and tuned to each mode.

The system tailors your vehicle
configuration for each mode you select.

Note:

Not all settings may be available.

Note:

The system has diagnostic checks

that continuously monitor the system for
proper operation. If a mode is unavailable
due to a system fault or change in gear
shifter position, the mode defaults to
Normal.

WHAT IS DRIVE MODE
CONTROL - FULL HYBRID
ELECTRIC VEHICLE (FHEV)/
PLUG-IN HYBRID ELECTRIC
VEHICLE (PHEV)

The system delivers a driving experience
through a suite of sophisticated electronic
vehicle systems. These systems optimize
steering, handling and powertrain
response. This provides a single location
to control multiple systems performance
settings.

Changing the drive mode changes the
functionality of the following systems:

Electric power-assisted steering
system adjusts steering effort and feel
based on the mode you select.  See

How Does Electric Power Steering
Work

 (page 238).

Electronic stability control and traction
control maintain your vehicle control
in adverse conditions or high
performance driving.  See 

Stability

Control

 (page 237).

Electronic throttle control enhances
the powertrain response to your driving
inputs.

Transmission controls become
optimized with shift schedules tuned
to each mode.

Four-wheel drive settings are optimized
and tuned to each mode.

Electric vehicle mode selections may
be limited.  See 

Hybrid Electric

Vehicle Driving Characteristics

(page 179).

The system tailors your vehicle
configuration for each mode you select.

Note:

Not all settings may be available.

273

Drive Mode Control

Note:

The system has diagnostic checks

that continuously monitor the system for
proper operation. If a mode is unavailable
due to a system fault or change in gear
shifter position, the mode defaults to
Normal.

SELECTING A DRIVE MODE

E267358

Press the button on the
instrument panel to directly
access the drive modes on the

touchscreen.

As a secondary option:

1.

Press 

Features

 on the touchscreen.

2. Press 

DRIVE MODES

.

3. Select a setting.

DRIVE MODES

ECO

E295413

For efficient driving. This mode
helps deliver maximum fuel
efficiency and helps to increase

driving range.

NORMAL

E225310

For everyday driving. This mode
is a perfect balance of
excitement, comfort and

convenience. This is the default mode after
each ignition cycle.

SLIPPERY

E295414

For less than ideal road
conditions such as snow or ice
covered roads. This mode lowers

throttle response, adjusts transmission
shift points, and optimizes vehicle stability
controls to help mitigate wheel spin and
maintain vehicle control when driving in
winter conditions.

Note:

Using slippery mode on dry, hard

surfaces could produce some vibration,
driveline bind up, and potential excessive
tire wear.

SPORT

E246593

For sporty driving with improved
performance handling and
response. This mode increases

accelerator pedal response, enhances
steering to provide a sportier feel, and
adjusts transmission shift points for quicker
vehicle acceleration.

PLUG-IN HYBRID ELECTRIC
VEHICLE DRIVE MODES

AUTO EV

E287836

This mode provides an
automatic use of high voltage
battery power during the drive,

staying in electric mode when possible and
running the engine when needed.

EV LATER

E287824

In EV Later, your vehicle runs on
the engine as needed and saves
most of the available electric

range for later use in Auto EV or EV Now
mode.

274

Drive Mode Control

For example, your initial drive is at high
speeds on open roads, but later your drive
is at low speeds in an urban area where
electric only driving is most efficient. In this
case, you can select EV Later for the higher
speed portion of your trip and then select
Auto EV or EV Now for the urban portion.

When you enable EV Later, a white EV
Later icon appears in the information
display. EV Later resets to Auto EV when
you switch off your vehicle. You may select
EV Later again during your next drive.

When you select EV Later with the vehicle
fully charged or near fully charged, some
electric-only driving range is used to
discharge the battery. This is to allow for
full operation of the regenerative braking
system.

EV NOW

E287826

This mode provides an electric
only driving experience.

Do not use EV Now when towing a trailer.
The electric drive system is not designed
for towing.

Your vehicle could accelerate slower and
the top speed could be lower than when
in Auto EV mode.

You can enable your engine at any time by
using one of the following methods:

Fully press the accelerator pedal. A
pop-up message appears. Press the
OK button on the steering wheel to
enable the engine. When the engine is
no longer needed, your vehicle returns
to EV Now. The message disappears if
you release the accelerator pedal.

Select a different EV mode. This exits
EV Now mode and permits engine
operation. To return to EV Now mode,
select it again.

Your vehicle could enter Engine Enabled
mode if system conditions require it. A
message displays if this occurs. This is a
normal function of the system and your
vehicle returns to EV Now mode when
possible.

When you enable EV Now mode, a blue EV
Now icon appears in the information
display. If your vehicle is in Engine Enabled
mode, the EV Now icon is amber. EV Now
exits when your available electric range
reaches zero.

Note:

In certain vehicles, cabin air heating

is not available in EV Now mode, only
heated seats and heated steering wheel.

275

Drive Mode Control

PLUG-IN HYBRID ELECTRIC VEHICLE DRIVE MODES –
TROUBLESHOOTING

PLUG-IN HYBRID ELECTRIC VEHICLE DRIVE MODES – INFORMATION
MESSAGES

Action

Message

Select either EV Later or EV Auto to enable
full defrost. The engine may run to provide
more cabin heat.

Change EV mode for full defrost heat

Your vehicle enables the engine for system
performance. This is normal operation.

Engine Enabled for System Performance

You can press OK to enable the engine
temporarily for increased performance
when in EV Now mode.

Press OK to Enable Engine

276

Drive Mode Control

WHAT IS ECO COACH

Eco coach is designed to monitor certain
driving characteristics to help you drive
more efficiently.

HOW DOES ECO COACH WORK

Eco coach provides feedback through the
instrument cluster display about your
driving behaviour.

Note:

The efficiency levels do not result in

a defined fuel consumption figure.

Note:

The system only indicates the

efficiency level for the current trip. The
system resets each time you switch the
ignition on.

HOW DOES INSTANTANEOUS
EFFICIENCY LEVEL WORK

The display ring increases as the
instantaneous efficiency level increases
and illuminates when it reaches maximum
efficiency. The level continuously updates
to indicate the efficiency level for the
current trip.

VIEWING THE
INSTANTANEOUS EFFICIENCY
LEVEL - VEHICLES WITH: 8
INCH INSTRUMENT CLUSTER
DISPLAY SCREEN

1.

Press the menu button on the steering
wheel to enter the instrument cluster
display main menu.

2. Select 

Settings

.

3. Select 

Display

.

4. Select 

Eco Coach

.

5. Select a setting and press the 

OK

button.

VIEWING THE
INSTANTANEOUS EFFICIENCY
LEVEL - VEHICLES WITH: 12.3
INCH INSTRUMENT CLUSTER
DISPLAY SCREEN

1.

Press the menu button on the steering
wheel to enter the instrument cluster
display main menu.

2. Select 

Settings

.

3. Select 

Display Setup

.

4. Select 

Eco Coach

.

5. Select a setting and press the 

OK

button.

HOW DOES TRIP SUMMARY
WORK

The calculated trip summary is shown as
four percentage values. The percentage
values increase as the calculated efficiency
levels increase. The percentage values
indicate the average efficiency level for
acceleration, deceleration, speed and gear
shifting during the total distance traveled
by your vehicle for the current trip.

How to improve your efficiency:

Acceleration: Light to moderate
acceleration improves your score.

Braking: We recommend slow and
steady braking.

Speed: Maintain reasonable vehicle
speeds for best scores.

Gear shifting: Shifting the gears at the
right moment improves your score.

Compliance: Follow the
recommendations to improve your
score.

Note:

Vehicles with an automatic

transmission do not have a percentage
value for gear shifting.

277

Eco Coach

VIEWING THE TRIP SUMMARY
- VEHICLES WITH: 8 INCH
INSTRUMENT CLUSTER
DISPLAY SCREEN

1.

Press the menu button on the steering
wheel to enter the instrument cluster
display main menu.

2. Select 

MyView

.

3. Select 

Configure MyView

.

4. Select 

Eco Coach

.

VIEWING THE TRIP SUMMARY
- VEHICLES WITH: 12.3 INCH
INSTRUMENT CLUSTER
DISPLAY SCREEN

1.

Press the menu button on the steering
wheel to enter the instrument cluster
display main menu.

2. Select 

MyView

.

3. Select 

Configure MyView

.

4. Select 

Eco Behavior

.

278

Eco Coach

WHAT IS THE LANE KEEPING
SYSTEM

The lane keeping system is a driving aid
designed to provide temporary steering
assistance or steering wheel vibration
when it detects an unintended lane
departure.

HOW DOES THE LANE
KEEPING SYSTEM WORK

The system is designed to alert you by
providing temporary steering assistance
or steering wheel vibration when it detects
an unintended lane departure.  The system
detects and tracks the road lane markings
using a camera mounted behind the
interior mirror.  When you switch the
system on, a graphic of lane markings
appears in the instrument cluster display.

E313922

Note:

The system works when the camera

can detect at least one lane marking or the
edge of the road.

LANE KEEPING SYSTEM
PRECAUTIONS

WARNING: 

You are responsible for

controlling your vehicle at all times. The
system is designed to be an aid and does
not relieve you of your responsibility to
drive with due care and attention. Failure
to follow this instruction could result in
the loss of control of your vehicle,
personal injury or death.

WARNING: 

The system may not

function if the sensor is blocked.

WARNING: 

The sensor may

incorrectly track lane markings as other
structures or objects. This can result in
a false or missed warning.

WARNING: 

In cold and severe

weather conditions the system may not
function. Rain, snow and spray can all
limit sensor performance.

WARNING: 

Large contrasts in

outside lighting can limit sensor
performance.

WARNING: 

The system will not

operate if the sensor cannot track the
road lane markings.

WARNING: 

If damage occurs in the

immediate area surrounding the sensor,
have your vehicle checked as soon as
possible.

WARNING: 

The system may not

correctly operate if your vehicle is fitted
with a suspension kit not approved by
us.

279

Lane Keeping System


Content      ..     6      7      8      9     ..