Ford Edge (2024 year). Manual in english - page 3


  Index      Manuals     Ford Edge (2024 year). Manual in english


Search            copyright infringement  


Content      ..     1      2      3      4      ..


Ford Edge (2024 year). Manual in english - page 3


WHAT IS MYKEY

MyKey

MyKey allows you to program keys with
restricted driving modes to promote good
driving habits.

MYKEY SETTINGS

NON-CONFIGURABLE MYKEY
SETTINGS

Seatbelt Reminder or Belt-
Minder™

MyKey mutes the audio system until the
front seat passengers buckle the front seat
belts.

Note:

If your vehicle includes an AM/FM

radio or a very basic audio system, then the
radio may not mute.

Satellite Radio

 (If Equipped)

Some Satellite radio channels have
restricted access to adult radio content.

Early Low Fuel

The low fuel level warning lamp turns on
earlier.

Driving and Parking Aids

You cannot configure settings for parking
aids, blind spot information system, and
cross traffic alert. These systems turn on
when the vehicle turns on, and you cannot
switch them off with a MyKey.

You cannot configure settings for
pre-collision assist and lane keeping. These
systems turn on when the vehicle turns on,
but you can switch them off with a MyKey.

A new destination in the navigation system
can only be set using voice commands
when using a MyKey, and with your vehicle
moving.

Note:

MyKey drivers may be able to switch

the lane departure warning feature off, but
this feature turns back on automatically
with every new key cycle.

CONFIGURABLE MYKEY
SETTINGS

You can configure the following settings
after creating a MyKey.  See 

Creating a

MyKey

 (page 66).

Speed Limit

WARNING: 

Do not set MyKey

maximum speed limit to a limit that will
prevent the driver from maintaining a
safe speed considering posted speed
limits and prevailing road conditions. The
driver is always responsible to drive in
accordance with local laws and
prevailing conditions. Failure to do so
could result in accident or injury.

You can set a speed limit for your vehicle.
Warning messages appear on the
instrument cluster display and a tone
sounds if your vehicle reaches the set
speed. You cannot override the set speed
when using a MyKey.

Speed Minder

You can set a speed reminder for your
vehicle. Warning messages appear on the
instrument cluster display and a tone
sounds if your vehicle exceeds the set
speed.

65

MyKey™
Audio System Volume Limit

The audio system maximum volume
reduces. A message appears on the
instrument cluster display if you attempt
to exceed the volume limit. Automatic
volume control turns off.

911 Assist

If you set 911 assist to always on, you
cannot switch it off with a MyKey.

Do Not Disturb

If you set do not disturb to always on, you
cannot switch it off with a MyKey.

Note:

If a phone is connected using Apple

CarPlay or Android Auto while driving with
a MyKey, the driver can receive phone calls
and text messages even if the do not disturb
restriction is on. And if the vehicle comes
with satellite radio, there is no restriction on
the adult content.

Traction and Stability Control

If you set traction control or stability
control to always on, you cannot switch it
off with a MyKey.

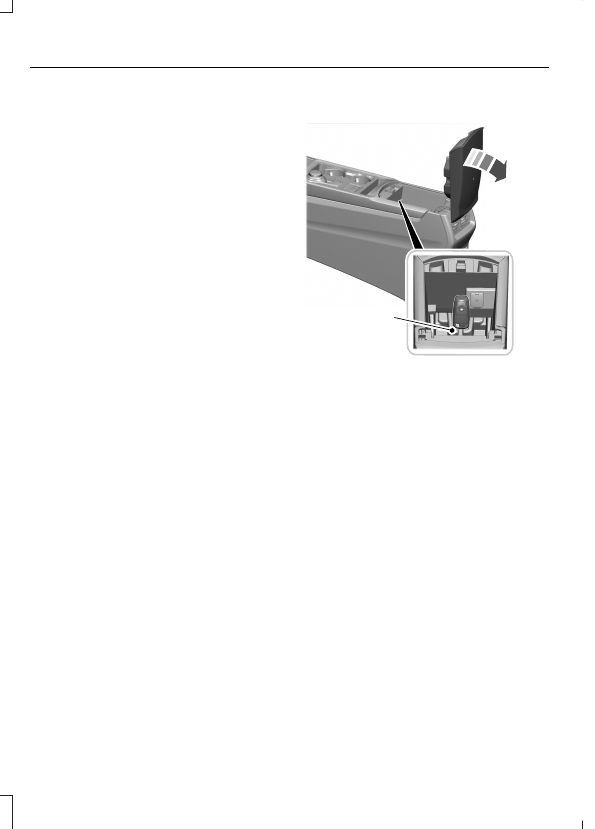
CREATING A MYKEY

E331284

1

2

1.

Raise the console storage
compartment lid.

2. Place the passive key in the position

shown, with the buttons facing the rear
of the vehicle.

3. Switch the ignition on.

4. Access the main menu in the

information display and scroll through
the menus to select the MyKey menu.
From the MyKey menu select the
option Create MyKey.  See 

Instrument

Cluster Display Main Menu

 (page

115).

5. Switch the ignition off.

Note:

The programmed restrictions apply

when you switch the vehicle off, open and
close the driver door and restart your vehicle
with the programmed key or remote control.

Note:

We recommend that you label this

key.

66

MyKey™

PROGRAMMING A MYKEY

You can only program MyKeys to the same
settings.

1.

Switch the ignition on using an admin
key.

2. Press the menu button on the steering

wheel to enter the information display
main menu.

3. Select 

Settings

.

4. Select 

MyKey

.

5. Select a setting and press the 

OK

button.

6. Configure the setting.

7.

Switch the ignition off.

CLEARING ALL MYKEYS

When you clear all MyKeys, you remove all
restrictions and return all MyKeys to their
original admin key status.

1.

Switch the ignition on using an admin
key.

2. Press the menu button on the steering

wheel to enter the information display
main menu.

3. Select 

Settings

.

4. Select 

MyKey

.

5. Select 

Clear MyKeys

.

6. Press and hold the 

OK

 button until a

confirmation message appears in the
information display.

CHECKING MYKEY SYSTEM
STATUS

You can find information about the
distance traveled using a MyKey and also
the number of admin keys and MyKeys
created for your vehicle.

1.

Switch the ignition on.

2. Press the menu button on the steering

wheel to enter the information display
main menu.

3. Select 

Settings

.

4. Select 

MyKey

.

5. Select 

MyKey Info

.

USING MYKEY WITH REMOTE
START SYSTEMS

MyKey is not compatible with unapproved,
aftermarket remote start systems. If you
choose to install a remote start system,
see an authorized dealer for an approved
remote start system.

67

MyKey™

MYKEY – TROUBLESHOOTING

MYKEY – INFORMATION MESSAGES

Description

Message

Displays when trying to create a MyKey and the admin key is
not placed in the backup position.  See 

Creating a MyKey

(page 66).

Place Key in Backup
Location

Displays when trying to create a MyKey with a key already
designated as a MyKey.

Key is Already a MyKey

Displays to confirm that the key is restricted after you switch
the vehicle off.

This Key restricted at
Next Key Cycle. Label
Key as MyKey

68

MyKey™

MYKEY – FREQUENTLY ASKED
QUESTIONS

What is an admin key?

An admin key is a key that you have not
created as a MyKey.  See 

Creating a

MyKey

 (page 66).

Why am I not able to create a
MyKey?

You have not placed the admin key in
the backup position.  See 

Creating a

MyKey

 (page 66).

The key used to switch the vehicle on
is not an admin key.

The key used to switch the vehicle on
is the only admin key.

There has to be at least one admin key.

You did not switch the vehicle off after
creating the last MyKey.

Why am I not able to program a
MyKey?

The admin key is not inside your
vehicle.

The key used to switch the vehicle on
is not an admin key.

You have not created any MyKeys.  See

Creating a MyKey

 (page 66).

Why am I not able to clear the
MyKeys?

The admin key is not inside your
vehicle.

The key used to switch the vehicle on
is not an admin key.

You have not created any MyKeys.  See

Creating a MyKey

 (page 66).

Why is the MyKey distance not
accumulating?

The key used to start the vehicle is an
admin key.

An admin key and a MyKey are inside
your vehicle.

You have not created any MyKeys.  See

Creating a MyKey

 (page 66).

You have cleared the MyKeys.  See

Clearing All MyKeys

 (page 67).

Why am I not able to start the
vehicle with a MyKey?

An admin key and a MyKey are inside
your vehicle. The system recognizes
only the admin key when both are
present.

69

MyKey™

OPERATING THE DOORS
FROM OUTSIDE YOUR
VEHICLE

UNLOCKING AND LOCKING THE
DOORS USING THE REMOTE
CONTROL

You can only use the remote control when
your vehicle is stationary.

Unlocking the Doors

E267112

Press the button to unlock all
doors.  One long flash of the turn
signal lamps confirms that your

vehicle has unlocked.

Locking the Doors

E267111

Press the button to lock all
doors.  One short flash of the
turn signal lamps confirms that

your vehicle has locked.

UNLOCKING AND LOCKING THE
DOORS USING THE KEY BLADE

If there is a power door lock fault you can
use the key blade to lock and unlock the
doors. See 

Removing the Key Blade

(page 61).

1.

Insert the key blade inside the door
handle bezel slot and move it in the
direction shown, using both hands to
remove the handle bezel.

E151956

2. After removing the handle bezel, insert

the key blade into the door lock
cylinder.

E399724

Turn clockwise to lock.

A

Turn counterclockwise to unlock.

B

70

Doors and Locks

INDIVIDUALLY UNLOCKING AND
LOCKING THE DOORS USING THE
KEY BLADE

If there is a power door lock fault you can
use the key blade to lock and unlock the
doors.

E112203

Lock.

A

Unlock.

B

OPERATING THE DOORS
FROM INSIDE YOUR VEHICLE

UNLOCKING AND LOCKING THE
DOORS USING THE CENTRAL
LOCKING

The power door lock control is on the front
doors.

E267112

Press the button to unlock all
doors.

E267111

Press the button to lock all
doors.

Note:

The central locking only operates if

the front doors are fully closed.

OPENING THE DOORS FROM
INSIDE YOUR VEHICLE

Pull the interior door handle twice to
unlock and open a rear door.  The first pull
unlocks the door and the second pull
opens the door.

AUTOUNLOCK

WHAT IS AUTOUNLOCK

Autounlock is a feature that centrally
unlocks the vehicle doors when your
vehicle comes to a stop and you open the
driver door.

AUTOUNLOCK REQUIREMENTS

Autounlock unlocks all the doors after:

1.

The vehicle speed exceeds 12 mph
(20 km/h).

2. Your vehicle comes to a stop.

3. You open the driver door.

Note:

Autounlock operates for only 10

minutes after the ignition is switched off.

SWITCHING AUTOUNLOCK ON
AND OFF

1.

Press the menu button on the steering
wheel to enter the information display
main menu.

2. Select 

Settings

.

3. Select 

Vehicle

.

4. Select 

Locks

.

5. Switch 

Autounlock

 on or off.

71

Doors and Locks

AUTOLOCK

WHAT IS AUTOLOCK

Autolock is a locking feature that centrally
locks your vehicle doors when driving.

AUTOLOCK REQUIREMENTS

Autolock locks all the doors after:

1.

All doors are closed and the ignition is
on.

2. Your vehicle speed exceeds 12 mph

(20 km/h).

Autolock repeats if:

1.

Your vehicle is stopped.

2. Any door is opened and closed again.

3. Your vehicle speed exceeds 12 mph

(20 km/h).

MISLOCK

WHAT IS MISLOCK

Mislock is a locking feature that warns you
if your vehicle has not locked.

MISLOCK LIMITATIONS

When you press the lock button once, the
direction indicators do not flash if any door
or the liftgate or hood is open.

1.

If any door or the liftgate is open.

2. The hood is open.

SWITCHING MISLOCK ON AND
OFF

1.

Press the menu button on the steering
wheel to enter the information display
main menu.

2. Select 

Settings

.

3. Select 

Vehicle

.

4. Select 

Locks

.

5. Switch 

Mislock Chirp

 on or off.

DOORS AND LOCKS AUDIBLE
WARNINGS

Door Ajar Audible Warning

Sounds when any front door is not fully
closed and your vehicle is moving.

DOORS AND LOCKS –
TROUBLESHOOTING

DOORS AND LOCKS – WARNING
LAMPS

Door Ajar Warning Lamp

E249859

Illuminates when you switch the
ignition on and remains on if any
door or the hood is open.

72

Doors and Locks

DOORS AND LOCKS – INFORMATION MESSAGES

Details

Message

Displays if a door is open. Fully close the door.

Driver Door Ajar

Passenger Door Ajar

Rear Left Door Ajar

Rear Right Door Ajar

Displays if a hood is open. Fully close the hood.

Hood Ajar

73

Doors and Locks

DOORS AND LOCKS –
FREQUENTLY ASKED QUESTIONS

Can accessories such as steps or
handles be used with the latch
assembly?

Do not use the door latch assembly to
attach any accessory, such as handles
or steps, as this can cause damage to
your vehicle.

74

Doors and Locks

WHAT IS KEYLESS ENTRY

The system allows you to lock and unlock
your vehicle without taking the passive key
out of your pocket or purse.

KEYLESS ENTRY LIMITATIONS

Make sure your remote control is within 3 ft
(1 m) from the front door handles and the
tailgate.

The system could not function if:

The remote control remains stationary
for about a minute.

The vehicle battery has no charge.

The remote control battery has no
charge.

There is interference causing issues
with the remote control frequencies.

The remote control is too close to
metal objects or electronic devices, for
example keys or a cell phone.

KEYLESS ENTRY SETTINGS

Reprogramming the Unlocking
Function

You can enable two-stage unlocking
function allowing you to unlock only the
driver door when you touch the unlock
sensor.

Press and hold both the lock and unlock
buttons on the remote control for four
seconds to disable or enable two-stage
unlocking.

If you program the unlocking function so
that only the driver door unlocks, you can
unlock all of the other doors from inside
your vehicle using the power door lock
control. You can unlock individual doors
by pulling the interior door handles on
those doors.

USING KEYLESS ENTRY

Unlocking the Doors

E248553

With your passive key within 3 ft (1 m) of
your vehicle, touch the unlock sensor on
the back of the door handle for a brief
period and then pull on the door handle to
unlock, being careful not to touch the lock
sensor at the same time or pull on the door
handle too quickly. The intelligent access
system requires a brief delay to
authenticate your intelligent access key.

Using the Electronic Liftgate with
Passive Key (If Equipped)

E138632

With your passive key within 3 ft (1 m) of
your vehicle, press the exterior liftgate
release button inside of the liftgate handle.
The liftgate unlocks and opens.  See

Opening the Liftgate From Outside
Your Vehicle

 (page 77).

75

Keyless Entry

Locking the Doors

E248554

With your passive key within 3 ft (1 m) of
your vehicle, touch the outer door handle
lock sensor for approximately one second
to lock, being careful not to touch the
unlock sensor on the back of the door
handle at the same time. After locking, you
can immediately pull on the door handle
to confirm locking occurred without
inadvertently unlocking.

KEYLESS ENTRY –
TROUBLESHOOTING

KEYLESS ENTRY – FREQUENTLY
ASKED QUESTIONS

Why does the keyless entry system
not function?

If the system does not function it may
be limited.  See 

Keyless Entry

Limitations

 (page 75).  If the system

still does not function use the remote
control or the key blade to lock and
unlock your vehicle.

Why can I not lock my vehicle?

If you electronically lock your vehicle
with a rear door or the liftgate open,
the system searches for a passive key
inside your vehicle after you close the
last door. If the system detects a key,
all doors unlock indicating that a key is
inside. Your vehicle locks if another
passive key is within the detection
range after you close the last door.

76

Keyless Entry

OPENING THE LIFTGATE

OPENING THE LIFTGATE FROM
OUTSIDE YOUR VEHICLE

E138632

Press the control button to unlatch the
liftgate and then lift to open.

Note:

Be careful when opening or closing

the liftgate in a garage or other enclosed
area to avoid damaging the liftgate.

Note:

Do not hang anything, for example a

bike rack, from the glass or liftgate. This
could damage the liftgate and its
components.

Note:

Do not leave the liftgate open while

driving. This could damage the liftgate and
its components.

OPENING THE LIFTGATE USING
THE REMOTE CONTROL

E267940

Press the button twice within
three seconds. The liftgate
unlocks for 45 seconds, during

which time you can open the liftgate using
the outside control button.

Note:

Be careful when opening or closing

the liftgate in a garage or other enclosed
area to avoid damaging the liftgate.

Note:

Do not hang anything, for example a

bike rack, from the glass or liftgate. This
could damage the liftgate and its
components.

Note:

Do not leave the liftgate open while

driving. This could damage the liftgate and
its components.

CLOSING THE LIFTGATE

CLOSING THE LIFTGATE FROM
OUTSIDE YOUR VEHICLE

WARNING: 

It is extremely

dangerous to ride in a cargo area, inside
or outside of a vehicle. In a crash, people
riding in these areas are more likely to be
seriously injured or killed. Do not allow
people to ride in any area of your vehicle
that is not equipped with seats and
seatbelts. Make sure everyone in your
vehicle is in a seat and properly using a
seatbelt. Failure to follow this warning
could result in serious personal injury or
death.

WARNING: 

Make sure that you fully

close the liftgate to prevent exhaust
fumes from entering your vehicle. If you
are unable to fully close the liftgate,
open the air vents or the windows to
allow fresh air to enter your vehicle.
Failure to follow this instruction could
result in personal injury or death.

77

Liftgate - Vehicles With: Manual Liftgate

E252964

A handle is inside the liftgate to help with
closing.

Note:

Make sure that you fully close the

liftgate to prevent cargo from falling out.

78

Liftgate - Vehicles With: Manual Liftgate

LIFTGATE PRECAUTIONS

WARNING: 

Make sure all persons

are clear of the power liftgate area
before opening or closing the liftgate.

WARNING: 

It is extremely

dangerous to ride in a cargo area, inside
or outside of a vehicle. In a crash, people
riding in these areas are more likely to be
seriously injured or killed. Do not allow
people to ride in any area of your vehicle
that is not equipped with seats and
seatbelts. Make sure everyone in your
vehicle is in a seat and properly using a
seatbelt. Failure to follow this warning
could result in serious personal injury or
death.

WARNING: 

Make sure that you fully

close the liftgate to prevent exhaust
fumes from entering your vehicle. If you
are unable to fully close the liftgate,
open the air vents or the windows to
allow fresh air to enter your vehicle.
Failure to follow this instruction could
result in personal injury or death.

WARNING: 

Keep keys out of reach

of children. Do not allow children to
operate or play near an open or moving
power liftgate. You should supervise the
operation of the power liftgate at all
times.

OPENING THE LIFTGATE

OPENING THE LIFTGATE FROM
INSIDE YOUR VEHICLE

Power Liftgate Release

Power Liftgate Obstacle Detection

E138633

With the transmission in park
(P), press the button on the
instrument panel.

Note:

Be careful when opening or closing

the liftgate in a garage or other enclosed
area to avoid damaging the liftgate.

Note:

 Do not hang anything, for example

a bike rack, from the glass or liftgate.  This
could damage the liftgate and its
components.

Note:

 Do not leave the liftgate open while

driving. This could damage the liftgate and
its components.

OPENING THE LIFTGATE FROM
OUTSIDE YOUR VEHICLE

1.

Unlock the liftgate with the remote
control or power door unlock control.
If a remote control is within 3 ft (1 m)
of the liftgate, the liftgate unlocks
when you press the liftgate release
button.

E138632

2. Press and release the liftgate control

button.

Note:

Allow the power system to open the

liftgate. Manually pushing or pulling the
liftgate may activate the system’s obstacle
detection feature and stop the power
operation or reverse its direction, replicate
a strut failure, or damage mechanical
components.

79

Liftgate - Vehicles With: Power Liftgate

Note:

Be careful when opening or closing

the liftgate in a garage or other enclosed
area to avoid damaging the liftgate.

Note:

 Do not hang anything, for example

a bike rack, from the glass or liftgate.  This
could damage the liftgate and its
components.

Note:

 Do not leave the liftgate open while

driving.  This could damage the liftgate and
its components.

Switching the Power Liftgate On
or Off

You can switch the power liftgate on or off
through the vehicle settings in your
instrument cluster.

Note:

Depending on your region or vehicle

type the vehicle settings may be located on
your touchscreen.

When switched off, the liftgate only
unlatches and will not power open or close.

OPENING THE LIFTGATE USING
THE REMOTE CONTROL

E267940

Press the button twice within
three seconds.

Note:

Be careful when opening or closing

the liftgate in a garage or other enclosed
area to avoid damaging the liftgate.

Note:

Do not hang anything, for example a

bike rack, from the glass or liftgate. This
could damage the liftgate and its
components.

Note:

Do not leave the liftgate open while

driving. This could damage the liftgate and
its components.

OPENING THE HANDS-FREE
LIFTGATE

 (If Equipped)

Hands-Free Liftgate

Make sure you have the passive key within
3 ft (1 m) of the liftgate.

1.

Stand behind your vehicle, and face the
liftgate.

2. Move your foot, in a single-kick motion,

without pausing, under and away from
the rear bumper detection area.

E300799

3. The liftgate opens.

Avoid the following actions when using the
hands-free opening feature:

Making physical contact with the
bumper.

Holding your foot under the bumper.

Sweeping your foot from side to side,
or kicking at an odd angle.

Detection Zones

Vehicles Without a Trailer Hitch

E310717

80

Liftgate - Vehicles With: Power Liftgate

The detection area is in the center of the
rear bumper.

Vehicles With a Trailer Hitch

E310718

The detection area is on the left-hand side
and right-hand side of the hitch, between
the exhaust and the hitch.

Note:

Allow the power system to open the

liftgate. Manually pushing or pulling the
liftgate may activate the system’s obstacle
detection feature and stop the power
operation or reverse its direction, replicate
a strut failure, or damage mechanical
components.

Note:

Any physical actions that mimic a

kicking motion such as splashing water,
trailer chains or vacuum hoses may cause
the hands-free liftgate to activate. Switch
the power liftgate off through your vehicle
settings or keep the passive key away from
the rear bumper detection area.

SETTING THE LIFTGATE
OPENING HEIGHT

1.

Open the liftgate.

2. Stop the liftgate movement by pressing

the control button on the liftgate when
it reaches the desired height.

Note:

Once the liftgate stops moving, you

can manually move it to the desired height.

3. Press and hold the control button on

the liftgate until a tone sounds,
indicating programming is complete.

Note:

You can only use the liftgate control

button to program the height.

Note:

You cannot program the height if the

liftgate position is too low.

4. The power liftgate now opens at the

programmed height. To change the
programmed height, repeat the steps.

Note:

You can fully open the liftgate by

manually pushing it upward to the
maximum open position if it opens in a
lower position.

Note:

The system recalls the new

programmed height until you reprogram it,
even if you disconnect the battery.

CLOSING THE LIFTGATE

CLOSING THE LIFTGATE FROM

INSIDE YOUR VEHICLE

WARNING: 

Make sure all persons

are clear of the power liftgate area
before opening or closing the liftgate.

E138633

With the transmission in park
(P), press the button on the
instrument panel.

Note:

 Make sure that you close the liftgate

before operating or moving your vehicle,
especially in an enclosure like a garage or a
parking structure.  This could damage the
liftgate and its components.

81

Liftgate - Vehicles With: Power Liftgate

Note:

 Make sure the area behind your

vehicle is free from obstruction and that
there is enough room for you to operate the
liftgate.  Objects too close to your vehicle,
for example a wall, garage door or another
vehicle may come into contact with the
moving liftgate.  This could damage the
liftgate and its components.

Note:

Make sure that you fully close the

liftgate to prevent cargo from falling out.

CLOSING THE LIFTGATE FROM
OUTSIDE YOUR VEHICLE

WARNING: 

Make sure all persons

are clear of the power liftgate area
before opening or closing the liftgate.

E138636

Press the liftgate button.

Note:

 Make sure that you close the liftgate

before operating or moving your vehicle,
especially in an enclosure like a garage or a
parking structure.  This could damage the
liftgate and its components.

Note:

 Make sure the area behind your

vehicle is free from obstruction and that
there is enough room for you to operate the
liftgate.  Objects too close to your vehicle,
for example a wall, garage door or another
vehicle may come into contact with the
moving liftgate.  This could damage the
liftgate and its components.

Note:

Make sure that you fully close the

liftgate to prevent cargo from falling out.

CLOSING THE LIFTGATE USING
THE REMOTE CONTROL

WARNING: 

Make sure all persons

are clear of the power liftgate area
before opening or closing the liftgate.

E267940

Press the button twice within
three seconds. A tone sounds
when the liftgate begins to close.

Note:

 Make sure that you close the liftgate

before operating or moving your vehicle,
especially in an enclosure like a garage or a
parking structure.  This could damage the
liftgate and its components.

Note:

 Make sure the area behind your

vehicle is free from obstruction and that
there is enough room for you to operate the
liftgate.  Objects too close to your vehicle,
for example a wall, garage door or another
vehicle may come into contact with the
moving liftgate.  This could damage the
liftgate and its components.

Note:

Make sure that you fully close the

liftgate to prevent cargo from falling out.

CLOSING THE HANDS-FREE
LIFTGATE

 (If Equipped)

Make sure you have the remote control
within 3 ft (1 m) of the liftgate.

82

Liftgate - Vehicles With: Power Liftgate

1.

Stand behind your vehicle, and face the
liftgate.

2. Move your foot, in a single-kick motion,

without pausing, under and away from
the rear bumper detection area.

E300799

3. The liftgate closes.

Avoid the following actions when using the
hands-free opening feature:

Making physical contact with the
bumper.

Holding your foot under the bumper.

Sweeping your foot from side to side,
or kicking at an odd angle.

Detection Zones

Vehicles Without a Trailer Hitch

E310717

The detection area is in the center of the
rear bumper.

Vehicles With a Trailer Hitch

E310718

The detection area is on the left-hand side
and right-hand side of the hitch, between
the exhaust and the hitch.

Note:

Allow the power system to close the

liftgate. Manually pushing the liftgate may
activate the system’s obstacle detection
feature and stop the power operation or
reverse its direction, replicate a strut failure,
or damage mechanical components.

STOPPING THE LIFTGATE
MOVEMENT

Note:

 Do not apply sudden excessive force

to the liftgate while it is in motion.  This
could damage the power liftgate and its
components.

Note:

Selections will vary depending on

region or options.

You can stop the liftgate movement by
doing any of the following:

Pressing the liftgate control button on
the liftgate.

Pressing the liftgate control button
inside the vehicle.

Pressing the liftgate button on the
remote control twice.

83

Liftgate - Vehicles With: Power Liftgate

Pressing the liftgate button on an
authorized device.

Moving your foot under and away from
the center rear bumper in a single-kick
motion.

LIFTGATE OBSTACLE
DETECTION

Closing the Liftgate

The system stops when it detects an
obstacle.  A tone sounds and the system
reverses to open.  Once you remove the
obstacle, you can power close the liftgate.

Note:

To prevent accidental obstacle

detection, let the power liftgate close
completely before you enter your vehicle.

Opening the Liftgate

The system stops when it detects an
obstacle and a tone sounds.  Once you
remove the obstacle, you can continue to
operate the liftgate.

LIFTGATE –
TROUBLESHOOTING

LIFTGATE – WARNING LAMPS

E162453

Illuminates when the liftgate is
not completely closed.

LIFTGATE – INFORMATION MESSAGES

Action

Message

The liftgate is not completely closed. Close the liftgate.

Liftgate Ajar

84

Liftgate - Vehicles With: Power Liftgate

LIFTGATE – FREQUENTLY ASKED
QUESTIONS

Why won't my power liftgate
function?

It can happen in freezing conditions or
when parking on downhill slopes.

Make sure the power liftgate is enabled
in the vehicle settings menu.

Make sure the transmission is in park
(P), ensure nothing is obstructing the
liftgate path and there is not excessive
weight on the liftgate.

If there are continued issues, the
battery voltage may be low or there
may be other system issues. See an
authorized dealer.

85

Liftgate - Vehicles With: Power Liftgate

PASSIVE ANTI-THEFT
SYSTEM

WHAT IS THE PASSIVE ANTI-
THEFT SYSTEM

The passive anti-theft system prevents
someone from starting your vehicle with
an incorrectly coded key.

Note:

Do not leave a duplicate coded key

in your vehicle. Always take the keys and
lock all the doors when leaving your vehicle.

HOW DOES THE PASSIVE ANTI-
THEFT SYSTEM WORK

The passive anti-theft system arms when
you switch your vehicle off.

It disarms when you switch your vehicle on
with a correctly coded key.

Note:

The system is not compatible with

non-Ford aftermarket remote start systems.

Note:

Do not leave a duplicate coded key

in your vehicle. Always take the keys and
lock all doors when leaving your vehicle.

ANTI-THEFT ALARM SYSTEM

(IF EQUIPPED)

WHAT IS THE ANTI-THEFT ALARM
SYSTEM

The anti-theft alarm system warns you of
an unauthorized entry to your vehicle.

HOW DOES THE ANTI-THEFT
ALARM SYSTEM WORK

When armed, the anti-theft alarm is
triggered in any of the following ways:

If someone opens a door, the liftgate
or the hood without a correctly coded
key or remote control.

If you turn the power on without a
correctly coded key.

If the interior sensors detect movement
inside your vehicle.

If the inclination sensors detect an
attempt to raise your vehicle.

If someone disconnects your vehicle's
12V battery or the battery backup
alarm.

If the anti-theft alarm is triggered, the
alarm horn sounds for 30 seconds and the
turn signals flash for 5 minutes.

Any further attempts to carry out one of
the above sounds the alarm again.

WHAT IS THE PERIMETER ALARM

The perimeter alarm is designed to detect
unauthorized access to your vehicle.

ARMING THE ANTI-THEFT ALARM
SYSTEM

The alarm is ready to arm when you switch
your vehicle off.

Lock your vehicle with your remote control
to arm the alarm.

86

Security

DISARMING THE ANTI-THEFT
ALARM SYSTEM

Disarm the alarm by performing any of the
following actions:

Unlock the doors or luggage
compartment with the remote control.

Switch your vehicle on or start your
vehicle.

SECURITY – TROUBLESHOOTING

SECURITY – INFORMATION MESSAGES

Details

Message

The system has not detected a correctly coded key.

No Key Detected

The system has malfunctioned.  Have your vehicle checked
as soon as possible.

Starting System Fault

Displays when the alarm has been triggered due to unauthor-
ized entry.

Vehicle Alarm To Stop
Alarm, Start Vehicle.

Alarm

87

Security

SECURITY – FREQUENTLY ASKED
QUESTIONS

What should I do if there is a
potential alarm problem with my
vehicle?

Take all remote controls to an
authorized dealer if there is a potential
alarm problem with your vehicle.

What should I do if my vehicle is
unable to start with a correctly
coded key?

Have your vehicle checked as soon as
possible.

88

Security

ADJUSTING THE STEERING
WHEEL - VEHICLES WITH:
MANUAL ADJUSTABLE
STEERING COLUMN

Adjusting the Steering Wheel

WARNING: 

Do not adjust the

steering wheel when your vehicle is
moving.

Note:

Make sure that you are sitting in the

correct position.  See 

Sitting in the Correct

Position

 (page 129).

E191039

1.

Unlock the steering column.

2. Adjust the steering wheel to the desired

position.

E191047

3. Lock the steering column.

ADJUSTING THE STEERING
WHEEL - VEHICLES WITH:
POWER ADJUSTABLE
STEERING COLUMN

WARNING: 

Do not adjust the

steering wheel when your vehicle is
moving.

Note:

 Make sure that you are sitting in the

correct position.  See 

Sitting in the Correct

Position

 (page 129).

E261582

Press the top or bottom of the control to
move the steering wheel up or down.

Press the front or rear of the control to
move the steering wheel in or out.

89

Steering Wheel

RESETTING THE STOPPING
POSITION - VEHICLES WITH:
POWER ADJUSTABLE
STEERING COLUMN

Note:

The steering wheel stops when it

detects an obstruction. This sets a new
stopping position.

To reset the steering column to its normal
stopping position:

1.

Confirm there is nothing obstructing
the motion of the steering column.

2. Press and hold the steering column

control until the steering column stops
moving.

3. Press the steering column control

again.

Note:

The steering column may start to

move again.

4. When the steering column stops,

continue holding the control for a few
seconds.

5. Repeat for each direction, as necessary.

HORN

E270945

Press on the center of the
steering wheel near the horn icon
to activate the horn.

SWITCHING THE HEATED
STEERING WHEEL ON AND OFF

(IF EQUIPPED)

E369755

To activate the heated steering
wheel, press the button on the
touchscreen near the climate

controls. The button illuminates when the
heated steering wheel is on. To turn it off,
press the heated steering wheel button
again.

Note:

The engine must be running to use

the heated steering wheel.

Note:

A sensor regulates the temperature

of the steering wheel.

Note:

Depending on the remote start

settings, the heated steering wheel may
remain on after remote starting your vehicle.
It may also turn on when you start your
vehicle if it was on the last time the engine
was switched off.

90

Steering Wheel

WIPERS

WIPER PRECAUTIONS

Do not operate the wipers on a dry
windshield. This could scratch the glass or
damage the wiper blades. Use the
windshield washers before wiping a dry
windshield.

Fully defrost the windshield before you
switch the windshield wipers on.

Switch the windshield wipers off before
entering a car wash.

SWITCHING WINDSHIELD WIPERS
ON AND OFF

Front and Rear Wiper Stalk

Courtesy Wipe

E197525

Single wipe.

A

Intermittent wipe.

B

Normal wipe.

C

High-speed wipe.

D

E270969

Push the lever up or down to
operate the windshield wipers.

AUTOWIPERS

 (IF EQUIPPED)

WHAT ARE AUTOWIPERS

Autowipers turns on and controls the
speed and frequency of the windshield
wipers.

AUTOWIPERS SETTINGS

1.

Press 

Settings

 on the touchscreen.

2. Press 

Vehicle Settings

.

3. Press 

Wipers

.

4. Switch 

Rain Sensing

 on or off.

Note:

When you switch the feature off, the

wipers do not operate based on the rain
sensor. When you switch on the windshield
wipers to the intermittent wipe position with
the feature off, the wipers use the wipe
speed set by the rotary control.

ADJUSTING THE SENSITIVITY OF
THE RAIN SENSOR

E331276

High sensitivity.

A

Low sensitivity.

B

Use the rotary control to set the sensitivity
of the rain sensor.

91

Wipers and Washers

When you select high sensitivity, the wipers
operate when the sensor detects a small
amount of water on the windshield.

When you select low sensitivity, the wipers
operate when the sensor detects a large
amount of water on the windshield.

SWITCHING THE REAR
WINDOW WIPER ON AND OFF

Front and Rear Wiper Stalk

E171615

Intermittent wipe.

A

Continuous wipe.

B

Rear window wiper off.

C

REVERSE WIPE

WHAT IS REVERSE WIPE

Reverse wipe turns on the rear window
wiper when you shift into reverse (R) and
the windshield wipers are on.

REVERSE WIPE SETTINGS

1.

Using the instrument cluster controls
on the steering wheel, select 

Settings

.

2. Select 

Vehicle

.

3. Select 

Wipers

.

4. Switch 

Reverse Wiper

 on or off.

CHECKING THE WIPER
BLADES

Improving Your Windshield Wiper
Performance

E142463

Run the tip of your fingers over the edge of
the blade to check for roughness.

REPLACING THE FRONT
WIPER BLADES

Make sure your vehicle is off before
beginning this procedure.

E129990

1.

Lift the wiper arm and then press the
wiper blade locking buttons together.

Note:

Do not hold the wiper blade to lift the

wiper arm.

Note:

Make sure that the wiper arm does

not spring back against the glass when the
wiper blade is not attached.

2. Slightly rotate the wiper blade.

92

Wipers and Washers

3. Remove the wiper blade.

4. To install, reverse the removal

procedure.

Note:

Make sure that the wiper blade locks

into place.

REPLACING THE REAR WIPER
BLADES

E271380

1.

Lift the wiper arm.

Note:

Do not hold the wiper blade to lift the

wiper arm.

2. Remove the wiper blade.

Note:

Make sure that the wiper arm does

not spring back against the glass when the
wiper blade is not attached.

3. To install, reverse the removal

procedure.

Note:

Make sure that the wiper blade locks

into place.

WASHERS

WASHER PRECAUTIONS

WARNING: 

If you operate your

vehicle in temperatures below 41°F
(5°C), use washer fluid with antifreeze
protection. Failure to use washer fluid
with antifreeze protection in cold
weather could result in impaired
windshield vision and increase the risk
of injury or accident.

Do not operate the washers when the
washer reservoir is empty. This could cause
the washer pump to overheat.

Keep the outside of the windshield clean.
The rain sensor is very sensitive and the
wipers may operate if dirt, mist or insects
hit the windshield.

USING THE WINDSHIELD WASHER

E197528

E270967

Pull the lever toward you to
operate the windshield washer.

Note:

A courtesy wipe occurs a short time

after the wipers stop to clear any remaining
washer fluid when switched on.  See

Switching the Courtesy Wipe On and Off

(page 94).

93

Wipers and Washers

SWITCHING THE COURTESY WIPE
ON AND OFF

1.

Using the instrument cluster controls
on the steering wheel, select 

Settings

.

2. Select 

Vehicle

.

3. Select 

Wipers

.

4. Switch 

Courtesy Wipe

 on or off.

USING THE REAR WINDOW
WASHER

E167407

Push the lever away from you to operate
the rear window washer.

Note:

A courtesy wipe occurs a short time

after the wipers stop to clear any remaining
washer fluid when switched on.  See

Switching the Courtesy Wipe On and Off

(page 94).

ADDING WASHER FLUID

E330184

WASHER FLUID SPECIFICATION

See 

Washer Fluid Specification

 (page

357).

WIPERS AND WASHERS
VIDEOS

Improving Your Windshield Wiper
Performance Video Link

Courtesy Wipe Video Link

WIPERS AND WASHERS –
TROUBLESHOOTING

WIPERS AND WASHERS –
WARNING LAMPS

E132353

Illuminates when the windshield
washer fluid is low.

94

Wipers and Washers

WIPERS AND WASHERS –
FREQUENTLY ASKED QUESTIONS

Why are there streaks and smears
on the windshield?

The wiper blades could be dirty, worn
or damaged. Check the wiper blades.
See 

Checking the Wiper Blades

(page 92).  If the wiper blades are dirty,
clean them with washer fluid or water
applied with a soft sponge or cloth. If
the wiper blades are worn or damaged,
install new ones.  See 

Replacing the

Front Wiper Blades

 (page 92).

95

Wipers and Washers

EXTERIOR LIGHTING
CONTROL

E322426

Lamps off.

A

Parking lamps on.

B

Headlamps on.

C

Autolamps on.

D

Rotate the control to make a selection.

HEADLAMPS

USING THE HIGH BEAM
HEADLAMPS

E339577

E67019

Push the lever away from you to
switch the high beam on.

Push the lever away from you again or pull
the lever toward you to switch the high
beam off.

Slightly pull the lever toward you and
release it to flash the headlamps.

SWITCHING HEADLAMP EXIT
DELAY ON AND OFF

To switch headlamp exit delay on, pull the
turn signal lever toward you after switching
your vehicle off.

To switch headlamp exit delay off, pull the
turn signal lever toward you again or switch
your vehicle on.

Note:

The headlamps turn off after three

minutes with any door open or 30 seconds
after the last door closes.

HEADLAMP INDICATORS

Lamps On

E71341

Illuminates when you switch the
low beam headlamps or the
parking lamps on.

Headlamp High Beam

E67019

Illuminates when you switch the
high beam headlamps on.

96

Exterior Lighting


Content      ..     1      2      3      4      ..