Ford F-150 (2022 year). Manual in english - page 9
 

  Index      Manuals     Ford F-150 (2022 year). Manual in english


Search            copyright infringement  


Content      ..     7      8      9      10     ..


Ford F-150 (2022 year). Manual in english - page 9


GLARE FREE LIGHTING

 (IF

EQUIPPED)

HOW DOES GLARE FREE LIGHTING
WORK

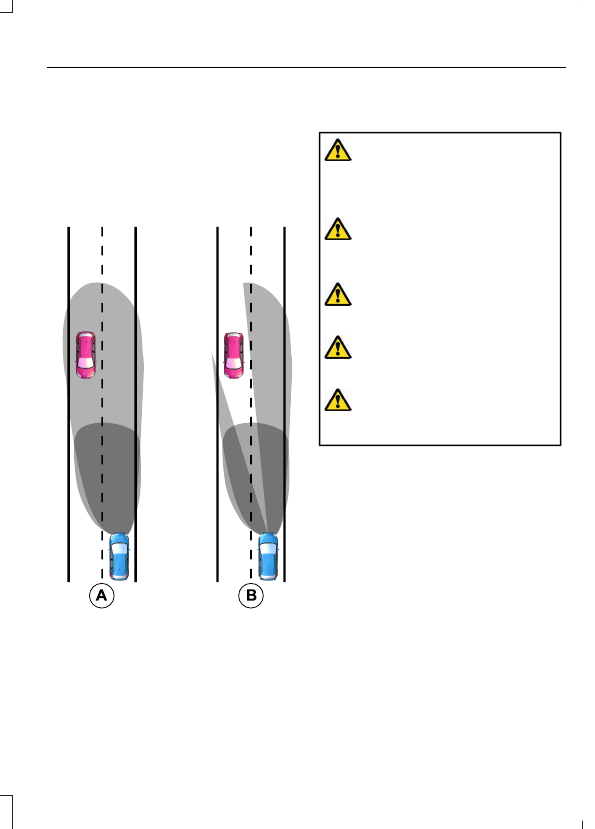
Glare free lighting enhances visibility and
minimizes glare for other road users.

E220921

Without glare free lighting.

A

With glare free lighting.

B

GLARE FREE LIGHTING
PRECAUTIONS

WARNING: 

The system does not

relieve you of your responsibility to drive
with due care and attention. You may
need to override the system if it does not
adapt the light.

WARNING: 

The system may not

adapt the lighting to avoid glare if the
lights of oncoming vehicles are hidden
by obstacles such as guard rails.

WARNING: 

You may need to

override the system when approaching
other road users.

WARNING: 

You may need to

override the system during inclement
weather.

WARNING: 

Do not use the system

in poor visibility, for example fog, heavy
rain, spray or snow.

GLARE FREE LIGHTING
REQUIREMENTS

The system turns on if all of the following
occur:

You switch the system on.

You set the lighting control to the
autolamps position.

The ambient light level is low enough.

Your vehicle speed is greater than
approximately 32 mph (52 km/h).

153

Exterior Lighting

The system adapts the lighting to avoid
glare if all of the following occur:

You switch the system on.

You set the lighting control to the
autolamps position.

The system detects an approaching
vehicle's headlamps or rear lamps.

GLARE FREE LIGHTING
LIMITATIONS

The system turns off if any of the following
occur:

You switch the system off.

You set the lighting control to any
position except autolamps.

The ambient light level is high enough.

The system detects severe rain, snow
or fog.

The system detects street lighting.

The camera has reduced visibility.

The vehicle speed falls below
approximately 19 mph (30 km/h).

Note:

The deactivation speed is lower on

curves.

SWITCHING GLARE FREE
LIGHTING ON AND OFF

1.

Press 

Settings

 on the touchscreen.

2. Press 

Vehicle Settings

.

3. Press 

Lighting

.

4. Switch 

Glarefree Lighting

 on or off.

GLARE FREE LIGHTING
INDICATORS

Illuminates to confirm when the
system is ready to assist.

OVERRIDING GLARE FREE
LIGHTING

E308790

Push the lever away from you to switch
the high beams on.

Push the lever away from you again to
switch the high beams off.

Push the lever away from you for a third
time to switch glare free lighting back on.

154

Exterior Lighting

GLARE FREE LIGHTING – TROUBLESHOOTING

 (IF EQUIPPED)

GLARE FREE LIGHTING – INFORMATION MESSAGES

Description

Message

The camera has reduced visibility.  Clean the windshield.  If
the message continues to appear, have your vehicle checked
as soon as possible.

Front Camera Low Visib-
ility Clean Screen

The camera has malfunctioned.  Wait a short period of time
for the camera to cool down.  If the message continues to
appear, have your vehicle checked as soon as possible.

Front Camera Tempor-
arily Not Available

The camera has malfunctioned.  Have your vehicle checked
as soon as possible.

Front Camera Malfunc-
tion Service Required

ADAPTIVE FRONT LIGHTING

 (IF

EQUIPPED)

HOW DOES ADAPTIVE FRONT
LIGHTING WORK

Adaptive front lighting adapts when you
are steering around a curve or if the camera
detects lane markings indicating a curve.

E161714

Without adaptive front lighting.

A

With adaptive front lighting.

B

155

Exterior Lighting

SWITCHING ADAPTIVE FRONT
LIGHTING ON AND OFF

1.

Press 

Settings

 on the touchscreen.

2. Press 

Vehicle Settings

.

3. Press 

Lighting

.

4. Switch 

Adaptive Headlamps

 on or off.

Set the lighting control to the autolamps
position to use the adaptive front lighting.

156

Exterior Lighting

SWITCHING ALL OF THE
INTERIOR LAMPS ON AND OFF

The lamps turn on under the following
conditions:

You open any door.

You press a button on the remote
control.

You press the all lamps on button on
the overhead console.

Press to switch all interior lamps
on or off.

SWITCHING THE FRONT
INTERIOR LAMPS ON AND OFF

E339273

The front interior lamp switches are on the
overhead console.

Note:

The position of each button on the

overhead console depends on your vehicle.

Individual Map Lamps

E262193

Press to switch the left-hand
individual dome lamp on and off.

Press to switch the right-hand
individual dome lamp on and off.

SWITCHING THE FRONT
INTERIOR LAMPS ON AND OFF
- POLICE RESPONDER

E339273

The front interior lamp switches are on the
overhead console.

Note:

The position of each button on the

overhead console depends on your vehicle.

Night Vision Red Task Lamp

E281231

Press to switch the lamp on or
off.

Individual Map Lamps

E262193

Press to switch the left-hand
individual dome lamp on and off.

Press to switch the right-hand
individual dome lamp on and off.

157

Interior Lighting

SWITCHING THE REAR
INTERIOR LAMPS ON AND OFF

E281231

The rear interior lamps may be above the
rear seat or above the rear windows.

Press to switch the lamps on or
off.

Note:

If you switch the rear lamps on

through the overhead console, you cannot
switch them off with the rear lamp switch.

INTERIOR LAMP FUNCTION

WHAT IS THE INTERIOR LAMP
FUNCTION

The interior lamp function switches the
courtesy and door lamps on or off.

SWITCHING THE INTERIOR LAMP
FUNCTION ON AND OFF

Press to switch the interior lamp
function on and off.

Note:

The indicator lamp illuminates amber

when the door function is off.

ADJUSTING THE INSTRUMENT
PANEL LIGHTING
BRIGHTNESS

The instrument lighting dimmer buttons
are on the lighting control.

E291299

E296433

Repeatedly press one of the
buttons to adjust the brightness.

AMBIENT LIGHTING

SWITCHING AMBIENT LIGHTING
ON AND OFF

1.

Press 

Settings

 on the touchscreen.

2. Press 

Vehicle Settings

.

3. Press 

Ambient Light

.

4. Switch 

Ambient Light

 on or off.

ADJUSTING AMBIENT LIGHTING

Drag the slider left or right.

INTERIOR LIGHTING –
TROUBLESHOOTING

INTERIOR LIGHTING –
FREQUENTLY ASKED QUESTIONS

Why do my courtesy lamps or interior
lamps turn off when I have them
switched on when I switch my vehicle
off?

The battery saver turns the courtesy
lamps and interior lamps off after a
short period of time after you switch
your vehicle off.

158

Interior Lighting

OPENING AND CLOSING THE
WINDOWS

WARNING: 

Do not leave children

unattended in your vehicle and do not
let them play with the power windows.
Failure to follow this instruction could
result in personal injury.

WARNING: 

When closing the

power windows, verify they are free of
obstruction and make sure that children
and pets are not in the proximity of the
window openings.

Press the window control switch
to open the window.  Lift the
window control switch to close

the window.

Note:

The power windows operate with the

ignition on, and for several minutes after you
switch the ignition off or until you open a
front door.

To reduce wind noise or pulsing noise when
one window is open, slightly open the
opposite window.

One-Touch Open

Fully press the window control switch and
release it.  Press again or lift it to stop the
window.

One-Touch Close

Fully lift the window control switch and
release it.  Press again or lift it to stop the
window.

Resetting One-Touch Close

Carry out all steps within 30 seconds of
starting the sequence.

1.

Close the window.

2. Press and hold the window control

switch until the window is fully open.
Keep the window control switch
pressed for a few seconds.

3. Lift and hold the window control switch

until the window is fully closed. Keep
the window control switch held for a
few seconds.

4. Press and hold the window control

switch until the window is fully open.
Keep the window control switch
pressed for a few seconds.

5. Lift and hold the window control switch

until the window is fully closed. Keep
the window control switch held for a
few seconds.

Note:

Repeat the procedure if the window

does not close when you use one-touch.

WINDOW BOUNCE-BACK

WHAT IS WINDOW BOUNCE-BACK

The window stops and reverses if it detects
an obstruction when closing.

OVERRIDING WINDOW BOUNCE-
BACK

WARNING: 

If you override

bounce-back, the window does not
reverse if it detects an obstacle. Take
care when closing the windows to avoid
personal injury or damage to your
vehicle.

1.

Close the window until it reaches the
point of resistance and let it reverse.

2. Lift and hold the window control switch

within two seconds to override
bounce-back and close the window.
Bounce-back is now disabled and you
can close the window manually.

159

Windows

Note:

The window goes past the point of

resistance and you can fully close it.

Note:

If the window does not close, have

your vehicle checked as soon as possible.

LOCKING THE REAR WINDOW
CONTROLS

 (IF EQUIPPED)

Press the window control switch
to lock or unlock the rear window
controls.  It illuminates when you

lock the rear window controls.

OPENING AND CLOSING THE
SLIDING WINDOWS

 (IF EQUIPPED)

WARNING: 

When closing the

power windows, verify they are free of
obstruction and make sure that children
and pets are not in the proximity of the
window openings.

WARNING: 

Do not leave children

unattended in your vehicle and do not
let them play with the power windows.
Failure to follow this instruction could
result in personal injury.

E311430

The window control switch is on the
overhead console.

Press and hold the window control switch
to open the window. Pull and hold the
window control switch to close the
window.

160

Windows

INTERIOR MIRROR
PRECAUTIONS

WARNING: 

Do not adjust the

mirrors when your vehicle is moving. This
could result in the loss of control of your
vehicle, serious personal injury or death.

Note:

Do not clean the mirror housing or

glass with harsh abrasives, fuel or other
petroleum-based cleaning products.

MANUALLY DIMMING THE
INTERIOR MIRROR

Pull the tab below the mirror toward you
to reduce glare at night.

AUTO-DIMMING INTERIOR
MIRROR

 (IF EQUIPPED)

WHAT IS THE AUTO-DIMMING
INTERIOR MIRROR

The mirror dims to reduce the effect of
bright light from behind. It returns to
normal when the bright light from behind
is no longer present or if you shift into
reverse (R).

AUTO-DIMMING INTERIOR
MIRROR LIMITATIONS

Do not block the sensors on the front and
back of the mirror.

Note:

A rear center passenger or raised rear

center head restraint could prevent light
from reaching the sensor.

161

Interior Mirror

ADJUSTING THE EXTERIOR
MIRRORS

WARNING: 

Do not adjust the

mirrors when your vehicle is moving. This
could result in the loss of control of your
vehicle, serious personal injury or death.

E311081

Power fold.

A

Window lock.

B

Adjustment control.

C

Right-hand mirror.

D

Left-hand mirror.

E

To adjust the mirrors, switch your vehicle
on, with the ignition in accessory mode or
the engine running:

1.

Select the mirror you want to adjust.
The control light turns on.

2. Use the adjustment control to adjust

the position of the mirror.

3. Press the mirror control again. The

control light turns off.

FOLDING THE EXTERIOR
MIRRORS - VEHICLES WITH:
MANUAL FOLDING MIRRORS

Push the mirror toward the door window
glass.

Make sure that you fully engage the mirror
in its support when returning it to its
original position.

FOLDING THE EXTERIOR
MIRRORS - VEHICLES WITH:
POWER FOLDING MIRRORS

The exterior mirrors fold when you lock
your vehicle and unfold when you unlock
your vehicle.

For tight parking conditions,
press the control to fold the
mirrors.

Press the control switch again to unfold
the mirrors.

Note:

Do not stop the mirrors midway

through their movement. Wait until the
mirrors stop moving and press the control
again.

The left-hand and right-hand mirrors move
at different rates. For example, one mirror
may stop while the other one continues to
move. This is normal.

If you press the control switch to fold in the
mirrors with auto-fold on, the mirrors do
not unfold when you unlock your vehicle.

Note:

The power folding mirrors operate

with the ignition on, and for several minutes
after you switch the ignition off.

Note:

If you fold and unfold the mirrors

several times within one minute, the power
fold function may turn off to protect the
motors from overheating.

162

Exterior Mirrors

Switching Auto-fold On and Off

1.

Press 

Settings

 on the touchscreen.

2. Press 

Vehicle Settings

.

3. Press 

Mirrors

.

4. Switch 

Autofold

 on or off.

Loose Mirror

If your power-folding mirrors are manually
folded, they may not work properly even
after you re-position them. You need to
reset them if:

The mirrors vibrate when you drive.

The mirrors feel loose.

The mirrors do not stay in the folded or
unfolded position.

One of the mirrors is not in its normal
driving position.

To reset the mirrors perform the following
steps:

1.

By hand, fold or retract both mirrors.

2. Using the power folding/power

telescoping mirror control switch,
operate the mirrors until you hear an
audible click.

3. Operate the power folding or power

telescoping mirrors an additional 3 to
4 times to synchronize the mirrors.

EXTENDING THE EXTERIOR
MIRRORS

This optional feature lets you extend the
mirror about 3 in (75 mm). It is useful when
towing a trailer. You can manually pull out
or push in the mirrors to various positions.

Power Telescoping Mirrors

 (If

Equipped)

This feature lets you position both mirrors
at the same time.

E218902

A. Extend.
B. Retract.

To adjust your mirrors, make sure you
switch your vehicle on, with the ignition in
accessory mode or the engine running.

1.

Press and release the control switch.

2. Press the adjustment control to

position the mirrors.

3. Press the left arrow to extend the

mirrors out. Press the right arrow to
retract the mirrors in.

Note:

Moving the mirrors 10 or more times

within one minute, or repeated folding and
unfolding of the mirrors when holding the
control down during full travel, could disable
the system to protect the motors from
overheating. Wait approximately three
minutes with the vehicle running, and up to
10 minutes with the vehicle off, for the
system to reset and for function to return to
normal.

AUTO-DIMMING EXTERIOR
MIRROR

 (IF EQUIPPED)

WHAT IS THE AUTO-DIMMING
EXTERIOR MIRROR

The driver exterior mirror dims when the
interior auto-dimming mirror turns on.

163

Exterior Mirrors

OPENING AND CLOSING THE
SUN SHADE

WARNING: 

Do not leave children

unattended in your vehicle and do not
let them play with the sun shades.
Failure to follow this instruction could
result in personal injury.

The controls are on the overhead console.

Opening the Sun Shade

E312249

Press and release the switch to
activate the one-touch open
feature. To stop movement,

press the switch a second time. The sun
shade also opens when you open the
moonroof.

Note:

The sun shade stops short of its fully

opened position for the comfort of rear
passengers. To fully open the sun shade,
press the switch again.

Closing the Sun Shade

E312250

Press and release the switch to
activate the one-touch close
feature. To stop movement,

press the switch a second time.

OPENING AND CLOSING THE
MOONROOF

WARNING: 

Do not leave children

unattended in your vehicle and do not
let them play with the moonroof. Failure
to follow this instruction could result in
personal injury.

WARNING: 

When closing the

moonroof, verify that it is free of
obstruction and make sure that children
and pets are not in the proximity of the
roof opening.

The controls are on the overhead console.

Opening the Moonroof

E312251

Press and release the switch to
activate the one-touch open
feature. To stop movement,

press the switch a second time.

Note:

The moonroof stops short of the fully

opened position to reduce wind noise or
rumbling that may happen with the
moonroof fully open.

Press and release the switch again to fully
open the moonroof.

Closing the Moonroof

E312252

Press and release the switch to
activate the one-touch close
feature, from either the open or

vent positions. To stop movement, press
the switch a second time.

VENTING THE MOONROOF

WARNING: 

Do not leave children

unattended in your vehicle and do not
let them play with the moonroof. Failure
to follow this instruction could result in
personal injury.

The moonroof controls are on the
overhead console.

164

Moonroof

 (If Equipped)

E312252

With the moonroof in the closed
position, press and release the
switch to vent the moonroof. To

close the moonroof from the vent position,
press and release the switch again.

MOONROOF BOUNCE-BACK

WHAT IS MOONROOF BOUNCE-
BACK

The moonroof stops and reverses some
distance if it detects an obstacle when
closing.

OVERRIDING MOONROOF
BOUNCE-BACK

Press and hold the close button within two
seconds after the moonroof comes to a
stop.

165

Moonroof

 (If Equipped)

INSTRUMENT CLUSTER OVERVIEW - VEHICLES WITH: 4.2 INCH
SCREEN

E219638

Engine oil pressure gauge.

A

Engine coolant temperature gauge.

B

Fuel gauge.

C

Transmission fluid temperature gauge.

D

Speedometer.

E

Information display.

F

Tachometer.

G

166

Instrument Cluster

INSTRUMENT CLUSTER OVERVIEW - VEHICLES WITH: 8 INCH
SCREEN

E311317

Tachometer.

A

Engine coolant temperature gauge.

B

Configurable gauges. Oil pressure, transmission oil temperature, turbo boost,
or diesel exhaust fluid level gauges.

C

Compass.

D

Fuel gauge.

E

Ambient temperature.

F

Speedometer.

G

Distance to empty.

H

Odometer.

I

167

Instrument Cluster

INSTRUMENT CLUSTER OVERVIEW - VEHICLES WITH: 12.3 INCH
SCREEN

E310245

Tachometer.

A

Engine coolant temperature gauge.

B

Configurable gauges. Oil pressure, transmission oil temperature, turbo boost,
vacuum/boost, battery voltage, air charge temperature, engine oil temperature
or diesel exhaust fluid level gauges.

C

Fuel gauge.

D

Speedometer.

E

Odometer.

F

Compass.

G

Ambient temperature.

H

TACHOMETER

Indicates the engine speed.

SPEEDOMETER

Indicates the vehicle speed.

FUEL GAUGE

WHAT IS THE FUEL GAUGE

Indicates approximately how much fuel is
in the fuel tank.

168

Instrument Cluster


Content      ..     7      8      9      10     ..