Ford F-150 (2022 year). Manual in english - page 8
 

  Index      Manuals     Ford F-150 (2022 year). Manual in english


Search            copyright infringement  


Content      ..     6      7      8      9     ..


Ford F-150 (2022 year). Manual in english - page 8


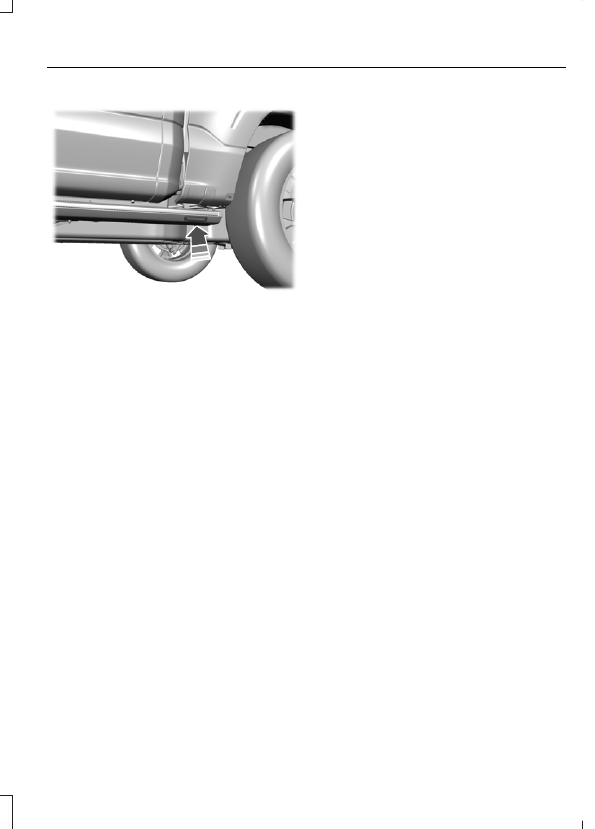
E334917

Press the switch with your foot to use the
power running board kick switch.

Pressing the kick switch with the power
running boards stowed switches the mode
to 

Out

.

Pressing the kick switch with the power
running boards deployed switches the
mode to 

Auto

.

Note:

When you use the kick switch, the

power running board mode changes until
you press the kick switch again.

You can change the kick switch setting on
the touchscreen.  See 

Power Running

Board Settings

 (page 136).

Kick switch

Always active

The kick switch is on regardless of whether
the doors are locked or unlocked.

Only while unlocked

The kick switch is on only with the doors
unlocked.

DEPLOYING AND STOWING
THE POWER RUNNING
BOARDS

The power running boards deploy when
you approach your vehicle with a remote
control, unlock the door or open the door.

The power running boards stow:

After a few seconds when you close
the doors.

If you unlock the door but do not open
it.

If you have switched 

Approach

detection

 on and do not open a door

before the 

Auto Timer

 setting expires.

See 

Power Running Board Settings

(page 136).

Note:

The power running boards reverse

direction and move to the end of travel if
they encounter an object when moving.

POWER RUNNING BOARDS –
TROUBLESHOOTING

POWER RUNNING BOARDS –
FREQUENTLY ASKED QUESTIONS

Why is there unwanted noise coming
from my power running boards?

The power running board mechanism
could trap debris such as mud, dirt,
snow, ice and salt. If this happens, set
the running boards to the deployed
position. Then, wash the system, in
particular the front and rear hinge
arms, with a high-pressure car wash
wand.

137

Power Running Boards

 (If Equipped)

ADJUSTING THE STEERING
WHEEL - VEHICLES WITH:
POWER ADJUSTABLE
STEERING COLUMN

WARNING: 

Do not adjust the

steering wheel when your vehicle is
moving.

Note:

 Make sure that you are sitting in the

correct position.  See 

Sitting in the Correct

Position

 (page 190).

E261582

Press the top or bottom of the control to
move the steering wheel up or down.

Press the front or rear of the control to
move the steering wheel in or out.

You can save and recall the steering wheel
position with the memory function. See

Recalling a Preset Position

 (page 204).

ADJUSTING THE STEERING
WHEEL - VEHICLES WITH:
MANUAL ADJUSTABLE
STEERING COLUMN

WARNING: 

Do not adjust the

steering wheel when your vehicle is
moving.

Note:

 Make sure that you are sitting in the

correct position.  See 

Sitting in the Correct

Position

 (page 190).

E359744

1.

Unlock the steering column.

2. Adjust the steering wheel to the

position you prefer.

3. Lock the steering column.

138

Steering Wheel

RESETTING THE STOPPING
POSITION - VEHICLES WITH:
POWER ADJUSTABLE
STEERING COLUMN

Note:

The steering wheel stops when it

detects an obstruction. This sets a new
stopping position.

To reset the steering column to its normal
stopping position:

1.

Confirm there is nothing obstructing
the motion of the steering column.

2. Press and hold the steering column

control until the steering column stops
moving.

3. Press the steering column control

again.

Note:

The steering column may start to

move again.

4. When the steering column stops,

continue holding the control for a few
seconds.

5. Repeat for each direction, as necessary.

HORN

E270945

Press on the center of the
steering wheel near the horn icon
to activate the horn.

SWITCHING THE HEATED
STEERING WHEEL ON AND OFF
- VEHICLES WITH: HEATED
STEERING WHEEL

To activate the heated steering
wheel, press the button on the
climate control unit.

On some vehicles, an indicator on the
button illuminates when the heated
steering wheel is on.

Note:

A sensor regulates the temperature

of the steering wheel.

139

Steering Wheel

ADJUSTING THE PEDALS

WARNING: 

Do not use the pedal

adjustment controls when the vehicle is
moving. Failure to follow this instruction
could result in personal injury or death.

Your control is on the left-hand side of the
steering column or on the instrument
panel.

E176213

Farther away from you.

A.

Closer to you.

B.

You can save and recall the pedal positions
with the memory feature.  See 

Memory

Function

 (page 204).

140

Adjustable Pedals

 (If Equipped)

WIPERS

WIPER PRECAUTIONS

Do not operate the wipers on a dry
windshield. This could scratch the glass or
damage the wiper blades. Use the
windshield washers before wiping a dry
windshield.

Fully defrost the windshield before you
switch the windshield wipers on.

Switch the windshield wipers off before
entering a car wash.

SWITCHING WINDSHIELD WIPERS
ON AND OFF

E327739

High-speed wipe.

A

Intermittent wipe.

B

Off.

C

E270969

Use the rotary control.

AUTOWIPERS

 (IF EQUIPPED)

WHAT ARE AUTOWIPERS

Autowipers turns on and controls the
speed and frequency of the windshield
wipers.

AUTOWIPERS SETTINGS

1.

Press 

Settings

 on the touchscreen.

2. Press 

Vehicle Settings

.

3. Press 

Wipers

.

4. Switch 

Rain Sensing

 on or off.

Note:

When you switch the feature off, the

wipers do not operate based on the rain
sensor. When you switch on the windshield
wipers to the intermittent wipe position with
the feature off, the wipers use the wipe
speed set by the rotary control.

ADJUSTING THE SENSITIVITY OF
THE RAIN SENSOR

E311292

Low sensitivity.

A

High sensitivity.

B

Use the rotary control to set the sensitivity
of the rain sensor.

141

Wipers and Washers

When you select low sensitivity, the wipers
operate when the sensor detects a large
amount of water on the windshield.

When you select high sensitivity, the wipers
operate when the sensor detects a small
amount of water on the windshield.

CHECKING THE WIPER
BLADES

E142463

Run the tip of your fingers over the edge of
the blade to check for roughness.

REPLACING THE FRONT
WIPER BLADES

E165804

1.

Pull the wiper blade and arm away
from the glass.

Note:

Do not hold the wiper blade to lift the

wiper arm.

E327597

2

2. Lift the wiper blade primary locking clip.

E327598

3. Press the wiper blade secondary

locking clip.

4. Remove the wiper blade.

Note:

Make sure that the wiper arm does

not spring back against the glass when the
wiper blade is not attached.

5. To install, reverse the removal

procedure.

Note:

Make sure that the wiper blade locks

into place.

142

Wipers and Washers

WASHERS

WASHER PRECAUTIONS

WARNING: 

If you operate your

vehicle in temperatures below 41°F
(5°C), use washer fluid with antifreeze
protection. Failure to use washer fluid
with antifreeze protection in cold
weather could result in impaired
windshield vision and increase the risk
of injury or accident.

Do not operate the washers when the
washer reservoir is empty. This could cause
the washer pump to overheat.

Keep the outside of the windshield clean.
The rain sensor is very sensitive and the
wipers may operate if dirt, mist or insects
hit the windshield.

USING THE WINDSHIELD WASHER

E311291

E270967

Press and hold the button at the
end of the lever to operate the
windshield washer.

Note:

A courtesy wipe occurs a short time

after the wipers stop to clear any remaining
washer fluid when switched on.  See

Switching the Courtesy Wipe On and Off

(page 143).

SWITCHING THE COURTESY WIPE
ON AND OFF

1.

Press 

Settings

 on the touchscreen.

2. Press 

Vehicle Settings

.

3. Press 

Wipers

.

4. Switch 

Courtesy Wipe

 on or off.

ADDING WASHER FLUID

E328222

WASHER FLUID SPECIFICATION

See 

Washer Fluid Specification

 (page

589).

WIPERS AND WASHERS –
TROUBLESHOOTING

WIPERS AND WASHERS –
WARNING LAMPS

E132353

Illuminates when the windshield
washer fluid is low.

143

Wipers and Washers

WIPERS AND WASHERS –
FREQUENTLY ASKED QUESTIONS

Why are there streaks and smears on
the windshield?

The wiper blades could be dirty, worn
or damaged. Check the wiper blades.
See 

Checking the Wiper Blades

(page 142).  If the wiper blades are dirty,
clean them with washer fluid or water
applied with a soft sponge or cloth. If
the wiper blades are worn or damaged,
install new ones.  See 

Replacing the

Front Wiper Blades

 (page 142).

144

Wipers and Washers

EXTERIOR LIGHTING
CONTROL

E327629

Lamps off.

A

Parking lamps on.

B

Autolamps on.

C

Headlamps on.

D

Rotate the control to make a selection.

Note:

The lighting control defaults to

autolamps every time you switch your
vehicle on.

EXTERIOR LIGHTING
CONTROL - POLICE
RESPONDER

E327629

Lamps off.

A

Parking lamps on.

B

Autolamps on.

C

Headlamps on.

D

Rotate the control to make a selection.

Note:

The lighting control defaults to the

last known state every time you switch your
vehicle on.

HEADLAMPS

USING THE HIGH BEAM
HEADLAMPS

E327570

Push the lever away from you to
switch the high beam on.

Push the lever forward again or pull the
lever toward you to switch the high beams
off.

Slightly pull the lever toward you and
release it to flash the headlamps.

HEADLAMP INDICATORS

Lamps On

Illuminates when you switch the
low beam headlamps or the
parking lamps on.

Headlamp High Beam

Illuminates when you switch the
high beam headlamps on.

145

Exterior Lighting

HEADLAMPS –
TROUBLESHOOTING

HEADLAMPS – FREQUENTLY
ASKED QUESTIONS

Why is there condensation in the
headlamps?

Headlamps have vents to
accommodate normal changes in air
pressure. Condensation can be a
natural by-product of this design.
When moist air enters the lamp
assembly through the vents, there is a
possibility that condensation can
occur when the temperature is cold.
When normal condensation occurs, a
fine mist can form on the interior of the
lens. The fine mist eventually clears
and exits through the vents during
normal operation.

How much condensation is
acceptable?

The presence of a fine mist, for
example no streaks, drip marks or
large droplets. A fine mist covers less
than 50% of the lens.

How long may it take for the
acceptable condensation to be
cleared?

Clearing time may take as long as 48
hours under dry weather conditions.

How much condensation is
unacceptable?

A water puddle inside the lamp.
Streaks, drip marks or large droplets
present on the interior of the lens.

What should I do if unacceptable
condensation is present?

Have your vehicle checked as soon as
possible.

Why do my headlamps turn off when I
have them switched on when I switch
my vehicle off?

The battery saver turns the headlamps
off after a short period of time after
you switch your vehicle off.

AUTOLAMPS

WHAT ARE AUTOLAMPS

WARNING: 

The system does not

relieve you of your responsibility to drive
with due care and attention. You may
need to override the system if it does not
turn the headlamps on in low visibility
conditions, for example daytime fog.

Autolamps turn the headlamps on in low
light situations or when the windshield
wipers operate.

AUTOLAMP SETTINGS

1.

Press 

Settings

 on the touchscreen.

2. Press 

Vehicle Settings

.

3. Press 

Lighting

.

4. Press 

Autolamp Delay

.

5. Press a setting.

146

Exterior Lighting

EXTERIOR LAMPS

SWITCHING THE TURN SIGNAL
LAMPS ON AND OFF

E311431

Push the lever up or down to
switch the turn signal lamps on.

Set the lever to the middle position to
switch the turn signal lamps off.

Note:

Tap the lever up or down to make the

turn signal lamps flash three times.

HOW DO CORNERING LAMPS
WORK

 (If Equipped)

The cornering lamps illuminate the inside
of a corner when you are turning the
steering wheel or when you switch the turn
signal lamps on. They turn on when the
vehicle speed is below 25 mph (40 km/h).

Note:

Only the cornering lamp on the side

your vehicle is turning illuminates.

Note:

Cornering lamps do not operate if

you switch the front fog lamps on.

E327599

Headlamp beam.

A

Cornering lamp beam.

B

SWITCHING THE DAYTIME
RUNNING LAMPS ON AND OFF -
VEHICLES WITH: CONFIGURABLE
DAYTIME RUNNING LAMPS

WARNING: 

The daytime running

lamps system does not activate the rear
lamps and may not provide adequate
lighting during low visibility driving
conditions. Make sure you switch the
headlamps on, as appropriate, during all
low visibility conditions. Failure to do so
may result in a crash.

1.

Press 

Settings

 on the touchscreen.

2. Press 

Vehicle Settings

.

3. Press 

Lighting

.

147

Exterior Lighting

4. Switch 

Daytime Running Lights

 on or

off.

The daytime running lamps turn on when
all of the following occur:

You switch the system on.

You switch your vehicle on.

The transmission is not in park (P) for
vehicles with automatic transmissions
or you release the parking brake for
vehicles with manual transmissions.

The lighting control is in the autolamps
position.

The headlamps are off.

Note:

Other lighting control positions do

not turn on the daytime running lamps.

SWITCHING THE DAYTIME
RUNNING LAMPS ON AND OFF -
VEHICLES WITH: DAYTIME
RUNNING LAMPS (DRL)

WARNING: 

The daytime running

lamps system does not activate the rear
lamps and may not provide adequate
lighting during low visibility driving
conditions. Make sure you switch the
headlamps on, as appropriate, during all
low visibility conditions. Failure to do so
may result in a crash.

Daytime running lamps are always on
unless you switch on the headlamps or
your vehicle is in park (P).

SWITCHING THE FRONT FOG
LAMPS ON AND OFF

 (If Equipped)

The front fog lamp button is on the lighting
control.

Press the button to switch the
front fog lamps on or off.

Note:

Only switch the front fog lamps on

during reduced visibility.

Note:

The brightness of the daytime running

lamps may decrease when the front fog
lamps are switched on.

Note:

When the lighting control is in the

autolamps position, you cannot switch the
fog lamps on unless the headlamps are on.

SWITCHING THE FRONT FOG
LAMPS ON AND OFF - RAPTOR

 (If

Equipped)

The front fog lamp button is on the lighting
control.

Press the button to switch the
front fog lamps on or off.

Note:

Only switch the front fog lamps on

during reduced visibility.

Note:

The brightness of the daytime running

lamps may decrease when you switch the
front fog lamps on.

Note:

When the lighting control is in the

autolamps position, you cannot switch the
fog lamps on unless the headlamps are on.

Switching the Off-Road Lamps On
and Off

 (If Equipped)

Use auxiliary switch 1 to switch the off-road
lamps on and off.  See 

What Are the

Auxiliary Switches

 (page 636).

SWITCHING THE CARGO LAMPS
ON

E189587

Press the button in the lighting
control or in the rear cargo box.

148

Exterior Lighting

SWITCHING THE SPOT LAMPS ON
AND OFF

 (If Equipped)

The spot lamp buttons are near the lighting
control.

E340436

Press the button to switch on the
left-hand spot lamp.

E340437

Press the button to switch on the
right-hand spot lamp.

Move the position of the exterior mirrors
to adjust the aim.

Note:

The lighting control must be set to

the parking lamp position.

Note:

The spot lamps illuminate the area

in front of and to the side of your vehicle.

EXTERIOR LAMP INDICATORS

Front Fog Lamp

It illuminates when you switch
the front fog lamps on.

Turn Signal Lamp

It flashes when you switch the
turn signal lamps on.

Note:

An increase in the rate of flashing

warns of a failed turn signal lamp.

EXTERIOR LAMP AUDIBLE
WARNING

Exterior Lamps On

Sounds when you open the driver door and
the exterior lamps are on.

EXTERIOR ZONE LIGHTING

 (IF

EQUIPPED)

WHAT IS EXTERIOR ZONE
LIGHTING

Exterior zone lighting divides the exterior
lighting into zones and allows you to switch
them on and off to provide lighting around
the perimeter of your vehicle.

USING THE EXTERIOR ZONE
LIGHTING

1.

Press 

Features

 on the touchscreen.

2. Press 

Zone Lighting

.

E339129

On and off button.

A

Settings menu.

B

Exterior lamp indicators.

C

Individual zones on and off.

D

All zones on and off.

E

You can use zone lighting when your
vehicle is on or off. When it is off, the
lighting turns off after a certain period of
time.

149

Exterior Lighting

You can also use individual zone controls
to switch on each zone.

Note:

Make sure to remove exterior lighting

covers when using zone lighting.

Note:

When your vehicle is off and the timer

has one minute remaining, the direction
indicators flash six times.

Note:

Indicators on the touchscreen

illuminate when the lights outside of the
zone lighting control are on.

Note:

You can remotely control the zone

lighting using the FordPass app.

Note:

Vehicles without spot lamps only

have two zones.

EXTERIOR ZONE LIGHTING
SETTINGS

1.

Press 

Features

 on the touchscreen.

2. Press 

Zone Lighting

.

3. Press the settings menu in the upper

right-hand corner.

4. Press a setting.

Enable Autolamp Override

This setting allows your vehicle to override
the autolamps when using zone lighting.

When you access zone lighting for the first
time, you can choose this setting. You can
change this setting at any time.

Include Reverse Lamps

This setting turns the reverse lamps on
when you switch the rear lighting zone on.

Switch this setting off if you have a backup
alarm installed to prevent the reverse
lamps from turning on and sounding the
alarm when using zone lighting.

AUTOMATIC HIGH BEAM
CONTROL

HOW DOES AUTOMATIC HIGH
BEAM CONTROL WORK

Automatic high beam control turns the
high beams on if it is dark enough and no
other traffic is present. If it detects an
approaching vehicle’s headlamps or tail
lamps, or street lighting ahead, the system
turns the high beams off.

A camera sensor, centrally mounted
behind the windshield of your vehicle,
continuously monitors conditions to turn
the high beams on and off.

150

Exterior Lighting

E327596

Without automatic high beam
control.

A

With automatic high beam
control.

B

AUTOMATIC HIGH BEAM
CONTROL PRECAUTIONS

WARNING: 

The system does not

relieve you of your responsibility to drive
with due care and attention. You may
need to override the system if it does not
turn the high beams on or off.

WARNING: 

The system may not

switch the high beams off if the lights of
oncoming vehicles are hidden by
obstacles, for example guard rails.

WARNING: 

Do not use the system

in poor visibility, for example fog, heavy
rain, spray or snow.

WARNING: 

You may need to

override the system when approaching
other road users.

WARNING: 

You may need to

override the system during inclement
weather.

AUTOMATIC HIGH BEAM
CONTROL REQUIREMENTS

The system turns the high beams on if all
of the following occur:

You switch the system on.

You set the lighting control to the
autolamps position.

The ambient light level is low enough
that you require high beams.

There is no traffic in front of your
vehicle.

The vehicle speed is greater than
approximately 32 mph (52 km/h).

AUTOMATIC HIGH BEAM
CONTROL LIMITATIONS

The system turns the high beams off if any
of the following occur:

You switch the system off.

You set the lighting control to any
position except autolamps.

The ambient light level is high enough
that you do not require high beams.

151

Exterior Lighting

The system detects an approaching
vehicle's headlamps or a leading
vehicle's tail lamps.

The system detects severe rain, snow
or fog.

The system detects street lighting.

The camera has reduced visibility.

The vehicle speed falls below
approximately 19 mph (30 km/h).

SWITCHING AUTOMATIC HIGH
BEAM CONTROL ON AND OFF

1.

Press 

Settings

 on the touchscreen.

2. Press 

Vehicle Settings

.

3. Press 

Lighting

.

4. Switch 

Auto Highbeam

 on or off.

AUTOMATIC HIGH BEAM
CONTROL INDICATORS

Illuminates to confirm when the
system is ready to assist.

OVERRIDING AUTOMATIC HIGH
BEAM CONTROL

E308790

Push the lever away from you to switch
the high beams on.

Push the lever away from you again to
switch the high beams off.

Push the lever away from you for a third
time to switch automatic high beam
control back on.

AUTOMATIC HIGH BEAM CONTROL – TROUBLESHOOTING

AUTOMATIC HIGH BEAM CONTROL – INFORMATION MESSAGES

Description

Message

The camera has reduced visibility.  Clean the windshield.  If
the message continues to appear, have your vehicle checked
as soon as possible.

Front Camera Low Visib-
ility Clean Screen

The camera has malfunctioned.  Wait a short period of time
for the camera to cool down.  If the message continues to
appear, have your vehicle checked as soon as possible.

Front Camera Tempor-
arily Not Available

The camera has malfunctioned.  Have your vehicle checked
as soon as possible.

Front Camera Malfunc-
tion Service Required

152

Exterior Lighting


Content      ..     6      7      8      9     ..