Ford Transit (2022 year). Manual in english - page 20
 

  Index      Manuals     Ford Transit (2022 year). Manual in english


Search            copyright infringement  


Content      ..     18      19      20      21     ..


Ford Transit (2022 year). Manual in english - page 20


CALCULATING PAYLOAD

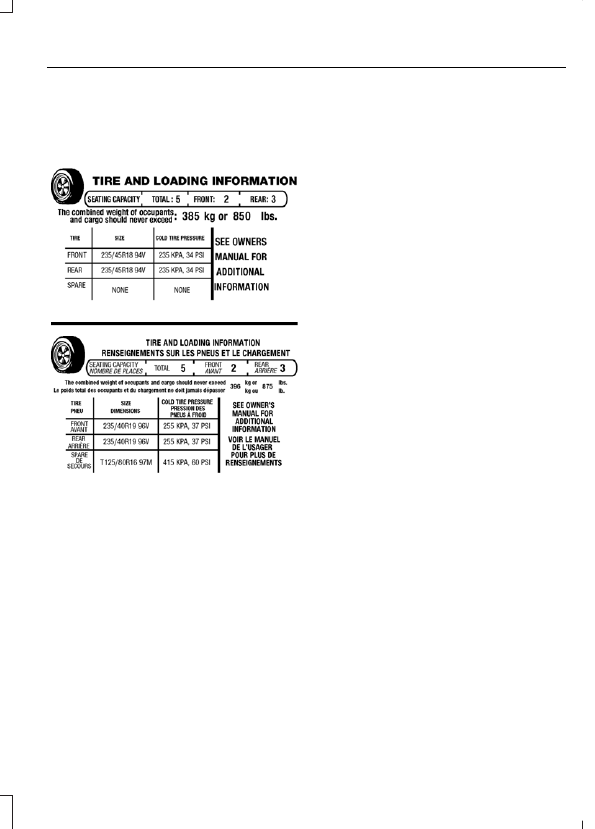
Tire and Loading Label Information
Example:

E198719

Payload is the combined weight
of cargo and passengers that your
vehicle is carrying. The maximum
payload for your vehicle appears
on the Tire and Loading label. The
label is either on the B-pillar or the
edge of the driver door. Vehicles
exported outside the US and
Canada may not have a tire and
loading label. Look for “The
combined weight of occupants
and cargo should never exceed
XXX kg or XXX lb” for maximum
payload. The payload listed on the
Tire and Loading Information label

is the maximum payload for your
vehicle as built by the assembly
plant. If you install any additional
equipment on your vehicle, you
must determine the new payload.
Subtract the weight of the
equipment from the payload listed
on the Tire and Loading label.
When towing, trailer tongue
weight or king pin weight is also
part of payload.

CALCULATING THE LOAD
LIMIT

Steps for determining the correct
load limit:

1. Locate the statement "The

combined weight of occupants
and cargo should never exceed
XXX kg or XXX lb." on your
vehicle’s placard.

2. Determine the combined

weight of the driver and
passengers that will be riding
in your vehicle.

3. Subtract the combined weight

of the driver and passengers
from XXX kg or XXX lb.

4. The resulting figure equals the

available amount of cargo and
luggage load capacity. For
example, if the “XXX” amount
equals 1,400 lb. and there will
be five 150 lb. passengers in
your vehicle, the amount of
available cargo and luggage
load capacity is 650 lb.
(1400-750 (5 x 150) = 650 lb.)

325

Load Carrying

5. Determine the combined

weight of luggage and cargo
being loaded on the vehicle.
That weight may not safely
exceed the available cargo and
luggage load capacity
calculated in Step 4.

6. If your vehicle will be towing a

trailer, load from your trailer
will be transferred to your
vehicle. Consult this manual to
determine how this reduces the
available cargo and luggage
load capacity of your vehicle.

Helpful examples for
calculating the available
amount of cargo and luggage
load capacity

Suppose your vehicle has a
1400-pound (635-kilogram) cargo
and luggage capacity. You decide
to go golfing. Is there enough load
capacity to carry you, four of your
friends and all the golf bags? You
and four friends average 220
pounds (99 kilograms) each and
the golf bags weigh approximately
30 pounds (13.5 kilograms) each.
The calculation would be: 1400 -
(5 x 220) - (5 x 30) = 1400 - 1100
- 150 = 150 pounds. Yes, you have
enough load capacity in your
vehicle to transport four friends
and your golf bags. In metric units,
the calculation would be: 635
kilograms - (5 x 99 kilograms) -
(5 x 13.5 kilograms) = 635 - 495 -
67.5 = 72.5 kilograms.

Suppose your vehicle has a
1400-pound (635-kilogram) cargo
and luggage capacity. You and
one of your friends decide to pick
up cement from the local home
improvement store to finish that
patio you have been planning for
the past two years. Measuring the
inside of the vehicle with the rear
seat folded down, you have room
for twelve 100-pound
(45-kilogram) bags of cement. Do
you have enough load capacity to
transport the cement to your
home? If you and your friend each
weigh 220 pounds (99 kilograms),
the calculation would be: 1400 -
(2 x 220) - (12 x 100) = 1400 - 440
- 1200 = - 240 pounds. No, you do
not have enough cargo capacity
to carry that much weight. In
metric units, the calculation would
be: 635 kilograms - (2 x 99
kilograms) - (12 x 45 kilograms) =
635 - 198 - 540 = -103 kilograms.
You will need to reduce the load
weight by at least 240 pounds
(104 kilograms). If you remove
three 100-pound (45-kilogram)
cement bags, then the load
calculation would be: 1400 - (2 x
220) - (9 x 100) = 1400 - 440 -
900 = 60 pounds. Now you have
the load capacity to transport the
cement and your friend home. In
metric units, the calculation would
be: 635 kilograms - (2 x 99
kilograms) - (9 x 45 kilograms) =
635 - 198 - 405 = 32 kilograms.

326

Load Carrying

The above calculations also
assume that the loads are
positioned in your vehicle in a
manner that does not overload
the front or the rear gross axle
weight rating specified for your
vehicle on the Safety Compliance
Certification label.

ROOF RACK - BUS

ROOF RACK PRECAUTIONS

WARNING: 

Your vehicle is not

approved for roof racks. Never install a
roof rack to your vehicle.

ROOF RACK - VAN

ROOF RACK PRECAUTIONS

WARNING: 

Read and follow the

manufacturer's instructions when you
are fitting a roof rack.

WARNING: 

When loading the roof

racks, we recommend you evenly
distribute the load, as well as maintain
a low center of gravity. Loaded vehicles,
with higher centers of gravity, may
handle differently than unloaded
vehicles. Take extra precautions, such
as slower speeds and increased stopping
distance, when driving a heavily loaded
vehicle.

Note:

If you use a roof rack, the fuel

consumption of your vehicle will be higher
and you may experience different driving
characteristics.

Note:

Never place loads directly on the roof

panel. The roof panel is not designed to
directly carry a load.

You must place loads directly on the
crossbars fitted to the roof rack side rails.
When using the roof rack system, we
recommend that you use genuine Ford
accessory crossbars specifically designed
for your vehicle.

Make sure that you securely fasten the
load.  Check the tightness of the load
before driving and at each fuel stop.

ROOF RACK LOAD CAPACITIES

Maximum Roof Load

lb (kg)

Variant

419 (190)

Low Roof.

331 (150)

Medium Roof.

220 (100)

High Roof.

327

Load Carrying

REAR CARGO AREA ANCHOR
POINTS

LOCATING THE REAR CARGO
AREA ANCHOR POINTS

E175810

Note:

The number of load retaining fixtures

could vary depending on your vehicle model.

REAR CARGO AREA ANCHOR
POINT LOAD CAPACITIES

Maximum Load

Value

Variant

1,125 lb (5,000 N)

All Van

328

Rear Cargo Area

CONNECTING A TRAILER
PRECAUTIONS

Do not tow a trailer until you drive your
vehicle at least 1,000 mi (1,600 km).

Consult your local motor vehicle laws for
towing a trailer.

See the instructions included with towing
accessories for the proper installation and
adjustment specifications.

Service your vehicle more frequently if you
tow a trailer.  See 

Normal Scheduled

Maintenance

 (page 523).

If you use a rental trailer, follow the
instructions the rental agency gives you.

When attaching the trailer wiring connector
to your vehicle, only use a proper fitting
connector that works with the vehicle and
trailer functions.

Account for the trailer coupler weight as
part of your vehicle load when calculating
the total vehicle weight.

Do not exceed the load limits.  See

Calculating the Load Limit

 (page 325).

CONNECTING A TRAILER

1.

Attach the trailer and wiring connector
to your vehicle.

2. Switch on your vehicle.

3. Set up the trailer brake controller using

the instrument cluster display.

Note:

If your vehicle does not recognize the

trailer, press and hold the brake pedal for a
few seconds.

E193232

When attaching the trailer wiring connector
to your vehicle, only use a proper fitting
connector that works with the vehicle and
trailer functions.

Safety Chains

Install trailer safety chains to the trailer
hitch as recommended by the
manufacturer. Cross the chains under the
trailer coupler and allow enough slack for
turning tight corners. Do not allow the
chains to drag on the ground.

Note:

Do not attach safety chains to the

bumper. Always connect the safety chains
to the frame or hook retainers of your trailer
hitch.

329

Connecting a Trailer

E265060

If the trailer safety chain hook has a latch,
make sure the latch is fully closed.

Trailer Connection Checklist

1.

Press 

Features

 on the touchscreen.

2. Press 

Towing

.

3. Press 

Connection Checklist

.

Trailer Light Check

WARNING: 

Never connect any

trailer lamp wiring to the vehicle's tail
lamp wiring; this may damage the
electrical system resulting in fire. Contact
your authorized dealer as soon as
possible for assistance in proper trailer
tow wiring installation. Additional
electrical equipment may be required.

Perform a trailer light illumination
sequence to confirm that all lights are
functioning by using the FordPass app.

Note:

The FordPass app allows one person

to confirm that all lights are functioning.

Electronic Park Hold

E337016

Applies the electronic parking
brake when you shift to park (P).

The electronic park hold button illuminates
when activated.

The feature prevents your vehicle from
moving in any direction when you are
aligned with your trailer coupler and shift
to park (P).

Note:

The feature is active for the current

key cycle.

You can also press a zoom button when
using the camera views to switch the
feature on.

Trailer Connection Alarm

The alarm is set when the following occur:

Your vehicle detects the trailer.

Your vehicle is locked.

The alarm is armed.

When the trailer is disconnected in this
state, the vehicle alarm sounds and an
alert is sent to your FordPass app.

Note:

For reliable trailer detection, the

trailer’s lamps must be SAE certified for
each intended purpose.

Note:

If the trailer is not compatible with

the feature, the turn signals flash twice.

330

Connecting a Trailer

CONNECTING A TRAILER – TROUBLESHOOTING

CONNECTING A TRAILER – INFORMATION MESSAGES

Description

Message

The system senses a trailer connection

becomes disconnected, either intentionally

or unintentionally, during a given ignition

cycle.

Trailer Disconnected

There are certain faults in your vehicle

wiring and trailer wiring or brake system.

Trailer Wiring Fault

There is a fault with your trailer battery, or

your trailer battery voltage is very low.

Trailer Battery Not Charging See Manual

One or more tires on your trailer is below

the specified tire pressure.

Trailer Tire Low Specified:

Displays when one or more tires on the

trailer is above the recommended temper-

ature.

Trailer Tire Over Temperature

A trailer tire pressure sensor is malfunc-

tioning. If the warning stays on or continues

to come on, have the system checked as

soon as possible.

Trailer Tire Pressure Sensor Fault

The trailer tire pressure monitoring system

is malfunctioning. If the warning stays on

or continues to come on, have the system

checked.

Trailer Tire Pressure Monitor Fault

The system cannot detect the trailer tire

pressure monitoring system.

Trailer Tire Pressure Monitor Capability Not

Detected

The trailer tire pressure monitoring system

is not setup.

Trailer Tire Pressure Indication Not Setup

See Manual

331

Connecting a Trailer

TOWING A TRAILER
PRECAUTIONS - 3.5L
DURATEC/3.5L ECOBOOST™

WARNING: 

Do not exceed

the GVWR or the GAWR
specified on the certification
label.

WARNING: 

Towing trailers

beyond the maximum
recommended gross trailer
weight exceeds the limit of your
vehicle and could result in engine
damage, transmission damage,
structural damage, loss of
vehicle control, vehicle rollover
and personal injury.

WARNING: 

Do not exceed

the lowest rating capacity for
your vehicle or trailer hitch.
Overloading your vehicle or
trailer hitch can impair your
vehicle stability and handling.
Failure to follow this instruction
could result in the loss of control
of your vehicle, personal injury or
death.

WARNING: 

Make sure that

the vertical load on the tow ball
is between the minimum and
maximum recommended weight
at all times. Failure to follow this
instruction could result in the
loss of control of your vehicle,
personal injury or death.

WARNING: 

Do not cut,

drill, weld or modify the trailer
hitch. Modifying the trailer hitch
could reduce the hitch rating.

WARNING: 

The anti-lock

brake system does not control
the trailer brakes.

TOWING A TRAILER
PRECAUTIONS - ELECTRIC
MOTOR

WARNING: 

Your vehicle is

not approved for trailer towing.
Never tow a trailer with your
vehicle.

TRAILER BRAKE
PRECAUTIONS - 3.5L
DURATEC/3.5L ECOBOOST™

WARNING: 

Do not connect a

trailer's hydraulic brake system directly
to your vehicle's brake system. Your
vehicle may not have enough braking
power and your chances of having a
collision greatly increase.

332

Towing a Trailer

WARNING: 

Do not tow a trailer

fitted with electric trailer brakes unless
your vehicle is fitted with a compatible
aftermarket electronic trailer brake
controller. Failure to follow this
instruction could result in the loss of
control of your vehicle, personal injury or
death. For additional information and
assistance, we recommend that you
contact an authorized dealer.

Electric brakes and manual, automatic or
surge-type trailer brakes are safe if you
install them properly and adjust them to
the manufacturer's specifications. The
trailer brakes must meet local and federal
regulations.

The rating for the tow vehicle's braking
system operation is at the gross vehicle
weight rating, not the gross combined
weight rating.

Certain states require functioning trailer
brakes for trailers over a specified weight.
Be sure to check state regulations for this
specified weight.

Ford Motor Company recommends
separate functioning brake systems for
trailers weighing more than 1,500 lb
(680 kg) when loaded.

TOWING A TRAILER
LIMITATIONS - 3.5L DURATEC/
3.5L ECOBOOST™

The vehicle's load capacity
designation is by weight, not by
volume, so you cannot necessarily
use all available space when
loading a vehicle or trailer.

Note:

Your vehicle could have

reduced performance when
operating at high altitudes and
when heavily loaded or towing a
trailer. When driving at elevation,
to match driving performance as
perceived at sea level, reduce gross
vehicle weight and gross
combination weight by 2% per
1,000 ft (300 m) elevation.

LOADING YOUR TRAILER - 3.5L
DURATEC/3.5L ECOBOOST™

To help minimize how trailer
movement affects your vehicle
when driving:

Load the heaviest items closest
to the trailer floor.

Load the heaviest items
centered between the left and
right side trailer tires.

Load the heaviest items above
the trailer axles or just slightly
forward toward the trailer
tongue. Do not allow the final
trailer tongue weight to go
above or below 10-15% of the
loaded trailer weight. The
trailer tongue weight should
never exceed 10% of the
maximum towing capacity.

Select a ball mount with the
correct rise or drop. When both
the loaded vehicle and trailer
are connected, the trailer frame
should be level, or slightly
angled down toward your
vehicle, when viewed from the
side.

333

Towing a Trailer

TRAILER TOWING HINTS - 3.5L
DURATEC/3.5L ECOBOOST™

Towing a trailer places an extra load on
your vehicle's engine, transmission, axle,
brakes, tires and suspension. Periodically
inspect these components during and after
any towing operation.

When driving with a trailer or payload, a
slight takeoff vibration or shudder may be
present due to the increased payload
weight.

Your vehicle may have a temporary or
conventional spare tire. A temporary spare
tire is different in diameter or width,
tread-type, or is from a different
manufacturer than the road tires on your
vehicle. Consult information on the tire
label or Safety Compliance label for
limitations when using.

When towing a trailer:

Obey country specific regulations for
towing a trailer.

Do not drive faster than 70 mph
(113 km/h) during the first 500 mi
(800 km).

Do not make full-throttle starts.

Check your hitch, electrical connections
and trailer wheel lug nuts thoroughly
after you have traveled 50 mi (80 km).

When stopped in congested or heavy
traffic during hot weather, place the
transmission in park (P) to aid engine
and transmission cooling and to help
A/C performance.

Turn off the speed control with heavy
loads or in hilly terrain. The speed
control may turn off when you are
towing on long, steep slopes.

Shift to a lower gear when driving down
a long or steep hill. Do not continuously
apply the brakes, as they may overheat
and become less effective.

If your transmission has Grade Assist
or Tow/Haul, use this feature when
towing. This provides engine braking
and helps eliminate excessive
transmission shifting for optimum fuel
economy and transmission cooling.

Your vehicle has AdvanceTrac with roll
stability control. When towing a trailer,
additional loads could cause the
AdvanceTrac system to engage during
cornering maneuvers. Reduce cornering
speeds to make sure that you can
maintain control of the vehicle and
trailer if the AdvanceTrac system
engages.

Allow more distance for stopping with
a trailer attached. Anticipate stops and
gradually brake.

Avoid parking on a slope. However, if
you must park on a slope, turn the
steering wheel to point your vehicle
tires away from traffic flow, set the
parking brake, place the transmission
in park (P) and place wheel chocks in
front and back of the trailer wheels.

Note:

Chocks are not included with your

vehicle.

LAUNCHING OR RETRIEVING
A BOAT OR PERSONAL
WATERCRAFT - 3.5L
DURATEC/3.5L ECOBOOST™

When backing down a ramp during boat
launching or retrieval:

Do not allow the static water level to
rise above the bottom edge of the rear
bumper.

Do not allow waves to break higher
than 6 in (15 cm) above the bottom
edge of the rear bumper.

334

Towing a Trailer

Exceeding 6 in (15 cm) could allow water
to enter vehicle components, causing
internal damage to the components and
affecting driveability, emissions and
reliability.

Note:

Replace the rear axle lubricant

anytime the rear axle has been submerged
in water.

Note:

Disconnect the trailer wiring

connector before backing the trailer into the
water.

Note:

Reconnect the trailer wiring

connector after removing the trailer from
the water.

TOWING WEIGHTS AND DIMENSIONS

RECOMMENDED TOWING WEIGHTS

Website

Market

https://www.fleet.ford.com/

towing-guides/

United States of America

https://www.fleet.ford.ca/towing-

guides/

Canada

335

Towing a Trailer

WHAT IS THE MAXIMUM LOADED
TRAILER WEIGHT - 3.5L
DURATEC/3.5L ECOBOOST™

The maximum loaded trailer
weight is the highest possible
weight of a fully loaded trailer the
vehicle can tow.

CALCULATING THE MAXIMUM
LOADED TRAILER WEIGHT FOR
YOUR VEHICLE - 3.5L DURATEC/
3.5L ECOBOOST™

1. Start with the gross combined

weight rating for your vehicle
model and axle ratio.

2. Subtract all of the following

that apply to your vehicle:

Vehicle curb weight.

Hitch hardware weight, for
example a draw bar, ball, locks
or weight distributing hardware.

Driver weight.

Passenger weight.

Payload, cargo and luggage
weight.

Aftermarket equipment weight.

This equals the maximum loaded
trailer weight for this combination.

Note:

The trailer tongue load is

considered part of the payload for
your vehicle. Reduce the total
payload by the final trailer tongue
weight.

Note:

Consult an authorized dealer

to determine the maximum trailer
weight allowed for your vehicle if
you are not sure.

336

Towing a Trailer

WHAT IS THE INTEGRATED
TRAILER BRAKE CONTROLLER

The trailer brake controller assists in
smooth and effective trailer braking based
on the towing vehicle’s brake pressure.

INTEGRATED TRAILER BRAKE
CONTROLLER PRECAUTIONS

WARNING: 

Use the integrated

trailer brake controller to properly adjust
the trailer brakes and check all
connections before towing a trailer.
Failure to follow this instruction could
result in the loss of control of your
vehicle, personal injury or death.

Only use the manual control lever for
proper adjustment of the gain during
trailer setup. Misuse, such as
application during trailer sway, could
cause instability of trailer or tow
vehicle.

Avoid towing in adverse weather
conditions. The trailer brake controller
does not provide anti-lock control of
the trailer wheels. Trailer wheels can
lock up on slippery surfaces, resulting
in reduced stability of trailer and tow
vehicle.

The trailer brake controller is only a
factory-installed or dealer-installed
item. Ford is not responsible for
warranty or performance of the
controller due to misuse or customer
installation.

Note:

Do not attempt removal of the trailer

brake controller without consulting the
Workshop Manual. Damage to the unit may
result.

USING THE INTEGRATED
TRAILER BRAKE CONTROLLER

1.

Make sure the trailer brakes are in good
working condition, functioning normally
and properly adjusted. See your trailer
dealer if necessary.

Note:

An authorized dealer can diagnose

the trailer brake controller to determine
exactly which trailer fault has occurred. Your
vehicle warranty does not cover issues with
your trailer.

2. Hook up the trailer and make the

electrical connections according to the
trailer manufacturer's instructions.

Note:

Select default mode if the trailer has

surge brakes, or no brakes at all. The system
has no effect on the braking performance
of the trailer in either of these cases.

Note:

If a trailer is connected by a four-pin

connector, the trailer braking function will
not be supported.

3. When you plug in a trailer with electric

or electric-over-hydraulic brakes, a
message confirming connection
appears in the information display.

4. Use the gain adjustment to find the

desired starting point. A gain setting of
6.0 is a good starting point for heavier
loads.

Note:

Use the following steps to adjust the

gain setting whenever road, weather and
trailer, or vehicle loading conditions, change
from when you initially set the gain.

5. In a traffic-free environment, tow the

trailer on a dry, level surface and
squeeze the manual control lever
completely.

337

Integrated Trailer Brake Controller

6. If the trailer wheels lock up, indicated

by squealing tires, reduce the gain
setting. If the trailer wheels turn freely,
increase the gain setting. Repeat Steps
5 and 6 until the gain setting is at a
point just below trailer wheel lock-up.
If towing a heavier trailer, trailer wheel
lock-up may not be attainable even
with the maximum gain setting of 10.

Note:

Only perform this procedure at

speeds of approximately 20–25 mph
(30–40 km/h).

Note:

The trailer brake controller reduces

output at vehicle speeds below 11 mph
(18 km/h) so that trailer and vehicle braking
is not jerky or harsh. This feature is only
available when applying the brakes using
your vehicle's brake pedal, not the
controller.

Note:

Your vehicle's brake system and the

trailer brake system work independently of
each other. Changing the gain setting on the
controller does not affect the operation of
your vehicle's brakes whether you attach a
trailer or not.

Note:

With the proper electrical connection,

pressing your vehicle brake pedal or using
the manual control lever illuminates both
trailer and vehicle brake lamps.

Note:

When you switch the engine off, the

controller output is disabled and the display
and module shut down. The controller
module and display turn on when you switch
the ignition on.

Adjusting the Trailer Brake Gain

E333154

Increase or decrease the amount
of gain in set increments.

A

Slide the control to engage the
trailer brakes.

B

Note:

Adjust gain setting before using the

trailer brake controller for the first time.

Note:

The gain should be set to provide the

maximum trailer braking assistance while
making sure the trailer wheels do not lock
when using the brakes. Locked trailer wheels
may lead to trailer instability.

Note:

Setting adjustments are saved when

a trailer profile is selected.

ADJUSTING THE INTEGRATED
TRAILER BRAKE CONTROLLER
MODE

Select the correct integrated trailer brake
controller mode option using the
touchscreen.

Note:

Trailer brake gain settings are saved

to the active trailer profile.

338

Integrated Trailer Brake Controller

Selecting the Trailer Brake Type

1.

Press 

Default

 for trailers with

electromagnetic drum brake systems
or press 

Electric over Hydraulic

 for

trailers with electrically actuated
hydraulic brake systems.

2. Press 

Save

.

Selecting the Trailer Brake Effort

1.

Select a setting for your trailer.

Note:

The default value is 

Low

 and is the

recommended setting for most trailers.
Select a different setting if your trailer's
brakes require more initial voltage, or you
prefer more aggressive trailer braking.

2. Press 

Save

.

INTEGRATED TRAILER BRAKE CONTROLLER –
TROUBLESHOOTING

INTEGRATED TRAILER BRAKE CONTROLLER – INFORMATION
MESSAGES

Action

Message

The system detects a correct trailer

connection during a given ignition cycle.

Trailer Connected

The system detects the trailer wiring

connection is disconnected, during a given

ignition cycle.

Trailer Disconnected

The system detects an electrical fault in

the trailer brake circuit. If this message

appears without a trailer attached, see your

authorized dealer. If a trailer is attached,

inspect and repair the trailer wiring.

Trailer Wiring Fault

Displays the current gain setting for the

trailer brake.

Trailer Brake Gain: {trailer gain value:#0.0}

Displays the current gain setting for the

trailer brake when you do not have a trailer

connected.

Trailer Brake Gain: {trailer gain value:#0.0}

No Trailer

339

Integrated Trailer Brake Controller

INTEGRATED TRAILER BRAKE
CONTROLLER – FREQUENTLY
ASKED QUESTIONS

How do I determine if there is an issue
with the wiring on my vehicle?

A message displays accompanied by
a single tone, when no trailer is
connected. This indicates that the
issue is between the trailer brake
controller and the 7-pin connector at
the bumper.

How do I determine if there is an issue
with the wiring on my trailer?

A message only displays with a trailer
connected. Consult your trailer dealer
for assistance.

340

Integrated Trailer Brake Controller


Content      ..     18      19      20      21     ..