Ford Transit (2022 year). Manual in english - page 16
 

  Index      Manuals     Ford Transit (2022 year). Manual in english


Search            copyright infringement  


Content      ..     14      15      16      17     ..


Ford Transit (2022 year). Manual in english - page 16


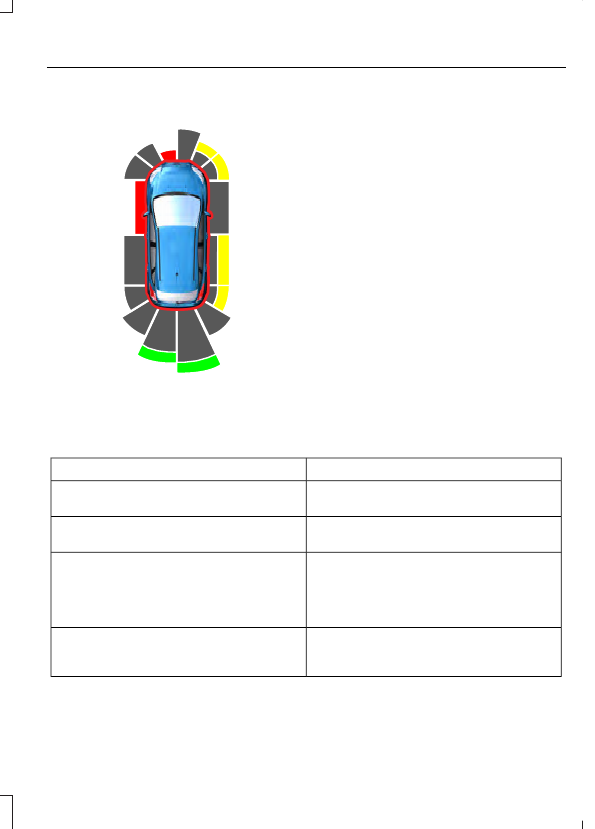
PARKING AID INDICATORS

E190459

The system provides object distance
indication through the information display.

As the distance to the object
decreases, the indicator blocks
illuminate and move toward the vehicle
icon.

If there is no object detected, the
distance indicator blocks are grey.

Visual indication remains on when the
transmission is in reverse (R). When you
stop your vehicle, visual indication turns
off after four seconds.

If the parking aids are not available, the
side distance indicator blocks do not
display.

PARKING AIDS –
TROUBLESHOOTING

PARKING AIDS – INFORMATION
MESSAGES

If a fault is present in the parking aids, a
warning message appears in the
instrument cluster or the information
display.

Action

Message

The system has malfunctioned.  Have your

vehicle checked as soon as possible.

Park Aid Fault

The system has malfunctioned.  Have your

vehicle checked as soon as possible.

Check Park Aid

A sensor is blocked or the system has

malfunctioned. Clean the bumper or

remove any obstruction. If the message

continues to appear, have your vehicle

checked as soon as possible.

Front Park Aid Not Available Sensor

Blocked See Manual

The system detects a condition that

requires service.  Have your vehicle checked

as soon as possible.

Check Front Park Aid

261

Parking Aids

Action

Message

The system detects a condition that

requires service.  Have your vehicle checked

as soon as possible.

Check Rear Park Aid

Displays the park aid status.

Front Park Aid On Off

Displays the park aid status.

Rear Park Aid On Off

262

Parking Aids

WHAT IS THE REAR VIEW
CAMERA

The rear view camera provides a video
image of the area behind your vehicle when
the transmission is in reverse (R). During
operation, guide lines appear in the display
that represents the path of your vehicle
and proximity to objects behind it.

REAR VIEW CAMERA
PRECAUTIONS

WARNING: 

The rear view camera

system is a reverse aid supplement
device that still requires the driver to use
it in conjunction with the interior and
exterior mirrors for maximum coverage.

WARNING: 

Objects that are close

to either corner of the bumper or under
the bumper, might not be seen on the
screen due to the limited coverage of the
camera system.

WARNING: 

Reverse your vehicle

slowly. Failure to follow this instruction
could result in the loss of control of your
vehicle, personal injury or death.

WARNING: 

Use caution when the

rear cargo door is ajar. If the rear cargo
door is ajar, the camera will be out of
position and the video image could be
incorrect. All guide lines disappear when
the rear cargo door is ajar. Failure to
follow this instruction could result in
personal injury.

WARNING: 

Use caution when

turning camera features on or off when
the transmission is not in park (P). Make
sure your vehicle is not moving.

Note:

 When towing, the camera only sees

what you are towing.  This might not provide
adequate coverage and you might not see
some objects.  In some vehicles, the guide
lines may disappear when you connect the
trailer tow connector.

REAR VIEW CAMERA
LIMITATIONS

The system may not correctly operate in
any of the following conditions:

Nighttime or dark areas if the reverse
lamps are not operating.

If the camera is obstructed. Clean the
lens with a soft, lint-free cloth and
non-abrasive cleaner.

The camera is misaligned due to
damage to the rear of your vehicle.

263

Rear View Camera

LOCATING THE REAR VIEW
CAMERA

E254267

The rear view camera is below the central
high mounted stop lamp or on the rear
cargo door.

REAR VIEW CAMERA GUIDE
LINES

Note:

Active guide lines are only available

when the transmission is in reverse (R).

E306774

Active guide lines.

A

Centerline.

B

Fixed guide line: Green zone.

C

Fixed guide line: Yellow zone.

D

Fixed guide line: Red zone.

E

Rear bumper.

F

Active guide lines only show with fixed
guide lines. To use active guide lines, turn
the steering wheel to point the guide lines
toward an intended path. If the steering
wheel position changes while reversing,
your vehicle might deviate from the
intended path.

264

Rear View Camera

The fixed and active guide lines fade in and
out depending on the steering wheel
position. The active guide lines do not
display when the steering wheel position
is straight.

Use caution while reversing. Objects in the
red zone are closest to your vehicle and
objects in the green zone are farther away.
Objects get closer to your vehicle as they
move from the green zone to the yellow or
red zones. Use the side view mirrors and
rear view mirror to get better coverage on
both sides and rear of your vehicle.

If the vehicle battery is disconnected, the
guidelines are not fully functional directly
after the battery is reconnected. The
guidelines become fully functional after
you drive your vehicle forward as straight
as possible for five minutes at a minimum
speed of 31 mph (50 km/h).

REAR VIEW CAMERA
SETTINGS

ZOOMING THE REAR VIEW
CAMERA IN AND OUT

WARNING: 

When manual zoom is

on, the full area behind your vehicle may
not show. Be aware of your surroundings
when using the manual zoom feature.

Selectable settings for this feature are
zoom in (+) and zoom out (-). Press the
symbol on the camera screen to change
the view. The default setting is zoom off.

This allows you to get a closer view of an
object behind your vehicle.  The zoomed
image keeps the bumper in the image to
provide a reference.  The zoom is only
active while the transmission is in reverse
(R).

Note:

Manual zoom is only available when

the transmission is in reverse (R).

Note:

Only the centerline shows when you

enable manual zoom.

SWITCHING REAR VIEW CAMERA
OBJECT DISTANCE INDICATOR
ON AND OFF

E190459

You can switch this feature on or off in the
settings. See 

Instrument Cluster Display

(page 136).

When the system detects an object, it
displays red, yellow and green distance
indicators on the information display.

SWITCHING REAR VIEW CAMERA
DELAY ON AND OFF

You can switch this feature on or off using
the touchscreen.  The default setting is off.

265

Rear View Camera

If you switch this feature on, the image
continues to display when you shift from
reverse (R) until:

You shift to a forward gear and the
vehicle speed sufficiently increases.

You shift in to park (P).

266

Rear View Camera

WHAT IS THE 180 DEGREE
CAMERA

The 180 degree camera provides an
extended image of the area behind your
vehicle.

HOW DOES THE 180 DEGREE
CAMERA WORK

When you switch the 180 degree view on,
the view splits into three images. You can
use the right and left outer images when
reversing to check for cross traffic and
pedestrians.

When you use the 180 degree camera view,
objects behind your vehicle are shown
extremely stretched and do not appear as
actual ratio.

180 DEGREE CAMERA
PRECAUTIONS

WARNING: 

The rear view camera

system is a reverse aid supplement
device that still requires the driver to use
it in conjunction with the interior and
exterior mirrors for maximum coverage.

WARNING: 

Objects that are close

to either corner of the bumper or under
the bumper, might not be seen on the
screen due to the limited coverage of the
camera system.

WARNING: 

Reverse your vehicle

slowly. Failure to follow this instruction
could result in the loss of control of your
vehicle, personal injury or death.

WARNING: 

Use caution when the

rear cargo door is ajar. If the rear cargo
door is ajar, the camera will be out of
position and the video image could be
incorrect. All guide lines disappear when
the rear cargo door is ajar. Failure to
follow this instruction could result in
personal injury.

WARNING: 

Use caution when

turning camera features on or off when
the transmission is not in park (P). Make
sure your vehicle is not moving.

Note:

If the image comes on while the

transmission is not in reverse (R), have the
system inspected by your authorized dealer.

Note:

 When towing, the camera only sees

what you are towing.  This might not provide
adequate coverage and you might not see
some objects.

Note:

Guide lines do not appear when you

switch the 180 degree view on.

SWITCHING THE 180 DEGREE
CAMERA ON AND OFF

When you shift to reverse (R) and the rear
view camera image appears, press the
button in the upper left corner of the touch
screen to switch the 180 degree view on.
Press the button again to switch it off.

The 180 degree view turns off when you
shift into park (P) or into any forward gear
and the vehicle speed sufficiently
increases.

Note:

Whenever you shift to reverse (R) the

standard rear view camera image with
guidelines is the default view.

267

180 Degree Camera

WHAT IS THE 360 DEGREE
CAMERA

The 360 degree camera system provides
visibility around your vehicle in parking
maneuvers such as:

Centering in a parking space.

Obstacles near your vehicle.

Parallel parking.

The 360 degree camera system consists
of front, side and rear cameras.

HOW DOES THE 360 DEGREE
CAMERA WORK

The 360 Degree Camera system:

Allows you to see what is directly in
front of or behind your vehicle.

Provides a cross traffic view in front of
and behind your vehicle.

Allows you to see a top-down view of
the area outside your vehicle, including
the blind spots and obstacles near your
vehicle.

360 DEGREE CAMERA
PRECAUTIONS

WARNING: 

The 360 degree

camera system still requires the driver
to use it in conjunction with looking out
of the windows, and checking the interior
and exterior mirrors for maximum
coverage.

WARNING: 

Objects that are close

to either corner of the bumper or under
the bumper, might not be seen on the
screen due to the limited coverage of the
camera system.

WARNING: 

Use caution when

turning camera features on or off when
the transmission is not in park (P). Make
sure your vehicle is not moving.

WARNING: 

Do not switch the

camera features on or off when your
vehicle is moving.

WARNING: 

You are responsible for

controlling your vehicle at all times. The
system is designed to be an aid and does
not relieve you of your responsibility to
drive with due care and attention. Failure
to follow this instruction could result in
the loss of control of your vehicle,
personal injury or death.

360 DEGREE CAMERA
LIMITATIONS

Note:

Use caution if a door is ajar. The 360

degree camera could be out of position and
the image could be incorrect.

LOCATING THE 360 DEGREE
CAMERAS

Rear View Camera

The rear view camera is on the liftgate. It
provides a video image of the area behind
your vehicle.

Front View Camera

The front view camera is in the grille. It
provides a video image of the area in front
of your vehicle.

268

360 Degree Camera

Side View Camera

The side view camera is on the outside
mirror. It provides a video image of the area
on the sides of your vehicle to aid you when
parking.

360 DEGREE CAMERA GUIDE
LINES

Note:

Active guide lines are only available

when the transmission is in reverse (R).

E306774

Active guide lines.

A

Centerline.

B

Fixed guide line: Green zone.

C

Fixed guide line: Yellow zone.

D

Fixed guide line: Red zone.

E

Rear bumper.

F

Active guide lines only show with fixed
guide lines. Turn the steering wheel to
point the guide lines toward an intended
path. If the steering wheel position changes
when reversing, your vehicle could deviate
from the intended path.

The fixed and active guide lines fade in and
out depending on the steering wheel
position. The active guide lines do not
display when the steering wheel position
is straight.

Objects in the red zone are closest to your
vehicle and objects in the green zone are
farther away. Objects get closer to your
vehicle as they move from the green zone
to the yellow or red zones. Use the side
view mirrors and rear view mirror to get
better coverage on both sides and rear of
your vehicle.

Keep Out Zone

E310341

The keep out zone is represented by the
yellow dotted lines running parallel to your
vehicle.

269

360 Degree Camera

SWITCHING THE 360 DEGREE
CAMERA ON AND OFF

E332186

The 360 degree camera system
button is on the instrument
panel. The front and rear

cameras have multiple screens which
consist of:

Normal view.

Normal view with 360.

Split view.

Note:

The rear view camera activates when

you switch into reverse (R). Additional views
are then accessible on the touchscreen.

When in park (P), neutral (N) or drive (D),
the front images display when the button
is pressed. When in reverse (R), only the
rear images display when the button is
pressed.

Note:

The 360 degree camera system turns

off when your vehicle is in motion at low
speed, except when in reverse (R).

SWITCHING THE 360 DEGREE
CAMERA VIEW

E337002

Press to access the different
camera views.

E336516

Front normal view provides an
image of what is directly in front
of your vehicle.

E336517

Front split view provides an
extended view of what is in front
of your vehicle.

E310996

Normal + 360 degree view
contains the normal camera
view next to a 360 degree

camera view.

E310967

Rear normal view provides an
image of what is directly behind
your vehicle.

E310974

Rear split view provides an
extended view of what is behind
your vehicle.

E337359

Zooms in on the 360 degree
image.

270

360 Degree Camera

WHAT IS ACTIVE PARK
ASSIST

Assists you with parking in and out of
parking spaces.

ACTIVE PARK ASSIST
PRECAUTIONS

WARNING: 

You must remain in

your vehicle when the system turns on.
At all times, you are responsible for
controlling your vehicle, supervising the
system and intervening, if required.
Failure to take care may result in the loss
of control of your vehicle, serious
personal injury or death.

WARNING: 

The sensors may not

detect objects in heavy rain or other
conditions that cause interference.

WARNING: 

You are responsible for

controlling your vehicle at all times. The
system is designed to be an aid and does
not relieve you of your responsibility to
drive with due care and attention. Failure
to follow this instruction could result in
the loss of control of your vehicle,
personal injury or death.

WARNING: 

Do not use the system

with accessories that extend beyond the
front or rear of your vehicle, for example
a trailer hitch or bike rack. The system is
not able to make corrections for the
additional length of the accessories.

SWITCHING ACTIVE PARK
ASSIST ON AND OFF -
VEHICLES WITH: SYNC 3 LITE,
VEHICLES WITHOUT: SYNC

The active park assist button is
next to the gearshift lever.

Press the button to activate active park
assist. Press again to switch between
parking modes.

Cancelling Active Park Assist

To cancel parking assistance at any time,
press the active park assist button or turn
the steering wheel.

Note:

It also cancels when your vehicle

exceeds 6 mph (9 km/h).

Brake System Intervention

When active park assist is controlling the
steering, it may under certain conditions
apply the brakes to slow or stop your
vehicle.

Note:

This could cause the parking

assistance to cancel.

SWITCHING ACTIVE PARK
ASSIST ON AND OFF -
VEHICLES WITH: SYNC 4

E326188

P

Press the parking aid button,
then press the active park assist
icon on the touchscreen to bring

up full screen notifications.

Press the soft keys on the touchscreen to
switch between the parallel park in,
perpendicular park in, or parallel park out
parking modes.

271

Active Park Assist

Cancelling Active Park Assist

To cancel parking assistance at any time,
press the active park assist button or turn
the steering wheel.

Note:

Active park assist also cancels when

your vehicle exceeds 6 mph (9 km/h).

Brake System Intervention

When active park assist is controlling the
steering, it could under certain conditions
apply the brakes to slow or stop your
vehicle.

Note:

This could cause the parking

assistance to cancel.

ENTERING A PARALLEL
PARKING SPACE

1.

Press the active park assist button.

Note:

The system searches for parallel

parking spaces on the passenger side. Press
the active park assist button again to make
the system search for perpendicular spaces.

2. Use the direction indicator lever to

search for a parking space on the driver
or passenger side of your vehicle.

3. Drive your vehicle approximately 3 ft

(1 m) away from and parallel to the
other parked vehicles when searching
for a parking space.

Note:

 A tone sounds and a message

appears in the information display when
active park assist finds a suitable parking
space.

4. Bring your vehicle to a complete

standstill.

5. Release the steering wheel and shift

into reverse (R).

6. Drive backward and your vehicle steers

itself into the parking space.

Note:

You can slow down your vehicle at

any time by pressing the brake pedal.

7.

Follow the instructions on the
information display.

Note:

When parking is complete, a tone

sounds and an information message
appears.

ENTERING A PERPENDICULAR
PARKING SPACE

1.

Press the active park assist button
twice.

2. Use the direction indicator lever to

search for a parking space on the driver
or passenger side of your vehicle.

3. Drive your vehicle approximately 3 ft

(1 m) away from and parallel to the
other parked vehicles when searching
for a parking space.

Note:

 A tone sounds and a message

appears in the information display when
active park assist finds a suitable parking
space.

4. Bring your vehicle to a complete

standstill.

5. Release the steering wheel and shift

into reverse (R).

6. Drive backward and your vehicle steers

itself into the parking space.

Note:

You can slow down your vehicle at

any time by pressing the brake pedal.

7.

Follow the instructions on the
information display.

Note:

When parking is complete, a tone

sounds and an information message
appears.

Note:

Active park assist does not recognize

parking space lines and centers your vehicle
between objects.

Note:

When the system detects only one

object, it allows enough distance to open
the door on either side.

272

Active Park Assist

EXITING A PARKING SPACE

The system assists leaving only parallel
parking spaces.

1.

Press the active park assist button.

2. Use the turn signal lever to choose the

direction to leave.

3. Release the steering wheel and shift

into reverse (R).

4. Follow the instructions on the

information display.

Note:

You can slow down your vehicle at

any time by pressing the brake pedal.

Note:

After the system drives your vehicle

to a position where you can exit the parking
space in a forward movement, a message
appears instructing you to take full control
of your vehicle.

ACTIVE PARK ASSIST –
TROUBLESHOOTING

ACTIVE PARK ASSIST –
INFORMATION MESSAGES

Action

Message

The system

requires service.

Have your vehicle

checked as soon as

possible.

Active Park Fault

ACTIVE PARK ASSIST –
FREQUENTLY ASKED QUESTIONS

Why does active park assist not
operate correctly?

The system is unable to detect a
vehicle, curb or object to park next to
or in between. The system needs
boundary objects to operate correctly.

Why does active park assist not search
for a parking space?

You have switched traction control off.

Why does active park assist not search
for a parking space?

The transmission is in reverse (R). Your
vehicle must be moving forward to be
able to detect a parking space.

Why does active park assist not offer
a parking space?

The sensors could be blocked. For
example, snow, ice or large
accumulations of dirt. Blocked sensors
can affect how the system functions.

Why does active park assist not offer
a parking space?

The sensors in the front or rear bumper
could be damaged.

Why does active park assist not offer
a parking space?

There is not enough room in the
parking space for your vehicle to safely
park.

Why does active park assist not offer
a parking space?

There is not enough space for the
parking maneuver on the opposite side
of the parking space.

Why does active park assist not offer
a parking space?

The parking space is more than 5 ft
(1.5 m) or less than 2 ft (0.5 m) away
from your vehicle.

Why does active park assist not offer
a parking space?

Your vehicle's speed is greater than
22 mph (35 km/h) for parallel parking
or greater than 19 mph (30 km/h) for
perpendicular parking.

273

Active Park Assist

Why does active park assist not offer
a parking space?

You recently disconnected or replaced
the battery. After you reconnect the
battery you must drive your vehicle on
a straight road for a short period of
time.

Why does active park assist not
correctly position the vehicle into a
parking space?

An irregular curb along the parking
space prevents the system from
correctly aligning your vehicle.

Why does active park assist not
correctly position the vehicle into a
parking space?

Vehicles or objects bordering the
space could not be correctly parked.

Why does active park assist not
correctly position the vehicle into a
parking space?

Your vehicle stopped too far past the
parking space.

Why does active park assist not
correctly position the vehicle into a
parking space?

The tires are not correctly installed or
maintained. For example, using a spare
tire, not inflated correctly, improper
size, or of different sizes.

Why does active park assist not
correctly position the vehicle into a
parking space?

A repair or alteration changed the
detection capabilities.

Why does active park assist not
correctly position the vehicle into a
parking space?

A parked vehicle has a high
attachment. For example, a salt
sprayer, snowplow or moving truck
bed.

Why does active park assist not
correctly position the vehicle into a
parking space?

The parking space length, or position
of parked objects, changes after your
vehicle passes the space.

Why does active park assist not
correctly position the vehicle into a
parking space?

The temperature around your vehicle
quickly changes. For example, driving
from a heated garage into a cold
outside temperature, or after leaving
a car wash.

274

Active Park Assist

WHAT IS CRUISE CONTROL

Cruise control lets you maintain a set
speed without keeping your foot on the
accelerator pedal.

Requirements

Use cruise control when the vehicle speed
is greater than 15 mph in imperial units and
20 km/h in metric units.

SWITCHING CRUISE CONTROL
ON AND OFF

WARNING: 

Do not use cruise

control on winding roads, in heavy traffic
or when the road surface is slippery. This
could result in loss of vehicle control,
serious injury or death.

The cruise controls are on the steering
wheel.

Switching Cruise Control On

E71340

Press the button to put the
system in standby mode.

Switching Cruise Control Off

E71340

Press the button when in
standby mode or switch the
ignition off.

Note:

When you switch cruise control off

the set speed clears.

SETTING THE CRUISE
CONTROL SPEED

WARNING: 

When you are going

downhill, your vehicle speed could
increase above the set speed. The
system does not apply the brakes.

Drive to the speed you prefer.

Press the buttons to set the
current speed.

Take your foot off the accelerator pedal.

Note:

The set speed appears in the

instrument cluster display.

Changing the Set Speed

Press the button to increase the
set speed in small increments.
Press and hold the button to

accelerate. Release the button when you
have reached your preferred speed.

Press the button to decrease the
set speed in small increments.
Press and hold the button to

decelerate. Release the button when you
have reached your preferred speed.

Note:

 If you accelerate by pressing the

accelerator pedal, the set speed does not
change.  When you release the accelerator
pedal, your vehicle returns to the speed that
you previously set.

CANCELING THE SET SPEED

Press the button, or tap the
brake pedal to cancel the set
speed.

275

Cruise Control

Note:

The system remembers the set

speed.

Note:

The system cancels if the vehicle

speed drops below 10 mph (16 km/h) under
the set speed when driving uphill.

RESUMING THE SET SPEED

Press the button.

CRUISE CONTROL
INDICATORS

E71340

Illuminates when you switch the
system on.

276

Cruise Control


Content      ..     14      15      16      17     ..