Mercury Marauder (2004 year). Manual - part 5


  Index      Mercury     Mercury Marauder (2004 year) - manual in english


Search            copyright infringement  


Content      ..     3      4      5      6     ..


Mercury Marauder (2004 year). Manual - part 5


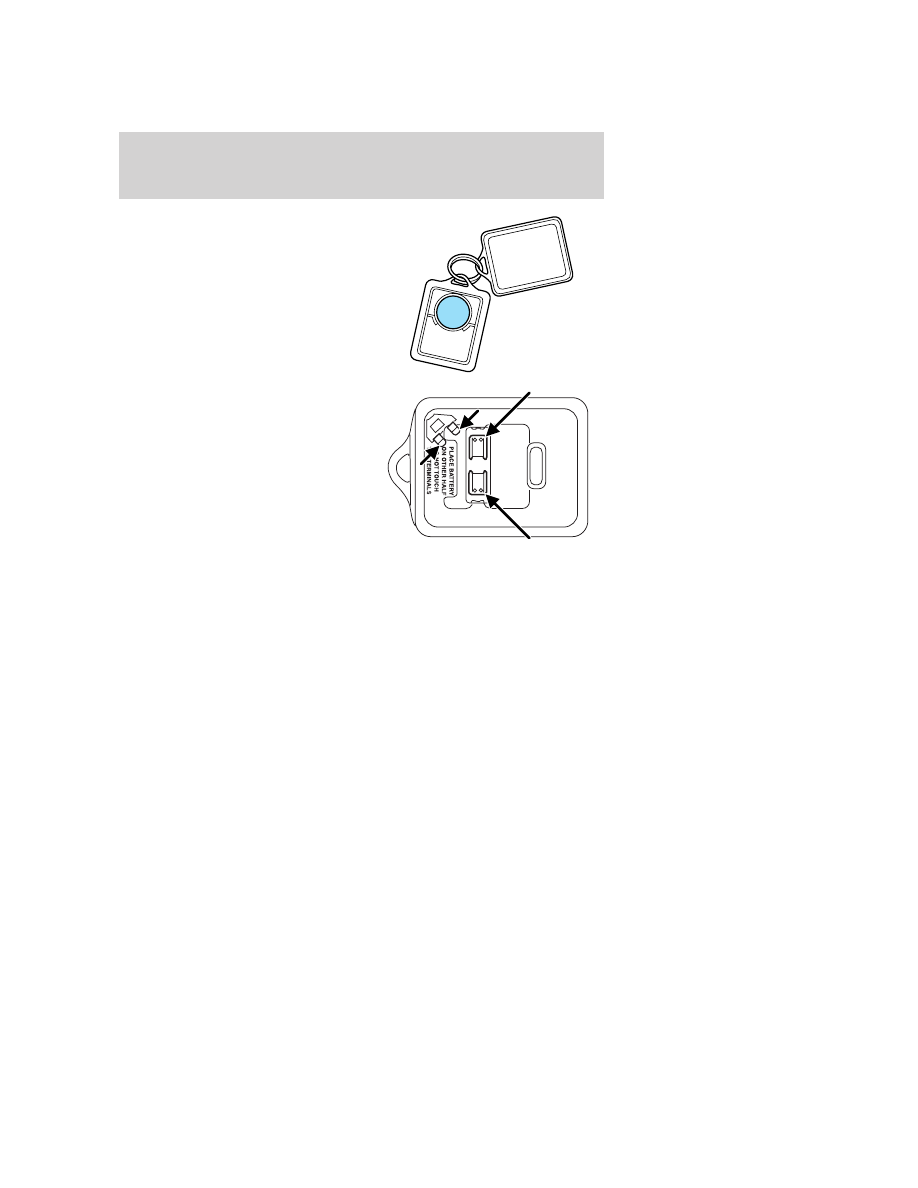
To replace the battery:

1. Twist a thin coin between the two
halves of the remote entry
transmitter near the key ring. DO
NOT TAKE THE RUBBER COVER
AND CIRCUIT BOARD OFF THE
FRONT HOUSING OF THE
REMOTE ENTRY TRANSMITTER.

2. Do not wipe off any grease on the
battery terminals on the back
surface of the circuit board.

3. Remove the old battery. Note: Please refer to local regulations when
disposing of transmitter batteries.

4. Insert the new battery. Refer to the diagram inside the remote entry
transmitter for the correct orientation of the battery. Press the battery
down to ensure that the battery is fully seated in the battery housing
cavity.

5. Snap the two halves back together.

Note: Replacement of the battery will not cause the remote transmitter
to become deprogrammed from your vehicle. The remote transmitter
should operate normally after battery replacement.

2004 Marauder (mdr)
Owners Guide (post-2002-fmt)
USA English 
(fus)

Locks and Security

65

-------------------------------------------------------------------------------------------------------------------------------------------------------------

Replacing lost transmitters

Take all your vehicle’s transmitters
to your dealer if service is required.

If a remote transmitter has been lost
and you would like to remove it
from the vehicle’s memory, or you
would like to purchase additional
remote transmitters and have them
programmed to your vehicle:
• Take all your vehicle’s

transmitters to your dealer for
programming, or

• Perform the following programming procedure yourself:
Place the key in the ignition and
turn from 2 (LOCK) to 3 (OFF) and
cycle between 3 (OFF) and 4 (ON)
four times in rapid succession within
3 seconds. After doors lock/unlock,
press any control on all transmitters
(up to four). When completed, turn
the ignition to 3 (OFF).

All transmitters must be
programmed at the same time.
• When completed, turn the ignition to the 3 (OFF) position and wait at

least 20 seconds in order to use the recently programmed
transmitter(s).

• All transmitters must be programmed during the same programming

cycle. A transmitter that is not programmed within the same
programming cycle will be erased and will no longer operate your
vehicle’s locks. If this occurs, you will have to reprogram all the
transmitters again, as you cannot just “add” a transmitter.

Illuminated entry

The interior lamps illuminate:
• when the remote entry system is used to unlock the door(s) or sound

the panic alarm, or

• when the driver door is unlocked using the key in the driver door key

cylinder.

The system automatically turns off after 25 seconds after the UNLOCK
button on the RUN or ACC position.

3

1

2

5

4

2004 Marauder (mdr)
Owners Guide (post-2002-fmt)
USA English 
(fus)

Locks and Security

66

-------------------------------------------------------------------------------------------------------------------------------------------------------------

The inside lights will not turn off if:
• they have been turned on with the dimmer control, or
• any door is open.
The battery saver will shut off the interior lamps 10 minutes after the
ignition is turned off. Demand lighting will turn off after 30 minutes.

Autolock

This feature automatically locks all vehicle doors when:
• all doors are closed,
• the ignition is in the ON position,
• the brake pedal is depressed and
• you shift into any gear.

Relock

The autolock feature repeats when:
• the ignition is in the ON position,
• a door is open and then closed,
• the transmission is placed in Reverse or any Drive gear, and then
• the brake pedal is depressed and then released.

Deactivating/activating the autolock feature

Before following the procedure, make sure that the ignition is OFF and
all vehicle doors are closed.

Automatic door locks can be turned on/off with the keyless entry keypad
through the following procedure:

You must complete steps 1-5 within 30 seconds or the procedure will
have to be repeated. If the procedure needs to be repeated, you must
wait 30 seconds.

1. Enter the keyless entry keypad factory code.

2. Within 5 seconds, press and hold control 7/8.

3. Within 5 seconds (while holding down control 7/8), press and release
control 3/4.

4. Release control 7/8.

The door will lock/unlock to confirm the feature has been disabled. Once
disabled, the feature can be enabled by repeating the same sequence.

2004 Marauder (mdr)
Owners Guide (post-2002-fmt)
USA English 
(fus)

Locks and Security

67

-------------------------------------------------------------------------------------------------------------------------------------------------------------

Automatic door locks can also be turned on/off through the following
procedure:

You must complete steps 1-7 within 30 seconds or the procedure will
have to be repeated. If the procedure needs to be repeated, you must
wait 30 seconds.

1. Turn the ignition key to ON.

2. Press the power door unlock control on the door panel three times.

3. Turn the ignition key from ON to OFF.

4. Press the power door unlock control three times.

5. Turn the ignition back to ON.

6. Press the unlock control once. After a five to ten second delay, the
door will lock/unlock to confirm successful programming.

7. Turn the ignition to OFF.

KEYLESS ENTRY SYSTEM

With the keyless entry keypad, you
can:
• lock or unlock the vehicle doors

without using the key.

• open the trunk.
See also Remote entry system in this chapter for more information.

Your vehicle has a factory-set 5–digit code that operates the keyless
entry system. You can also program your own 5–digit personal entry
code.

The factory-set code is located:
• On the owner’s wallet card in the glove compartment,
• Taped to the computer module, or
• At your dealer.
When using the keyless entry keypad, press the middle of each button in
order to ensure a good activation.

Programming a personal entry code

You can program up to three personal codes to unlock your vehicle.
These codes do not replace the permanent code that the dealership gave
you.

1 2

3 4

5 6

7 8

9 0

2004 Marauder (mdr)
Owners Guide (post-2002-fmt)
USA English 
(fus)

Locks and Security

68

-------------------------------------------------------------------------------------------------------------------------------------------------------------

To create your own personal entry code:

1. Enter the factory set code. Note: The keypad will illuminate when
pressed.

2. Within five seconds press 1

• 2 on the keypad to enter the

programming mode.

3. Enter your personal 5-digit code. Each number must be entered
within five seconds of each other.

4. Press 1

• 2 to store the first personal code.

5. The doors will lock then unlock to confirm programming of the new
code.

To store a second personal code:

1. Enter the factory set code.

2. Within five seconds press 1

• 2 on the keypad to enter the

programming mode.

3. Enter a second personal 5-digit code. Each number must be entered
within five seconds of each other.

4. Press 3

• 4 to store the second personal code.

5. The doors will again lock then unlock to confirm programming of the
new code.

To store a third personal code:

1. Enter the factory set code.

2. Within five seconds press 1

• 2 on the keypad to enter the

programming mode.

3. Enter a third personal 5-digit code. Each number must be entered
within five seconds of each other.

4. Press 5

• 6 (or 7 • 8, or 9 • 0, or wait five seconds) to store the third

personal code.

5. The doors will again lock then unlock to confirm programming of the
new code.

Tips:
• Do not set a code that uses five of the same number.
• Do not use five numbers in sequential order.
• The factory set code will work even if you have set your own personal

code.

• If you set a second personal code it will erase your first personal code.

2004 Marauder (mdr)
Owners Guide (post-2002-fmt)
USA English 
(fus)

Locks and Security

69

-------------------------------------------------------------------------------------------------------------------------------------------------------------

Erasing personal code

To erase all of the personal entry codes programmed to a vehicle:

1. Enter the factory-set code.

2. Press and release 1

• 2 within 5 seconds of step 1.

3. Press and hold 1

• 2 for two seconds. All of the vehicle doors will lock

and then unlock to confirm erasure.

Unlocking the doors and releasing the trunk with the keyless entry
system

To unlock the driver door, enter either the factory-set code or personal
code (each digit pressed within 5 seconds of prior digit). The interior
lamps will illuminate.
• To unlock all doors, enter the factory-set code or personal code

(driver door unlocks) and press 3

• 4 within five seconds.

• To release the trunk, enter the factory-set code or personal code

(driver door unlocks) and press 5

• 6 within five seconds.

After the factory-set code or personal code has been entered, you can
unlock all doors (press 3

• 4) and release the trunk (press 5 • 6) as

long as the controls are pressed within 5 seconds of each other.

Locking doors with the keyless entry system

It is not necessary to enter the factory-set code prior to locking all doors.
To lock the doors, press 7

• 8 and press 9 • 0 at the same time.

SECURILOCK

Y

PASSIVE ANTI-THEFT SYSTEM

SecuriLock

y passive anti-theft system is an engine immobilization

system. This system is designed to prevent the engine from being started
unless a coded key programmed to your vehicle is used.

The SecuriLock

y passive anti-theft system is not compatible with

non-Ford aftermarket remote start systems. Use of these systems may
result in vehicle starting problems and a loss of security protection.

THEFT INDICATOR

The theft indicator is the flashing red indicator located on the dash
panel.
• When the ignition is in the 1 (OFF/LOCK) position, the indicator will

flash once every 2 seconds to indicate the SecuriLock

y system is

functioning as a theft deterrent.

• When the ignition is in the 3 (ON) position, the indicator will glow for

3 seconds to indicate normal system functionality.

2004 Marauder (mdr)
Owners Guide (post-2002-fmt)
USA English 
(fus)

Locks and Security

70

-------------------------------------------------------------------------------------------------------------------------------------------------------------

If a problem occurs with the SecuriLock

y system, the indicator will flash

rapidly or glow steadily when the ignition is in the 3 (ON) position. If
this occurs, the vehicle should be taken to an authorized dealer for
service.

Automatic arming

The vehicle is armed immediately
after switching the ignition to the 3
(OFF) or 2 (LOCK) position. The
indicator on the instrument panel
will flash every two seconds when
the vehicle is armed.

Automatic disarming

Switching the ignition to the 4 (ON) position with a coded key disarms
the vehicle. The indicator on the instrument will illuminate for three
seconds and then go out. If the indicator stays on for an extended period
of time or flashes rapidly, have the system serviced by your dealership or
a qualified technician.

Key information

Your vehicle is supplied with two coded keys (or three, if your vehicle
is equipped with the valet feature). Only a coded key will start your
vehicle. Spare coded keys can be purchased from your dealership. Your
dealership can program your key or you can “do it yourself.” Refer to
Programming spare keys.

The following items may prevent the vehicle from starting:
• Large metallic objects
• Electronic devices on the key chain that can be used to purchase

gasoline or similar items

• A second key on the same key ring as the coded key

3

2

1

5

4

2004 Marauder (mdr)
Owners Guide (post-2002-fmt)
USA English 
(fus)

Locks and Security

71

-------------------------------------------------------------------------------------------------------------------------------------------------------------

If any of these items are present, you need to keep these objects from
touching the coded key while starting the engine. These objects and
devices cannot damage the coded key, but can cause a momentary “no
start” condition if they are too close to the key during engine start. If a
problem occurs, turn ignition OFF and restart the engine with all other
objects on the key ring held away from the ignition key. Check to make
sure the coded key is an approved Ford coded key.

If your keys are lost or stolen you will need to do the following:
• Use your spare key to start the vehicle, or
• Have your vehicle towed to a dealership or a locksmith. The key codes

will need to be erased from your vehicle and new key codes will need
to be re-coded.

Replacing coded keys can be very costly and you may want to store an
extra programmed key away from the vehicle in a safe place to prevent
an unforeseen inconvenience.

The correct coded key must be used for your vehicle. The use of the
wrong type of coded key may lead to a “no start” condition.

If an unprogrammed key is used in the ignition it will cause a “no
start” condition.

Programming spare keys

A maximum of eight keys can be coded to your vehicle. Only
SecuriLock

y keys can be used. To program a coded key yourself, you

will need two previously programmed coded keys (keys that already
operate your vehicle’s engine) and the new unprogrammed key(s) readily
accessible for timely implementation of each step in the procedure.

If two previously programmed coded keys are not available, you must
bring your vehicle to your dealership to have the spare coded key(s)
programmed.

Please read and understand the entire procedure before you begin.

2004 Marauder (mdr)
Owners Guide (post-2002-fmt)
USA English 
(fus)

Locks and Security

72

-------------------------------------------------------------------------------------------------------------------------------------------------------------

1. Insert the first previously
programmed coded key into the
ignition and turn the ignition from 3
(OFF) to 4 (ON) (maintain ignition
in 4 (ON) for at least one second).

2. Turn ignition to 3 (OFF) then 2
(LOCK) and remove the first coded
key 
from the ignition.

3. Within ten seconds of removing
the first coded key, insert the
second previously programmed coded key into the ignition and turn the
ignition from 3 (OFF) to 4 (ON) (maintain ignition in 4 (ON) for at least
one second but no more than ten seconds).

4. Turn the ignition to 3 (OFF) then 2 (LOCK) and remove the second
coded key from the ignition.

5. Within twenty seconds of removing the second coded key, insert the
new unprogrammed key (new key) into the ignition and turn the ignition
from 3 (OFF) to 4 (ON) (maintain ignition in 4 (ON) for at least one
second). This step will program your new key to a coded key.

6. To program additional new unprogrammed key(s), repeat this
procedure from step 1.

If successful, the new coded key(s) will start the vehicle’s engine and the
theft indicator will illuminate for three seconds and then go out.

If not successful, the new coded key(s) will not start the vehicle’s engine
and the theft indicator will flash on and off and you may repeat steps 1
through 6. If failure repeats, bring your vehicle to your dealership to
have the new spare key(s) programmed.

3

2

1

5

4

2004 Marauder (mdr)
Owners Guide (post-2002-fmt)
USA English 
(fus)

Locks and Security

73

-------------------------------------------------------------------------------------------------------------------------------------------------------------

SEATING

Adjustable head restraints

Your vehicle’s seats are equipped with head restraints which are
vertically adjustable. The purpose of these head restraints is to help limit
head motion in the event of a rear collision. To properly adjust your head
restraints, lift the head restraint so that it is located directly behind your
head or as close to that position as possible. Refer to the following to
raise and lower the head restraints.

The head restraints can be moved
up and down.

Push control to lower head restraint.

Using the power lumbar support

The power lumbar control is located
on the front inboard side of the
seat.

Press one side of the control to
adjust firmness.

Press the other side of the control
to adjust softness.

2004 Marauder (mdr)
Owners Guide (post-2002-fmt)
USA English 
(fus)

Seating and Safety Restraints

Seating and Safety Restraints

74

-------------------------------------------------------------------------------------------------------------------------------------------------------------

Heated seats (if equipped)

To operate the heated seats:
• Push the indicated side of the

control for maximum heat.

• Push again to deactivate.

• Push the indicated side of the

control for minimum heat.

• Push again to deactivate.

The heated seat module resets at every ignition run cycle. While the
ignition is in the run position, activating the high or low heated seat
switch enables heating mode. When activated, they will turn off
automatically when the ignition is turned to the OFF position.

The indicator light will illuminate when the heated seats have been
activated.

Adjusting the power front seats – door mounted controls
(if equipped)

The controls for the power seats are located on the inside of each front
door.

Never adjust the driver’s seat or seatback when the vehicle is
moving.

Do not pile cargo higher than the seatbacks to avoid injuring
people in a collision or sudden stop.

Always drive and ride with your seatback upright and the lap
belt snug and low across the hips.

2004 Marauder (mdr)
Owners Guide (post-2002-fmt)
USA English 
(fus)

Seating and Safety Restraints

75

-------------------------------------------------------------------------------------------------------------------------------------------------------------

Reclining the seatback can cause an occupant to slide under the
seat’s safety belt, resulting in severe personal injuries in the

event of a collision.

Press the control to recline the
seatback forward or backward.

Press to move the seat forward or
backward.

Press to move the front portion of
the seat cushion up or down.

2004 Marauder (mdr)
Owners Guide (post-2002-fmt)
USA English 
(fus)

Seating and Safety Restraints

76

-------------------------------------------------------------------------------------------------------------------------------------------------------------

Press to move the rear portion of
the seat cushion up or down.

SAFETY RESTRAINTS

Personal Safety System

The Personal Safety System provides an improved overall level of frontal
crash protection to front seat occupants and is designed to help further
reduce the risk of air bag-related injuries. The system is able to analyze
different occupant conditions and crash severity before activating the
appropriate safety devices to help better protect a range of occupants in
a variety of frontal crash situations.

Your vehicle’s Personal Safety System consists of the following items:
• Driver and passenger dual-stage air bag supplemental restraints
• Driver and front passenger side air bags (if equipped)
• Front safety belts with pretensioners, energy management retractors,

and safety belt usage sensors

• Driver’s seat position sensor
• Front crash severity sensor
• Restraints Control Module (RCM) with impact and safing sensors
• Restraint system warning light and back-up tone
• The electrical wiring for the air bags, crash sensor(s), safety belt

pretensioners, front safety belt usage sensors, driver seat position
sensor, and indicator lights

2004 Marauder (mdr)
Owners Guide (post-2002-fmt)
USA English 
(fus)

Seating and Safety Restraints

77

-------------------------------------------------------------------------------------------------------------------------------------------------------------

How does the Personal Safety System work?

The Personal Safety System can adapt the deployment strategy of your
vehicle’s safety devices according to crash severity and occupant
conditions. A collection of crash and occupant sensors provides
information to the Restraints control module (RCM). During a crash, the
RCM activates the safety belt pretensioners and/or either one or both
stages of the dual-stage air bag supplemental restraints based on crash
severity and occupant conditions.

The fact that the pretensioners or air bags did not activate for both front
seat occupants in a collision does not mean that something is wrong with
the system. Rather, it means the Personal Safety System determined the
accident conditions (crash severity, belt usage, etc.) were not
appropriate to activate these safety devices. Front air bags and
pretensioners are designed to activate only in frontal and near-frontal
collisions, not rollovers, side-impacts, or rear-impacts unless the collision
causes sufficient longitudinal deceleration.

Driver and passenger dual-stage air bag supplemental restraints

The dual-stage air bags offer the capability to tailor the level of air bag
inflation energy. A lower, less forceful energy level is provided for more
common, moderate-severity impacts. A higher energy level is used for
the most severe impacts. Refer to Air bag supplemental restraints
section in this chapter.

Front crash severity sensor

The front crash severity sensor enhances the ability to detect the
severity of an impact. Positioned up front, it provides valuable
information early in the crash event on the severity of the impact. This
allows your Personal Safety System to distinguish between different
levels of crash severity and modify the deployment strategy of the
dual-stage air bags and safety belt pretensioners.

Driver’s seat position sensor

The driver’s seat position sensor allows your Personal Safety System to
tailor the deployment level of the driver dual-stage air bag based on seat
position. The system is designed to help protect smaller drivers sitting
close to the driver air bag by providing a lower air bag output level.

Front safety belt usage sensors

The front safety belt usage sensors detect whether or not the driver and
front outboard passenger safety belts are fastened. This information
allows your Personal Safety System to tailor the air bag deployment and

2004 Marauder (mdr)
Owners Guide (post-2002-fmt)
USA English 
(fus)

Seating and Safety Restraints

78

-------------------------------------------------------------------------------------------------------------------------------------------------------------

safety belt pretensioner activation depending upon safety belt usage.
Refer to Safety belt section in this chapter.

Front safety belt pretensioners

The safety belt pretensioners at the front outboard seating positions are
designed to tighten the safety belts firmly against the occupant’s body
during a frontal or near-frontal collision. This maximizes the effectiveness
of the safety belts and helps properly position the occupant relative to
the air bag to improve protection. The safety belt pretensioners can be
either activated alone or, if the collision is of sufficient severity, together
with the air bags.

Front safety belt energy management retractors

The front outboard safety belt energy management retractors allow
webbing to be pulled out of the retractor in a gradual and controlled
manner in response to the occupant’s forward momentum. This helps
reduce the risk of force-related injuries to the occupant’s chest by
limiting the load on the occupant. Refer to Energy management feature
section in this chapter.

Determining if the Personal Safety System is operational

The Personal Safety System uses a warning light in the instrument
cluster or a back-up tone to indicate the condition of the system. Refer
to the Warning light section in the Instrument cluster chapter. Routine
maintenance of the Personal Safety System is not required.

The Restraints control module (RCM) monitors its own internal circuits
and the circuits for the air bag supplemental restraints, crash sensor(s),
safety belt pretensioners, front safety belt buckle sensors, and the driver
seat position sensor. In addition, the RCM also monitors the restraints
warning light in the instrument cluster. A difficulty with the system is
indicated by one or more of the following.
• The warning light will either flash or stay lit.
• The warning light will not illuminate immediately after ignition is

turned on.

• A series of five beeps will be heard. The tone pattern will repeat

periodically until the problem and warning light are repaired.

If any of these things happen, even intermittently, have the Personal
Safety System serviced at your dealership or by a qualified technician
immediately. Unless serviced, the system may not function properly in
the event of a collision.

2004 Marauder (mdr)
Owners Guide (post-2002-fmt)
USA English 
(fus)

Seating and Safety Restraints

79

-------------------------------------------------------------------------------------------------------------------------------------------------------------

Safety restraints precautions

Always drive and ride with your seatback upright and the lap
belt snug and low across the hips.

To reduce the risk of injury, make sure children sit in the back
seat where they can be properly restrained.

Never let a passenger hold a child on his or her lap while the
vehicle is moving. The passenger cannot protect the child from

injury in a collision.

All occupants of the vehicle, including the driver, should always
properly wear their safety belts, even when an air bag

supplemental restraint system (SRS) is provided.

It is extremely dangerous to ride in a cargo area, inside or
outside of a vehicle. In a collision, people riding in these areas

are more likely to be seriously injured or killed. Do not allow people to
ride in any area of your vehicle that is not equipped with seats and
safety belts. Be sure everyone in your vehicle is in a seat and using a
safety belt properly.

In a rollover crash, an unbelted person is significantly more likely
to die than a person wearing a safety belt.

Each seating position in your vehicle has a specific safety belt
assembly which is made up of one buckle and one tongue that

are designed to be used as a pair. 1) Use the shoulder belt on the
outside shoulder only. Never wear the shoulder belt under the arm. 2)
Never swing the safety belt around your neck over the inside shoulder.
3) Never use a single belt for more than one person.

Always transport children 12 years old and under in the back
seat and always properly use appropriate child restraints.

2004 Marauder (mdr)
Owners Guide (post-2002-fmt)
USA English 
(fus)

Seating and Safety Restraints

80

-------------------------------------------------------------------------------------------------------------------------------------------------------------


Content      ..     3      4      5      6     ..