Mercury Marauder (2004 year). Manual - part 4
 

  Index      Mercury     Mercury Marauder (2004 year) - manual in english


Search            copyright infringement  


Content      ..     2      3      4      5     ..


Mercury Marauder (2004 year). Manual - part 4


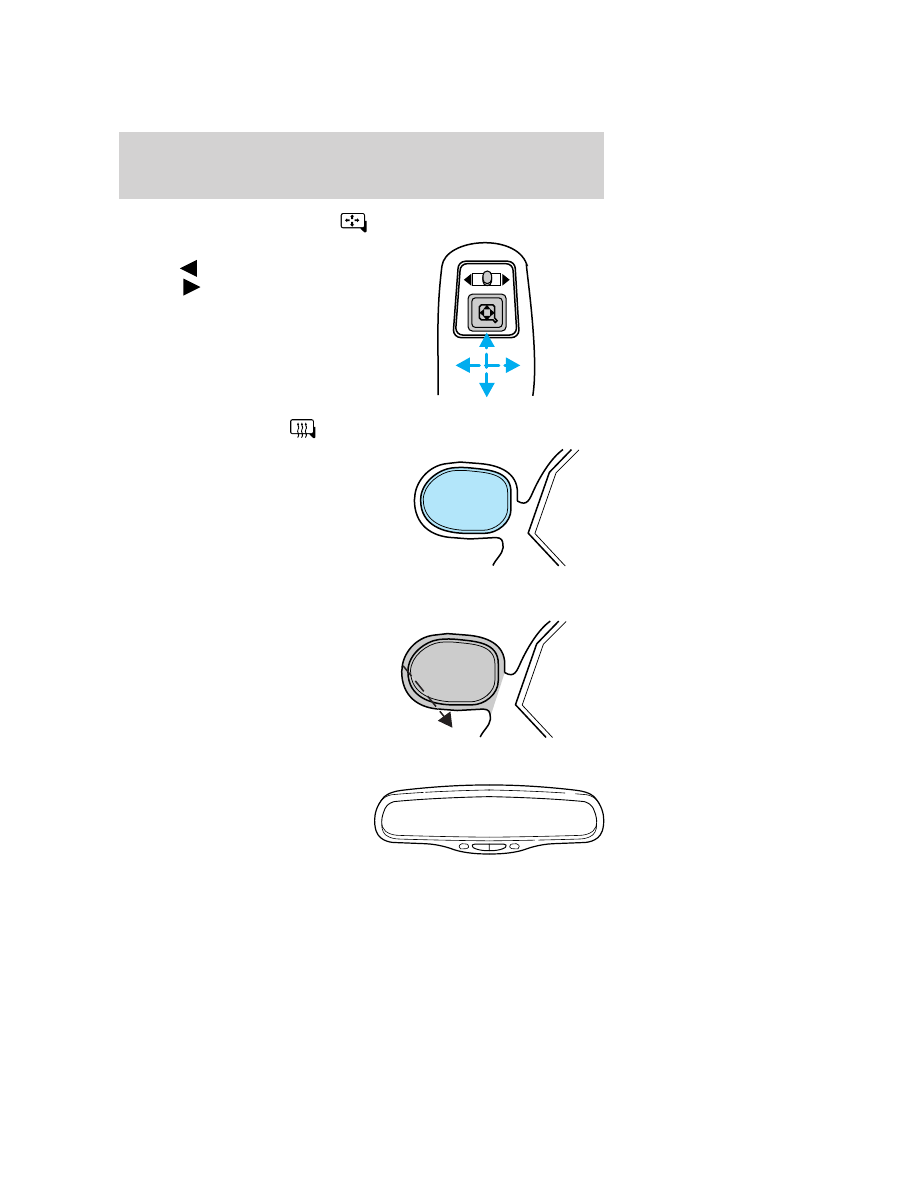
POWER SIDE VIEW MIRRORS

To adjust your mirrors:

1. Select

to adjust the left

mirror or

to adjust the right

mirror.

2. Move the control in the direction
you wish to tilt the mirror.

3. Return to the center position to
lock mirrors in place.

Heated outside mirrors

Both mirrors are heated
automatically to remove ice, mist
and fog when the rear window
defrost is activated.

Do not remove ice from the
mirrors with a scraper or
attempt to readjust the mirror
glass if it is frozen in place.
These actions could cause damage to the glass and mirrors.

Fold-away mirrors

Pull the side mirrors in carefully
when driving through a narrow
space, like an automatic car wash.

Automatic dimming inside rear view mirrors

Your vehicle is equipped with an
inside rear view mirror with an
auto-dimming function. The
electronic day/night mirror will
change from the normal state to the
non-glare state when bright lights

OFF

AUTO

2004 Marauder (mdr)
Owners Guide (post-2002-fmt)
USA English 
(fus)

Driver Controls

49

-------------------------------------------------------------------------------------------------------------------------------------------------------------

(glare) reach the mirror. When the mirror detects bright light from
behind the vehicle, it will automatically adjust (darken) to minimize
glare.

The mirror will automatically return to the normal state whenever the
vehicle is placed in R (Reverse)(when the mirror is on) to ensure a
bright clear view when backing up.

Do not block the sensor on the backside of the inside rear view mirror
since this may impair proper mirror performance.

Press the control to turn the mirror OFF or AUTO.

POWER ADJUSTABLE FOOT PEDALS

The accelerator and brake pedal
should only be adjusted when the
vehicle is stopped and the gearshift
lever is in the P (Park) position.

Press and hold the rocker control to
adjust accelerator and brake pedal.
• Press the right side of the control to adjust the pedals toward you.
• Press the left side of the control to adjust the pedals away from you.
The adjustment allows for approximately 65 mm (2.5 inches) of
maximum travel.

Never adjust the accelerator and brake pedal with feet on the
pedals while the vehicle is moving.

SPEED CONTROL

With speed control set, you can maintain a speed of 48 km/h (30 mph)
or more without keeping your foot on the accelerator pedal. Speed
control does not work at speeds below 48 km/h (30 mph).

Do not use the speed control in heavy traffic or on roads that
are winding, slippery or unpaved.

2004 Marauder (mdr)
Owners Guide (post-2002-fmt)
USA English 
(fus)

Driver Controls

50

-------------------------------------------------------------------------------------------------------------------------------------------------------------

Setting speed control

The controls for using your speed
control are located on the steering
wheel for your convenience.

1. Press the ON control and release
it.

2. Accelerate to the desired speed.

3. Press the SET ACCEL control
and release it.

4. Take your foot off the accelerator
pedal.

Note:
• Vehicle speed may vary when driving up and down a steep hill.
• If the vehicle speed increases above the set speed on a downhill, you

may want to apply the brakes to reduce the speed.

• If the vehicle speed decreases more than 16 km/h (10 mph) below

your set speed on an uphill, your speed control will disengage.

Disengaging speed control

To disengage the speed control:
• Depress the brake pedal
Disengaging the speed control will not erase previous set speed.

Resuming a set speed

Press the RESUME control and
release it. This will automatically
return the vehicle to the previously
set speed. The RESUME control will
not work if the vehicle speed is not
faster than 48 km/h (30 mph).

2004 Marauder (mdr)
Owners Guide (post-2002-fmt)
USA English 
(fus)

Driver Controls

51

-------------------------------------------------------------------------------------------------------------------------------------------------------------

Increasing speed while using speed control

There are two ways to set a higher
speed:
• Press and hold the SET ACCEL

control until you get to the
desired speed, then release the
control. You can also use the SET
ACCEL control to operate the
Tap-Up function. Press and
release this control to increase the vehicle set speed in small amounts
by 1.6 km/h (1 mph).

• Use the accelerator pedal to get to the desired speed. When the

vehicle reaches that speed press and release the SET ACCEL control.

Reducing speed while using speed control

There are two ways to reduce a set
speed:
• Press and hold the COAST

control until you get to the
desired speed, then release the
control. You can also use the
COAST control to operate the
Tap-Down function. Press and
release this control to decrease the vehicle set speed in small amounts
by 1.6 km/h (1 mph).

• Depress the brake pedal until the

desired vehicle speed is reached,
press the SET ACCEL control.

Turning off speed control

There are two ways to turn off the speed control:
• Depress the brake pedal. This will not erase your vehicle’s previously

set speed.

2004 Marauder (mdr)
Owners Guide (post-2002-fmt)
USA English 
(fus)

Driver Controls

52

-------------------------------------------------------------------------------------------------------------------------------------------------------------

• Press the speed control OFF

control.

Note: When you turn off the speed
control or the ignition, your speed
control set speed memory is erased.

STEERING WHEEL CONTROLS

Radio control features

• Press MODE to select AM, FM1,

FM2, TAPE or CD (if equipped).

In Radio mode:
• Press NEXT to select a preset

station from memory.

In Tape mode:
• Press NEXT to listen to the next

selection on the tape.

In CD mode:
• Press NEXT to listen to the next

track on the disc.

In any mode:
• Press VOL up or down to adjust

the volume.

Climate control features

• Press TEMP up or down to adjust temperature.
• Press FAN up or down to adjust fan speed.

NEXT

MODE

2004 Marauder (mdr)
Owners Guide (post-2002-fmt)
USA English 
(fus)

Driver Controls

53

-------------------------------------------------------------------------------------------------------------------------------------------------------------

MOON ROOF (IF EQUIPPED)

To open the moon roof:
• Press and hold the control

forward to raise the moon roof to
the vent position (when the glass
panel is closed).

• For one-touch operation, press

the control rearward and release;
this will fully open the moon roof.

• To stop one-touch operation at

the desired position, press the
control in any direction and
release.

To close the moon roof:
• Press and hold the control forward.
• To close from the vent position, press and hold the control rearward.

Do not let children play with the moon roof. They may seriously
hurt themselves.

HOMELINK

T

WIRELESS CONTROL SYSTEM

The HomeLink

t Wireless Control System, located on the overhead

console, provides a convenient way to replace up to three hand-held
transmitters with a single built-in device. This feature will learn the radio
frequency codes of most current transmitters to operate garage doors,
entry gate operators, security systems, entry door locks, and home or
office lighting.

When programming your HomeLink

t Wireless Control System to

a garage door or gate, be sure that people and objects are out of

the way to prevent potential harm or damage.

Do not use the HomeLink

t Wireless Control System with any garage

door opener that lacks safety stop and reverse features as required by
U.S. federal safety standards (this includes any garage door opener
model manufactured before April 1, 1982). A garage door which cannot
detect an object, signaling the door to stop and reverse, does not meet
current U.S. federal safety standards. For more information, contact
HomeLink

t at: www.homelink.com or 1–800–355–3515.

2004 Marauder (mdr)
Owners Guide (post-2002-fmt)
USA English 
(fus)

Driver Controls

54

-------------------------------------------------------------------------------------------------------------------------------------------------------------

Retain the original transmitter for use in other vehicles as well as for
future programming procedures (i.e. new HomeLink

t equipped vehicle

purchase). It is also suggested that upon the sale of the vehicle, the
programmed Homelink

t buttons be erased for security purposes, refer to

Programming in this section.

Programming

Do not program HomeLink

with the vehicle parked in the garage.

Note: Some vehicles may require the ignition switch to be turned to the
second (or “ACC”) position for programming and/or operation of the
HomeLink

t. It is also recommended that a new battery be placed in the

hand-held transmitter of the device being programmed to HomeLink

t for

quicker training and accurate transmission of the radio-frequency signal.

1. Press and hold the two outside
buttons releasing only when the red
light begins to flash after 20
seconds. Do not repeat step one to
program additional hand-held
transmitters to the remaining two
HomeLink

t buttons. This will erase

previously programmed hand-held
transmitter signals into HomeLink

t.

2. Position the end of your
hand-held transmitter 2–8 cm (1–3
inches) away from the HomeLink

t button you wish to program (located

on your overhead console) while keeping the red light in view.

3. Simultaneously press and hold
both the HomeLink

t and hand-held

transmitter button. Do not release
the buttons until step 4 has been
completed.

Some entry gates and garage door
openers may require you to replace
step 3 with procedures noted in the
“Gate Operator and Canadian
Programming” section for Canadian
residents.

4. The red light will flash slowly and then rapidly. Release both buttons
when the red light flashes rapidly. (The rapid flashing light indicates
acceptance of the hand-held transmitters’ radio frequency signals.)

2004 Marauder (mdr)
Owners Guide (post-2002-fmt)
USA English 
(fus)

Driver Controls

55

-------------------------------------------------------------------------------------------------------------------------------------------------------------

5. Press and hold the just-trained HomeLink

t button and observe the red

light. If the light is a constant red, programming is complete and your
device should activate when the HomeLink

t button is pressed and

released. Note: To program the remaining two HomeLink

t buttons,

begin with step 2 in the “Programming” section — do not repeat step 1.

Note: If the red light blinks rapidly for two seconds and then turns to a
continuous red, proceed with steps 6 through 8 to complete
programming of a rolling code equipped device.

6. At the garage door opener receiver (motor-head unit) in the garage,
locate the “learn” or “smart” button (usually near where the hanging
antenna wire is attached to the unit).

7. Press and release the “learn” or “smart” button. (The name and color
of the button may vary by manufacturer.)

Note: There are 30 seconds in which to initiate step eight.

8. Return to the vehicle and firmly press, hold for two seconds and
release the HomeLink

t button. Repeat the press/hold/release sequence

again, and, depending on the brand of the garage door opener (or other
rolling code equipped device), repeat this sequence a third time to
complete the programming.

HomeLink

t should now activate your rolling code equipped device. To

program additional HomeLink

t buttons begin with step 2 in the

“Programming” section. For questions or comments, please contact
HomeLink at www.homelink.com or 1–800–355–3515.

Operating the HomeLink

T

Wireless Control System

To operate, simply press and release
the appropriate HomeLink

t button.

Activation will now occur for the
trained product (garage door, gate
operator, security system, entry
door lock, or home or office lighting
etc.). For convenience, the
hand-held transmitter of the device
may also be used at any time. In the
event that there are still
programming difficulties, contact
HomeLink

t at www.homelink.com or 1–800–355–3515.

2004 Marauder (mdr)
Owners Guide (post-2002-fmt)
USA English 
(fus)

Driver Controls

56

-------------------------------------------------------------------------------------------------------------------------------------------------------------

Erasing HomeLink

T

buttons

To erase the three programmed
buttons (individual buttons cannot
be erased):
• Press and hold the two outer

HomeLink

t buttons until the red

indicator light begins to
flash-after 20 seconds. Release
both buttons. Do not hold for
longer that 30 seconds.

HomeLink

t is now in the train (or

learning) mode and can be programmed at any time beginning with step
2 in the “Programming” section.

Reprogramming a single HomeLink

T

button

To program a device to HomeLink

t using a HomeLinkt button previously

trained, follow these steps:

1. Press and hold the desired HomeLink

t button. Do NOT release the

button.

2. The red indicator light will begin to flash after 20 seconds. Without
releasing the HomeLink

t button, follow step 2 in the “Programming”

section.

For questions or comments, contact HomeLink

t at www.homelink.com

or 1–800–355–3515.

Gate Operator & Canadian Programming

During programming, your
hand-held transmitter may
automatically stop transmitting —
not allowing enough time for
HomeLink

t to accept the signal

from the hand-held transmitter.

After completing steps 1 and 2
outlined in the “Programming”
section, replace step 3 with the
following:

Note: If programming a garage door opener or gate operator, it is
advised to unplug the device during the “cycling” process to prevent
overheating.

2004 Marauder (mdr)
Owners Guide (post-2002-fmt)
USA English 
(fus)

Driver Controls

57

-------------------------------------------------------------------------------------------------------------------------------------------------------------

• Continue to press and hold the HomeLinkt button (note step 3 in the

“Programming” section) while you press and release — every two
seconds 
(“cycle”) your hand-held transmitter until the frequency
signal has been accepted by the HomeLink

t. The red indicator light

will flash slowly and then rapidly after HomeLink

t accepts the radio

frequency signal.

• Proceed with step 4 in the “Programming” section.

INTERIOR TRUNK CONTROL

The remote trunk release control is
located on the driver’s door trim
panel and can be operated at any
time.

You can render the switch
inoperable by locking the button
with your master key.

CELL PHONE USE

The use of Mobile Communications Equipment has become increasingly
important in the conduct of business and personal affairs. However,
drivers must not compromise their own or others’ safety when using
such equipment. Mobile Communications can enhance personal safety
and security when appropriately used, particularly in emergency
situations. Safety must be paramount when using mobile communications
equipment to avoid negating these benefits.

Mobile Communication Equipment includes, but is not limited to cellular
phones, pagers, portable email devices, in vehicle communications
systems, telematics devices and portable two-way radios.

A driver’s first responsibility is the safe operation of the vehicle.
The most important thing you can do to prevent a crash is to

avoid distractions and pay attention to the road. Wait until it is safe to
operate Mobile Communications Equipment.

2004 Marauder (mdr)
Owners Guide (post-2002-fmt)
USA English 
(fus)

Driver Controls

58

-------------------------------------------------------------------------------------------------------------------------------------------------------------

CENTER CONSOLE

Your vehicle may be equipped with a variety of console features. These
include:
• Utility compartment
• Power point (inside utility compartment storage bin)
• Cupholders
• Air vents to the rear seating positions (heat only)
• Coin holders (inside utility compartment storage bin)
• Ash tray cup (insert in left cup holder only)

Use only soft cups in the cupholder. Hard objects can injure you
in a collision.

POSITIVE RETENTION FLOOR MAT

Position the driver floor mat so that
the eyelet is over the pointed end of
the retention post and rotate
forward to lock in. Make sure that
the mat does not interfere with the
operation of the accelerator or the
brake pedal. To remove the floor
mat, reverse the installation
procedure.

2004 Marauder (mdr)
Owners Guide (post-2002-fmt)
USA English 
(fus)

Driver Controls

59

-------------------------------------------------------------------------------------------------------------------------------------------------------------

KEYS

The key operates all locks on your vehicle. In case of loss, replacement
keys are available from your dealer.

You should always carry a second key with you in a safe place in case
you require it in an emergency.

Refer to SecuriLock

Passive Anti-Theft System for more information.

POWER DOOR LOCKS

Press control to unlock all vehicle
doors.

Press control to lock all vehicle
doors.

Smart locks (if equipped)

With the key in any ignition position, and either the driver’s or
passenger’s door open, the doors cannot be locked using the power door
lock switches.

The vehicle may still be locked with the key in the ignition, and
performing one of the following actions:
• Pressing the manual lock button on the door.
• Operating the remote entry transmitter (if equipped).
• Operating the keyless entry keypad (if equipped).
• Operating the driver’s door with a key.

2004 Marauder (mdr)
Owners Guide (post-2002-fmt)
USA English 
(fus)

Locks and Security

Locks and Security

60

-------------------------------------------------------------------------------------------------------------------------------------------------------------

Childproof door locks

• When these locks are set, the

rear doors cannot be opened from
the inside.

• The rear doors can be opened

from the outside when the doors
are unlocked.

The childproof locks are located on
rear edge of each rear door and
must be set separately for each door. Setting the lock for one door will
not automatically set the lock for both doors.
• Move lock control up to engage the childproof lock.
• Move control down to disengage childproof locks.

INTERIOR LUGGAGE COMPARTMENT RELEASE

Your vehicle is equipped with a mechanical interior luggage compartment
release handle that provides a means of escape for children and adults in
the event they become locked inside the luggage compartment.

Adults are advised to familiarize themselves with the operation and
location of the release handle.

To open the luggage compartment
door (lid) from within the luggage
compartment, pull the illuminated
“T” shaped handle and push up on
the trunk lid. The handle is
composed of a material that will
glow for hours in darkness following
brief exposure to ambient light.

The “T” shaped handle will be
located either on the luggage
compartment door (lid) or inside
the luggage compartment near the
tail lamps.

2004 Marauder (mdr)
Owners Guide (post-2002-fmt)
USA English 
(fus)

Locks and Security

61

-------------------------------------------------------------------------------------------------------------------------------------------------------------

Keep vehicle doors and
luggage compartment

locked and keep keys and remote
transmitters out of a child’s reach.
Unsupervised children could lock
themselves in the trunk and risk
injury. Children should be taught
not to play in vehicles.

On hot days, the temperature in the trunk or vehicle interior can
rise very quickly. Exposure of people or animals to these high

temperatures for even a short time can cause death or serious
heat-related injuries, including brain damage. Small children are
particularly at risk.

REMOTE ENTRY SYSTEM

This device complies with part 15 of the FCC rules and with RS-210 of
Industry Canada. Operation is subject to the following two conditions:
(1) This device may not cause harmful interference, and (2) This device
must accept any interference received, including interference that may
cause undesired operation.

Changes or modifications not expressly approved by the party
responsible for compliance could void the user’s authority to
operate the equipment.

The remote entry system allows you to lock or unlock all vehicle doors
without a key.

The remote entry features operate in any ignition position except when
the vehicle is running and the transmission is not in P (park) or N
(Neutral).

If there is any potential remote keyless entry problem with your vehicle,
ensure ALL remote entry transmitters are brought to the dealership,
to aid in troubleshooting.

2004 Marauder (mdr)
Owners Guide (post-2002-fmt)
USA English 
(fus)

Locks and Security

62

-------------------------------------------------------------------------------------------------------------------------------------------------------------

Unlocking the doors

Press this control to unlock the
driver’s door. The interior lamps will
illuminate.

Press the control a second time
within five seconds to unlock all
doors.

Locking the doors

Press this control to lock all doors.

The horn will chirp and the
parklamps/taillamps will flash to
confirm the control was pressed.

Deactivating/activating the horn chirp and flash confirmation
feature

The horn chirp and flash confirmation feature can be turned on/off
through the following procedure using the power door locks:
You must complete steps 1-7 within 30 seconds or the procedure will
have to be repeated. If the procedure needs to be repeated, you must
wait 30 seconds.
1. Turn the ignition key to ON.
2. Press the power door unlock control on the door panel three times.
3. Turn the ignition key from ON to OFF.
4. Press the power door unlock control three times.
5. Turn the ignition back to ON. The door locks will cycle lock/unlock.
6. Press the unlock control twice.
7. After a five to ten second delay, the door locks will cycle lock/unlock
to confirm successful programming.

2004 Marauder (mdr)
Owners Guide (post-2002-fmt)
USA English 
(fus)

Locks and Security

63

-------------------------------------------------------------------------------------------------------------------------------------------------------------

8. Turn the ignition to OFF.

Sounding a panic alarm

Press this control to activate the
alarm.

To deactivate the alarm, press the
control again or turn the ignition to
ACC or ON.

Panic alarm will only operate with
the ignition in the OFF position.

Opening the trunk

Press the control once to open the
trunk.

Ensure that the trunk is closed and
latched before driving your vehicle.
Failure to latch the trunk may cause
objects to fall out of the trunk or
block the rear view. This feature will
not work with the transmission out
of P (Park) or N (Neutral) if the
ignition is in either the ACC or ON
position.

Replacing the battery

The remote entry transmitter uses one coin type three-volt lithium
battery CR2032 or equivalent.

2004 Marauder (mdr)
Owners Guide (post-2002-fmt)
USA English 
(fus)

Locks and Security

64

-------------------------------------------------------------------------------------------------------------------------------------------------------------


Content      ..     2      3      4      5     ..