Mercury Marauder (2004 year). Manual - part 2


  Index      Mercury     Mercury Marauder (2004 year) - manual in english


Search            copyright infringement  


Content      ..      1      2      3      ..


Mercury Marauder (2004 year). Manual - part 2


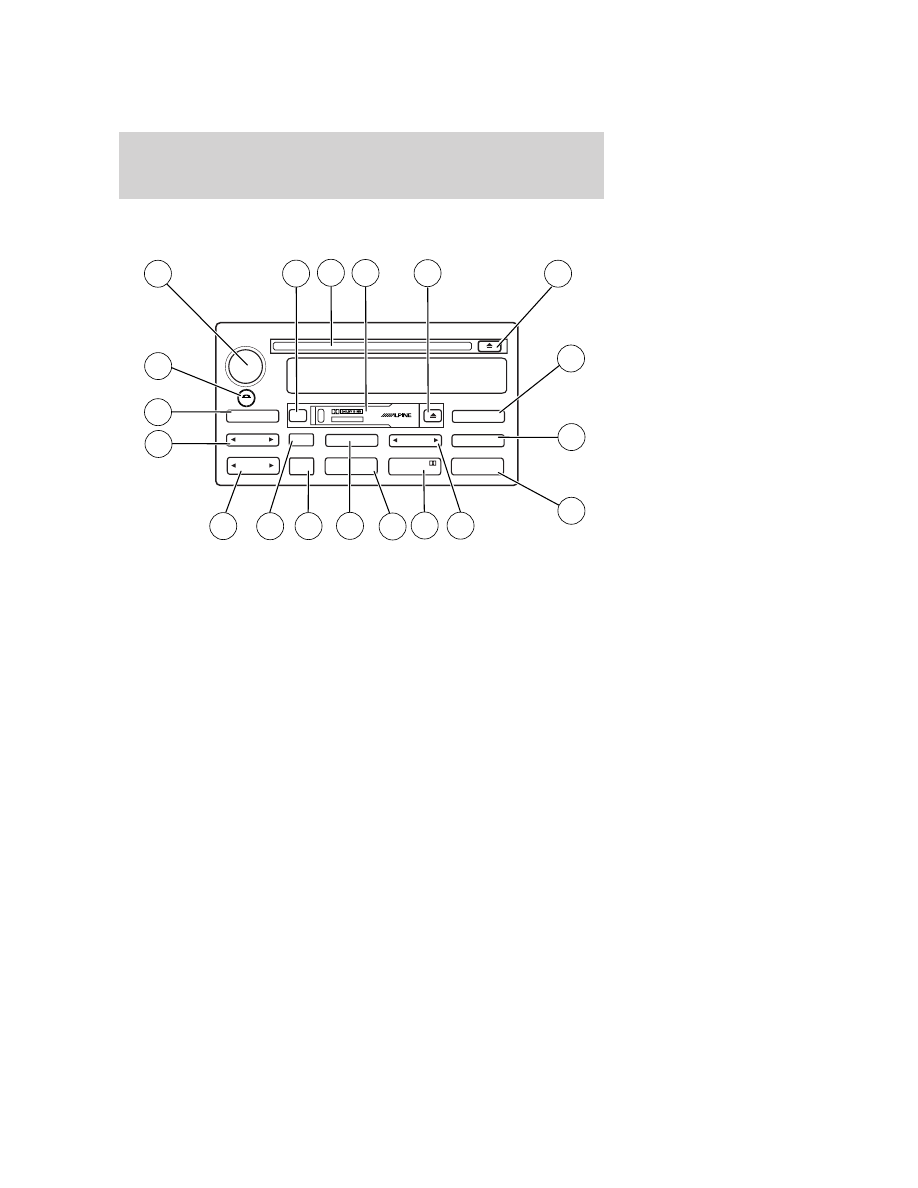
AUDIOPHILE AM/FM STEREO/CASSETTE/SINGLE CD
(IF EQUIPPED)

SHUF

DSP

SEL

BAL

BASS

FADE

TREB

SCAN

CD

AM/FM

SEEK

REW

FF

COMP

5

6

3

4

1

2

SIDE

TUNE

TAPE

RDS

AUTO

SET

2

7

9

10

12

1

6

11

13

14

3

4

5

8

17

19

15

16

18

MUTE

2004 Marauder (mdr)
Owners Guide (post-2002-fmt)
USA English 
(fus)

Entertainment Systems

Entertainment Systems

17

-------------------------------------------------------------------------------------------------------------------------------------------------------------

PREMIUM AM/FM STEREO/CASSETTE/SINGLE CD (IF EQUIPPED)

1. Eject: Press to eject a tape.

2. Eject: Press to eject a CD.

3. Bass: Allows you to increase or
decrease the audio system’s bass
output. Press BASS then press SEL
to decrease

or increase

the bass levels.

Treble: Allows you to increase or
decrease the audio system’s treble
output. Press TREB then press SEL
to decrease

or increase

the treble levels.

4. Balance: Allows you to shift
speaker sound between the right
and left speakers. Press BAL then
press SEL to shift sound to the left

or right

.

SHUF

SEL

BAL

BASS

FADE

TREB

SCAN

CD

AM/FM

SEEK

REW

FF

COMP

5

6

3

4

1

2

SIDE

TUNE

TAPE

RDS

AUTO

SET

2

7

9

10

12

1

6

11

13

14

3

4

5

8

17

19

15

16

18

MUTE

2004 Marauder (mdr)
Owners Guide (post-2002-fmt)
USA English 
(fus)

Entertainment Systems

18

-------------------------------------------------------------------------------------------------------------------------------------------------------------

Fade: Allows you to shift speaker
sound between the front and rear
speakers. Press FADE then press
SEL to shift the sound to the rear

or the front

.

5. COMP (Compression): In CD
mode, press to bring soft and loud
passages together for a more
consistent listening level.

SHUF (Shuffle): Press to play CD
tracks in random order.

6. Select: Use to adjust bass, treble,
balance and fade levels.

7. Side 1–2: Press to change sides
on the tape.

Dolby:

Dolby

noise

reduction: Reduces tape noise and
hiss; press to activate/deactivate.

8. REW (Rewind): Works in tape
and CD modes.

In tape mode, radio play continues
until rewind is stopped (with the TAPE control) or the beginning of the
tape is reached.

In CD mode, REW control reverses the CD within the current track.

FF (fast forward): Works in tape
and CD modes.

In the tape mode, tape direction
automatically reverses when the end of the tape is reached.

In CD mode, FF advances the CD within the current track.

9. Digital signal processing: Press
to adjust the occupancy modes
between the following:.
• ALL SEATS
• DRIVER SEAT
• REAR SEATS

2004 Marauder (mdr)
Owners Guide (post-2002-fmt)
USA English 
(fus)

Entertainment Systems

19

-------------------------------------------------------------------------------------------------------------------------------------------------------------

RDS: (Radio Data System): Allows you to access FM stations which are
RDS- equipped. Press RDS then SEL to select from:

Traffic — Allows you to receive traffic announcements and control their
volume level. Traffic information is not available in most U.S.
markets.

Show — Allows you to view the frequency and program type of the
chosen radio station.

Setting the clock: Press RDS until SELECT HOUR or SELECT MINS is

displayed. Press SEL to increase (

) or decrease (

).

The Federal Communications Commission (FCC) and the Canadian Radio
and Telecommunications Commission (CRTC) recommend that FM radio
broadcasters use RDS technology to transmit information. FM radio
stations are independently operated and individually elect to use RDS
technology to transmit station ID and program type as desired.

10. Autoset: Press to set first six
strong stations into AM, FM1 or
FM2 memory buttons; press again to
return to normal stations.

11. Scan: Works in radio, tape and
CD modes. Press SCAN for a brief
sampling of radio stations, tape
selections or CD tracks.

12. Seek: Works in radio, tape and
CD modes. Press to access the
previous

or next

listenable

radio station, tape selection or CD track.

13. Tune: Works in radio mode.
Press to manually advance up or
down the frequency band.

14. AM/FM/CD: Press AM/FM to
select a radio frequency. Press while
in tape or CD mode to return to
radio mode. Press CD to enter CD mode and to play a CD already in the
system.

15. Mute mode: Press to mute the
playing media.

2004 Marauder (mdr)
Owners Guide (post-2002-fmt)
USA English 
(fus)

Entertainment Systems

20

-------------------------------------------------------------------------------------------------------------------------------------------------------------

16. Power/volume: Press to turn
the system on/off. Turn to
raise/lower the volume.

17. Tape: Press to play the tape.

18. CD door: Insert the disc with the playing side down and printed side
up.

19. Tape door: Insert the tape facing the right.

CD CHANGER (IF EQUIPPED)

Your CD changer is either located in the trunk, the console or the right
side cargo area storage compartment.

1. Slide the door to access the CD
changer magazine.

2. Press

to eject the magazine.

3. Turn the magazine (A) over.

4. Using the disc holder release
knob (C), pull the disc holder (B)
out of the magazine.

Do not pull too hard on the disc holder as the disc holder may come
completely out of the magazine. If this happens, reinsert the disc holder
back into the magazine while pressing on the lever.

A

B

C

2004 Marauder (mdr)
Owners Guide (post-2002-fmt)
USA English 
(fus)

Entertainment Systems

21

-------------------------------------------------------------------------------------------------------------------------------------------------------------

5. Line up the CD with the groove
of the disc holder. Ensure that the
label on the CD faces downwards.

6. Press the disc holder until it locks
securely into the magazine.

Ensure that the disc holder is
evenly inserted and at the same
level as the magazine (A). The unit
will not operate if the disc holder is
not inserted at the same level (B).

RADIO FREQUENCIES

AM and FM frequencies are established by the Federal Communications
Commission (FCC) and the Canadian Radio and Telecommunications
Commission (CRTC). Those frequencies are:

AM - 530, 540–1700, 1710 kHz

FM- 87.7, 87.9–107.7, 107.9 MHz

RADIO RECEPTION FACTORS

There are three factors that can affect radio reception:
• Distance/strength: The further you travel from an FM station, the

weaker the signal and the weaker the reception.

• Terrain: Hills, mountains, tall buildings, power lines, electric fences,

traffic lights and thunderstorms can interfere with your reception.

• Station overload: When you pass a broadcast tower, a stronger signal

may overtake a weaker one and play while the weak station frequency
is displayed.

CASSETTE/PLAYER CARE

Do:
• Use only cassettes that are 90 minutes long or less.

A

B

2004 Marauder (mdr)
Owners Guide (post-2002-fmt)
USA English 
(fus)

Entertainment Systems

22

-------------------------------------------------------------------------------------------------------------------------------------------------------------

• Tighten very loose tapes by inserting a finger or pencil into the hole

and turning the hub.

• Remove loose labels before inserting tapes.
• Allow tapes which have been subjected to extreme heat, humidity or

cold to reach a moderate temperature before playing.

• Clean the cassette player head with a cassette cleaning cartridge after

10–12 hours of play to maintain good sound/operation.

Don’t:
• Expose tapes to direct sunlight, extreme humidity, heat or cold.
• Leave tapes in the cassette player for a long time when not being

played.

CD/CD PLAYER CARE

Do:
• Handle discs by their edges only. Never touch the playing surface.
• Inspect discs before playing. Clean only with an approved CD cleaner

and wipe from the center out.

Don’t:
• Expose discs to direct sunlight or heat sources for extended periods

of time.

• Insert more than one disc into each slot of the CD changer magazine.
• Clean using a circular motion.
CD units are designed to play commercially pressed 12 cm (4.75
in) audio compact discs only. Due to technical incompatibility,
certain recordable and re-recordable compact discs may not
function correctly when used in Ford CD players. Irregular
shaped CDs, CDs with a scratch protection film attached, and CDs
with homemade paper (adhesive) labels should not be inserted
into the CD player. The label may peel and cause the CD to
become jammed. It is recommended that homemade CDs be
identified with permanent felt tip marker rather than adhesive
labels. Ball point pens may damage CDs. Please contact your
dealer for further information.

AUDIO SYSTEM WARRANTY AND SERVICE

Refer to the Warranty Guide for audio system warranty information. If
service is necessary, see your dealer or qualified technician.

2004 Marauder (mdr)
Owners Guide (post-2002-fmt)
USA English 
(fus)

Entertainment Systems

23

-------------------------------------------------------------------------------------------------------------------------------------------------------------

ELECTRONIC AUTOMATIC TEMPERATURE CONTROL (EATC)
SYSTEM (IF EQUIPPED)

1. OFF: Outside air is shut out and
the fan will not operate.

2. AUTOMATIC: Press
AUTOMATIC and select the desired
temperature using the temperature
controls. The system will automatically determine fan speed, airflow
location, and outside or recirculated air to heat or cool the vehicle to the
selected temperature. The fan speed will remain automatic unless the
thumbwheel is turned.

3. Fan speed: Turn to manually
increase or decrease fan speed.

4. Defrost:

Distributes outside air through the windshield defroster

vents and the side window demisters.

5. Floor/defrost: Distributes outside air through the windshield
defroster vents, floor vents and the side window demisters.

6. Floor: Distributes outside air through the floor vents.

7. Vent: Distributes outside air through the instrument panel vents.

NORM A/C

VENT

FLOOR

FLR • DEF

DEF

HI

LO

MAX A/C

OUTSIDE TEMP

AUTOMATIC

OFF

F

AUTO

11

1

2

3

10

9

8

7

6

5

4

2004 Marauder (mdr)
Owners Guide (post-2002-fmt)
USA English 
(fus)

Climate Controls

Climate Controls

24

-------------------------------------------------------------------------------------------------------------------------------------------------------------

8. Norm A/C: Uses outside air to cool the vehicle . Air flows from the
instrument panel vents only.

9. Max A/C: Uses recirculated air to cool the vehicle. Air flows from the
instrument panel vents only. This mode will help prevent unpleasant
odors from entering the vehicle.

10. Outside Temp: Press to display
the outside temperature. It will
remain in the display until pressed
again. The temperature will be most accurate when the vehicle is in
motion.

11. Temperature control: Press this control to select the temperature.
The display window indicates the selected temperature.

Fahrenheit/Celsius temperature: Press MAX A/C and DEF
simultaneously to toggle between Fahrenheit and Celsius temperature.
The set point temperatures in Celsius will be displayed in half-degree
increments.

Operating tips

• To reduce fog build up on the windshield during humid weather, place

the air flow selector in the

position.

• To reduce humidity build up inside the vehicle: do not drive with the

air flow selector in the OFF or MAX A/C position.

• Under normal weather conditions, do not leave the air flow selector in

MAX A/C or OFF when the vehicle is parked. This allows the vehicle
to “breathe” using the outside air inlet vents.

• Do not put objects under the front seats that will interfere with the

airflow to the back seats.

• Remove any snow, ice or leaves from the air intake area at the base of

the windshield.

To aid in side window defogging/demisting in cold weather:

1. Select NORM A/C.

2. Modulate the temperature control to maintain comfort.

3. Set the fan speed to HI.

4. Direct the outer instrument panel vents towards the side windows.

To increase airflow to the outer instrument panel vents, close the vents
located in the middle of the instrument panel.

2004 Marauder (mdr)
Owners Guide (post-2002-fmt)
USA English 
(fus)

Climate Controls

25

-------------------------------------------------------------------------------------------------------------------------------------------------------------

Do not place objects on top of the instrument panel as these
objects may become projectiles in a collision or sudden stop.

REAR WINDOW DEFROSTER

The rear defroster control is located
on the instrument panel.

Press the rear defroster control to
clear the rear window of thin ice
and fog. A small LED will illuminate
when the rear defroster is activated.

The ignition must be in the ON position to operate the rear window
defroster.

The defroster turns off automatically after a predetermined amount of
time or when the ignition is turned to the OFF position. To manually
turn off the defroster, press the control again.

Activating the rear window defroster will also activate the heated mirrors
(if equipped). For more information refer to Heated outside mirrors in
the Driver controls chapter.

Do not use razor blades or other sharp objects to clean the inside
of the rear window or to remove decals from the inside of the
rear window. This may cause damage to the heated grid lines and
will not be covered by your warranty.

R

2004 Marauder (mdr)
Owners Guide (post-2002-fmt)
USA English 
(fus)

Climate Controls

26

-------------------------------------------------------------------------------------------------------------------------------------------------------------

HEADLAMP CONTROL

Turns the lamps off.

Turns on the parking

lamps, instrument panel lamps,
license plate lamps and tail lamps.

Turns the headlamps on.

Your vehicle’s headlamp system is equipped with a feature that will not
dim the instrument panel lighting when the headlamps are on in the
daytime. Even during full daylight, the instrument panel lighting will still
be visible with the headlamps operating.

Autolamp control

The autolamp system provides light
sensitive automatic on-off control of
the exterior lights normally
controlled by the headlamp control.

The autolamp system also keeps the
lights on for a predetermined period
of time after the ignition switch is
turned to OFF.
• To turn autolamps on, rotate the

control counterclockwise to the
next position from OFF.

• To turn autolamps off, rotate the control clockwise past OFF to the

parking lamp position

, then back to OFF.

The headlamps will turn on under the following conditions:

1. Headlamp switch is turned to the “headlamps on position”

2. With the ignition in run or start, wipers turned on and the headlamp
switch in the autolamp position.

2004 Marauder (mdr)
Owners Guide (post-2002-fmt)
USA English 
(fus)

Lights

Lights

27

-------------------------------------------------------------------------------------------------------------------------------------------------------------

Foglamp control

The foglamps can be turned on
when the headlamp control is pulled
toward you and is in any of the
following positions:
• Parking lamps
• Low beams
• Autolamps

Daytime running lamps (DRL) (if equipped)

Turns the lowbeam headlamps on with a reduced output. To activate:
• the key must be in the ON position,
• the parking brake released, and
• the headlamp control is in the OFF or Parking lamps position.

Always remember to turn on your headlamps at dusk or during
inclement weather. The Daytime Running Light (DRL) System

does not activate your tail lamps and generally may not provide
adequate lighting during these conditions. Failure to activate your
headlamps under these conditions may result in a collision.

High beams

Push the lever toward the
instrument panel to activate. Pull
the lever towards you to deactivate.

2004 Marauder (mdr)
Owners Guide (post-2002-fmt)
USA English 
(fus)

Lights

28

-------------------------------------------------------------------------------------------------------------------------------------------------------------

Flash to pass

Pull toward you slightly to activate
and release to deactivate.

PANEL DIMMER CONTROL

Use to adjust the brightness of the
instrument panel during headlight
and parklamp operation.
• Rotate the thumbwheel from left

to right to brighten the
instrument panel.

• Rotate the thumbwheel from right

to left to dim the instrument
panel.

Domelamp Control

The panel dimmer control also controls the domelamp operation.
• Rotate the thumbwheel fully to the right, past detent to activate the

domelamp.

• In order to turn off the domelamp, rotate the thumbwheel to the left.

AIMING THE HEADLAMPS

The headlamps on your vehicle are properly aimed at the assembly plant.
If your vehicle has been in an accident the alignment of your headlamps
should be checked by a qualified service technician.

Vertical aim adjustment

1. Park the vehicle on a level surface approximately 7.6 meters (25 feet)
from a vertical wall or screen directly in front of it.

2004 Marauder (mdr)
Owners Guide (post-2002-fmt)
USA English 
(fus)

Lights

29

-------------------------------------------------------------------------------------------------------------------------------------------------------------

• (1) Eight feet
• (2) Center height of lamp to

ground

• (3) Twenty five feet
• (4) Horizontal reference line

2. Measure the height of the headlamp bulb center from the ground and
mark a 2.5 meter (8 foot) horizontal reference line on the vertical wall or
screen at this height (a piece of masking tape works well).

3. Turn on the low beam headlamps to illuminate the wall or screen and
open the hood.

4. On the wall or screen you will
observe an area of high intensity
light. The top of the high intensity
area should touch the horizontal
reference line, if not, the beam will
need to be adjusted.

To see a clearer light pattern for
adjusting, you may want to block
the light from one headlamp while
adjusting the other.

5. Locate the vertical adjuster on
each headlamp. Using a 4 mm
wrench, turn the adjuster either
clockwise (to adjust down) or
counterclockwise (to adjust up).
The horizontal edge of the brighter
light should touch the horizontal
reference line.

6. HORIZONTAL AIM IS NOT REQUIRED FOR THIS VEHICLE AND IS
NON-ADJUSTABLE.

7. Close the hood and turn off the lamps.

2004 Marauder (mdr)
Owners Guide (post-2002-fmt)
USA English 
(fus)

Lights

30

-------------------------------------------------------------------------------------------------------------------------------------------------------------

TURN SIGNAL CONTROL

• Push down to activate the left

turn signal.

• Push up to activate the right turn

signal.

The flash rate of the turn signal will speed up considerably if the left or
right turn lamp bulb (front or rear) is burned out.

Cornering lamps

When the turn signal is used and the headlamps are on, the cornering
lamps will light either the right or left side depending on the direction of
the turn.

MAP/COURTESY LAMPS

Without a moon roof

With a moon roof

To turn on the map lamps, press the
map lamp control.

2004 Marauder (mdr)
Owners Guide (post-2002-fmt)
USA English 
(fus)

Lights

31

-------------------------------------------------------------------------------------------------------------------------------------------------------------

BULBS

Replacing exterior bulbs

Check the operation of all the bulbs frequently.

Using the right bulbs

Replacement bulbs are specified in the chart below. Headlamp bulbs
must be marked with an authorized “D.O.T.” for North America and an
“E” for Europe to assure lamp performance, light brightness and pattern
and safe visibility. The correct bulbs will not damage the lamp assembly
or void the lamp assembly warranty and will provide quality bulb burn
time.

Function

Trade Number

Headlamp

9007

Park lamp and turn lamp (front)

3157 AK

Cornering lamp (front)

3156 K

Tail, stop and turn (rear)

3157 K

Backup lamp

3156 K

License plate lamp

168

High-mount brakelamp

912

Foglamps

H1

Luggage compartment lamp

211-2

Dome lamp

906

Underhood lamp

211–2

Rear reading lamp

211-2

Map lamp

168

Illuminated visor mirror

168

Dual floorwell lamp

906

Glove compartment

168

All replacement bulbs are clear in color except where noted.

To replace all instrument panel lights - see your dealer.

Replacing the interior bulbs

Check the operation of all bulbs frequently.

2004 Marauder (mdr)
Owners Guide (post-2002-fmt)
USA English 
(fus)

Lights

32

-------------------------------------------------------------------------------------------------------------------------------------------------------------


Content      ..      1      2      3      ..