Ford Galaxy / Ford S-MAX. Manual - part 1060


  Index      Ford     Ford Galaxy / Ford S-MAX - service repair manual 2006 year


Search            


Content   ..  1058  1059  1060  1061   ..


Ford Galaxy / Ford S-MAX. Manual - part 1060
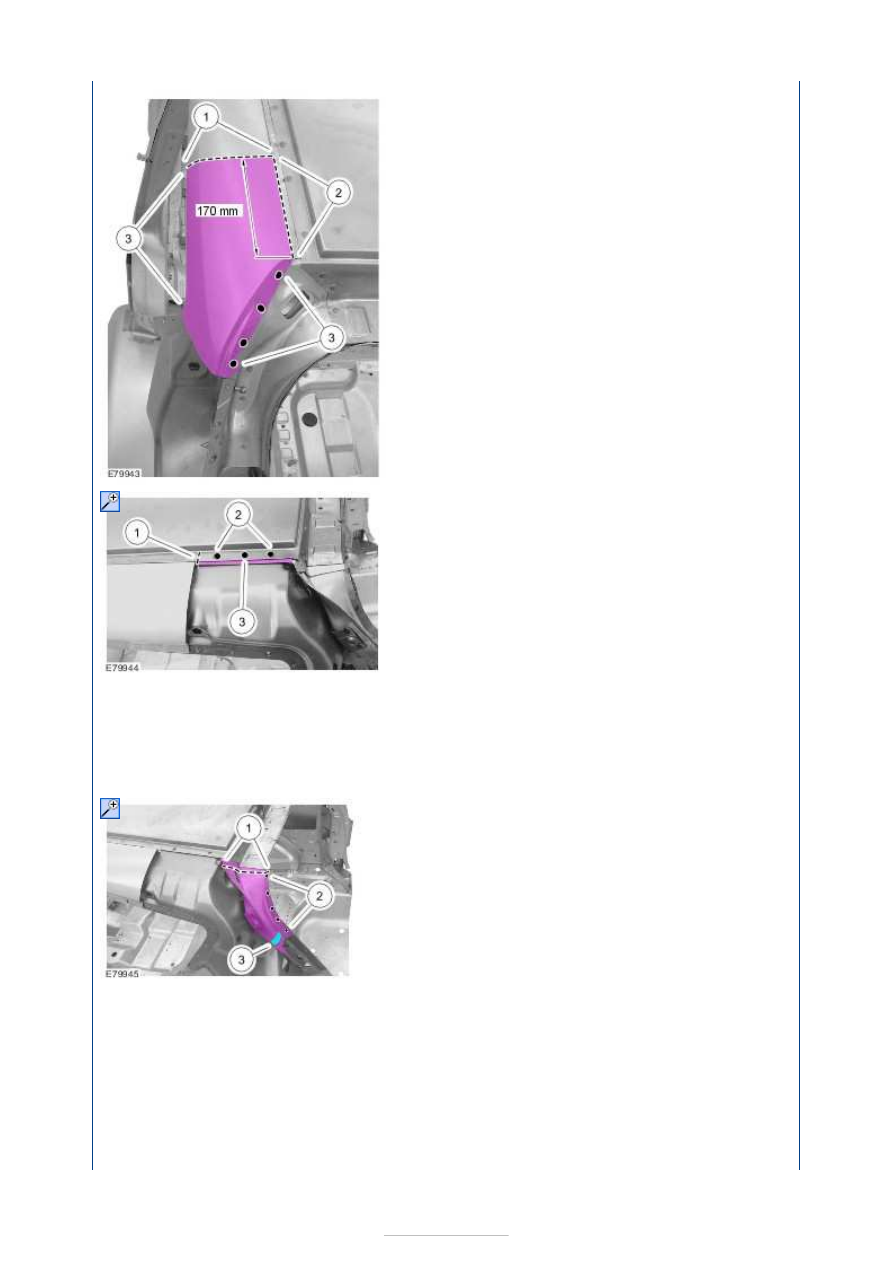


NOTE: The upper water drain panel only needs to be cut out if it is necessary to fully 
expose the upper water drain panel reinforcement. 

drain panel reinforcement. 

Upper quarter panel 

1. Cut location. 
2. Rough cut location. 
3. Mill out the spot welds. 

5.

NOTE:  

When making the cut at position 1 it is 
also necessary to cut through the outer 
area of the roof.  
The spot weld in position 3 is covered by 
the roof. In order to accurately locate it, 
you need to slightly lift up the roof sealing 
flange. 

Residual part of the upper quarter panel 

1. Cut location (through two panel 

thicknesses). 

2. Mill out the spot welds (two panel 

thicknesses). 

3. Mill out the spot weld (two panel 

thicknesses). 

6. Residual part of the upper water drain panel 

1. Cut location. 
2. Grind out the spot welds. 
3. Warm the area (to about 170° C) and 

release the NVH elements. 

7. Upper water drain panel reinforcement 

1. Cut location. 
2. Mill out the spot welds. 


Installation 

NOTE: Before resistance spot welding of body panels with a total panel thickness of 3 mm 
and greater, the welding equipment instructions contained in sub-section 501-25 must be 
followed. 

8.

NOTE: Working from the passenger 
compartment, heat up the NVH element and 
detach it. The NVH element is also secured 
to the water drain panel reinforcement from 
the inside by means of plastic clips. 

Upper water drain panel reinforcement 

1. Mill out the spot welds. 
2. Grind out the spot welds. 
3. Heat the area (approx. 170° C) and 

detach the NVH element from the inner 
quarter panel. 

1.

NOTE: Working from the inside, insert the 
NVH element at the water drain panel 
reinforcement using PU window adhesive 
and secure it with the two plastic clips. 

Upper water drain panel reinforcement 

1. Apply PU glass adhesive to the NVH 

element. 

2. Continuous MIG weld seam. 

2.

NOTE: Only tack-weld the water drain panel 
reinforcement to the tailgate aperture and 
the side window aperture. The final welded 
joint is made when the quarter panel is 
installed. 

Upper water drain panel reinforcement 

1. Resistance spot weld. 
2. Resistance spot welding (tack-weld). 

3.

NOTE:  

By drilling out the holes it is possible to 
weld all three layers of metal together.  
Only tack-weld the water drain panel 
reinforcement at the tailgate aperture and 
at the inner quarter panel. The final 
welded joint is made when the water drain 
panel and the quarter panel are installed. 

Lower water drain panel reinforcement 

1. Drill out by one panel thickness and 


puddle weld. 

2. Resistance spot weld. 
3. Resistance spot welding (tack-weld). 

4. Water drain panel, upper 

1. Continuous MIG weld seam. 
2. Resistance spot weld. 
3. Apply PU glass adhesive to the NVH 

element and insert the NVH element from 
the inside into the water drain panel. 

5.

NOTE: By drilling out the holes it is possible 
to weld all three layers of metal together. 

Upper quarter panel 

1. Continuous MIG weld seam. 
2. Drill out by one panel thickness and 

puddle weld. 

3. Puddle welding. 
4. Resistance spot weld. 


Rear End Sheet Metal Repairs - Water 
Drain Panel Reinforcement—VIN Plate 
Body Style Code: M

S-MAX/Galaxy 2006.5 (02/2006-)


Print


Removal and Installation 

Removal 

NOTE: The revised cut locations in the upper area need to be taken into account when 
installing the water drain panel and the quarter panel. 

NOTE: The upper quarter panel only needs to be cut out if it is necessary to fully expose 
the upper water drain panel reinforcement. 

1. Replacement parts 

Upper water drain panel reinforcement 
Lower water drain panel reinforcement 

1. General Notes 

Remove the following components before 
starting the repairs: quarter panel, rear 
panel with reinforcement and luggage 
compartment water drain panel. 
Reposition the carpeting and the wiring 
harness away from the working area. 

2. Lower water drain panel reinforcement 

1. Mill out the spot welds. 
2. Mill out the spot welds (two panel 

thicknesses). 

3. Lower water drain panel reinforcement (inside 

view) 

1. Mill out the spot weld. 
2. Grind out the spot welds. 

4.

NOTE: The cutting dimensions for the 
quarter panel cut must be accurately met in 
order to obtain access to the upper water 


Content   ..  1058  1059  1060  1061   ..