Ford Galaxy / Ford S-MAX. Manual - part 1022


  Index      Ford     Ford Galaxy / Ford S-MAX - service repair manual 2006 year


Search            


Content   ..  1020  1021  1022  1023   ..


Ford Galaxy / Ford S-MAX. Manual - part 1022


Body Repairs - General Information - 
Wind Noise

S-MAX/Galaxy 2006.5 (02/2006-)


Print


Description and Operation 

Wind noises as well as other general noises are dealt with under Noise, Vibration and 
Harshness (NVH).  

NOTE: Basic and in-depth training is offered on the following topics. You will find an 
overview of the complete range of courses in the Training Brochure issued by the Ford 
Service Organization. 

Due to the continuous reduction in drivetrain noises, wind noises have come to the fore in 
the vehicle and are perceived to a greater extent by the customer. 

There are various causes of wind noises. They can be due to the design of the vehicle, or 
they can occur after a repair. They are mostly caused by poorly mounted components, 
which must be located and installed in the correct position. 

General information 

In order to carry out targeted diagnosis, it is important to know the basics of noise 
formation and sound transmission. 

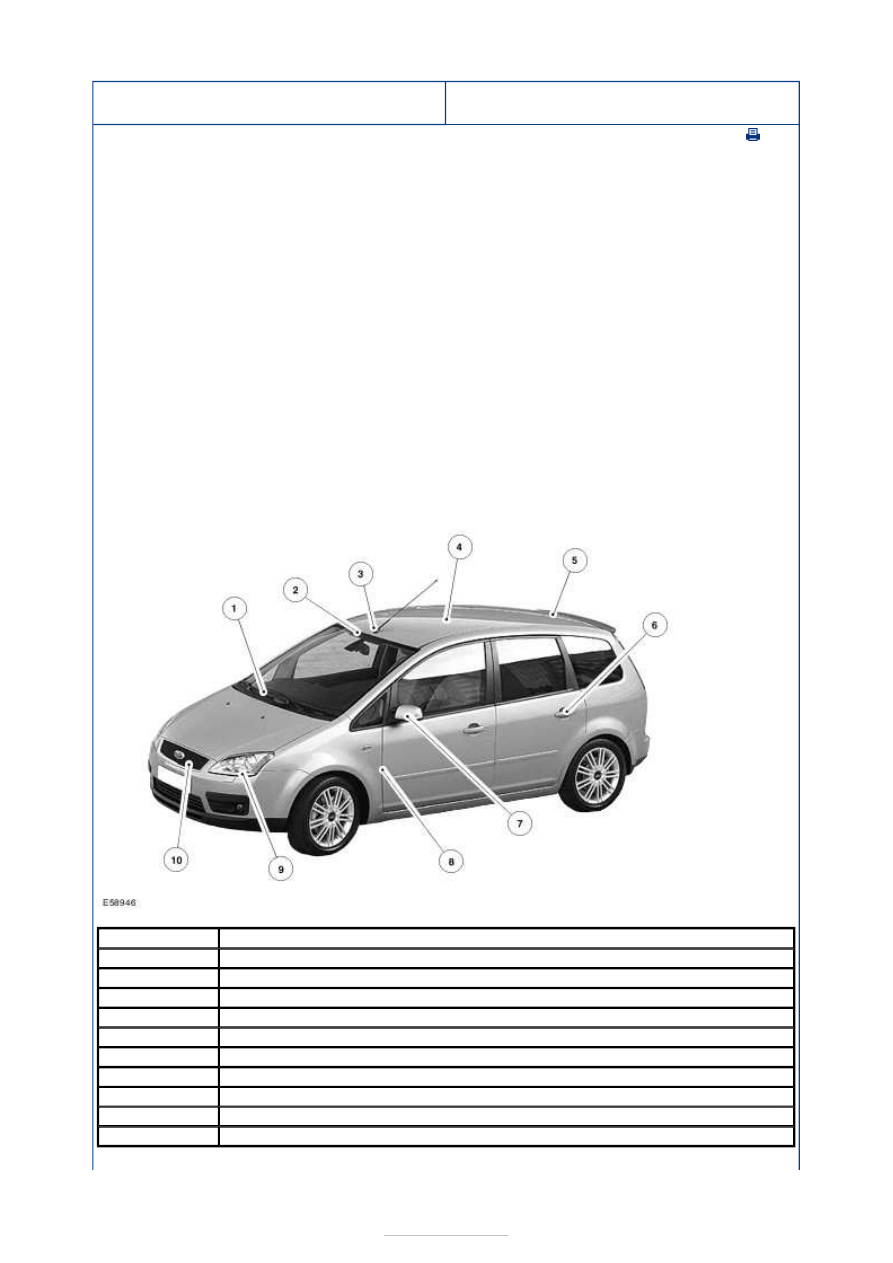
Potential areas of wind noises 

Noises are categorized according to their type and formation as follows:  

Item

Description

1

Wiper arms

2

Windscreen seal

3

Antenna/antenna base

4

Sun roof/roof rail

5

Tailgate

6

Door handles

7

Exterior Rear View Mirror

8

Door seals

9

Headlamps

10

Radiator grille.


"Normal" air flow noises: 

Normal air flow noises are caused by air blowing against even, flat vehicle surfaces, such as 
the roof, doors and side windows. When the vehicle is moving fast, air layers (turbulence) 
form, which cause variations in air pressure. These variations in air pressure spread in the 
form of sound waves and are transferred to the vehicle interior via the side windows and 
seals. 

Noises caused by deviations in air flow and circulation around separate 
components:
 

If air flows over an edge on a vehicle, the air flow cannot follow the shape of the surface, 
but separates at the edge. Eddies are formed, which collapse again after a certain time or 
distance. The associated fluctuations in air pressure create a corresponding sound wave 
which is noticeable by for instance a rushing noise at the A-pillar or the outside mirror. 

Turbulence and the associated radiation of noise can also occur at the vehicle underbody. 
Air circulation around small components and also flow through small gaps (e.g. the radiator 
grille) cause the rushing noise to change to a whistling, which rises and becomes louder as 
the vehicle speed increases. 

Noises caused by vibrating seals: 

Seals which do not make firm contact at the door or window area can be made to vibrate 
by pressure variations outside the vehicle, which in turn mean noise radiating into the 
interior of the vehicle. 

Noises caused by air flowing out: 

Noises caused by air flowing out are created by leaks at the vehicle interior sealing system, 
when stationary air mixes with flowing air. As a result, the noise increases as the speed of 
the air flowing out increases. Example: Letting air out of a tire. 

Cavity noises: 

Cavity noises are those created when the air volumes found in bodywork cavities are 
caused to vibrate by an opening located in the airflow. The frequency of the tone does not 
vary with the vehicle speed but depends on the volume of the cavity and the size of the 
opening. Example: Blowing across the top of a bottle. 

Wind noises overview: 

Workshop diagnosis 

Those noises listed under "Serious" indicate a possible source of the fault. 

Workshop diagnosis 

There are two ways that the level of noise in the vehicle interior can be reduced and the 
character of the noise can be improved through assessment and diagnosis in the service 
department: 

Reducing the intensity of the noise sources.  
Reducing the noise transfer routes. 

Assessment

Type of wind noises

Place of origin

Normal

"Normal" wind noises

Roof, side windows

Normal

Noises caused partly by changes in the 

direction of air flow and by air flow around 

separate components

A-pillars, outside mirrors, antennas

Serious

Noises caused by vibrating seals

Door gaps too large, door/window 

seals not making firm contact

Serious

Air escape and air passage noises

Leaks in the bodywork/sealing 

system

Serious

Cavity noises

Unsealed bodywork cavities

Before carrying out repair work, a visual inspection of the vehicle must be carried out. The 
gaps in the doors, the sunroof and at all other body parts must be checked in particular. 

When the doors are adjusted to fit exactly, development of wind noises at high speeds can 
often be eliminated (lifting of doors off the seals). Furthermore, the following points should 
be noted: 

The windows and doors must be fully closed.  
The air guides and air grilles must be correctly seated.  
All of the trim strips and plastic components must be firmly fixed down without gaps.  
All blanking plugs present. 

Test method 

The test procedures given in the chapter Noise, Vibration and Harshness can also be used 
to diagnose wind noises.  

Road tests 

Wind noises can usually only be localized by road tests  

NOTE: There should always be two people present during road tests to find noises. A 
driver who reconstructs the situation causing the noise, and a person to carry out the 
checks. 

The following points should be taken into account for such road tests: 

Check that the tire pressure is correct.  
Remove non-standard ancillary components from the vehicle.  
Choose a dry, flat road with as little traffic as possible.  
Carry out the road test in all speed ranges. Use a high gear so that the engine noise is 
low.  
Do not perform a road test near any sound reflecting objects. 

If it is difficult to detect the noise sources, the search can be made easier by masking 
potential areas. 

Chalk/powder test 

This test checks the contact surfaces of seals on doors, hatches and lids. 

Process using a door seal as an example:  

To do this, the door seal is coated with powder or brushed with chalk. A thin layer of grease 
is applied to the surface against which the seal makes contact. The door must then be 
slowly closed and reopened. The width and continuity of the imprint can now be checked on 
the seal. 

Smoke test 

Flow checking device 

Item

Description


Mode of operation: 

The flow checking device is a set made up of a flow-testing pipe, a test pipe opener, puffer 
ball and closing-off caps for the pipe.  

The test pipe contains a filling layer which is impregnated with fuming sulfuric acid. When 
air is blown through the pipe by the puffer ball, sulfuric acid aerosol is emitted in the form 
of a white smoke. 

NOTE: Pay attention to the instructions for use and the safety directions issued by the 
manufacturer. The smoke test can only be performed in a draft-free environment. 

This test can be used to detect leaks visually. 

Procedure: 

Break off both tips of the pipe in the pipe opener, in exceptional cases in the top of the 
packaging.  
Insert the pipe into the puffer ball so there are no leaks.  
Close the hole in the puffer ball with your thumb and press the air contained in the ball 
through the pipe.  
Set the ventilation blower in the passenger compartment to the highest setting.  
Close all doors so that a slight overpressure can build up in the passenger compartment.  
Move the smoke pipe along the outside of the body to the areas to be checked. Leaks can 
be detected through the irregular movement of the smoke. 

Ultrasonic test 

This test searches for leaks in the system of seals or rather acoustic bridges. When an 
ultrasonic transmitter is placed inside the vehicle, it sends out ultrasonic waves. A leak is 
located by running a detector along the suspected area. The position with the loudest 
reception of the escaping ultrasonic waves indicates places where noises occur. 

Ultrasonic test device 

Procedure: 

Place the ultrasonic transmitter in the vehicle.  
Completely close the vehicle.  
Search the exterior of the vehicle using the detector.  
The detector provides a simple indication of a leak. 

Stethoscope test 

Stethoscope 

1

Test pipe

2

Test pipe opener

3

Puffer ball


Content   ..  1020  1021  1022  1023   ..