Ford Galaxy / Ford S-MAX. Manual - part 1020


  Index      Ford     Ford Galaxy / Ford S-MAX - service repair manual 2006 year


Search            


Content   ..  1018  1019  1020  1021   ..


Ford Galaxy / Ford S-MAX. Manual - part 1020
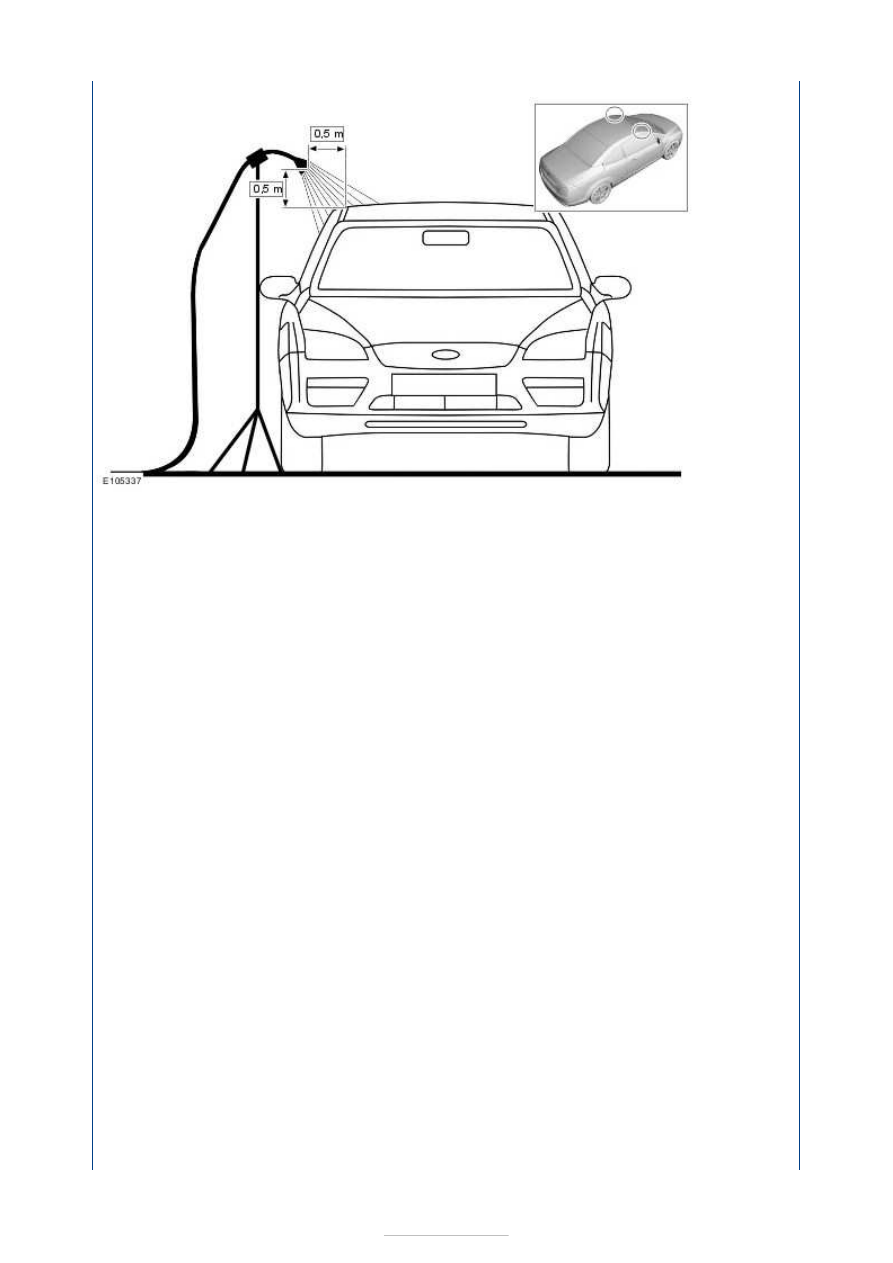


Car wash test 

Certain leak problems only appear in a car wash or can only be simulated there. The 
concerned area of the passenger compartment should be inspected with a torch during the 
wash procedure. 

Road Test 

Some leaks only appear when the vehicle is moving. If no leaks are detected during the 
above-mentioned tests, road tests should be carried out on wet roads: 

At various speeds.  
On various road surfaces (asphalt to cobbles).  
With loaded or unloaded vehicle.  
Driving through puddles (splash water). 

Test with UV lamp 

A leak test can also be performed using a UV lamp and a special contrasting agent. The 
advantages of using contrast agent are: 

No need to dry out wet areas beforehand.  
The water entry and its subsequent path can be seen more clearly.  
No need to remove most ancillary components from the vehicle. 

NOTE: The equipment manufacturer's instructions must be followed when using a UV 
lamp and contrast agent. 

Procedure for using a UV lamp. 

Wet the test area with clear water from the outside.  
Prepare test liquid and apply it from the outside using a suitable water sprayer.  
Illuminate the relevant area from the inside using the UV lamp. The test liquid which 
enters will make the leak visible. 

Chalk/powder test 

This test checks the contact surfaces of seals on doors, hatches and lids. 


Process using a door seal as an example:  

To do this, the door seal is coated with powder or brushed with chalk. A thin layer of grease 
is applied to the contact area of the seal. The door must then be slowly closed and 
reopened. The width and continuity of the imprint can now be checked on the seal. 

Smoke test 

Flow checking device 

Operating principle 

The flow checking device is a set made up of a flow-testing pipe, a test pipe opener, puffer 
ball and closing-off caps for the pipe.  

The test pipe contains a filling layer which is impregnated with fuming sulfuric acid. When 
air is blown through the pipe by the puffer ball, sulfuric acid is emitted as an aerosol in the 
form of a white smoke. 

NOTE: Pay attention to the instructions for use and the safety directions issued by the 
manufacturer. The smoke test can only be performed in a draft-free environment. 

This test can be used to detect leaks visually. Procedure: 

Break off both tips of the pipe in the pipe opener, in exceptional cases in the top of the 
packaging.  
Insert the pipe into the puffer ball so there are no leaks.  
Close the hole in the puffer ball with your thumb and press the air contained in the ball 
through the pipe.  
Set the ventilation blower in the passenger compartment to the highest setting.  
Close all doors so that a slight overpressure can build up in the passenger compartment.  
Move the smoke pipe along the outside of the body to the areas to be checked.  
Leaks can be detected through the irregular movement of the smoke. 

Stethoscope test 

This procedure is very similar to the smoke test. Instead of the smoke pipe, move a 
stethoscope past the areas of the body that are at risk. Leaks can now be detected 
acoustically. 

Stethoscope 

Description

Description

1

Test pipe

2

Test pipe opener

3

Puffer ball


Ultrasonic detection 

This test uses ultrasonic waves to locate the positions of leaks. When an ultrasonic 
transmitter is placed inside the vehicle, it sends out ultrasonic waves. A leak is located by 
running a detector along the suspected area. The position with the loudest reception of the 
escaping ultrasonic waves is the location of the leak.  

Procedure: 

Place the ultrasonic transmitter in the vehicle.  
Completely close the vehicle.  
Search the exterior of the vehicle using the detector.  
The detector provides a simple indication of a leak. 

Ultrasonic test device 

Workflow for tracing water entry 

Stage

Testing

Result

Action

1st Ask customer for a detailed list of possible 

reasons for the water entry. Does this 
information allow the cause of the leak to be 
identified?

Yes Dry out the vehicle and repair the 

damage. Perform a water test as a 
check (see test method).

No

Step 2.

2nd Perform an initial visual inspection on the 

vehicle. Look for signs of water entry. Can 
the cause of the leak be identified 
immediately?

Yes Dry out vehicle. Repair damage. 

Perform a water test as a check (see 
test method).

No

Step 3.

3rd Is it possible that water is getting into the 

vehicle through a seal (door seal, trunk lid 
seal)?

Check the seal for damage. Check 
the creation of the seal using the 
chalk test (see test methods). Step 
4.

No

Step 5.

4th Is the contact area for the seal adequate?

Yes Step 5.

No

Perform work as described under 
Areas with possible water leaks - 
Door seals. Dry out vehicle. Repair 


Possible complaints and corrective actions 

NOTE: Water leaks and changed vehicle acoustics can have similar causes. For this 
reason, information from the Wind noise or Noise, vibrations, roughness chapters may be 
useful in identifying the fault. 

An outline of the possible complaints due to water leaks is provided below. The causes of 
water leaks and the possible remedies are presented using selected examples. They are 
intended to provide troubleshooting tips and suggestions for the user but do not represent 
an exhaustive faults list. 

Glued windows 

A broken pasted seam can cause water to enter around the window. A broken pasted seam 
can be located using a water test or by carefully blowing compressed air onto the inside of 
the window seal. 

Corrective action 

Broken adhesive seams -Arrow- can be sealed from inside using PU glass adhesive. 

If this seal does not resolve the problem or the broken pasted seam is too extensive, it is 
necessary to remove the window and glue it back into place. 

damage. Perform a water test as a 
check (see test method).

5th Before starting any further work, use the 

VIN to look for model-specific information in 
eTIS. Perform Oasis query and check TSIs. 
Does this information allow the cause of the 
leak to be identified?

Yes Dry out vehicle. Repair the damage 

using the information found. 
Perform a water test as a check (see 
test method).

No

Step 6.

6th Establish the extent of the damage. To do 

this, expose wet areas. Remove parts. 
Investigate the suspected area for signs of 
water. Does an investigation of the 
suspected area allow the cause of the leak 
to be identified?

Yes Dry out vehicle. Repair leak. Perform 

a water test as a check (see test 
method).

No

Step 7.

7th Check exterior areas (seals, seal welds). 

Check interior areas: Signs of water, plugs, 
seal welds. Can the cause of the leak be 
identified?

Yes Dry out vehicle. Repair leak. Perform 

a water test as a check (see test 
method).

No

Step 8.

8th Perform water test or ultrasound test. Can 

the cause of the leak be found?

Yes Dry out vehicle. Repair leak. Perform 

a water test as a check (see test 
method).

No

The water entry may only occur 
under dynamic driving conditions. 
This requires intensive tests to be 
repeated with the corresponding 
climatic influences (rain).


Content   ..  1018  1019  1020  1021   ..