Ford Galaxy / Ford S-MAX. Manual - part 60
 

  Index      Ford     Ford Galaxy / Ford S-MAX - service repair manual 2006 year


Search            


Content   ..  58  59  60  61   ..


Ford Galaxy / Ford S-MAX. Manual - part 60


Begin the road test with a general brake performance check. Keeping the description of the 
concern in mind, test the brakes at different vehicle speeds using both light and heavy 
pedal pressure. To determine if the concern is in the front or rear braking system, use the 
brake pedal and then use the parking brake control. If the condition (pull, vibration, 
isolation) occurs only with the parking brake, the concern is in the rear brake system. 

Avoid locking the brakes and sliding the tires. Locked brakes and sliding tires do not 
indicate brake efficiency. A heavily braked and turning wheel will stop the vehicle in a 
shorter distance than locked brakes. 

If the concern becomes evident during this check, verify it fits the description given before 
the road test. If the concern is not evident, attempt to duplicate the condition using the 
information from the description. 

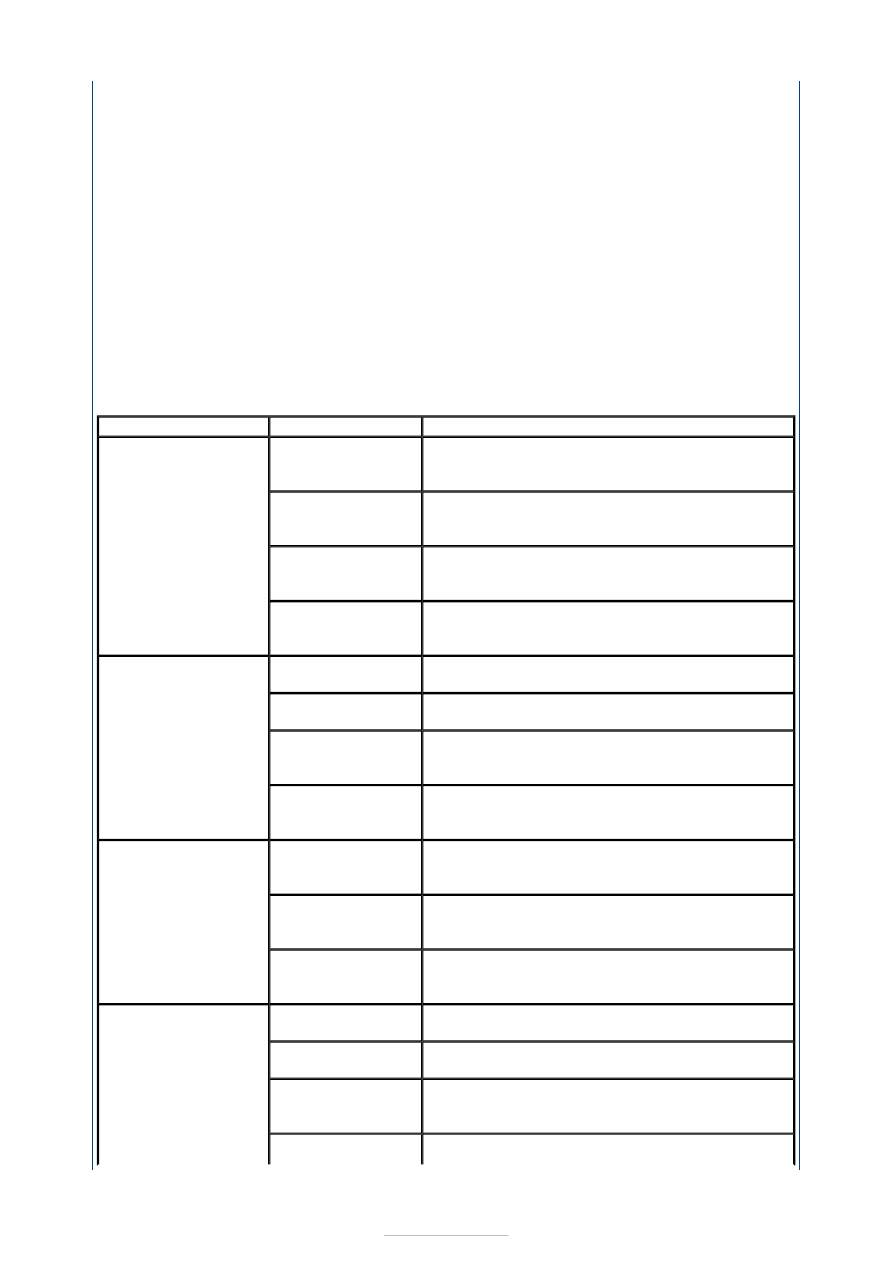
If a concern exists, use the Symptom Chart in order to isolate it to a specific sub-system 
and condition description. From this description, a list of possible sources can be used to 
further narrow the cause to a specific component or condition. 

Symptom Chart 

Symptom

Possible Sources

Action

The brakes pull or drift

Wheel alignment 

angles. 

*

CHECK the wheel alignment angles. REFER to 

Section 

 204-00 Suspension System - General 

Information

*

Brake pads. 

*

CHECK and INSTALL new components as 

necessary. REFER to Section 

 206-03 Front Disc 

Brake

 / 

206-04 Rear Disc Brake

*

Brake disc. 

*

CHECK and INSTALL new components as 

necessary. REFER to Section 

 206-03 Front Disc 

Brake

 / 

206-04 Rear Disc Brake

*

Brake caliper. 

*

CHECK and INSTALL new components as 

necessary. REFER to Section 

 206-03 Front Disc 

Brake

 / 

206-04 Rear Disc Brake

*

The red brake warning 
indicator is always on

Brake fluid level 

sensor. 

*

REFER to WDS. 

*

Parking brake 

control. 

*

RELEASE and ADJUST the parking brake. REFER 

to Section 

 206-05 Parking Brake and Actuation

*

Excessively worn 

brake pads. 

*

CHECK and INSTALL new components as 

necessary. REFER to Section 

 206-03 Front Disc 

Brake

 / 

206-04 Rear Disc Brake

*

Brake master 

cylinder primary 
piston cup. 

*

INSTALL a new brake master cylinder. REFER to 

Section 

 206-06 Hydraulic Brake Actuation

*

Vibration when brakes 
are applied

Brake pads. 

*

CHECK and INSTALL new components as 

necessary. REFER to Section 

 206-03 Front Disc 

Brake

 / 

206-04 Rear Disc Brake

*

Brake caliper. 

*

CHECK and INSTALL new components as 

necessary. REFER to Section 

 206-03 Front Disc 

Brake

 / 

206-04 Rear Disc Brake

*

Brake disc. 

*

CHECK and INSTALL new components as 

necessary. REFER to Section 

 206-03 Front Disc 

Brake

 / 

206-04 Rear Disc Brake

*

The pedal goes down 
fast

Air in system. 

*

BLEED the system. REFER to Section 

 206-00 

Brake System - General Information

*

Brake master 

cylinder 

*

Carry out the brake master cylinder component 

test in this section. 

*

Brake disc. 

*

CHECK and INSTALL new components as 

necessary. REFER to Section 

 206-03 Front Disc 

Brake

 / 

206-04 Rear Disc Brake

*

Brake pads. 

*

CHECK and INSTALL new components as 

*

Pinpoint Tests 

necessary. REFER to Section 

 206-03 Front Disc 

Brake

 / 

206-04 Rear Disc Brake

The pedal eases down 
slowly

Brake caliper 

*

CHECK and INSTALL new components as 

necessary. CHECK and INSTALL new 
components as necessary. REFER to Section 


206-03 Front Disc Brake

 / 

206-04 Rear Disc 

Brake

*

Brake master 

cylinder. 

*

Carry out the brake master cylinder component 

test in this section. 

*

The pedal is low or 
feels spongy

Air in system. 

*

Bleed the system. REFER to Section 

 206-00 

Brake System - General Information

*

Brake pads. 

*

CHECK and INSTALL new components as 

necessary. REFER to Section 

 206-03 Front Disc 

Brake

 / 

206-04 Rear Disc Brake

*

Brake booster 

*

CARRY out the brake booster component test in 

this section. 

*

Brake lockup during 
light brake pedal force

Brake pads. 

*

CHECK and INSTALL new components as 

necessary. REFER to Section 

 206-03 Front Disc 

Brake

 / 

206-04 Rear Disc Brake

*

Brake disc. 

*

CHECK and INSTALL new components as 

necessary. REFER to Section 

 206-03 Front Disc 

Brake

 / 

206-04 Rear Disc Brake

*

Brake booster. 

*

CARRY out the brake booster component test in 

this section. 

*

Excessive/erratic brake 
pedal travel

Insufficient 

grease on sliding 
parts. 

*

APPLY grease where necessary. 

*

Brake pads. 

*

CHECK and INSTALL new components as 

necessary. REFER to Section 

 206-03 Front Disc 

Brake

 / 

206-04 Rear Disc Brake

*

Brake disc. 

*

CHECK and INSTALL new components as 

necessary. REFER to Section 

 206-03 Front Disc 

Brake

 / 

206-04 Rear Disc Brake

*

Wheel bearing. 

*

CHECK or INSTALL a new wheel bearing. REFER 

to Section 

 204-01 Front Suspension

*

Brake pedal. 

*

GO to Pinpoint Test 

A. 


*

Brake drag

Brake booster. 

*

Carry out the brake booster component test in 

this section. 

*

Brake caliper. 

*

CHECK and INSTALL new components as 

necessary. REFER to Section 

 206-03 Front Disc 

Brake

 / 

206-04 Rear Disc Brake

*

Stability assist 

system (if 
equipped) 

*

REFER to WDS. 

*

Brake pedal. 

*

GO to Pinpoint Test 

B. 


*

Slow or incomplete 
brake pedal return

Stability assist 

system (if 
equipped) 

*

REFER to WDS. 

*

Brake master 

cylinder. 

*

Carry out the brake master cylinder component 

test in this section. 

*

Brake pedal. 

*

GO to Pinpoint Test 

C. 


*

PINPOINT TEST A : EXCESSIVE/ERRATIC BRAKE PEDAL TRAVEL 

TEST 

CONDITIONS

DETAILS/RESULTS/ACTIONS

A1: CHECK FOR BRAKE PEDAL RETURN

Run the engine at fast idle whilst making several brake applications. 

Pull the brake pedal upwards. 

Release the brake pedal and measure the distance from the rubber to the 
floor. 

Make a hard brake application. 

Release the brake pedal and measure the distance from brake pedal 
rubber to the floor. The brake pedal should return to its original position. 

Does the brake pedal return to its original position? 
Yes 

Vehicle is OK. 

No 

GO to A2

.  

A2: CHECK FOR BRAKE PEDAL BINDING

Check the brake pedal to make sure it is operating freely. 

Is the brake pedal operating freely? 
Yes 

INSTALL a new brake booster. REFER to Section 

 206-07 Power Brake 

Actuation

. TEST the system for normal operation. 

No 

REPAIR or INSTALL new brake pedal and bracket. TEST the system for 
normal operation. 

PINPOINT TEST B : BRAKES DRAG 

TEST 

CONDITIONS

DETAILS/RESULTS/ACTIONS

B1: CHECK FOR BRAKE PEDAL RETURN

Run the engine at fast idle whilst making several brake applications 

Pull the brake pedal upwards. 

Release the brake pedal and measure the distance from the rubber to the 
floor. 

Make a hard brake application. 

Release the brake pedal and measure the distance from brake pedal 
rubber to the floor. The brake pedal should return to its original position. 

Does the brake pedal return to its original position? 
Yes 

Vehicle is OK. 

No 

GO to B2

.  

B2: CHECK FOR BRAKE PEDAL BINDING

Check the brake pedal to make sure it is operating freely. 

Is the brake pedal operating freely? 
Yes 

INSTALL a new brake booster. REFER to Section 

 206-07 Power Brake 

Actuation

. TEST the system for normal operation. 

No 

REPAIR or INSTALL new brake pedal and bracket. TEST the system for 
normal operation. 

PINPOINT TEST C : SLOW OR INCOMPLETE BRAKE PEDAL RETURN 

TEST 

CONDITIONS

DETAILS/RESULTS/ACTIONS

C1: CHECK FOR BRAKE PEDAL RETURN

Run the engine at fast idle whilst making several brake applications. 

Pull the brake pedal upwards. 

Release the brake pedal and measure the distance from the rubber to the 
floor. 

Component Tests 

Brake Booster 

1. 1. Inspect all hoses and connections. All unused vacuum connectors should be 

capped. Hoses and their connections should be correctly secured and in good 
condition with no holes and no collapsed areas. Inspect the brake booster check 
valve for damage. 

2. 2. Check the hydraulic brake system for leaks or low fluid. 

3. 3. With the transmission in PARK (automatic transmission), stop the engine and 

operate the parking brake. Operate the brake pedal several times to exhaust all 
vacuum in the system. 

4. 4. With the engine turned OFF and all vacuum in the system exhausted operate the 

brake pedal and hold it down. Start the engine. If the vacuum system is operating, 
the brake pedal will tend to move downward under constant foot pressure. If no 
motion is felt, the vacuum booster system is not functioning. 

5. 5. Remove the vacuum hose from the brake booster. Manifold vacuum should be 

available at the brake booster end of the hose with the engine at idle speed and the 
transmission in PARK or NEUTRAL. Make sure that all unused vacuum outlets are 
correctly capped, hose connectors are correctly secured and vacuum hoses are in 
good condition. When it is established that manifold vacuum is available to the 
brake booster, connect the vacuum hose to the brake booster and repeat Step 3. If 
no downward movement of the brake pedal is felt, the vacuum booster system is 
not functioning. 

6. 6. Run the engine for a minimum of 10 seconds at fast idle. Stop the engine and let 

the vehicle stand for 10 minutes. Then, operate the brake pedal with approximately 
98N (20 lb) of force. The pedal feel (brake applications) should be the same as 
noted with the engine running. If the brake pedal feels hard (no power assist), 
install a new check valve and then repeat the testing. If the brake pedal still feels 
hard, install a new brake booster. If the brake pedal movement feels spongy, bleed 
the brake system. Refer to General Procedures. 

Brake Master Cylinder 

Usually, the first and strongest indicator of anything wrong in the brake system is a feeling 
through the brake pedal. In diagnosing the condition of the brake master cylinder, check 

Make a hard brake application. 

Release the brake pedal and measure the distance from brake pedal 
rubber to the floor. The brake pedal should return to its original position. 

Does the brake pedal return to its original position? 
Yes 

Vehicle is OK. 

No 

GO to C2

.  

C2: CHECK FOR BRAKE PEDAL BINDING

Check the brake pedal to make sure it is operating freely. 

Is the brake pedal operating freely? 
Yes 

INSTALL a new brake booster. REFER to Section 

 206-07 Power Brake 

Actuation

. TEST the system for normal operation. 

No 

REPAIR or INSTALL new brake pedal and bracket. TEST the system for 
normal operation. 


Content   ..  58  59  60  61   ..