Fiat 500X (2022 year). Manual in english - page 17
 

  Index      Manuals     Fiat 500X (2022 year). Manual in english


Search            copyright infringement  


Content      ..     15      16      17      18     ..


Fiat 500X (2022 year). Manual in english - page 17


SERVICING AND MAINTENANCE

263

4. Replace the bayonet-fitted bulb.

Bulb Assembly

5. Finally, refit the inspection door, fully 

tightening fixing screws.

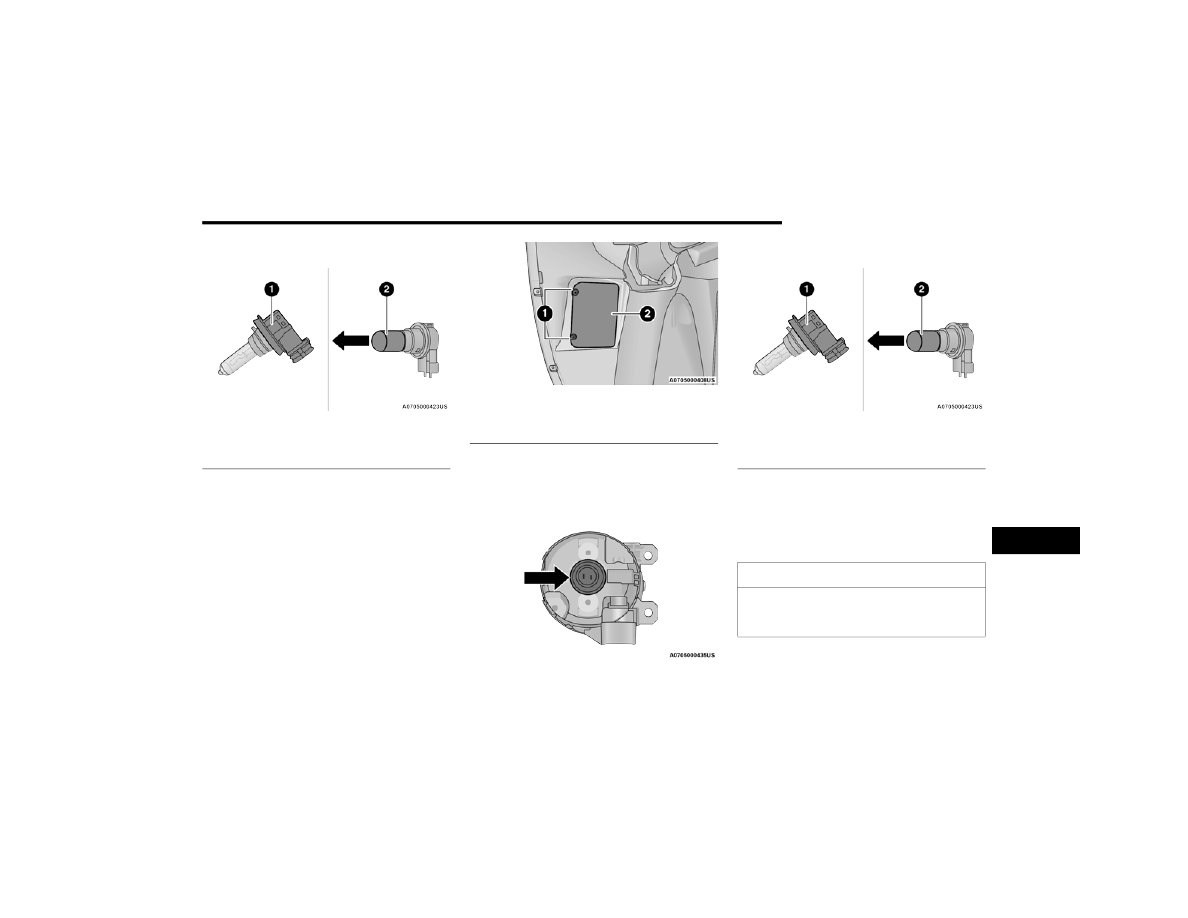
Fog Lights (Halogen)
See below steps for bulb replacement:
1. Turn the front wheels completely.
2. Use a suitable tool to remove the access door.

Fog Light Access

3. Turn the bulb and bulb holder assembly 

counterclockwise and then remove it sliding it 

outwards.

Fog Lamp Bulb Location

4. Replace the bayonet-fitted bulb.

Bulb Assembly

5. Finally, refit the inspection door, fully 

tightening fixing screws.

Side Indicators on External Rear View Mirrors – 

If Equipped

1 — Bulb Holder
2 — Bulb

1 — Screws
2 — Access Door

1 — Bulb Holder
2 — Bulb

CAUTION!

The procedure is described as a guideline. For 

the replacement of the lamp it is recommended 

that you contact an authorized dealer.

8

-------------------------------------------------------------------------------------------------------------------------------------------------------------

264

SERVICING AND MAINTENANCE


See below steps for bulb replacement:
1. Remove the mirror cap on the outside rear 

view mirror.

Mirror Cap

2. Remove the transparent lens assembly as 

shown.

3. Remove the bulb socket and bulb from the 

transparent lens assembly by rotating the 

socket counterclockwise.

4. Remove the bulb from the bulb socket by 

pulling the bulb straight out.

5. Insert the new bulb, making sure that it is 

locked into place

6. Reinstall the socket in to the transparent lens 

assembly.

7. Reinstall the cover on the outside rear view 

mirror, making sure it is locked into place.

Rear Tail Lamps

Tail Light

Tail Lamps
The tail lights are LED-type. For replacing these 

bulbs, contact an authorized dealership.
Brake Lights
The brake lights are LED-type. For replacing these 

bulbs, contact an authorized dealership.
Side Marker
Side marker lights are LED-type. For replacing 

these bulbs, contact an authorized dealer
3th Stop Lamp
The CHMSL is LED. For their replacement see an 

authorized dealer.

1 — Mirror Cover
2 — Side Indicator Lens
3 — Side Indicator Bulb Location

1 — Tail lights/Brake Lights
2 — Direction indicator
3 — REVERSE lights

-------------------------------------------------------------------------------------------------------------------------------------------------------------

SERVICING AND MAINTENANCE

265

Reversing Light & Rear Direction Indicators
See below steps for bulb replacement:
1. Open liftgate
2. Using a suitable tool, undo the two inboard 

screws, then release the light cluster from the 

respective pin fasteners pulling it carefully.

Tail Light Screws

3. Disconnect the connector, then undo the two 

screws to access the bulbs.

Tail Light Access

4. Locate faulty bulb and press slightly and turn 

at the same time: counterclockwise to extract; 

clockwise to install.

5. Reposition the bulb holder assembly in the 

headlight body, proceed until you hear the tabs 

click.

6. Reinstall tail lamp assembly and close liftgate.

License Plate Lights
See below steps for bulb replacement:
To replace the bulbs proceed as follows:
1. Using a suitable tool remove the license plate 

lens.

License Plate Light Location

License Plate Light

8

-------------------------------------------------------------------------------------------------------------------------------------------------------------

266

SERVICING AND MAINTENANCE


2. Remove the bulbs from the individual side 

contacts.

Lamp Assembly

3. Insert the new bulbs, and ensure that they are 

properly locked between the contacts.

4. Reinstall the license plate lens.

NOTE:

If removal the license plate lens using a suitable 

tool, be sure to cover the tip of the suitable with a 

cloth so no damage is done to the lenses or the 

vehicle paint.

Replacing Interior Bulbs

Front Courtesy Light
See below steps for bulb replacement:
1. Using a suitable tool remove the front 

courtesy light as shown.

Front Courtesy Light Housing

2. Release the retainer clips and bulb housing as 

shown.

Front Courtesy Bulb Housing

3. Replace the bulbs by pulling straight out of 

bulb housing.

Front Courtesy Bulb Housing

1 — Bulb Holder
2 — Bulb

1 — Retaining Clips
2 — Bulb Housing

-------------------------------------------------------------------------------------------------------------------------------------------------------------

SERVICING AND MAINTENANCE

267

4. Insert the new bulbs, making sure that they are 

properly locked.

5. Reassemble the bulb housing and courtesy 

light housing making sure that they are 

properly locked.

6. Install the front courtesy light making sure that 

it is properly locked.

Dome Light Vanity Mirror
See below steps for bulb replacement:
1. Lift the cover of the mirror and pull out the 

visor mirror light cover.

2. Replace the bulb, releasing it from the side 

contacts, and then insert the new bulb, making 

sure that it is properly locked between the 

contacts.

Visor Mirror Cover

3. Reinstall the visor mirror light cover making 

sure that it is properly locked.

4. Finally lower the visor mirror cover to the 

mirror.

Dome Light Glove Compartment
See below steps for bulb replacement:
1. Open the glove compartment.
2. Place your fingers inside the light assembly, 

pull the bulb to replace it.

Bulb Removal/Installation

3. Insert the new bulb, making sure it is properly 

locked.

1 — Visor Mirror Cover
2 — Visor Mirror Light

8

-------------------------------------------------------------------------------------------------------------------------------------------------------------

268

SERVICING AND MAINTENANCE


(Continued)

Rear Dome Light — Without Retractable Roof
See below steps for bulb replacement:
1. Using a suitable tool release the lamp 

assembly at both the ends.

2. Open the flap and replace the bulb.

Rear Dome Light

3. Insert the new bulb, locking it between the 

contacts.

4. Reinstall the dome light.

Dome Light
See below steps for bulb replacement:

1. Lower the handle in the direction shown 

remove the dome light.

Retractable Roof Light

2. Replace the bulb by removing it from the side 

contacts.

Bulb

3. Insert the new bulb, locking it between the 

contacts.

4. Reinstall the dome light.

Interior Cargo Lights
See below steps for bulb replacement:
1. Open the luggage compartment and remove 

the dome light assembly.

2. Open the light cover and replace the bulb.

Light Cover

3. Close the light cover over the bulb.
4. Reinstall the dome light in its correct position.

1 — Bulb
2 — Flap

WARNING!

Before proceeding with the lamp replace

-

ment, wait for the lamp to cool: DANGER OF 

BURNS!

-------------------------------------------------------------------------------------------------------------------------------------------------------------

SERVICING AND MAINTENANCE

269

TIRES

T

IRE

 S

AFETY

 I

NFORMATION


Tire safety information will cover aspects of the 

following information: Tire Markings, Tire 

Identification Numbers, Tire Terminology and 

Definitions, Tire Pressures, and Tire Loading.

Tire Markings 

Tire Markings

NOTE:

P (Passenger) — Metric tire sizing is based on US 

design standards. P-Metric tires have the letter 

“P” molded into the sidewall preceding the size 

designation. Example: P215/65R15 95H.

European — Metric tire sizing is based on Euro

-

pean design standards. Tires designed to this 

standard have the tire size molded into the side

-

wall beginning with the section width. The letter 

"P" is absent from this tire size designation. 

Example: 215/65R15 96H.

LT (Light Truck) — Metric tire sizing is based on 

US design standards. The size designation for 

LT-Metric tires is the same as for P-Metric tires 

except for the letters “LT” that are molded into 

the sidewall preceding the size designation. 

Example: LT235/85R16.

Temporary spare tires are designed for tempo

-

rary emergency use only. Temporary high pres

-

sure compact spare tires have the letter “T” or 

“S” molded into the sidewall preceding the size 

designation. Example: T145/80D18 103M.

High flotation tire sizing is based on US design 

standards and it begins with the tire diameter 

molded into the sidewall. Example: 31x10.5 

R15 LT.

Modifications or repair of the electrical system 

performed incorrectly and without taking into 

account the technical characteristics can 

cause malfunctions with the risk of fire.

Halogen lamps contain gas under pressure, in 

the event of breakage be careful of the projec

-

tion of fragments of glass.

Halogen lamps must be handled by touching 

only the metallic part. If the transparent bulb 

is in contact with the fingers, reduces the 

intensity of the emitted light and you can also 

affect the life of the lamp. In case of acci

-

dental contact, rub the bulb with a cloth damp

-

ened with alcohol and allow to dry.

WARNING!

1 — US DOT Safety Standards Code (TIN)
2 — Size Designation
3 — Service Description
4 — Maximum Load
5 — Maximum Pressure
6 — Treadwear, Traction and 

Temperature Grades

8

-------------------------------------------------------------------------------------------------------------------------------------------------------------

270

SERVICING AND MAINTENANCE


TIRE SIZING CHART 

EXAMPLE:

Example Size Designation: P215/65R15XL 95H, 215/65R15 96H, LT235/85R16C, T145/80D18 103M, 31x10.5 R15 LT
P = Passenger car tire size based on US design standards, or
"....blank...." = Passenger car tire based on European design standards, or
LT = Light truck tire based on US design standards, or
T or S = Temporary spare tire or
31 = Overall diameter in inches (in)
215, 235, 145 = Section width in millimeters (mm)
65, 85, 80 = Aspect ratio in percent (%) 

Ratio of section height to section width of tire, or

10.5 = Section width in inches (in)
R = Construction code 

"R" means radial construction, or

"D" means diagonal or bias construction

15, 16, 18 = Rim diameter in inches (in)
Service Description:
95 = Load Index 

A numerical code associated with the maximum load a tire can carry

H = Speed Symbol 

A symbol indicating the range of speeds at which a tire can carry a load corresponding to its load index under certain operating conditions

The maximum speed corresponding to the speed symbol should only be achieved under specified operating conditions (i.e., tire pressure, vehicle loading, 

road conditions, and posted speed limits)

-------------------------------------------------------------------------------------------------------------------------------------------------------------

SERVICING AND MAINTENANCE

271

Tire Identification Number (TIN)

The TIN may be found on one or both sides of the tire; however, the date code may only be on one side. Tires with white sidewalls will have the full TIN, including 

the date code, located on the white sidewall side of the tire. Look for the TIN on the outboard side of black sidewall tires as mounted on the vehicle. If the TIN is 

not found on the outboard side, then you will find it on the inboard side of the tire.

Load Identification:
Absence of the following load identification symbols on the sidewall of the tire indicates a Standard Load (SL) tire:

XL = Extra load (or reinforced) tire, or

LL = Light load tire or

C, D, E, F, G = Load range associated with the maximum load a tire can carry at a specified pressure

Maximum Load – Maximum load indicates the maximum load this tire is designed to carry
Maximum Pressure – Maximum pressure indicates the maximum permissible cold tire inflation pressure for this tire

EXAMPLE:

EXAMPLE:

DOT MA L9 ABCD 0301
DOT = Department of Transportation 

This symbol certifies that the tire is in compliance with the US Department of Transportation tire safety standards and is approved for highway use

MA = Code representing the tire manufacturing location (two digits)
L9 = Code representing the tire size (two digits)
ABCD = Code used by the tire manufacturer (one to four digits)
03 = Number representing the week in which the tire was manufactured (two digits) 

03 means the 3rd week

8

-------------------------------------------------------------------------------------------------------------------------------------------------------------

272

SERVICING AND MAINTENANCE


Tire Terminology And Definitions

01 = Number representing the year in which the tire was manufactured (two digits) 

01 means the year 2001

Prior to July 2000, tire manufacturers were only required to have one number to represent the year in which the tire was manufactured. Example: 031 could 

represent the 3rd week of 1981 or 1991

Term

Definition

B-pillar

The vehicle B-pillar is the structural member of the body located behind the 

front door.

Cold Tire Inflation Pressure

Cold tire inflation pressure is defined as the tire pressure after the vehicle has 

not been driven for at least three hours, or driven less than 1 mile (1.6 km) 

after sitting for a minimum of three hours. Inflation pressure is measured in 

units of PSI (pounds per square inch) or kPa (kilopascals).

Maximum Inflation Pressure

The maximum inflation pressure is the maximum permissible cold tire 

inflation pressure for this tire. The maximum inflation pressure is molded into 

the sidewall.

Recommended Cold Tire Inflation Pressure

Vehicle manufacturer's recommended cold tire inflation pressure as shown 

on the tire placard.

Tire Placard

A label permanently attached to the vehicle describing the vehicle’s loading 

capacity, the original equipment tire sizes and the recommended cold tire 

inflation pressures.

EXAMPLE:

-------------------------------------------------------------------------------------------------------------------------------------------------------------

SERVICING AND MAINTENANCE

273

Tire Loading And Tire Pressure  

NOTE:

The proper cold tire inflation pressure is listed on 

the driver’s side B-pillar or the rear edge of the 

driver's side door.
Check the inflation pressure of each tire, including 

the spare tire (if equipped), at least monthly and 

inflate to the recommended pressure for your 

vehicle.

Example Tire Placard Location (Door)

Example Tire Placard Location (B-pillar)

Tire And Loading Information Placard

Tire And Loading Information Placard

This placard tells you important information about 

the:
1. Number of people that can be carried in the 

vehicle.

2. Total weight your vehicle can carry.
3. Tire size designed for your vehicle.
4. Cold tire inflation pressures for the front, rear, 

and spare tires.

Loading 

The vehicle maximum load on the tire must not 

exceed the load carrying capacity of the tire on your 

vehicle. You will not exceed the tire's load carrying 

capacity if you adhere to the loading conditions, 

tire size, and cold tire inflation pressures specified 

on the Tire and Loading Information placard  

Ú

page 112.

NOTE:

Under a maximum loaded vehicle condition, Gross 

Axle Weight Rating (GAWR) for the front and rear 

axles must not be exceeded. 
For further information on GAWR, vehicle loading, 

and trailer towing  

Ú

page 112.

8

-------------------------------------------------------------------------------------------------------------------------------------------------------------

274

SERVICING AND MAINTENANCE


To determine the maximum loading conditions of 

your vehicle, locate the statement “The combined 

weight of occupants and cargo should never 

exceed XXX kg or XXX lbs” on the Tire and Loading 

Information placard. The combined weight of 

occupants, cargo/luggage and trailer tongue 

weight (if applicable) should never exceed the 

weight referenced here.

Steps For Determining Correct Load 

Limit—
(1) Locate the statement “The combined 

weight of occupants and cargo should 

never exceed XXX kg or XXX lbs.” on your 

vehicle's placard.
(2) Determine the combined weight of 

the driver and passengers that will be 

riding in your vehicle.
(3) Subtract the combined weight of the 

driver and passengers from XXX kg or 

XXX lbs.

(4) The resulting figure equals the 

available amount of cargo and luggage 

load capacity. For example, if “XXX” 

amount equals 1400 lbs. and there will 

be five 150 lb passengers in your 

vehicle, the amount of available cargo 

and luggage load capacity is 650 lbs. 

(1400-750 (5x150) = 650 lbs.)
(5) Determine the combined weight of 

luggage and cargo being loaded on the 

vehicle. That weight may not safely 

exceed the available cargo and luggage 

load capacity calculated in Step 4.
(6) If your vehicle will be towing a trailer, 

load from your trailer will be transferred 

to your vehicle. Consult this manual to 

determine how this reduces the 

available cargo and luggage load 

capacity of your vehicle.

Metric Example For Load Limit
For example, if “XXX” amount equals 635 kg and 

there will be five 68 kg passengers in your vehicle, 

the amount of available cargo and luggage load 

capacity is 295 kg (635-340 (5x68) = 295 kg) as 

shown in step 4.

NOTE:

If your vehicle will be towing a trailer, load from 

your trailer will be transferred to your vehicle. 

The following table shows examples on how to 

calculate total load, cargo/luggage, and towing 

capacities of your vehicle with varying seating 

configurations and number and size of occu

-

pants. This table is for illustration purposes only 

and may not be accurate for the seating and 

load carry capacity of your vehicle.

For the following example, the combined weight 

of occupants and cargo should never exceed 

865 lb (392 kg).

-------------------------------------------------------------------------------------------------------------------------------------------------------------

SERVICING AND MAINTENANCE

275

WARNING!

Overloading of your tires is dangerous. Overloading can cause tire failure, affect vehicle handling, and increase your stopping distance. Use tires of the 

recommended load capacity for your vehicle. Never overload them.

8

-------------------------------------------------------------------------------------------------------------------------------------------------------------

276

SERVICING AND MAINTENANCE


(Continued)

T

IRES

 — G

ENERAL

 I

NFORMATION


Tire Pressure 

Proper tire inflation pressure is essential to the 

safe and satisfactory operation of your vehicle. 

Four primary areas are affected by improper tire 

pressure:

Safety

Fuel Economy

Tread Wear

Ride Comfort and Vehicle Stability

Safety

Both underinflation and overinflation affect the 

stability of the vehicle and can produce a feeling of 

sluggish response or over responsiveness in the 

steering.

NOTE:

Unequal tire pressures from side to side may 

cause erratic and unpredictable steering 

response.

Unequal tire pressure from side to side may 

cause the vehicle to drift left or right.

Fuel Economy
Underinflated tires will increase tire rolling 

resistance resulting in higher fuel consumption.

Tread Wear
Improper cold tire inflation pressures can cause 

abnormal wear patterns and reduced tread life, 

resulting in the need for earlier tire replacement.
Ride Comfort And Vehicle Stability
Proper tire inflation contributes to a comfortable 

ride. Overinflation produces a jarring and 

uncomfortable ride.

Tire Inflation Pressures 

The proper cold tire inflation pressure is listed on 

the driver's side B-pillar or rear edge of the driver's 

side door.
At least once a month:

Check and adjust tire pressure with a good 

quality pocket-type pressure gauge. Do not 

make a visual judgment when determining 

proper inflation. Tires may look properly inflated 

even when they are under-inflated.

Inspect tires for signs of tire wear or visible 

damage.

WARNING!

Improperly inflated tires are dangerous and 

can cause collisions.

Underinflation increases tire flexing and can 

result in overheating and tire failure.

Overinflation reduces a tire's ability to cushion 

shock. Objects on the road and chuckholes 

can cause damage that result in tire failure.

Overinflated or underinflated tires can affect 

vehicle handling and can fail suddenly, 

resulting in loss of vehicle control.

Unequal tire pressures can cause steering 

problems. You could lose control of your 

vehicle.

Unequal tire pressures from one side of the 

vehicle to the other can cause the vehicle to 

drift to the right or left.

Always drive with each tire inflated to the 

recommended cold tire inflation pressure.

WARNING!

CAUTION!

After inspecting or adjusting the tire pressure, 

always reinstall the valve stem cap. This will 

prevent moisture and dirt from entering the 

valve stem, which could damage the valve stem.

-------------------------------------------------------------------------------------------------------------------------------------------------------------

SERVICING AND MAINTENANCE

277

Inflation pressures specified on the placard are 

always “cold tire inflation pressure”. Cold tire 

inflation pressure is defined as the tire pressure 

after the vehicle has not been driven for at least 

three hours, or driven less than 1 mile (1.6 km) 

after sitting for a minimum of three hours. The cold 

tire inflation pressure must not exceed the 

maximum inflation pressure molded into the tire 

sidewall.
Check tire pressures more often if subject to a 

wide range of outdoor temperatures, as tire 

pressures vary with temperature changes.
Tire pressures change by approximately 1 psi 

(7 kPa) per 12°F (7°C) of air temperature change. 

Keep this in mind when checking tire pressure 

inside a garage, especially in the Winter.
Example: If garage temperature = 68°F (20°C) 

and the outside temperature = 32°F (0°C) then 

the cold tire inflation pressure should be increased 

by 3 psi (21 kPa), which equals 1 psi (7 kPa) for 

every 12°F (7°C) for this outside temperature 

condition.
Tire pressure may increase from 2 to 6 psi (13 to 

40 kPa) during operation. DO NOT reduce this 

normal pressure build up or your tire pressure will 

be too low.

Tire Pressures For High Speed Operation 

The manufacturer advocates driving at safe 

speeds and within posted speed limits. Where 

speed limits or conditions are such that the vehicle 

can be driven at high speeds, maintaining correct 

tire inflation pressure is very important. Increased 

tire pressure and reduced vehicle loading may be 

required for high-speed vehicle operation. Refer to 

an authorized tire dealer or original equipment 

vehicle dealer for recommended safe operating 

speeds, loading and cold tire inflation pressures.

Radial Ply Tires 

Tire Repair
If your tire becomes damaged, it may be repaired if 

it meets the following criteria:

The tire has not been driven on when flat.

The damage is only on the tread section of your 

tire (sidewall damage is not repairable).

The puncture is no greater than a ¼ of an inch 

(6 mm).

Consult an authorized tire dealer for tire repairs 

and additional information.
Damaged Run Flat tires, or Run Flat tires that have 

experienced a loss of pressure should be replaced 

immediately with another Run Flat tire of identical 

size and service description (Load Index and 

Speed Symbol). Replace the tire pressure sensor 

as well as it is not designed to be reused.

Run Flat Tires — If Equipped

Run Flat tires allow you the capability to drive 

50 miles (80 km) at 50 mph (80 km/h) after a 

rapid loss of inflation pressure. This rapid loss of 

inflation is referred to as the Run Flat mode. A Run 

Flat mode occurs when the tire inflation pressure is 

of/or below 14 psi (96 kPa). Once a Run Flat tire 

reaches the Run Flat mode it has limited driving 

capabilities and needs to be replaced immediately. 

A Run Flat tire is not repairable. When a Run Flat 

tire is changed after driving with underinflated tire 

WARNING!

High speed driving with your vehicle under 

maximum load is dangerous. The added strain 

on your tires could cause them to fail. You could 

have a serious collision. Do not drive a vehicle 

loaded to the maximum capacity at continuous 

speeds above 75 mph (120 km/h).

WARNING!

Combining radial ply tires with other types of 

tires on your vehicle will cause your vehicle to 

handle poorly. The instability could cause a 

collision. Always use radial ply tires in sets of 

four. Never combine them with other types of 

tires.

8

-------------------------------------------------------------------------------------------------------------------------------------------------------------

278

SERVICING AND MAINTENANCE


condition, please replace the TPMS sensor as it is 

not designed to be reused when driven under Run 

Flat mode 14 psi (96 kPa) condition.

NOTE:

TPMS sensor must be replaced after driving the 

vehicle on a flat tire condition.
It is not recommended driving a vehicle loaded at 

full capacity or to tow a trailer while a tire is in the 

Run Flat mode.
See  

Ú

page 185.

Tire Spinning 

When stuck in mud, sand, snow, or ice conditions, 

do not spin your vehicle's wheels above 30 mph 

(48 km/h) or for longer than 30 seconds 

continuously without stopping.
For further information  

Ú

page 231.

Tread Wear Indicators 

Tread wear indicators are in the original equipment 

tires to help you in determining when your tires 

should be replaced.

Tire Tread

These indicators are molded into the bottom of the 

tread grooves. They will appear as bands when the 

tread depth becomes a 1/16 of an inch (1.6 mm). 

When the tread is worn to the tread wear 

indicators, the tire should be replaced.
For further information  

Ú

page 279.

Life Of Tire  

The service life of a tire is dependent upon varying 

factors including, but not limited to:

Driving style.

Tire pressure - Improper cold tire inflation pres

-

sures can cause uneven wear patterns to 

develop across the tire tread. These abnormal 

wear patterns will reduce tread life, resulting in 

the need for earlier tire replacement.

Distance driven.

Performance tires, tires with a speed rating of V 

or higher, and Summer tires typically have a 

reduced tread life. Rotation of these tires per 

the vehicle scheduled maintenance is highly 

recommended.

NOTE:

Wheel valve stem must be replaced as well when 

installing new tires due to wear and tear in existing 

tires.

WARNING!

Fast spinning tires can be dangerous. Forces 

generated by excessive wheel speeds may 

cause tire damage or failure. A tire could 

explode and injure someone. Do not spin your 

vehicle's wheels faster than 30 mph (48 km/h) 

for more than 30 seconds continuously when 

you are stuck, and do not let anyone near a 

spinning wheel, no matter what the speed.

1 — Worn Tire
2 — New Tire

WARNING!

Tires and the spare tire should be replaced after 

six years, regardless of the remaining tread. 

Failure to follow this warning can result in 

sudden tire failure. You could lose control and 

have a collision resulting in serious injury or 

death.

-------------------------------------------------------------------------------------------------------------------------------------------------------------


Content      ..     15      16      17      18     ..