Fiat 500 (2022 year). Manual in english - page 12


  Index      Manuals     Fiat 500 (2022 year). Manual in english


Search            copyright infringement  


Content      ..     10      11      12      13     ..


Fiat 500 (2022 year). Manual in english - page 12


191

G

J

K

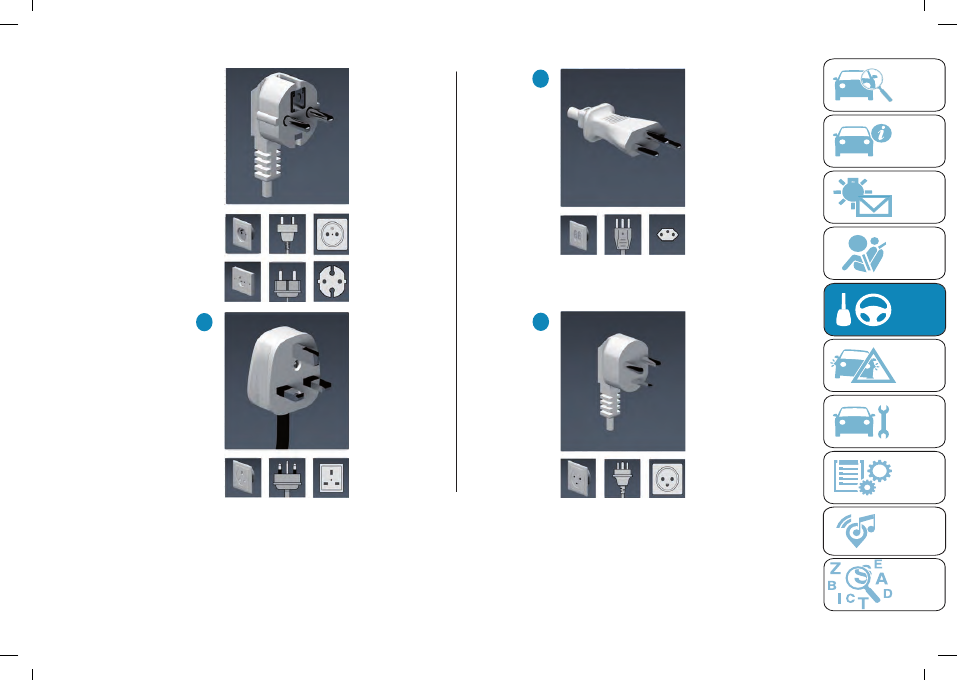
CEE 7/7

192

F0S1203
-------------------------------------------------------------------------------------------------------------------------------------------------------------

 STARTING AND DRIVING

192

CHARGE STATUS

CONTROL UNIT

202) 203)

Signal LED

There are three LEDs on the front of

the charge status control unit:

GREEN LED on

(A) fig. 193:

indicates correct operation in the

domestic power distribution system: it

is therefore possible to proceed with

the high-voltage battery charging.

RED LED on

(B): indicates a fault in

the charging system.

YELLOW LED on

(C): indicates a

possible failure in the domestic power

distribution system.

WARNING Never carry out any repair

work on your own: always contact the

Fiat Dealership.

A

B

C

193

F0S1062

For the type of failure, refer to the

description under "Charging system

failure" on the following pages.

Symbol label

On the back of the charge status

control unit there is a summary label,

fig. 194, which shows some symbols.

The main ones are listed below:

This symbol indicates a

risk of electric shock.

this symbol indicates

a general dangerous

situation.

This symbol shows the

minimum operating

temperature of the charge

status control unit in

accordance with IEC

61851 and IEC 62752

certification.

NOTE FCA guarantees

that the device has been

tested for use from -40

°

C

to +50

°

C. If the device

is not used and must be

stored, the temperature

must be between -40

°

C

and +80

°

C. Exceeding

these temperature values

may damage the device.

The presence of this

symbol on the label

indicates that the specific

"Mode 2" charge

cable cannot be used

for domestic power

distribution networks

where the earthing cable is

not present. For specific

markets, without the

grounding cable, check for

"COUNTRY GROUP" on

the label of the charging

cable.

-------------------------------------------------------------------------------------------------------------------------------------------------------------

193

The presence of this

symbol on the label

indicates that the charge

status control unit does

not have the function of

disconnecting the earthing

cable.

The symbol indicates that

the charging unit should

not be placed in the waste

if it no longer works:

for disposal refer to the

environmental regulations

in force in the country in

which it circulates.

The symbol prompts you

to read the instructions in

this publication carefully

before using the charging

cable.

194

F0S1204

202)

The device is to be used exclusively

for charging the car.

203)

Never attempt to make a repair

and/or perform maintenance on the

charge cables, this may result in serious

personal injury or even death. Always go to

a Fiat Dealership.

-------------------------------------------------------------------------------------------------------------------------------------------------------------

 STARTING AND DRIVING

194

CHARGING SYSTEM FAILURE

Any faults during charging are displayed by the LEDs, either steady or flashing, located on the front of the charge status control

unit.

Refer to the table below.

GREEN LED

RED LED

YELLOW

LED

Description

Action/Consequence

1

OFF

OFF

OFF

Charging cable not connected to

the domestic charging port or

power failure in the domestic

power supply mains

2

ON

OFF

OFF

There are no faults in the

domestic power distribution

system, so the charging cable

can be connected to the

charging port on the car

3

ON

ON (Flashing)

ON

Overheating at the charging port

of the domestic mains power

supply

When the normal temperature is

reached, the system will make a

new charge attempt at a lower

current level.

4

ON

OFF

ON (Flashing)

Charging to a lower current level

due to overheating of the

charging port of the domestic

electricity distribution mains (see

point 3)

-------------------------------------------------------------------------------------------------------------------------------------------------------------

195

GREEN LED

RED LED

YELLOW

LED

Description

Action/Consequence

5

ON

ON

ON (Flashing)

Overheating at the charging port

of the domestic mains power

supply

Overheating during charging at a

lower current level (see point 4)

Proceed as follows:

disconnect the charge cable

from the car and from the

domestic power socket with care

(the domestic power plug may be

hot);

please wait for the domestic

power plug and socket to reach a

normal temperature;

reconnect the cable to the

domestic power socket and to the

car’s charge socket, then try to

charge again.

In case of a new anomaly, contact

a certified electrician

6

ON

ON (2 blinks)

ON (2 blinks)

Lack of earthing cable in the

charging port of the domestic

mains power supply

The system will make a new

charge attempt after 30 seconds

(6 attempts in total).

7

ON

ON

ON (2 blinks)

Lack of earthing cable in the

charging port of the domestic

mains power supply

New charge attempt (see point 6)

failed.

Disconnect the charge cable from

the car and the domestic power

socket and reconnect it, then try

to charge again.

In case of a new anomaly, contact

a certified electrician.

-------------------------------------------------------------------------------------------------------------------------------------------------------------

 STARTING AND DRIVING

196

GREEN LED

RED LED

YELLOW

LED

Description

Action/Consequence

8

ON (Flashing)

OFF

OFF

Domestic mains power

incorrectly supplied

The system will make a new

charge attempt after 30 seconds

(6 attempts in total).

If the fault persists, disconnect the

charge cable from the car and the

domestic power socket and

reconnect it, then try to charge

again.

In case of a new anomaly, contact

a certified electrician.

9

ON

ON

OFF

Dispersion of electricity on the

car

Disconnect the charge cable from

the car and the domestic power

socket and reconnect it, then try

to charge again.

In case of a new anomaly, contact

a Fiat Dealership.

10

ON

ON (flashing)

OFF

Electric charging current too high

The system will make a new

charge attempt after 30 seconds

(6 attempts in total).

11

ON

ON (7 blinks)

OFF

Electric charging current too high

New charge attempt (see point

10) failed.

Disconnect the charge cable from

the car and the domestic power

socket and reconnect it, then try

to charge again.

In case of a new anomaly, contact

a Fiat Dealership.

-------------------------------------------------------------------------------------------------------------------------------------------------------------

197

GREEN LED

RED LED

YELLOW

LED

Description

Action/Consequence

12

ON

ON (2 blinks)

OFF

Charge anomaly on the car

The system will make a new

charge attempt after 30 seconds

(6 attempts in total).

If the fault persists, disconnect the

charging cable from the car and

the home power port and

reconnect it, then try charging

again.

In case of a new anomaly, contact

a Fiat Dealership.

13

ON

ON (3 blinks)

OFF

Charging cable failure

14

ON

ON (4 blinks)

OFF

15

ON

ON (5 blinks)

OFF

16

ON

ON (6 blinks)

OFF

Key

ON = LED on

OFF = LED off

BLINK = 0.5 seconds ON / 0.5 seconds OFF / 3 seconds pause

FLASHING = 0.5 seconds ON / 0.5 seconds OFF

-------------------------------------------------------------------------------------------------------------------------------------------------------------

 STARTING AND DRIVING

198

The device is maintenance-free.

If you need to clean the device, use a

soft cloth slightly dampened with a mild

detergent solution, then wipe dry with a

dry cloth. Do not use abrasive products

or flammable substances (e.g. alcohol,

petrol or their derivatives).

Do not

wash

the device with water, hazard of fire or

electric shock with the risk of serious

injury or death.

WARNING Only clean the device

when it is DISCONNECTED from both

the domestic charging port and the

charging port located on the car.

FCC (Federal

Communications

Commission)

SPECIFICATIONS

The state of charge Control Unit

complies with Section 15 of the FCC

Regulation.
The use of the device meets the

following two requirements:
1. This device does not cause harmful

interference.
2. Correct operation of the device may

be affected by interference from nearby

electrical/electronic devices.

This device is designed to withstand

radio frequency interference (RFI),

however, some factors (e.g., high

intensity radio signals or radio

transmitters in the vicinity of the device)

may cause it to malfunction. If you find

an anomaly in the operation of the

device, contact the Fiat Dealership.

WARNING Modifications and/or repairs

made incorrectly and NOT carried out

by the Fiat Dealership will invalidate the

Warranty and the above requirements.

"MODE 3" CHARGE

CABLE

(for versions/markets where provided)
The car can be equipped with a "

Mode 3

" charging cable fig. 195,

located inside a special bag under the

boot floor.
The "

Mode 3

" charging cable:

complies with EN 61851- 1, EN

62196- 1 and EN 62196- 2 standards;

can be used for a minimum

temperature of -40

°

C up to a maximum

temperature of +50

°

C.

This type of cable allows you to

connect to public alternating current

(AC) charging stations. The charging

speed may be faster than charging

through a domestic power socket.

Using this type of cable it is possible to

charge the car with a current of up to

16A.
NOTE After use, remember to replace

the protective covers on both sides of

the charging cable correctly to prevent

moisture and/or dust from entering the

cable charging port connections.

195

F0S1064

"MODE 4" CHARGING

CABLE - FAST CHARGE

This can be used to charge from DC

(direct current) public charging sockets.
The charging cable is connected to the

charging station.
The charging procedure can be faster

than with AC charging stations.

CHARGING SYSTEM/

MAINTENANCE/CLEANING

-------------------------------------------------------------------------------------------------------------------------------------------------------------

199

C

196

F0S1120

ALTERNATING

CURRENT (AC)

CHARGING AT

HOME

204) 205) 206) 207) 208) 209) 210) 211) 212)

67) 68) 69) 70) 71) 72) 73) 74) 75)

CHARGING PROCEDURE

WARNING Always connect the

cable to the charging port of the

domestic mains first and only then

to the car.

The car high-voltage battery is charged

by connecting the Mode 2 charge

cable (for versions/markets where

provided) to an AC charging port.
For the characteristics of the "Mode 2"

cable, refer to the "Power sources that

can be used - Mode 2 cable" chapter.
To charge, proceed as follows:

park the car safely (transmission in

position "P" - Park);

turn the ignition device to the STOP

position;

engage the electric parking brake;

take the charging kit located in the

boot (for versions/markets where

provided);

remove any dust that may have

accumulated on the charging

connector and charging port;

unroll the charging cable and

connect it to an AC charging port,

fig. 197;

197

F0S1051

NOTE From the moment the plug is

connected to the domestic mains

charging port, the 3 LEDs on the

control unit of the cable will flash

for approx. 6 seconds (control unit

switching on phase);

open the charging flap by pressing

on the area indicated by the arrow;

198

F0S1052

remove the protective cover of the

charging port and attach it to the

device;

grasp the charging connector by

the handle (A) fig. 199, remove the

protective cover (where provided) and

insert it into the charging port until you

hear the click indicating that it has been

locked;

199

F0S1309

if no scheduled charging has been

set (see the "Charging functions"

chapter), charging starts automatically;

-------------------------------------------------------------------------------------------------------------------------------------------------------------

 STARTING AND DRIVING

200

check by turning on the LEDs on the

cable control unit that there are no

faults in the charging system (for more

information see "charge status control

unit" chapter in the "Power sources

that can be used - Mode 2 cable"

section). If there are no anomalies,

the green LEDs located next to the

charging port will light up momentarily.

In case of anomalies, refer to the

description in the "Charging system

failure" chapter in the "Power sources

that can be used - Mode 2 cable"

section.
NOTE The charging procedure is

interrupted when opening the bonnet:

a dedicated message will be shown

on the instrument panel display. The

charge will be reactivated when the

bonnet is closed correctly.
The time required to charge the high-

voltage battery depends on several

factors: for more information see the

description in the “Electric” chapter of

in the “Multimedia" section.
If the passenger compartment

preconditioning is activated, the battery

charging time will be extended. The

time required for heating/cooling the

car is mainly determined by the outside

temperature.

WARNING The maximum power

consumption of the charging port

depends on the type of contract signed

by the user, the type of cable used and

the charge level set in the

Uconnect™

system menu.

WARNING Only use charging

cables supplied with your car, or a

replacement cable recommended by

FCA.

WARNING The high-voltage battery

must be charged in accordance with

the maximum amperage rating allowed

by local and national recommendations

for charging electric vehicles.

END OF CHARGING

PROCEDURE

The charging procedure ends when all

the LEDs (A) fig. 200, located next to

the charging port, will light up steady

green (during the charging phase, on

the other hand, the LEDs will light up

flashing/fixed green according to the

state of charge of the battery portion

indicated by the LED. The fixed green

light indicates that the battery portion is

fully charged).

200

F0S1220

DISCONNECTING THE

"MODE 2" CHARGING

CABLE

During the charging procedure the

cable is automatically locked on

the charging port in the car.

To complete the charging, proceed as

follows:

unlock the doors of the car allowing

the charging cable to unlock;

if charging is in progress, press

button (B) fig. 200 on the charging port;

disconnect the cable from the car

charging port by grasping the handle of

the charging connector and avoiding to

pull the cable directly;

disconnect the cable from the

charging port fig. 201;

-------------------------------------------------------------------------------------------------------------------------------------------------------------

201

201

F0S1053

replace the protective cover of the

charging port;

close the charging flap, making sure

it locks properly;

roll up the charging cable correctly,

repositioning the protective cover

correctly on the charging connector

(where provided). When rolling up,

take care not to damage the cable.

Then place the cable, together with the

charging kit, inside the housing located

inside the boot.

WARNING Before disconnecting the

charging connector, make sure that

the doors are unlocked. If the door is

locked, the charging connector locking

system does not allow disconnection.

204)

The charging current level ("Level 1"

/ "Level 2" / "Level 3", etc.) can only be

changed using the

Uconnect™

system

display (see "Settings" in the"Vehicle

mode" paragraph in the "Multimedia"

section). The default charge level set is

"Level 3". For countries in which the 13A

"Mode 2" charge cable can be used,

if the domestic power socket IS NOT

CERTIFIED, it is recommended to set

"Level 4" charge to the maximum, which

corresponds to approx. 10A. For the list of

country-specific cable types refer to what

is indicated in the "Mode 2 cable variant

table".

205)

The set level applies indifferently to

both AC home charging (Mode 2) and

charging from an AC public charging

station (Mode 3). It is therefore always

advisable to check that the level is set as

desired for the actual charging type that is

about to be carried out.

206)

Incorrect setting of the charge current

intensity can overload or overheat the

mains power supply of the domestic

power socket. Fire hazard. Before charging

from other domestic sockets, adjust the

charge current intensity to the mains. If

you do not know the mains, set to the

lowest level. Never use extension cords for

charging.

207)

Incorrect connection between

connector and charging terminals

constitutes a fire hazard!

208)

During normal operation, the

domestic power socket can overheat. In

the case of extreme overheating, the

charge is interrupted and the warning LED

on the front of the cable control unit will

turn on. Refer to the table in the "Charging

system failure" chapter in the "Power

sources that can be used" section.

209)

The "Mode 2" charge cable must be

connected to a dedicated circuit that is

not shared with other devices that absorb

electrical energy.

210)

Do not insert fingers or objects in the

cable charging connector.

211)

The high-voltage battery must only

be charged through approved, earthed

domestic sockets or at a public charging

station using the supplied Mode 3

charge cable (for versions/markets where

provided).

212)

Keep the charging flap closed when

the charging port is not in use.

67)

Do not charge if the external

temperature is -30

°

C or lower, as charging

is likely to take longer and the charging

device may be damaged.

68)

Do not leave the car or the charging

cable in areas where the external

temperature is below -40

°

C as they may

be damaged.

69)

In cold temperatures, the charging

cable may become stiff. Therefore, be

careful not to apply excessive force to the

charging cable as it may be damaged.

70)

Do not use personal generators to

charge the high-voltage battery. This may

cause fluctuations in charging and the

voltage may be insufficient, resulting in

damage to the car system.

-------------------------------------------------------------------------------------------------------------------------------------------------------------

 STARTING AND DRIVING

202

71)

Charging the high-voltage battery

using incorrect or damaged sockets, or

charging cables and not following the

prescribed charging procedures may

cause short circuits, fire and potential risk

of damage to the electrical system of the

car.

72)

Avoid leaving the battery for several

days with the charge indicator at or near

zero. The high-voltage battery may be

damaged.

73)

You do not need to wait until the

battery level is low to recharge. The

performance of the battery is optimal when

it is charged regularly.

74)

Charging the high-voltage battery may

take longer if the temperature of the high-

voltage battery is high or low.

75)

During charging, especially with fast

charging, battery cooling components may

be activated. Therefore, it is normal to hear

noises during this operation.

QUICK DOMESTIC

CHARGING

PROCEDURE FROM

THE WALLBOX

CHARGING STATION

WARNING The wallbox charging

station domestic charging station must

be installed by qualified personnel

after checking the domestic electrical

system. For information on available

wallbox charging stations, contact a

Fiat Dealership.

The high-voltage battery of your car

can be charged by directly connecting

the charging cable to the wallbox

charging station or using the

Mode 3

charge cable (for versions/markets

where provided).

For the characteristics of the "

Mode 3

"

cable, refer to the "Power sources that

can be used - Mode 3 cable" chapter.

Charging with wallbox charging station,

fig. 202, allows to reach, from a

domestic user, a higher charge power

than the charge achieved using a

domestic socket: the charging time,

as a consequence, is significantly

reduced.

202

F0S1271

NOTE The wallbox charging station

configuration may vary depending on

the country where the car is sold.

NOTE The electrical system of the

house must be checked regularly by

qualified personnel.

The maximum charging current value

is automatically set by the device,

depending on the building's electrical

system.

For the charging procedure, refer to the

"Alternating current (AC) charging at

home" chapter.

-------------------------------------------------------------------------------------------------------------------------------------------------------------

203

CHARGING

PROCEDURE FROM

PUBLIC CHARGING

STATION (AC)

213) 211) 215)

The high-voltage battery of the car can

be charged by directly connecting the

charging cable of the public charging

stations or using the

Mode 3

charge

cable (for versions/markets where

provided).

For the characteristics of the "Mode 3"

cable, refer to the "Power sources that

can be used - Mode 3 cable" chapter.

To charge, proceed as follows:

park the car safely (transmission in

position "P" - Park);

engage the electric parking brake;

turn the ignition device to the STOP

position;

pull out the charging cable fig. 203

(where provided) in the boot (inside a

special bag);

remove any dust that may have

accumulated on the charging

connector and charging port;

plug the charging connector into the

socket of the public charging station,

fig. 204;

203

F0S1207

204

F0S1054

open the charging flap fig. 205 by

pressing on the area indicated by the

arrow;

205

F0S1052

remove the protective cover of the

charging port and attach it to the

device;

grasp the charging cable, remove the

protective covers on both sides of the

cable (where provided). Hold the first

charging connector and insert it into

the charging port on the car until you

hear a click indicating that it is locked;

charging starts automatically if there

is no programming on the

Uconnect™

system (see chapter "Charging

functions"). If necessary, the public

charging station must be enabled;

follow the manufacturer's instructions

and warnings when using the charging

station;

the 5 LEDs with a steady green light

will light up momentarily to indicate the

correct insertion of the plug;

during charging, the LEDs will light

on with green flashing/green steady

light depending on the state of charge

-------------------------------------------------------------------------------------------------------------------------------------------------------------

 STARTING AND DRIVING

204

of the battery portion indicated by the

LED. The fixed green light indicates that

the battery portion is fully charged.

NOTE The charging procedure is

interrupted when opening the bonnet:

a dedicated message will be shown

on the instrument panel display. The

charge will be reactivated when the

bonnet is closed correctly.

NOTE In some countries the "Mode 3"

cable is not available.

WARNING Always connect the

connector first to the socket on the

public charging station and then to the

car.

WARNING Before leaving the car, it is

advisable to lock the doors by pressing
the button

on the key. If it is not

possible to lock the doors by pressing
the button

on the key, lock the

doors by pressing the button on the

driver's side door handle.

END OF CHARGING

PROCEDURE

The charging procedure ends when all

the LEDs (A) fig. 206, located next to

the charging port, will light up steady

green (during the charging phase, on

the other hand, the LEDs will light up

flashing/fixed green according to the

state of charge of the battery portion

indicated by the LED. The fixed green

light indicates that the battery portion is

fully charged).

206

F0S1220

DISCONNECTING THE

"MODE 3" CHARGING

CABLE

To complete the charging, proceed as

follows:

unlock the doors of the car allowing

the charging cable to unlock;

if charging is in progress, press

button (B) fig. 206;

disconnect the cable from the

charging port of the car and put the

protective cover (where provided) back

on the connector;

unplug the cable from the charging

port on the public charging station

and put the protective cover (where

provided) back correctly on the two-

colour connector;

replace the protective cover of the

charging port;

close the charging flap, making sure

it locks properly;

roll up the charging cable correctly,

repositioning the protective covers on

both sides of the cable correctly (take

care not to damage the cable when

rolling it up). Then place the cable and

case inside the boot.

213)

The charging current level ("Level 1"

/ "Level 2" / "Level 3", etc.) can only be

changed using the

Uconnect™

system

display (see "Settings" in the"Vehicle

mode" paragraph in the "Multimedia"

section). The default charge level set is

"Level 3". The set level applies indifferently

to both AC home charging (Mode 2) and

charging from an AC public charging

station (Mode 3). It is therefore always

advisable to check that the level is set as

desired for the actual charging type that is

about to be carried out.

214)

The high-voltage battery must only

be charged through approved, earthed

domestic sockets or at a public charging

station using the supplied Mode 3

charge cable (for versions/markets where

provided).

215)

Keep the charging flap closed when

the charging port is not in use.

-------------------------------------------------------------------------------------------------------------------------------------------------------------

205

CHARGING FROM

PUBLIC CHARGING

STATION (DC)

PROCEDURE -

MODE 4

76) 77) 78) 79) 80) 81)

The high-voltage battery of the car can

be charged by directly connecting the

charging cable of DC (direct current)

public charging stations.

To charge, proceed as follows:

park the car safely (transmission in

position "P" - Park);

engage the electric parking brake;

turn the ignition device to the STOP

position;

take the charging cable from the

charging station;

remove any dust that may have

accumulated on the charging

connector and charging port;

open the charging flap fig. 207 by

pressing on the area indicated by the

arrow;

207

F0S1052

remove the protective cover of the

charging port and attach it to the

device;

grasp the charging cable, hold the

first charging connector and insert it

into the charging port on the car until

you hear a click indicating that it is

locked;

the 5 LEDs with a steady green light

will light up momentarily to indicate the

correct insertion of the plug;

lock the doors by pressing the button

on the key;

charging starts automatically.

If necessary, the public charging

station must be enabled; follow the

manufacturer's instructions and

warnings when using the charging

station.

END OF CHARGING

PROCEDURE

The charging procedure ends when all

the LEDs (A) fig. 208, located next to

the charging port, will light up steady

green (during the charging phase, on

the other hand, the LEDs will light up

flashing/fixed green according to the

state of charge of the battery portion

indicated by the LED. The fixed green

light indicates that the battery portion is

fully charged).

208

F0S1220

DISCONNECTING THE

"MODE 4" CHARGING

CABLE

To complete the charging, proceed as

follows:

unlock the doors of the car allowing

the charging cable to unlock;

if charging is in progress, press

button (B) fig. 208 on the charging port;

disconnect the cable from the

charging port of the car and put the

protective cover (where provided) back

on the connector;

-------------------------------------------------------------------------------------------------------------------------------------------------------------

 STARTING AND DRIVING

206

put the cable on the public charging

station;

replace the protective cover of the

charging port;

close the charging flap, making sure

it locks properly.

76)

Using "Fast Charge - Mode 4" can

accelerate the battery degradation

process.

77)

If fast charging is not required,

standard (AC) charging is always

preferred. This maximises battery life by

ensuring the best performance of the car

over time.

78)

The charging times in "Fast Charge -

Mode 4" are referred to up to 80% of the

state of charge of the high-voltage battery

in standard environmental conditions

(25

°

C).

79)

Charging times in extreme weather

conditions can increase by as much as

several minutes due to the intervention

of the high-voltage battery management

system, which ensures optimal regulation

of the battery temperature to prevent

possible damage.

80)

The charging speed slows down when

the state of charge of the high-voltage

battery exceeds 80%.

81)

The battery charging time can increase

by a few minutes in case of very cold/hot

outside temperatures, many quick

charging sessions, high frequency of use

of "Fast Charge - Mode 4" charging or

ageing of the battery. This reduction in

charging speed is necessary to preserve

the battery.

CHARGE CABLE

EMERGENCY

UNLOCK

If the charging cable does not unlock at

the end of the charging procedure, you

can unlock it manually.

If, after closing and opening the doors

by pressing the relevant buttons

/

located on the key and after

having pressed the button near the

charging port, it is still not possible to

remove the charge cable from the

socket on the car, it is possible to

act manually by operating a special

emergency unlocking device located

on the right side of the boot and

performing the operations described

below:

acting inside the boot, remove the

cap (A) fig. 209;

pull the release cord (B) fig. 209 to

manually unlock the actuator of the

charging port;

disconnect the charging cable;

check that the release cord is

correctly repositioned inside its

housing, then reinsert the cap (A)

fig. 209.

NOTE To restore correct operation of

the system, contact the Fiat Dealership.

209

F0S1208

CHARGING

FUNCTIONS

CHARGING SCHEDULE

Two charging modes are available:

immediate and scheduled.
The two charging modes can be

selected in two ways:

via the dedicated smartphone app

(refer to the chapter "Connected

Services - Uconnect Services" in the

"Multimedia" section) (where provided)

by means of the

Uconnect™

system.
The page available on the

Uconnect™

system can be used to set charging

times when the car will be charged

via Mode 2 or Mode 3. By acting on

the

Uconnect™

system display and

selecting the "Charging schedule"

function on the screen under the

-------------------------------------------------------------------------------------------------------------------------------------------------------------


Content      ..     10      11      12      13     ..