Fiat 124 Spider (2020 year). Manual in english - page 11


  Index      Manuals     Fiat 124 Spider (2020 year). Manual in english


Search            copyright infringement  


Content      ..     9      10      11      12     ..


Fiat 124 Spider (2020 year). Manual in english - page 11


-------------------------------------------------------------------------------------------------------------------------------------------------------------
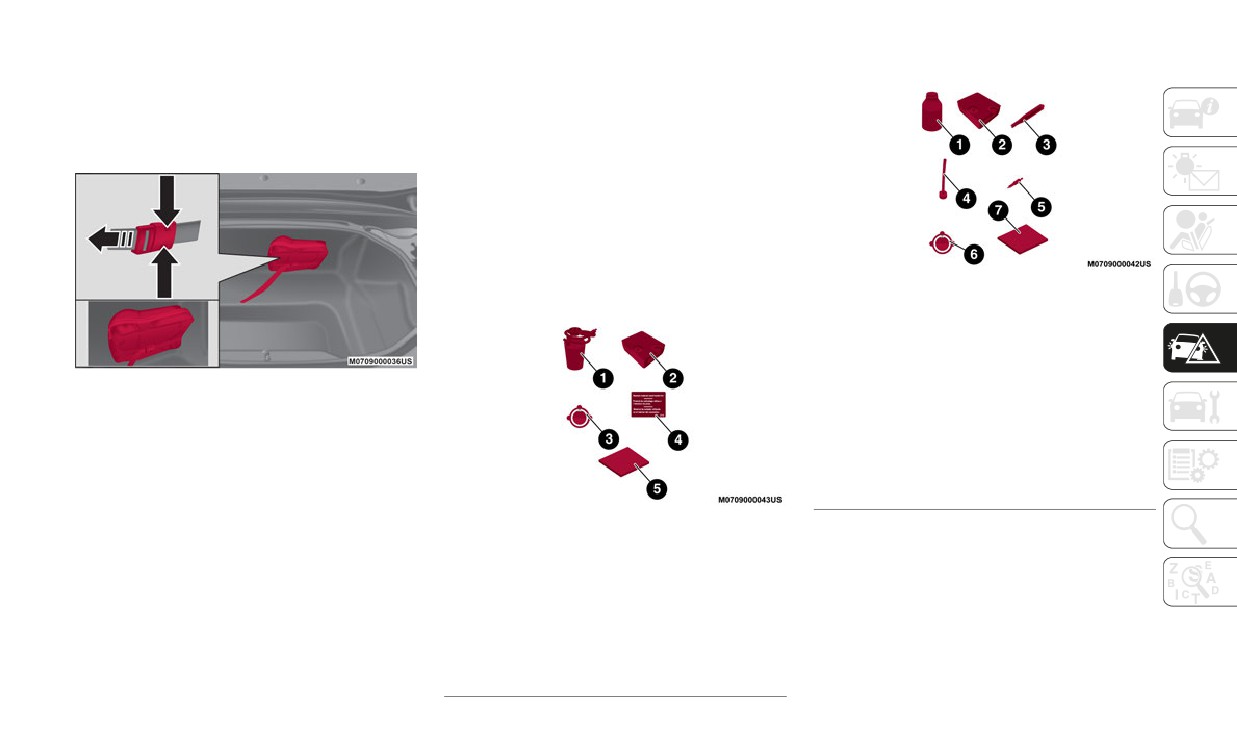
TIRE SERVICE KIT
tions included in the Tire Service Kit. If an
Mexico Market:
emergency repair was performed on a flat tire
using the Tire Service Kit, contact an autho-
Tire Service Storage
rized dealer to repair or replace the tire as
The Tire Service Kit is located inside the
soon as possible.
trunk.
Tire Service Kit Components And
Operation
The Tire Service Kit includes the following
items:
U.S.A. And Canada Markets:
Tire Service Kit Components — Mexico
Markets
1— Tire Sealant
2— Compressor
Tire Service Kit Location
3— Valve Core Tool
The Tire Service Kit included with your
4— Injection Hose
vehicle is for a temporary repair of a slightly
5— Spare Valve Core
damaged flat tire resulting from running over
6— Speed Restriction Sticker
nails or similar sharp objects on the road
surface.
7— Instructions
Tire Service Kit Components — U.S.A. And
Perform the emergency flat tire repair
Tire Service Usage Precautions
Canada Markets
without removing the nail or similar sharp
object which punctured the tire.
The tire sealant cannot be reused. If the
1— Sealant Bottle
sealant has been used, or is expired,
NOTE:
2— Compressor
purchase new tire sealant at an authorized
Your vehicle is not equipped with a spare
3— Speed Restriction Sticker
dealer.
tire. In the event of a flat tire, use the Tire
4— Repaired Tire Sticker
Service Kit to repair the tire temporarily.
5— Instructions
When doing the repair, refer to the instruc-
221

-------------------------------------------------------------------------------------------------------------------------------------------------------------

NOTE:
WARNING! (Continued)
The Tire Service Kit cannot be used in the
following cases. Consult an authorized dealer
† Do not use Tire Service Kit or drive the
† Take care not to allow the contents of
if any of these conditions exist:
vehicle under the following circum-
Tire Service Kit to come in contact with
stances:
hair, eyes, or clothing. Tire Service Kit
† The period of effective use for the tire
sealant is harmful if inhaled, swallowed,
† If the puncture in the tire tread is
sealant has expired (the period of effec-
or absorbed through the skin. It causes
approximately
1/4 inch
(6 mm) or
tiveness is indicated on the bottle label).
skin, eye, and respiratory irritation.
larger.
Flush immediately with plenty of water if
† The tear or puncture in the tire exceeds
† If the tire has any sidewall damage.
there is any contact with eyes or skin.
about 0.16 inches (4 mm).
Change clothing as soon as possible, if
† If the tire has any damage from
† The damage has occurred to an area of the
there is any contact with clothing.
driving with extremely low tire pres-
tire other than the tread.
sure.
† Tire Service Kit Sealant solution
contains latex. In case of an allergic
† The vehicle has been driven with nearly no
† If the tire has any damage from
reaction or rash, consult a physician
air remaining in the tire.
driving on a flat tire.
immediately. Keep Tire Service Kit out
† The tire has come off the wheel rim.
† If the wheel has any damage.
of reach of children. If swallowed, rinse
mouth immediately with plenty of water
† If you are unsure of the condition of
† Damage to the wheel rim has occurred.
and drink plenty of water. Do not induce
the tire or the wheel.
vomiting! Consult a physician immedi-
† The tire has two or more punctures.
† Keep Tire Service Kit away from open
ately.
flames or heat sources.
Sealing A Tire With Tire Service Kit
†
A loose Tire Service Kit thrown forward in
U.S.A. And CANADA Markets:
WARNING!
a collision or hard stop could endanger
Proceed as follows:
the occupants of the vehicle. Always
† Do not attempt to seal a tire on the side
stow the Tire Service Kit in the place
1. Pull over to a safe location and turn on
of the vehicle closest to traffic. Pull far
provided. Failure to follow these warn-
the vehicle’s Hazard Warning Lights.
enough off the road to avoid the danger
ings can result in injuries that are serious
of being hit when using the Tire Service
or fatal to you, your passengers, and
2. Verify that the valve stem (on the wheel
Kit.
others around you.
with the deflated tire) is in a position that
(Continued)
(Continued)
is near to the ground. This will allow the
222

-------------------------------------------------------------------------------------------------------------------------------------------------------------

Tire Service Kit hoses to reach the valve
6. Gently shake the sealant bottle to mix the
† The sealant hardens easily, and injecting
stem and keep the Tire Service Kit flat on
contents. Then extend the injection hose.
it will be difficult under cold weather
the ground. This will provide the best
conditions (32 °F (0 °C) or below). Warm
positioning of the kit when injecting the
the sealant inside the vehicle to facilitate
sealant into the deflated tire and running
injection.
the air pump. Move the vehicle as neces-
7.
Pull out the air compressor hose and the
sary to place the valve stem in this posi-
air compressor plug from the
air
tion before proceeding.
compressor.
3.
Place the gear selector in REVERSE (R)
for a manual transmission, and PARK (P)
for automatic transmission.
4.
Apply the parking brake with the brake
Sealant Bottle With Injection Hose
pedal pressed and cycle the engine OFF.
1 — Injection Hose
5.
Unload passengers and cargo, then
remove the Tire Service Kit.
NOTE:
† Do not shake the bottle excessively. Other-
Air Compressor With Hose And Plug
wise, the sealant could spray out of the
injection hose. If the sealant contacts
2 — Air Compressor Hose
clothing or other objects, you may not be
able to remove it.
Tire Service Kit Location
223

-------------------------------------------------------------------------------------------------------------------------------------------------------------

8. Install the air compressor hose, which
10.Install the bottle to the air compressor
was pulled out of the air compressor, into
and push it in until the left and right tabs
the injection valve of the bottle.
are engaged securely.
Abarth Valve And Valve Cover
5 — Valve Cap
6 — Valve
Install Air Compressor To Sealant Bottle
Sealant Bottle Into Air Compressor
3 — Air Compressor Hose
7 — Air Compressor Tabs
4 — Injection Valve
11.Insert the air compressor plug into the
NOTE:
accessory socket, located deep in the
Make sure that the air compressor switch is
back of the footwell on the passenger
off before inserting the air compressor hose
side, and cycle the ignition to ACC.
into the injection valve of the bottle. If the air
NOTE:
compressor hose is not installed to the injec-
When inserting the air compressor plug into
tion valve of the bottle securely, the sealant
Valve And Valve Cover
or removing it from the accessory socket,
may leak.
make sure that the air compressor switch is
9. Remove the valve cap from the valve of
5 — Valve Cap
off. When turning the air compressor on/off,
the flat tire, install the injection hose to
6 — Valve
use the air compressor switch. Before
the tire valve, and turn the sleeve to the
right to tighten.
224

-------------------------------------------------------------------------------------------------------------------------------------------------------------

checking the tire inflation pressure using the
14.Adhere the repaired tire sticker to the
CAUTION!
tire pressure gauge, turn the air compressor
wheel of the flat tire.
switch off.
† If the tire inflation pressure does not
increase, repair of the tire is not
12.The sealant is injected into the tire when
possible. If the tire does not reach the
the air compressor is switched on. After
specified tire inflation pressure within
the sealant is injected completely, wait
10 minutes, it may have received exten-
until the tire inflation pressure increases
sive damage. In this case, the repair
to the specified tire inflation pressure.
using the tire service kit was not
For the correct pressure, check the tire
successful.
inflation pressure label on the driver's
door frame.
† Do not operate the air compressor for a
continuous
10 minutes or longer
NOTE:
because using it for long periods could
Repaired Tire Sticker
The inflation pressure may increase to about
cause a malfunction.
15.When the tire inflates to the specified tire
43.5 psi (3 Bar) temporarily to inject the
sealant through the valve. Normally, the
inflation
pressure, turn the air
13.Adhere the speed restriction sticker to an
compressor switch off, turn the sleeve of
inflation pressure decreases gradually and it
area where it can be viewed easily by the
reaches the actual inflation pressure after
the injection hose to the left, and pull it
driver.
out of the tire valve.
about 30 seconds.
WARNING!
WARNING!
Do not adhere the speed restriction sticker
Never use the air compressor above 3 Bar
to the padded area on the steering wheel.
(43.5 psi). Using the air compressor at an
Adhering the speed restriction sticker to
inflation pressure above 3 Bar (43.5 psi)
the padded area on the steering wheel is
continuously is dangerous. If the air
dangerous because the air bag may not
compressor overheats, hot air will be
operate
(deploy) normally resulting in
exhausted and you could get burned.
serious injury. In addition, do not adhere
the sticker to areas where warning lights or
the speedometer cannot be viewed.
225

-------------------------------------------------------------------------------------------------------------------------------------------------------------

16.Remove the air compressor hose from the
NOTE:
NOTE:
injection valve of the bottle. Then, install
Carefully drive the vehicle at a speed of
† If an emergency flat tire repair has been
the injection hose to the injection valve
50 mph (80 km/h) or less. If the vehicle is
performed using the Tire Service Kit, FCA
of the bottle to prevent leakage of any
driven at a speed of 50 mph (80 km/h) or
recommends that the tire be replaced with
remaining sealant.
more, the vehicle may vibrate.
a new one as soon as possible. If the tire
NOTE:
is to be repaired or reused, contact an
With TPMS System: if the tire is not properly
authorized dealer.
inflated, the
warning light will illuminate.
† The wheel can be reused if the sealant
† After driving the vehicle for about
adhering to it is removed. However,
10 minutes or 3 miles (5 km), connect
replace the valve with a new one.
the air compressor to the tire using Step
Sealing A Tire With Tire Service Kit
nine of the procedure, and check the tire
inflation pressure using the tire pressure
WARNING!
gauge on the air compressor. If the tire
Install Injection Hose To Sealant Bottle
inflation pressure is lower than the speci-
† Do not attempt to seal a tire on the side
fied tire inflation pressure, turn the air
of the vehicle closest to traffic. Pull far
NOTE:
compressor on and wait until it reaches
enough off the road to avoid the danger
The remaining sealant in the hose may spray
the specified tire inflation pressure.
of being hit when using the Tire Service
out when the hose is removed. Remove the
Kit.
† The Tire Service Kit is completed success-
hose carefully because you may not be able
fully if the tire inflation pressure does not
† Do not use Tire Service Kit or drive the
to remove the sealant contacting clothing or
decrease. Carefully drive the vehicle to the
vehicle under the following circum-
other objects.
nearest authorized dealer immediately and
stances:
17.Install the tire valve cap.
have the flat tire replaced. Replacement
† If the puncture in the tire tread is
with a new tire is recommended. If the tire
18.Place the Tire Service Kit back into its
approximately
1/4 inch
(6 mm) or
is to be repaired or reused, consult an
storage location.
larger.
authorized dealer.
† If the tire has any sidewall damage.
19.Start driving immediately to spread the
(Continued)
sealant in the tire.
226

-------------------------------------------------------------------------------------------------------------------------------------------------------------

Mexico Market
WARNING! (Continued)
Proceed as follows:
† If the tire has any damage from
† Take care not to allow the contents of
driving with extremely low tire pres-
Tire Service Kit to come in contact with
1.
Pull over to a safe location and turn on
sure.
hair, eyes, or clothing. Tire Service Kit
the vehicle’s Hazard Warning Lights.
sealant is harmful if inhaled, swallowed,
† If the tire has any damage from
2.
Verify that the valve stem (on the wheel
or absorbed through the skin. It causes
driving on a flat tire.
with the deflated tire) is in a position that
skin, eye, and respiratory irritation.
† If the wheel has any damage.
is near to the ground. This will allow the
Flush immediately with plenty of water if
Tire Service Kit hoses to reach the valve
† If you are unsure of the condition of
there is any contact with eyes or skin.
stem and keep the Tire Service Kit flat on
the tire or the wheel.
Change clothing as soon as possible, if
the ground. This will provide the best
there is any contact with clothing.
† Keep Tire Service Kit away from open
positioning of the kit when injecting the
flames or heat sources.
† Tire Service Kit Sealant solution
sealant into the deflated tire and running
contains latex. In case of an allergic
the air pump. Move the vehicle as neces-
† A loose Tire Service Kit thrown forward in
reaction or rash, consult a physician
a collision or hard stop could endanger
sary to place the valve stem in this posi-
immediately. Keep Tire Service Kit out
tion before proceeding.
the occupants of the vehicle. Always
of reach of children. If swallowed, rinse
stow the Tire Service Kit in the place
mouth immediately with plenty of water
3.
Place the gear selector in REVERSE (R)
provided. Failure to follow these warn-
and drink plenty of water. Do not induce
for a manual transmission, or PARK (P)
ings can result in injuries that are serious
vomiting! Consult a physician immedi-
for automatic transmission.
or fatal to you, your passengers, and
ately.
others around you.
4.
Apply the parking brake with the brake
(Continued)
pedal pressed and cycle the engine OFF.
227

-------------------------------------------------------------------------------------------------------------------------------------------------------------

5. Unload passengers and cargo, then
remove the Tire Service Kit.
6. Gently shake the tire sealant. If the bottle
is shaken after the injection hose is
screwed on, tire sealant could spray out
from the injection hose. Tire sealant
contacting clothing or other objects may
be impossible to remove. Shake the
bottle before screwing on the injection
hose.
Remove Cap To Sealant Bottle
Valve And Valve Cover
NOTE:
5 — Valve Cap
6 — Tire Valve
† Do not shake the bottle excessively. Other-
wise, the sealant could spray out of the
injection hose, and if the sealant contacts
clothing or other objects, you may not be
able to remove it.
† The sealant hardens easily and injecting it
will be difficult under cold weather condi-
tions 32 °F (0 °C) or below. Warm the
Attach Injection Hose To Sealant Bottle
sealant inside the vehicle to facilitate
injection.
8.
Remove the valve cap from the flat tire.
Push the back of a valve core tool to the
7. Remove the cap from the bottle and
core of the tire valve and bleed out all of
Abarth Valve And Valve Cover
screw on the injection hose with the
the remaining air.
bottle's inner cap left on to break the
5 — Valve Cap
inner cap.
6 — Tire Valve
228

-------------------------------------------------------------------------------------------------------------------------------------------------------------

NOTE:
NOTE:
11.Hold the bottom of the bottle upright,
If there is air remaining in the tire when the
Store the valve core in a place where it will
squeeze the bottle with your hands, and
valve core is removed, the valve core could
not get dirty.
inject the entire amount of tire sealant
fly out. Remove the valve core carefully.
into the tire.
10.Insert the injection hose into the valve.
9. Turn the valve core counterclockwise
with the valve core tool and remove the
valve core.
Squeeze Sealant Into Tire
Injection Hose Into Valve
12.Pull out the injection hose from the
valve.
Turn Valve Core Counterclockwise
Abarth Injection Hose Into Valve
Turn Valve Core Clockwise To Reinstall
Abarth Turn Valve Core Counterclockwise
229

-------------------------------------------------------------------------------------------------------------------------------------------------------------

14.Install the injection hose to the tab of the
bottle to prevent leakage of any
remaining sealant.
15.Adhere the speed restriction sticker to an
area where it can be viewed easily by the
driver.
WARNING!
Abarth Turn Valve Core Clockwise To Reinstall
Do not adhere the speed restriction sticker
Air Compressor With Hose And Plug
to the padded area on the steering wheel.
13.Reinsert the valve core into the valve and
Adhering the speed restriction sticker to
2 — Air Compressor Hose
turn it clockwise to install.
the padded area on the steering wheel is
dangerous because the air bag may not
NOTE:
17.Install the air compressor hose to the tire
operate
(deploy) normally resulting in
valve.
† The tire sealant cannot be reused. If the
serious injury. In addition, do not adhere
tire sealant kit has been used, or is
the sticker to areas where warning lights or
expired, purchase a new one at an autho-
the speedometer cannot be viewed.
rized dealer.
16.Pull out the air compressor hose and the
† Do not throw away the empty tire sealant
air compressor plug from the air
bottle after use. Return the empty tire
compressor.
sealant bottle to an authorized dealer
when replacing the tire. The empty tire
sealant bottle will need to be used to
extract and dispose of the used sealant
from the tire.
Air Compressor Hose Into Valve
230

-------------------------------------------------------------------------------------------------------------------------------------------------------------

NOTE:
CAUTION!
† Carefully drive the vehicle at a speed of
† If the tire inflation pressure does not
50 mph (80 km/h) or less. If the vehicle is
increase, repair of the tire is not
driven at a speed of 50 mph (80 km/h) or
possible. If the tire does not reach the
more, the vehicle may vibrate.
specified tire inflation pressure within
10 minutes, it may have received exten-
† With TPMS System: if the tire is not prop-
sive damage. In this case, the repair
erly inflated, the
warning light will illu-
using the tire service kit was not
minate.
successful.
Abarth Air Compressor Hose Into Valve
† After driving the vehicle for about
† Do not operate the air compressor for a
continuous
10 minutes or longer
10 minutes or 3 miles (5 km), connect
18.Insert the air compressor plug into the
because using it for long periods could
the air compressor to the tire using step
accessory socket, located deep in the
cause a malfunction.
nine of the procedure, and check the tire
back of the footwell on the passenger
inflation pressure using the tire pressure
side, and cycle the ignition to ACC.
NOTE:
gauge on the air compressor. If the tire
If the tire has been over inflated, loosen the
inflation pressure is lower than the speci-
19.Turn the air compressor switch on and
screw cap on the air compressor and bleed
fied tire inflation pressure, turn the air
inflate the tire carefully to the correct
some of the air out.
compressor on and wait until it reaches
inflation pressure. For the correct pres-
the specified tire inflation pressure;
sure, check the tire inflation pressure
20.When the tire inflates to the specified tire
label on the driver's door frame.
inflation
pressure, turn the air
† The emergency flat tire repair is
compressor switch off, turn the sleeve of
completed successfully if the tire inflation
NOTE:
the air compressor hose to the left, and
pressure does not decrease. Carefully
When inserting the air compressor plug into
pull it out of the tire valve.
drive the vehicle to the nearest authorized
or removing it from the accessory socket,
21.Install the tire valve cap.
dealer and have the flat tire replaced.
make sure that the air compressor switch is
Replacement with a new tire is recom-
off. When turning the air compressor on/off,
22.Place the Tire Service Kit back into its
mended. If the tire is to be repaired or
use the air compressor switch. Before
storage location.
reused, contact an authorized dealer.
checking the tire inflation pressure using the
tire pressure gauge, turn the air compressor
23.Start driving immediately to spread the
sealant in the tire.
switch off.
231

-------------------------------------------------------------------------------------------------------------------------------------------------------------

† If an emergency flat tire repair has been
JUMP STARTING
performed using the Tire Service Kit, FCA
recommends that the tire be replaced with
Preparations For Jump Starting
a new one as soon as possible. If the tire
is to be repaired or reused, contact an
If the battery is discharged, a jump starting
authorized dealer.
procedure can be performed using the
battery and the cables of another vehicle, or
† The tire can be reused if the sealant
using a booster battery.
adhering to it is removed. However,
replace the valve with a new one.
Jump starting is dangerous if done incor-
rectly, so follow the procedure in this section
Replacing The Bottle
carefully. If you feel unsure about jump
starting, it is strongly recommended that you
NOTE:
have a competent service technician do the
The tire sealant has a period of effective use.
work.
Check the period of effective use indicated
on the bottle label and do not use it if it has
NOTE:
expired. Have the tire sealant replaced at an
When a booster battery is being used, comply
authorized dealer before the period of effec-
with the utilization and precaution instruc-
tive use has expired.
tions specified by the manufacturer.
Inspect the Tire Service Kit at regular inter-
vals as well as the operation of the tire
compressor.
Jump Start Locations
232

-------------------------------------------------------------------------------------------------------------------------------------------------------------

To jump start the vehicle, follow this proce-
4.
Connect the positive end of the jumper
WARNING!
dure:
cable to the positive terminal on the
Do not attempt jump starting if the battery
discharged battery.
1.
Remove the positive terminal cover.
is frozen. It could rupture or explode and
cause personal injury.
5.
Connect the opposite end of the positive
jumper cable to the positive terminal on
the booster battery.
CAUTION!
6.
Connect the negative end of the negative
Do not use a portable battery booster pack
jumper cable to the negative terminal of
or any other booster source with a system
the booster battery.
voltage greater than 12 Volts or damage to
the battery, starter motor, alternator or
7.
Connect the opposite end of the negative
electrical system may occur.
jumper cable to a good engine ground of
the vehicle with the discharged battery
Positive Terminal Cover
Jump Starting Procedure
(exposed metal part of the engine) away
from the battery and the fuel injection
2.
Make sure the booster battery is 12 Volts
system.
WARNING!
and that the negative terminal is
grounded.
Failure to follow this jump starting
8.
Start the engine of the booster vehicle
procedure could result in personal injury or
and run it a few minutes. Then start the
3.
Make sure the engine of the vehicle with
property damage due to battery explosion.
engine of the other vehicle.
the booster battery is OFF and all unnec-
essary electrical loads in both vehicles.
9.
Once the engine is started, remove the
CAUTION!
jumper cables in the reverse sequence.
WARNING!
Failure to follow these procedures could
10.Replace the positive terminal cover.
Do not allow vehicles to touch each other
result in damage to the charging system of
Make sure cover is secure.
as this could establish a ground
the booster vehicle or the discharged
connection and personal injury could
vehicle.
result.
233

-------------------------------------------------------------------------------------------------------------------------------------------------------------

Bump Starting
4. Press the clutch pedal (manual transmis-
NOTE:
sion) or the brake pedal (automatic trans-
There are steps that you can take to slow
Never jump start the engine by pushing,
mission), then push the STOP/START
down an impending overheat condition:
towing or coasting downhill.
button. If the engine starts, release the
† If your Air Conditioner (A/C) is on, turn it
accelerator immediately because the
NOTE:
off. The A/C system adds heat to the
engine will suddenly rev up.
engine cooling system and turning the A/C
† You cannot start a vehicle with an auto-
matic transmission by pushing it.
5. If the engine fails to start, crank it
off can help remove this heat.
without pressing the accelerator.
† You can also turn the temperature control
† Do not push-start a vehicle that has a
to maximum heat, the mode control to
manual transmission. It can damage the
If the engine still does not start using the
floor and the blower control to high. This
emission control system.
above procedure, have your vehicle
allows the heater core to act as a supple-
inspected by an authorized dealer.
Starting A Flooded Engine
ment to the radiator and aids in removing
heat from the engine cooling system.
If the engine fails to start, it may be flooded
IF YOUR ENGINE
(excessive fuel in the engine).
OVERHEATS
WARNING!
Follow this procedure:
If Your Engine Overheats
You or others can be badly burned by hot
engine coolant (antifreeze) or steam from
1. If the engine does not start within
5
In any of the following situations, you can
your radiator. If you see or hear steam
seconds on the first try, wait 10 seconds
reduce the potential for overheating by
coming from under the hood, do not open
and try again.
taking the appropriate action.
the hood until the radiator has had time to
2. Make sure the parking brake is applied.
cool. Never try to open a cooling system
† On highways — slow down.
pressure cap when the radiator or coolant
3. Press the accelerator all the way and hold
† In city traffic — while stopped, place the
bottle is hot.
it there.
transmission in NEUTRAL, but do not
increase engine idle speed.
234

-------------------------------------------------------------------------------------------------------------------------------------------------------------

seriously damaged unless repairs are
CAUTION!
CAUTION!
made. Contact an authorized dealer.
Driving with a hot cooling system could
† The tow eye must be used exclusively for
damage your vehicle. If temperature gauge
TOWING THE VEHICLE
roadside assistance operations. Only use
reads “H”, pull over and stop the vehicle.
the tow eye with an appropriate device in
Idle the vehicle with the air conditioner
Attaching The Tow Eyes — If Equipped
accordance with the highway code (a
turned off until the pointer drops back into
rigid bar or rope) to flat tow the vehicle
the normal range. If the pointer remains
WARNING!
for a short distance to the nearest service
on the
“H”, turn the engine off
location.
immediately, and call for service.
Stand clear of vehicles when pulling with
† Tow eyes MUST NOT be used to tow
tow eyes.
If Steam Is Coming From The Engine Compart-
vehicles off the road or where there are
† Do not use a chain with a tow eye. Chains
ment:
obstacles.
may break, causing serious injury or
† In compliance with the above condi-
Do not go near the front of the vehicle. Stop
death.
tions, towing with a tow eye must take
the engine. Wait until the steam dissipates,
† Do not use a tow strap with a tow eye.
place with two vehicles (one towing, the
then open the hood and start the engine.
Tow straps may break or become disen-
other towed) aligned as much as possible
If Neither Coolant Nor Steam Is Escaping:
gaged, causing serious injury or death.
along the same center line. Damage to
† Failure to follow proper tow eye usage
your vehicle may occur if these guide-
Open the hood and idle the engine until it
may cause components to break
lines are not followed.
cools.
resulting in serious injury or death.
† When towing, only use a facility that can
NOTE:
tow vehicles with low ground clearances
† If the cooling fan does not operate while
as extensive damage can result by using
a standard tow truck platform.
the engine is running, the engine tempera-
ture will increase. Stop the engine and
contact an authorized dealer.
† If the engine continues to overheat or
frequently overheats, have the cooling
system inspected. The engine could be
235

-------------------------------------------------------------------------------------------------------------------------------------------------------------

Proceed as follows:
1. Remove the towing eyelet and the lug
wrench from the luggage compartment.
2. Wrap a flathead screwdriver or similar
tool with a soft cloth to prevent damage
to a painted bumper, and open the cap
located on the front or rear bumper.
Abarth Front Bumper Cap Location
Abarth Rear Bumper Cap Location
1— Front Bumper Cap
NOTE:
Do not use excessive force as it may damage
the cap or scratch the painted bumper
surface. Remove the cap completely and
store it so as not to lose it.
3. Securely install the tow eye in front or
rear using the lug wrench or equivalent.
Front Bumper Cap Location
1— Front Bumper Cap
Rear Bumper Cap Location
2— Rear Bumper Cap
Installing Front Towing Eye
236

-------------------------------------------------------------------------------------------------------------------------------------------------------------

4. Hook the towing rope to the tow eye.
Emergency Towing
CAUTION!
Towing Description
Tow eyes are for emergency use only, to
Proper lifting and towing are necessary to
rescue a vehicle stranded off road. Do not
prevent damage to the vehicle. Government
use tow eyes for tow truck hookup or
and local laws must be followed.
highway towing. You could damage your
A towed vehicle usually should have its drive
vehicle.
wheels (rear wheels) OFF of the ground. If
Abarth Installing Front Towing Eye
When using the tow eyes, always pull the
excessive damage or other conditions
prevent this, use wheel dollies.
lead or chain in a straight direction with
respect to the eyelet. Never apply a sideways
When towing with the rear wheels on the
force.
ground, release the parking brake.
NOTE:
CAUTION!
Follow the precautions below to avoid
damage to the towing eyelet and towing
DO NOT use sling-type equipment when
hook, vehicle body, or transmission system
towing. When securing the vehicle to a
when towing:
flatbed truck, do not attach to front or rear
suspension components. Damage to your
Installing Rear Tow Eye
† Do not tow a vehicle heavier than yours.
vehicle may result from improper towing.
† Do not suddenly accelerate your vehicle as
If towing service is not available in an emer-
it will apply a severe shock to the tow eye
gency, the vehicle may be towed with all four
and towing hook or rope.
wheels on the ground using the towing hook
† Do not attach any rope other than to the
at the front of the vehicle. Only tow the
tow eye and towing hook.
vehicle on paved surfaces for short distances
at low speeds.
Abarth Installing Rear Tow Eye
237

-------------------------------------------------------------------------------------------------------------------------------------------------------------

Follow these instructions when towing the
ENHANCED ACCIDENT
EVENT DATA RECORDER
vehicle with all wheels on the ground:
RESPONSE SYSTEM (EARS)
(EDR)
1. Shift to NEUTRAL for manual transmis-
sion or automatic transmission.
This vehicle is equipped with an Enhanced
This vehicle is equipped with an Event Data
Accident Response System.
Recorder (EDR). The main purpose of an
2. Cycle the ignition to ACC mode.
EDR is to record data that will assist in
Please refer to
“Constant Monitoring” in
understanding how a vehicle’s systems
3. Release the parking brake.
“Safety” for further information on the
performed under certain crash or near
Enhanced Accident Response System
NOTE:
crash-like situations, such as an air bag
(EARS) function.
Remember that power assist for the brakes
deployment or hitting a road obstacle.
and steering will not be available when the
Please refer to “Event Data Recorder (EDR)”
engine is not running.
in “Safety” for further information on the
Event Data Recorder (EDR).
238

-------------------------------------------------------------------------------------------------------------------------------------------------------------

SCHEDULED SERVICING
To continue New Vehicle Limited Warranty
NOTE:
eligibility and to protect your investment, it
If you elect to perform maintenance yourself
Be extremely careful and prevent injury to
is your responsibility to properly maintain
or have your vehicle serviced at a location
yourself and others or damage to your vehicle
your vehicle according to factory recom-
other than an authorized dealer, FCA
mended schedules outlined in this Owner’s
requires that all fluids, parts and materials
tion and maintenance.
Manual. As part of this you must keep your
must meet FCA standards for durability and
maintenance records, receipts, repair orders
performance as described in this Owner’s
If you are unsure about any procedure it
and any other documents as evidence this
Manual.
describes, we strongly urge you to have a reli-
maintenance was performed. You must
able and qualified service shop perform the
Claims against the warranty resulting from
present these documents, should any New
work, preferably at an authorized dealer.
lack of maintenance, as opposed to defective
Vehicle Limited Warranty coverage disagree-
materials or authorized FCA workmanship,
ment occur. Failure to do so can result in
Factory-trained FCA technicians and genuine
will not be honored.
your New Vehicle Limited Warranty being
FCA parts are best for your vehicle. Without
voided either in whole or in part.
Any auto repair shop using parts equivalent
this expertise and the parts that have been
designed and made especially for your
to your vehicle's original equipment may
This evidence may consist of the following:
vehicle, inadequate, incomplete, and insuffi-
perform maintenance. But we recommend
† Original copies of repair orders or other
cient servicing may result in problems. This
that it always be done by an authorized
receipts that include the mileage and date
could lead to vehicle damage or an accident
dealer using genuine FCA parts. Selecting
the vehicle was serviced. Each receipt
and injuries.
“Maintenance Monitor” enables the system
should be signed by a qualified automo-
to notify you of your vehicle's approaching
For expert advice and quality service, contact
tive service technician.
inspection/servicing period.
an authorized dealer.
† For self maintenance, a statement that
Owner Maintenance Precautions
NOTE:
you completed the maintenance yourself,
Under no circumstances should oil change
displaying mileage and the date the work
The owner or a qualified service technician
intervals exceed 10,000 miles (16,000 kilo-
was performed. Also, receipts for the
should make these vehicle inspections at the
meters) or 1 year.
replacement parts (fluid, filters, etc.) indi-
indicated intervals to ensure safe and
cating the date and mileage must accom-
dependable operation.
pany this statement.
239

-------------------------------------------------------------------------------------------------------------------------------------------------------------

Bring any problem to the attention of an
There are strict environmental laws regarding
Heavy-Duty Use Of The Vehicle
authorized dealer or qualified service techni-
the disposal of waste oil and fluids. Please
If the vehicle is used under one of the
cian as soon as possible.
dispose of your waste properly and with due
following conditions:
regard to the environment.
When refueling perform inspection of:
† Dusty roads
We recommend that you entrust the oil and
† Brake and clutch fluid level
fluid changes of your vehicle to an autho-
† Short, repeated trips less than
4.4
-
† Engine coolant level
rized dealer.
5 miles (7 - 8 km) at sub-zero outside
temperatures
† Engine oil level
Periodic Checks
† Engine idling for long periods of time or
† Washer fluid level
Every 620 miles (1,000 km) or before long
driving long distances at low speeds or
At least monthly perform inspection of:
trips check and, if necessary, top off:
long periods of inactivity
† Engine coolant level
Tire inflation pressures
The following checks must be carried out
† Brake fluid level
more often than indicated in the Scheduled
At least twice a year
(for example, every
Servicing Plan:
spring and fall) perform inspection of:
† Windshield washer fluid level
† Check front disc brake pad condition and
† Engine coolant
† Tire inflation pressure and condition
wear
† Engine oil
† Operation of lighting system (headlights,
† Check cleanliness of underhood area and
As explained in the Introduction paragraph
direction indicators, hazard warning
all door and trunk locks, cleanliness and
of
“Scheduled Servicing”, several proce-
lights, etc.)
lubrication of linkage
dures can be done only by a qualified service
† Operation of windshield washer/wiper
† Visually inspect conditions of the: engine,
technician with special tools.
system and positioning/wear of windshield
transmission, lines and hoses
(exhaust/
For details, read the separate Warranty
wiper blades
fuel system/brakes) and rubber elements
Booklet provided with the vehicle. If you are
(hoses/belts/etc.)
Every 1,860 miles (3,000 km) check and top
unsure about any servicing or maintenance
off the engine oil level if required
† Check battery charge and battery fluid
procedure, have it done by an authorized
level
dealer.
240

-------------------------------------------------------------------------------------------------------------------------------------------------------------

† Visually inspect conditions of the acces-
Severe Duty All Models
sory drive belts
Change Engine Oil at
4,000 miles
† Check and, if necessary, change engine oil
(6,500 km) if the vehicle is operated in a
and replace oil filter
dusty and off road environment or is oper-
ated predominately at idle or only very low
† Check and, if necessary, replace cabin air
engine RPM. This type of vehicle use is
filter
considered Severe Duty.
† Check and, if necessary, replace air
cleaner
241


Content      ..     9      10      11      12     ..