Dodge Journey (2020 year). Manual in english - page 20
 

  Index      Manuals     Dodge Journey (2020 year). Manual in english


Search            copyright infringement  


Content      ..     18      19      20      21     ..


Dodge Journey (2020 year). Manual in english - page 20


312

MULTIMEDIA


Bluetooth® Communication Link
Mobile phones have been found to lose connec-

tion to the Uconnect Phone. When this 

happens, the connection can generally be rees-

tablished by switching the phone off/on. Your 

mobile phone is recommended to remain in 

Bluetooth® ON mode.

Power-Up
After switching the ignition key from OFF to 

either the ON/RUN or ACC position, or after a 

language change, you must wait at least 

15 seconds prior to using the system.

More Mode

More Button

Push the MORE button to display the More Main 

Menu. The More Main Menu contains the 

following options:

Economy — If Equipped

Phone

Outlet — If Equipped

Time

Compass

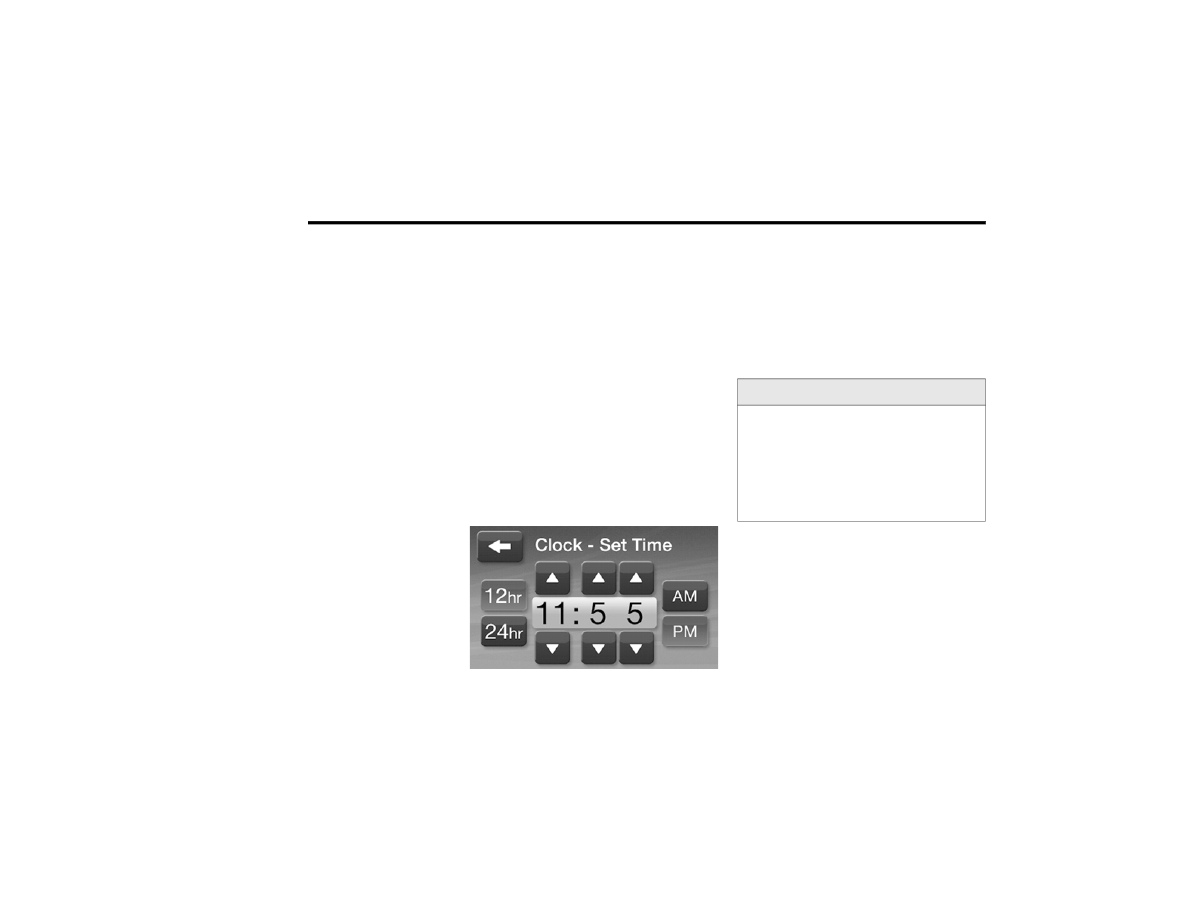
Clock Setting

1. Push the MORE button on the right side of 

the display, then press the Time button. 

Next, press the Set button.

Or,

Push the SETTINGS button on the right side 

of the display, then press the Clock button.

The Time setting screen is displayed and 

the clock can be adjusted as described in 

the following procedure.

2. Press the Up or Down Arrow buttons to 

adjust the hours or minutes, next select the 

AM or PM button. You can also select 12 hr 

or 24 hr format by pressing the desired 

button.

Setting The Clock

Once the time is set, press the Done button 

to exit the time screen.

UCONNECT 3/3 NAV WITH 8.4-INCH 

DISPLAY

Introduction To the Uconnect 3/3 Nav With 

8.4-Inch Display

WARNING!

ALWAYS drive safely with your hands on the 

steering wheel. You have full responsibility 

and assume all risks related to the use of the 

Uconnect features and applications in this 

vehicle. Only use Uconnect when it is safe to 

do so. Failure to do so may result in an 

accident involving serious injury or death.

MULTIMEDIA

313

Uconnect 3/3 Nav with 8.4-inch Display System

1 — ON/OFF & VOLUME
Push the ON/OFF button to turn the system on 

or off. Rotate the rotary knob to adjust the 

Volume.

NOTE:

If the ignition is switched off with the radio in 

standby mode, the radio memorizes the 

standby mode when the ignition is turned on 

again. Push the ON/OFF VOLUME Control to 

turn the radio on. It is possible to eject the Disc 

and to display the time if the system is off. The 

navigation software is always working when the 

ignition is switched on, even if the radio is in 

standby mode.

2 — CLIMATE CONTROLS (Faceplate Controls)
Refer to “Climate Controls” in “Getting To Know 

Your Vehicle” further more information.
3 — RADIO
Press the Radio button on the touchscreen to 

enter the Radio Mode. The different tuner 

modes, AM, FM, and SAT, can be selected by 

pressing the corresponding buttons in the 

Radio Mode.

4 — PLAYER
Press the Player button on the touchscreen to 

access media sources such as: Disc, USB 

Device, and AUX as long as the requested 

media is present.
5 — CONTROLS
Press the Controls button on the touchscreen to 

access the Settings list. Controls such as 

Heated Seats, Heated Steering Wheel, Vented 

Seats, etc. can be selected or turned on/off by 

pressing the corresponding button.

9

314

MULTIMEDIA


6 — CLIMATE (Touchcreen Controls)
Refer to “Climate Controls” in “Getting To Know 

Your Vehicle” for more information.
7 — NAV (Uconnect 3 NAV Only)
Press the Nav button on the touchscreen to 

access the Navigation feature.
8 — PHONE — If Equipped
Press the Phone button on the touchscreen to 

access the Uconnect Phone feature. Refer to 

“Uconnect Phone” in this section for more infor-

mation.
9 — MORE
Press the More button on the touchscreen to 

access additional options. Options available 

such as Settings and SiriusXM® Travel Link (if 

equipped) can be accessed by pressing the 

corresponding button in the More Menu.
10 — ENTER/BROWSE & TUNE/SCROLL
Push the ENTER/BROWSE button to accept a 

highlighted selection on the screen. Rotate the 

TUNE/SCROLL rotary knob to scroll through a 

list or tune a radio station.
11 — SD CARD SLOT
Insert an SD Card containing audio media files 

to play them through the vehicle’s sound 

system.

12 — DISC SLOT
When inserting a disc, ensure the label is facing 

up. Push the Eject button to eject the disc.

Radio Mode

Overview

Radio Mode

The radio is equipped with the following modes: 

FM

AM

SAT SiriusXM® Satellite Radio (if equipped)

Press the Radio button, bottom left corner, to 

enter the Radio Mode. The different tuner 

modes, AM, FM, and SAT, can be selected by 

pressing the corresponding buttons in the 

Radio mode.

Common Radio Functions

The following operations offer the same func-

tionality across all Radio Modes, and further 

instructions are provided where differences 

exist.

ON/OFF & Volume Control

Push the ON/OFF Volume Control 

knob to turn on the radio. Push the 

ON/OFF Volume Control knob a 

second time to turn off the radio.

The electronic Volume control turns continu-

ously (360 degrees) in either direction, without 

stopping. Turning the ON/OFF Volume Control 

knob clockwise increases the Volume and coun-

terclockwise decreases it.
When the audio system is turned on, the sound 

will be set at the same Volume level as last 

played.

Tune/Scroll Control

Turn the rotary TUNE/SCROLL control 

knob clockwise to increase or coun-

terclockwise to decrease the radio 

station frequency. Push the ENTER/

BROWSE button to choose a selection.

MULTIMEDIA

315

Seek And Direct Tune Functions

The Seek Up and Down functions are activated 

by pressing the Double Arrow buttons to the 

right and left of the radio station display, or by 

pushing the left Steering Wheel Audio Control (if 

equipped) up or down.

Seek Up
Press and release the Seek Up   button on the 

touchscreen to tune the radio to the next listen-

able station or channel.
During a Seek Up function, if the radio reaches 

the starting station after passing through the 

entire band two times, the radio will stop at the 

station where it began.

Fast Seek Up
Press and hold the Seek Up   button on the 

touchscreen to advance the radio through the 

available stations or channels at a faster rate. 

The radio stops at the next available station or 

channel when the button on the touchscreen is 

released.

Seek Down
Press and release the Seek Down   button on 

the touchscreen to tune the radio to the next 

listenable station or channel.
During a Seek Down function, if the radio 

reaches the starting station after passing 

through the entire band two times, the radio will 

stop at the station where it began.

Fast Seek Down
Press and hold the Seek Down   button on the 

touchscreen to advance the radio through the 

available stations or channel at a faster rate. 

The radio stops at the next available station or 

channel when the button is released.

Direct Tune
Press the Tune button located at the bottom of 

the radio screen. The Direct Tune screen is 

available in AM, FM, and SAT radio modes and 

can be used to direct tune the radio to a desired 

station or channel.

Direct Tune

Press the available number button on the 

touchscreen to begin selecting a desired 

station. Once a number has been entered, any 

numbers that are no longer possible (stations 

that cannot be reached) will become deacti-

vated/grayed out.
Once the last digit of a station has been 

entered, the Direct Tune screen will close and 

the system will automatically tune to that 

station.
The selected Station or Channel number is 

displayed in the Direct Tune text box.

9

316

MULTIMEDIA


Undo
You can backspace an entry by pressing the 

bottom left Undo button.
GO
When pressed, the GO button allows you to 

commit an entry, at which time the radio will 

tune to the entered station or channel and close 

the Direct Tune Screen.
Screen Close
The X button at the top right closes the Direct 

Tune Screen. The Direct Tune Screen also auto-

matically closes if no activity occurs within

10 seconds.

Setting Presets

The Presets are available for all Radio Modes, 

and are activated by pressing any of the six 

Preset buttons, located at the top of the touch-

screen.
When you are receiving a station that you wish 

to commit into memory, press and hold the 

desired numbered button for more than two 

seconds or until you hear a confirmation beep.

The Radio stores up to 12 presets in each of the 

Radio modes. A set of six presets are visible at 

the top of the radio touchscreen.
You can switch between the two radio presets 

by pressing the Arrow button located in the 

upper right of the radio screen.

Browse in AM/FM

Browsing In AM And FM

When in either AM or FM, the Browse Screen 

provides a means to edit the Presets List and is 

entered by pressing the Browse button on the 

touchscreen.

Scrolling Preset List

Preset List

Once in the Browse Presets screen, you can 

scroll the Preset List by rotation of the Tune 

Knob, or by pressing the Up and Down arrow 

buttons on the touchscreen, located on the right 

of the touchscreen.

Preset Selection From List
A Preset can be selected by pressing the listed 

“Presets”, or by pushing the ENTER/BROWSE 

button on the TUNE/SCROLL knob to select the 

currently highlighted Preset.
When selected, the radio tunes to the station 

stored in the Presets and returns to the main 

radio screen.

MULTIMEDIA

317

Deleting Presets
A Preset can be deleted in the Presets Browse 

screen by pressing the Trash Can icon for the 

corresponding Preset.

Return to Main Radio Screen
You can return to the Main Radio Screen, by 

pressing the X button on the touchscreen when 

in the Browse Presets screen.

SiriusXM® Satellite Radio Mode — If 

Equipped

SiriusXM® Radio

SiriusXM® Satellite Radio uses direct satel-

lite-to-receiver broadcasting technology to 

provide clear, coast-to-coast radio content. 

SiriusXM® is a subscription based service.

SiriusXM® Premier has over 160 channels. Get 

every channel available on your satellite radio, 

and enjoy all you want, all in one place. Hear 

commercial-free music plus sports, news, talk 

and entertainment.
Get all the premium programming, including 

Howard Stern, every NFL® game, Oprah Radio, 

every MLB® and NHL® game, every NASCAR® 

race, Martha Stewart and more. And get 20+ 

extra channels, including SiriusXM® Latino, 

offering 20 channels of commercial-free music, 

news, talk, comedy, sports and more dedicated 

to Spanish language programming.
SiriusXM® services require subscriptions, sold 

separately after the 12-month trial included 

with the new vehicle purchase. If you decide to 

continue your service at the end of your trial 

subscription, the plan you choose will automat-

ically renew and bill at then-current rates until 

you call SiriusXM® at 866-635-2349 to cancel. 

See SiriusXM® Customer Agreement for 

complete terms for US residents at 

www.siri-

usxm.com

, and for Canadian residents at 

www.siriusxm.ca

. All fees and programming 

subject to change. Our satellite service is avail-

able only to those at least 18 and older in the 

48 contiguous USA and D.C. Our Sirius satellite 

service is also available in PR (with coverage 

limitations). Our Internet radio service is avail-

able throughout our satellite service area and in 

AK and HI. © 2019 SiriusXM® Radio Inc. Sirius, 

XM and all related marks and logos are trade-

marks of SiriusXM® Radio Inc.
This functionality is only available for radios 

equipped with a Satellite receiver. To receive 

satellite radio, the vehicle needs to be outside 

with a clear view to the sky.
If the screen shows Acquiring Signal, you might 

have to change the vehicle’s position to receive 

a signal. In most cases, the satellite radio does 

not receive a signal in underground parking 

garages or tunnels.

No Subscription
Radios equipped with a Satellite receiver 

require a subscription to the SiriusXM® Service. 

When the Radio does not have the necessary 

subscription, the Radio is able to receive the 

Preview channel only.

Acquiring SiriusXM® Subscription
To activate the SiriusXM® Satellite Radio 

subscription, call 800-643-2112 (USA resi-

dents) or 888-534-7474 (Canadian Residents). 

9

318

MULTIMEDIA


You will need to provide the Sirius ID (ESN) 

located at the bottom of the Channel 0 screen.
The SiriusXM® Satellite Mode is activated by a 

press of the SAT button on the touchscreen.
When in SiriusXM® Satellite mode:

The SAT button is highlighted.

The SiriusXM® Presets are displayed at the 

top of the screen.

The Genre is displayed below the Presets 

Bar.

The SiriusXM® Channel Number is displayed 

in the center.

The Program Information is displayed at the 

bottom of the Channel Number.

The SiriusXM® function buttons are 

displayed below the Program Information.

Tuning is done by operating the Tune Knob or by 

Direct Tune, similar to other Radio Bands, see 

Presets, browse, Tune Knob, and Direct Tune.
In addition to the tuning Operation functions 

common to all Radio modes, the replay, Traffic/

Weather Jump, and Fav button functions are 

available in SiriusXM® Mode.

Replay
The replay function provides a means to store 

and replay up to 22 minutes of music audio and 

48 minutes of talk radio. Once the channel is 

switched, content in replay memory is lost.
Press the Replay button. The Play/Pause, 

Rewind/Forward and Live buttons will display at 

the top of the screen, along with the replay time.
You can exit by pressing the Replay button any 

time during the Replay mode.
Play/Pause
Press the Pause/Play buttons to pause playing 

of the content at any time that the content is 

playing live or rewound content. Play can be 

resumed again by pressing the Pause/Play 

button.
Rewind
Press the RW button to rewind the content in 

steps of five seconds. Pressing the RW button 

for more than two seconds rewinds the content. 

The Radio begins playing the content when the 

RW button is released.

Forward
Each press of the FW button forwards the 

content in steps of five seconds. Forwarding of 

the content can only be done when the content 

is previously rewound, and therefore, can not be 

done for live content. A continuous press of the 

FW button also forwards the content. The Radio 

begins playing the content when the FW button 

is released.
Live
Press the Live button to resume playing Live 

content.

Favorites
Press the Fav button to activate the favorites 

menu, which will time out in five seconds in 

absence of user interaction.
You can exit the Favorites Menu by a press of 

the “X” in the top right corner.
The favorites feature enables you to set a 

favorite artist, or song that is currently playing. 

The Radio then uses this information to alert 

you when either the favorite song, or favorite 

artist are being played at any time by any of the 

SiriusXM® Channels.
The maximum number of favorites that can be 

stored in the Radio is 50.

MULTIMEDIA

319

Fav. Artist
While the song is playing, to set a Favorite Artist, 

press the Fav button and then the Fav Artist 

button.
Fav. Song
While the song is playing, to set a Favorite Song, 

press the Fav button and then the Fav Song 

button.

Traffic & Weather
Press the Traffic & Weather button to tune to a 

SiriusXM® Traffic & Weather channel. To set a 

Traffic & Weather alert for any one of the cities 

in the Browse list, see Browse in SAT.
When the Traffic & Weather button is pressed, 

the Jump Traffic & Weather channel is tuned.
If the Traffic & Weather alert City is not set, you 

are presented with a pop-up to allow you to 

select the favorite city using the Browse Screen.

Browse In Sat

Press the Browse button to edit Presets, Favor-

ites, Game Zone, and Jump settings, along with 

providing the SiriusXM® Channel List.
This Screen contains many submenus. You can 

exit a submenu to get back to a parent menu by 

a press of the Back Arrow.

All
Press the All button on the touchscreen at the 

left of the Browse Screen.
Channel List
Press the Channel List to display all the 

SiriusXM® Channel Numbers along with the 

corresponding Genre. You can scroll the 

Channel list by pressing the Up and Down 

Arrows, located on the right side of the screen. 

Scrolling can also be done by operating the 

Tune/Scroll Knob.
Genre
Press the Genre button to display a list of 

Genres. You can select any desired Genre by 

pressing the Genre list, at which point, the 

Radio tunes to a channel with the content in the 

selected Genre.

Presets
Press the Presets button located at the left of 

the Browse screen.
You can scroll the Presets list pressing the Up 

and Down Arrows, located at the right side of 

the screen. Scrolling can also be done by oper-

ating the TUNE/SCROLL knob.

Preset Selection
A Preset can be selected by pressing any of the 

listed Presets, or by pushing the ENTER/

BROWSE button on the TUNE/SCROLL knob to 

select the currently highlighted Preset. When 

selected, the Radio tunes to the station stored 

in the Preset, and returns to the main Radio 

screen.
Deleting a Preset
A Preset can be deleted in the Presets Browse 

screen by pressing the Trash Can icon for the 

corresponding Preset.

Favorites
Press the Favorites button, located at the left of 

the Browse screen.
The Favorites menu provides a means to Edit 

the Favorites list and to configure the Alert 

Settings, along with providing a list of Channels 

currently airing any of the items in the Favorites 

list.
You can scroll the Favorites list pressing the Up 

and Down Arrows, located at the right side of 

the screen. Scrolling can also be done by oper-

ating the TUNE/SCROLL knob.

9

320

MULTIMEDIA


Remove Favorites
Press the Remove Favorites tab at the top of the 

screen. Press the Delete All button to delete all 

of the Favorites or press the Trash Can icon next 

to the Favorite to be deleted.
Alert Settings
Press the Alert Setting tab at the top of the 

screen. The Alert Settings menu allows you to 

choose from a Visual alert or Audible and Visual 

alert when one of your favorites is airing on any 

of the SiriusXM® channels.

Game Zone
Press the Game Zone button on the touch-

screen, located at the left of the Browse screen. 

This feature provides you with the ability to 

select teams, edit the selection, and set alerts.
On Air
Press the On-Air tab at the top of the screen. The 

On-Air list provides a list of Channels currently 

airing any of the items in the Selections list, and 

pressing any of the items in the list tunes the 

radio to that channel.
Select Teams
Press the Select Teams button on the touch-

screen to activate the League Scroll list. Press 

the chosen league and a scroll list of all teams 

within the league will appear, then you can 

select a team by pressing the corresponding 

box. A check mark appears for all teams that 

are chosen.
Remove Selection
Press the Remove Selection tab at the top of the 

screen. Press the Delete All button on the touch-

screen to delete all of the Selections or press 

the Trash Can icon next to the Selection to be 

deleted.
Alert Settings
Press the Alert Setting tab at the top of the 

screen. The Alert Settings menu allows you to 

choose from “Alert me to on-air games upon 

start” or “Alert upon score update” or both when 

one or more of your selections is airing on any 

of the SiriusXM® channels.

Traffic & Weather
Press the Traffic & Weather button to tune to a 

SiriusXM® Traffic & Weather channel.
Press the Up and Down Arrows to the right side 

of the list to view all the available cities. This 

operation can also be done with operation of 

the TUNE/SCROLL knob.
Press the check box next to the desired City. A 

check mark appears besides the selected City.

Audio

Press the Audio button to activate the Audio 

settings screen to adjust Balance/Fade, Equal-

izer and Speed Adjusted Volume.
You can return to the Radio screen by pressing 

the X button located at the top right.

Balance/Fade
Press the Balance/Fade button to Balance 

audio between the front speakers or fade the 

audio between the rear and front speakers.

Balance/Fade

Pressing the Front, Rear, Left, or Right buttons 

or press and drag the blue Speaker icon to 

adjust the Balance/Fade.

MULTIMEDIA

321

Equalizer
Press the Equalizer button to activate the Equal-

izer screen.

Equalizer

Press the + or – buttons, or by pressing and 

dragging over the level bar for each of the equal-

izer bands. The level value, which spans 

between ±9, is displayed at the bottom of each 

of the Bands.

Speed Adjusted Volume

Speed Adjusted Volume

Press the Speed Adjusted Volume button to 

activate the Speed Adjusted Volume screen.
Press the Speed Adjusted Volume button to 

select between “OFF,” “1,” “2”, or “3.” This will 

decrease the radio volume relative to a 

decrease in vehicle speed.

Music Info Cleanup

Music Info Cleanup

Press the On button to activate the Music Info 

Cleanup. Press “Off” to deactivate this feature.
When Music Info Cleanup is on, the radio uses 

the Gracenotes database to display standard 

normalized information for song title, artist, 

album, etc.

9

322

MULTIMEDIA


Surround Sound — If Equipped

Surround Sound

Press the On button to activate Surround 

Sound. Press “Off” to deactivate this feature.
When Surround Sound is on, you can hear audio 

coming from every direction as in a movie 

theatre or home theatre system.

Media Mode

Disc Mode

Overview
Disc Mode is entered by either inserting a Disc 

or by pressing the Player button located on the 

bottom of the display. Once in Player Mode, 

press the Source button and select Disc.

Media Mode

A “No Disc” message will be displayed on the 

screen in the Disc mode when a Disc is not 

present in the Radio.

Inserting Compact Disc
Gently insert one Disc into the Disc player with 

the Disc label facing up. The Disc will automati-

cally be pulled into the player and the Disc icon 

will illuminate on the radio display. If a Disc 

does not go into the slot more than 1 inch

(2.5 cm), a disc may already be loaded and 

must be ejected before a new disc can be 

loaded.
If you insert a disc with the ignition ON/RUN and 

the radio On, the unit will switch to Disc Mode 

and begin to play when you insert the disc. The 

display will show the track number, and index 

time in minutes and seconds. Play will begin at 

the start of track One.

Eject Button — Ejecting A Disc

Press the EJECT button to eject the 

Disc.
If you push EJECT and do not remove 

the disk within 10 seconds, it will be 

reloaded. If the Disc is not removed, the radio 

will reinsert the Disc but will not play it.
A disc can be ejected with the radio Off and igni-

tion in Accessories (ACC) mode.

CAUTION!

This CD Player will accept 4-3/4 inch

(12 cm) discs only. The use of other sized 

discs may damage the CD player 

mechanism.

Do not use adhesive labels. These labels 

can peel away and jam the player mecha-

nism.

Uconnect 3/3 NAV is a single Disc player. 

Do not attempt to insert a second Disc if 

one is already loaded.

MULTIMEDIA

323

Seek Up/Down
Press and release the Right Arrow button for the 

next selection on the Disc. Press and release 

the Left Arrow button to return to the beginning 

of the current selection, or return to the begin-

ning of the previous selection if the Disc is 

within the first second of the current selection.

Fast Seek Up
Press and hold the Right Arrow button and the 

Disc player will begin to fast forward through the 

current track until the button is released.

Fast Seek Down
Press and hold the Left Arrow button and the 

Disc player will begin to rewind through the 

current track until the button is released.

Browse
Press the Browse button to display the browse 

window. The left side of the browse window 

displays a list of ways you can browse through 

the contents of the Disc. If supported by the 

device, you can browse by Folders, Artists, Play-

lists, Albums, Songs, etc. Press the desired 

button on the left side of the screen. The center 

of the browse window shows items and it’s 

sub-functions, which can be scrolled by 

pressing the Up and Down buttons to the right. 

The TUNE/SCROLL knob can also be used to 

scroll.

Source
Press the Source button on the touchscreen to 

select the desired audio source: Disc/USB/SD 

Card/AUX/Bluetooth®. This screen will time out 

after a few seconds and return to the main radio 

screen if no selection is made.

Repeat
Press the Repeat button to toggle the repeat 

functionality. The Repeat button is highlighted 

when active. The radio will continue to play the 

current track, repeatedly, as long as the repeat 

is active.

Shuffle
Press the Shuffle button to play the selections 

on the compact disc in random order to provide 

an interesting change of pace. Press the Shuffle 

button a second time to turn this feature off.

Info
Press the Info button to display the current 

track information. Press the Info button a 

second time to cancel this feature.

Tracks
Press the Trks button to display a pop-up with 

the Song List. The currently playing song is indi-

cated by an arrow and lines above and below 

the song title.

Tracks

Pressing the Trks button while the pop-up is 

displayed will close the pop-up.

9

324

MULTIMEDIA


Audio
Refer to “Audio” in “Radio Mode” for further 

information on adjusting the audio settings.

USB Operation

Overview
USB Mode is entered by inserting a USB device 

and cable into the USB Port or by pressing the 

Player button located on the bottom of the 

display. Once in Player Mode, press the Source 

button and select USB.

USB Operation

Inserting USB Device
Gently insert the USB device into the USB Port. 

If you insert a USB device into the USB port, with 

the ignition ON/RUN and the radio on, the unit 

will switch to USB mode and begin to play. The 

display will show the track number and index 

time in minutes and seconds. Play will begin at 

the start of track one.

Seek Up/Down
Press and release the Right Arrow button on the 

touchscreen for the next selection on the USB 

device. Press and release the Left Arrow button 

on the touchscreen to return to the beginning of 

the current selection, or return to the beginning 

of the previous selection if the USB device is 

within the first second of the current selection.
Fast Seek Up
Press and hold the Right Arrow button and the 

USB device will begin to fast forward through 

the current track until the button is released.
Fast Seek Down
Press and hold the Left Arrow button on the 

touchscreen and the USB device will begin to 

rewind through the current track until the 

button on the touchscreen is released.

Browse
Press the Browse button to display the browse 

window. The left side of the browse window 

displays a list of ways you can browse through 

the contents of the USB device. If supported by 

the device, you can browse by Folders, Artists, 

Playlists, Albums, Songs, etc. Press the desired 

button on the left side of the screen. The center 

of the browse window shows items and its 

sub-functions, which can be scrolled by 

pressing the Up and Down buttons to the right. 

The TUNE/SCROLL knob can also be used to 

scroll.
ABC Jump
Press the ABC Jump button tab at the top of the 

screen to search an alpha numeric keypad used 

to search by letter/number for a certain Folder, 

Artist, Song, Album, or Genre. Press one letter to 

select all contents that start with that letter. 

Press the 123 button to display all contents that 

start with numbers. Press the 123 button again 

to return to letters. Press the X button to exit the 

ABC Jump feature.

MULTIMEDIA

325

NOTE:

Many features of this system are speed depen-

dent. For your own safety these features may be 

grayed out and not accessible while the vehicle 

is in motion. Pull over at a safe location to 

complete your task.

ABC Jump

Search
Press the Search tab at the top of the screen to 

display the Keyboard. This allows you to enter a 

folder or file name to be searched.
Up Arrow
Press the Up Arrow button to toggle between 

Upper Case and Lower Case keys.

ABC, ÅØÜ and 1234!&#@
Press the ABC key to activate a keyboard with 

Alphabetic characters, or press the ÅØÜ to acti-

vate a keyboard with accented characters or 

press the 1234!&#@ key to activate a keyboard 

with Numeric plus Special characters.
Folders — If Equipped
Press the Folders button on the left side of the 

screen to display the Folders scroll menu. The 

Folders list consists of folders and files sorted 

alphanumerically, followed by a list of files 

sorted similarly. You can browse the contents of 

a subfolder by pressing the Folder Name in the 

list. Press the Back Arrow button to return or 

back up to a previous folder level.
Artist
Press the Artist button on the left side of the 

screen to display the Artists list in which you can 

Scroll, Search, and Jump to operations.
Playlists — If Equipped
Press the Playlists button on the left side of the 

screen to display the current playlist 

information.

Songs
Press the Songs button on the left side of the 

screen to display the Songs list in which the 

user can Scroll, Search and Jump to operations.
The currently playing song is displayed with a 

black background and lines both above and 

below the title.
Albums
Press the Albums button on the left side of the 

screen to display the Albums list in which you 

can Scroll, Search, and Jump to operations.
Genres
Press the Genres button to display the Genres 

list in which you can Scroll, Search, and Jump to 

operations.

Source
Press the Source button on the touchscreen to 

select the desired audio source, Disc/USB/SD 

Card/AUX/ or Bluetooth®. This screen will time 

out after a few seconds and return to the main 

radio screen if no selection is made.

9

326

MULTIMEDIA


Repeat
Press the Repeat button to toggle the repeat 

functionality. The Repeat button is highlighted 

when active. The Radio will continue to play the 

current track, repeatedly, as long as the repeat 

is active.

Shuffle
Press the Shuffle button to play the selections 

on the USB device in random order. Press the 

Shuffle button a second time to turn this feature 

off.

Info
Press the Info button to display the current 

track information. Press the Info button a 

second time to cancel this feature.

Tracks
Press the Trks button to display a pop-up with 

the Song List. The currently playing song is indi-

cated by an arrow with lines above and below 

the song title. When in the Tracks List screen 

you can rotate the TUNE/SCROLL knob to high-

light a track (indicated by the line above and 

below the track name) and then push the 

ENTER/BROWSE knob to start playing that 

track.

Tracks

Pressing the Trks button while the pop-up is 

displayed will close the pop-up.

Audio
Refer to “Audio” in “Radio Mode” for further 

information on adjusting the audio settings.

AUX Mode

Overview
AUX Mode is entered by inserting an AUX device 

using a cable with a 3.5 mm audio jack into the 

AUX port or by pressing the Player button 

located at the bottom of the display. Once in 

Player Mode, press the Source button and 

select AUX.

Aux Mode

MULTIMEDIA

327

Inserting Auxiliary Device
Gently insert the Auxiliary device cable into the 

AUX Port. If you insert an Auxiliary device with 

the ignition ON/RUN and the radio on, the unit 

will switch to AUX mode and begin to play when 

you insert the device cable.
Controlling The Auxiliary Device
The control of the auxiliary device (e.g., 

selecting playlists, play, fast forward, etc.) 

cannot be provided by the radio; use the device 

controls instead. Adjust the volume with the 

ON/OFF VOLUME rotary knob, or with the 

volume of the attached device.

NOTE:

The vehicle radio unit is acting as the amplifier 

for audio output from the Auxiliary device. 

Therefore if the volume control on the Auxiliary 

device is set too low, there will be insufficient 

audio signal for the radio unit to play the music 

on the device.

Source  
Press the Source button on the touchscreen to 

select the desired audio source, Disc/USB/SD 

Card/AUX/ or Bluetooth®. This screen will time 

out after a few seconds and return to the main 

radio screen if no selection is made.

Audio
Refer to “Audio” in “Radio Mode” for further 

information on adjusting the audio settings.

SD Card Mode

Overview
SD Card Mode is entered by inserting a SD Card 

containing music into the SD Card slot above 

the Disc slot on the Instrument Panel or by 

pressing the Player button located at the 

bottom of the display. Once in Player Mode, 

press the Source button and select SD Card.

SD Card Mode

Inserting SD Card
Gently insert the SD Card into the SD Card slot. 

If you insert a SD Card with the ignition ON/RUN 

and the radio on, the unit will switch to SD Card 

mode and begin to play when you insert the 

card. The display will show the track number, 

and index time in minutes and seconds. Play 

will begin at the start of track one.

Seek Up/Down
Press and release the Seek Up   button for the 

next selection on the SD Card. Press and 
release the Seek Down   button to return to 

the beginning of the current selection, or return 

to the beginning of the previous selection if the 

SD Card is within the first second of the current 

selection.
Fast Seek Up
Press and hold the Right Arrow button and the 

SD Card will begin to fast forward through the 

current track until the button is released.
Fast Seek Down
Press and hold the Left Arrow button and the SD 

Card begins to rewind through the current track 

until the button is released.

9


Content      ..     18      19      20      21     ..