Dodge Journey (2020 year). Manual in english - page 15
 

  Index      Manuals     Dodge Journey (2020 year). Manual in english


Search            copyright infringement  


Content      ..     13      14      15      16     ..


Dodge Journey (2020 year). Manual in english - page 15


232

SERVICING AND MAINTENANCE


Some conditions can be caused by a faulty 

component such as a belt pulley. Belt pulleys 

should be carefully inspected for damage and 

proper alignment.
Belt replacement on some models requires the 

use of special tools, we recommend having your 

vehicle serviced at an authorized dealer.

Body Lubrication  

Locks and all body pivot points, including such 

items as seat tracks, door hinge pivot points 

and rollers, liftgate, tailgate, decklid, sliding 

doors and hood hinges, should be lubricated 

periodically with a lithium based grease, such 

as Mopar Spray White Lube to ensure quiet, 

easy operation and to protect against rust and 

wear. Prior to the application of any lubricant, 

the parts concerned should be wiped clean to 

remove dust and grit; after lubricating, excess 

oil and grease should be removed. Particular 

attention should also be given to hood latching 

components to ensure proper function. When 

performing other underhood services, the hood 

latch, release mechanism and safety catch 

should be cleaned and lubricated.

The external lock cylinders should be lubricated 

twice a year, preferably in the Autumn and 

Spring. Apply a small amount of a high quality 

lubricant, such as Mopar Lock Cylinder Lubri-

cant directly into the lock cylinder.

Windshield Wiper Blades  

Clean the rubber edges of the wiper blades and 

the windshield periodically with a sponge or soft 

cloth and a mild nonabrasive cleaner. This will 

remove accumulations of salt or road film.
Operation of the wipers on dry glass for long 

periods may cause deterioration of the wiper 

blades. Always use washer fluid when using the 

wipers to remove salt or dirt from a dry

windshield.
Avoid using the wiper blades to remove frost or 

ice from the windshield. Keep the blade rubber 

out of contact with petroleum products such as 

engine oil, gasoline, etc.

NOTE:

Life expectancy of wiper blades varies 

depending on geographical area and frequency 

of use. Poor performance of blades may be 

present with chattering, marks, water lines or 

wet spots. If any of these conditions are 

present, clean the wiper blades or replace as 

necessary.

Rear Wiper Blade Removal/Installation

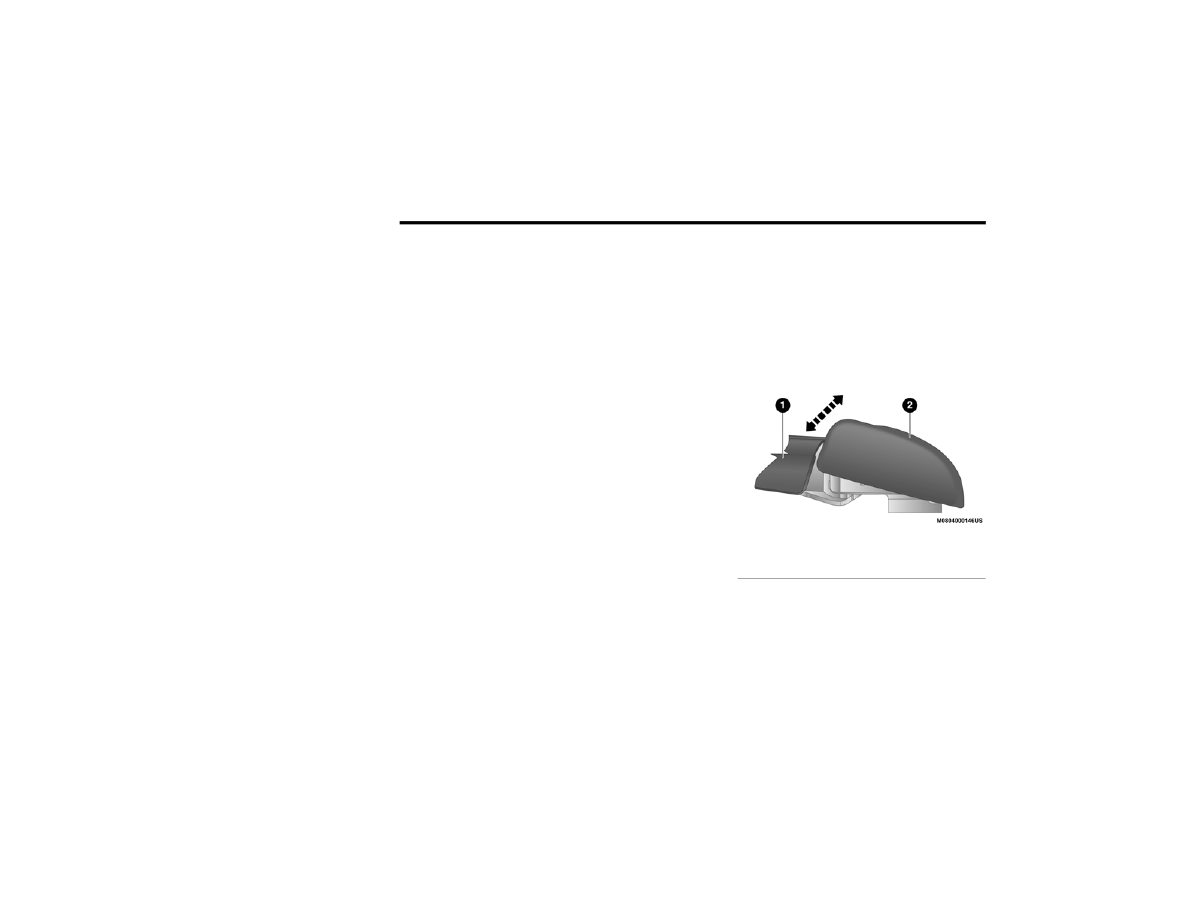
1. Lift the pivot cap on the rear wiper arm 

upward, this will allow the rear wiper blade 

to be raised off of the liftgate glass.

Lifting The Pivot Cap

NOTE:

The rear wiper arm cannot be raised fully 

upward unless the pivot cap is raised first.

1 — Wiper Arm
2 — Pivot Cap

SERVICING AND MAINTENANCE

233

(Continued)

2. Lift the rear wiper arm upward to raise the 

wiper blade off of the liftgate glass.

3. Grab the bottom of the wiper blade and 

rotate it forward to unsnap the blade pivot 

pin from the wiper blade holder.

Removing The Wiper Blade

4. Install the wiper blade pivot pin into the 

wiper blade holder at the end of the wiper 

arm, and firmly press the wiper blade until it 

snaps into place.

5. Lower the wiper blade and snap the pivot 

cap into place.

Exhaust System 

The best protection against carbon monoxide 

entry into the vehicle body is a properly main-

tained engine exhaust system.
If you notice a change in the sound of the 

exhaust system; or if the exhaust fumes can be 

detected inside the vehicle; or when the under-

side or rear of the vehicle is damaged; have an 

authorized technician inspect the complete 

exhaust system and adjacent body areas for 

broken, damaged, deteriorated, or misposi-

tioned parts. Open seams or loose connections 

could permit exhaust fumes to seep into the 

passenger compartment. In addition, have the 

exhaust system inspected each time the vehicle 

is raised for lubrication or oil change. Replace 

as required.

1 — Wiper Blade
2 — Blade Pivot Pin
3 — Wiper Arm
4 — Wiper Blade Holder

WARNING!

Exhaust gases can injure or kill. They 

contain carbon monoxide (CO), which is 

colorless and odorless. Breathing it can 

make you unconscious and can eventually 

poison you. To avoid breathing CO, refer to 

“Safety Tips” in “Safety” for further

information.

A hot exhaust system can start a fire if you 

park over materials that can burn. Such 

materials might be grass or leaves coming 

into contact with your exhaust system. Do 

not park or operate your vehicle in areas 

where your exhaust system can contact 

anything that can burn.

CAUTION!

The catalytic converter requires the use of 

unleaded fuel only. Leaded gasoline will 

destroy the effectiveness of the catalyst as 

an emissions control device and may seri-

ously reduce engine performance and 

cause serious damage to the engine.

7

234

SERVICING AND MAINTENANCE


Under normal operating conditions, the cata-

lytic converter will not require maintenance. 

However, it is important to keep the engine 

properly tuned to ensure proper catalyst opera-

tion and prevent possible catalyst damage.

NOTE:

Intentional tampering with emissions control 

systems can result in civil penalties being 

assessed against you.

In unusual situations involving grossly malfunc-

tioning engine operation, a scorching odor may 

suggest severe and abnormal catalyst over-

heating. If this occurs, stop the vehicle, turn off 

the engine and allow it to cool. Service, 

including a tune-up to manufacturer's specifica-

tions, should be obtained immediately.
To minimize the possibility of catalytic converter 

damage:

Do not interrupt the ignition when the trans-

mission is in gear and the vehicle is in 

motion.

Do not try to start the vehicle by pushing or 

towing the vehicle.

Do not idle the engine with any ignition 

components disconnected or removed, such 

as when diagnostic testing, or for prolonged 

periods during very rough idle or malfunc-

tioning operating conditions.

Cooling System 

Damage to the catalytic converter can 

result if your vehicle is not kept in proper 

operating condition. In the event of engine 

malfunction, particularly involving engine 

misfire or other apparent loss of perfor-

mance, have your vehicle serviced 

promptly. Continued operation of your 

vehicle with a severe malfunction could 

cause the converter to overheat, resulting 

in possible damage to the converter and 

vehicle.

CAUTION!

 (Continued)

WARNING!

You or others can be badly burned by hot 

engine coolant (antifreeze) or steam from 

your radiator. If you see or hear steam 

coming from under the hood, do not open 

the hood until the radiator has had time to 

cool. Never open a cooling system pressure 

cap when the radiator or coolant bottle is 

hot.

Keep hands, tools, clothing, and jewelry 

away from the radiator cooling fan when 

the hood is raised. The fan starts automati-

cally and may start at any time, whether the 

engine is running or not.

When working near the radiator cooling fan, 

disconnect the fan motor lead or turn the 

ignition to the OFF mode. The fan is 

temperature controlled and can start at any 

time the ignition is in the ON mode.

SERVICING AND MAINTENANCE

235

(Continued)

Coolant Checks 

Check the engine coolant (antifreeze) protec-

tion every 12 months (before the onset of 

freezing weather, where applicable). If the 

engine coolant (antifreeze) is dirty or rusty in 

appearance, the system should be drained, 

flushed, and refilled with fresh engine coolant 

(antifreeze). Check the front of the A/C 

condenser for any accumulation of bugs, 

leaves, etc. If dirty, clean by gently spraying 

water from a garden hose vertically down the 

face of the condenser.
Check the coolant recovery bottle tubing for 

brittle rubber, cracking, tears, cuts, and tight-

ness of the connection at the bottle and radi-

ator. Inspect the entire system for leaks.

Cooling System — Drain, Flush And Refill

NOTE:

Some vehicles require special tools to add 

coolant properly. Failure to fill these systems 

properly could lead to severe internal engine 

damage. If any coolant is needed to be added to 

the system please contact your local authorized 

dealer.

If the engine coolant (antifreeze) is dirty or 

contains visible sediment, have an authorized 

dealer clean and flush with OAT coolant 

(antifreeze) (conforming to MS.90032).
Refer to the “Maintenance Plan” in

(Servicing and Maintenance” for the proper 

maintenance intervals.

Selection Of Coolant 

Refer to “Fluids And Lubricants” in “Technical 

Specifications” for further information.

NOTE:

Mixing of engine coolant (antifreeze) other 

than specified Organic Additive Technology 

(OAT) engine coolant (antifreeze), may result 

in engine damage and may decrease corro-

sion protection. Organic Additive Technology 

(OAT) engine coolant is different and should 

not be mixed with Hybrid Organic Additive 

Technology (HOAT) engine coolant (anti-

freeze) or any “globally compatible” coolant 

(antifreeze). If a non-OAT engine coolant 

(antifreeze) is introduced into the cooling 

system in an emergency, the cooling system 

will need to be drained, flushed, and refilled 

with fresh OAT coolant (conforming to 

MS.90032), by an authorized dealer as soon 

as possible.

Do not use water alone or alcohol-based 

engine coolant (antifreeze) products. Do not 

use additional rust inhibitors or antirust prod-

ucts, as they may not be compatible with the 

radiator engine coolant and may plug the 

radiator.

WARNING!

The warning words “DO NOT OPEN HOT” on 

the cooling system pressure cap are a 

safety precaution. Never add engine 

coolant (antifreeze) when the engine is 

overheated. Do not loosen or remove the 

cap to cool an overheated engine. Heat 

causes pressure to build up in the cooling 

system. To prevent scalding or injury, do not 

remove the pressure cap while the system 

is hot or under pressure.

Do not use a pressure cap other than the 

one specified for your vehicle. Personal 

injury or engine damage may result.

WARNING!

 (Continued)

7

236

SERVICING AND MAINTENANCE


This vehicle has not been designed for use 

with propylene glycol-based engine coolant 

(antifreeze). Use of propylene glycolbased 

engine coolant (antifreeze) is not

recommended.

Some vehicles require special tools to add 

coolant properly. Failure to fill these systems 

properly could lead to severe internal engine 

damage. If any coolant is needed to be added 

to the system please contact an authorized 

dealer.

Adding Coolant 

Your vehicle has been built with an improved 

engine coolant (OAT coolant conforming to 

MS.90032) that allows extended maintenance 

intervals. This engine coolant (antifreeze) can 

be used up to ten years or 150,000 miles

(240,000 km) before replacement. To prevent 

reducing this extended maintenance period, it 

is important that you use the same engine 

coolant (OAT coolant conforming to MS.90032) 

throughout the life of your vehicle.

Please review these recommendations for 

using Organic Additive Technology (OAT) engine 

coolant (antifreeze) that meets the require-

ments of FCA Material Standard MS.90032. 

When adding engine coolant (antifreeze):

We recommend using Mopar 

Antifreeze/Coolant 10 Year/150,000 Mile 

(240,000 km) Formula OAT (Organic Additive 

Technology) that meets the requirements of 

FCA Material Standard MS.90032.

Mix a minimum solution of 50% OAT engine 

coolant that meets the requirements of 

FCA Material Standard MS.90032 and 

distilled water. Use higher concentrations 

(not to exceed 70%) if temperatures below 

−34°F (−37°C) are anticipated. Please 

contact an authorized dealer for assistance.

Use only high purity water such as distilled or 

deionized water when mixing the 

water/engine coolant (antifreeze) solution. 

The use of lower quality water will reduce the 

amount of corrosion protection in the engine 

cooling system.

NOTE:

It is the owner's responsibility to maintain the 

proper level of protection against freezing 

according to the temperatures occurring in 

the area where the vehicle is operated.

Some vehicles require special tools to add 

coolant properly. Failure to fill these systems 

properly could lead to severe internal engine 

damage. If any coolant is needed to be added 

to the system, please contact a local autho-

rized dealer.

Mixing engine coolant (antifreeze) types is 

not recommended and can result in cooling 

system damage. If HOAT and OAT coolant are 

mixed in an emergency, have a authorized 

dealer drain, flush, and refill with OAT coolant 

(conforming to MS.90032) as soon as 

possible.

Cooling System Pressure Cap   

The cap must be fully tightened to prevent loss 

of engine coolant (antifreeze), and to ensure 

that engine coolant (antifreeze) will return to 

the radiator from the coolant recovery bottle.
The cap should be inspected and cleaned if 

there is any accumulation of foreign material on 

the sealing surfaces.

SERVICING AND MAINTENANCE

237

Disposal Of Used Coolant 

Used ethylene glycol-based coolant (antifreeze) 

is a regulated substance requiring proper 

disposal. Check with your local authorities to 

determine the disposal rules for your commu-

nity. To prevent ingestion by animals or chil-

dren, do not store ethylene glycol-based coolant 

in open containers or allow it to remain in 

puddles on the ground. If ingested by a child or 

pet, seek emergency assistance immediately. 

Clean up any ground spills immediately.

Coolant Level 

The coolant bottle provides a quick visual 

method for determining that the coolant level is 

adequate. With the engine idling and warm to 

normal operating temperature, the level of the 

coolant in the bottle should be between the 

“ADD” and “FULL” lines, shown on the bottle.
The radiator normally remains completely full, 

so there is no need to remove the radiator cap 

unless checking for coolant freeze point or 

replacing engine coolant (antifreeze). Advise 

your service attendant of this. As long as the 

engine operating temperature is satisfactory, 

the coolant bottle need only be checked once a 

month. When additional engine coolant (anti-

freeze) is needed to maintain the proper level, it 

should be added to the coolant bottle. Do not 

overfill. See “Adding Coolant” in “Servicing and 

Maintenance” for further information.

Points To Remember 

NOTE:

When the vehicle is stopped after a few 

miles/kilometers of operation, you may observe 

vapor coming from the front of the engine 

compartment. This is normally a result of mois-

ture from rain, snow, or high humidity accumu-

lating on the radiator and being vaporized when 

the thermostat opens, allowing hot engine 

coolant (antifreeze) to enter the radiator.

If an examination of your engine compartment 

shows no evidence of radiator or hose leaks, 

the vehicle may be safely driven. The vapor will 

soon dissipate.

Do not overfill the coolant expansion bottle.

Check the coolant freeze point in the radiator 

and in the coolant expansion bottle. If engine 

coolant (antifreeze) needs to be added, the 

contents of the coolant expansion bottle 

must also be protected against freezing.

If frequent engine coolant (antifreeze) addi-

tions are required, the cooling system should 

be pressure tested for leaks.

Maintain engine coolant (antifreeze) concen-

tration at a minimum of 50% OAT coolant 

(conforming to MS.90032) and distilled 

water for proper corrosion protection of your 

engine which contains aluminum

components.

Make sure that the coolant expansion bottle 

overflow hoses are not kinked or obstructed.

WARNING!

The warning words “DO NOT OPEN HOT” on 

the cooling system pressure cap are a 

safety precaution. Never add engine 

coolant (antifreeze) when the engine is 

overheated. Do not loosen or remove the 

cap to cool an overheated engine. Heat 

causes pressure to build up in the cooling 

system. To prevent scalding or injury, do not 

remove the pressure cap while the system 

is hot or under pressure.

Do not use a pressure cap other than the 

one specified for your vehicle. Personal 

injury or engine damage may result.

7

238

SERVICING AND MAINTENANCE


(Continued)

Keep the front of the radiator clean. If your 

vehicle is equipped with air conditioning, 

keep the front of the condenser clean.

Do not change the thermostat for Summer or 

Winter operation. If replacement is ever 

necessary, install ONLY the correct type ther-

mostat. Other designs may result in unsatis-

factory engine coolant (antifreeze) 

performance, poor gas mileage, and 

increased emissions.

Brake System 

In order to ensure brake system performance, 

all brake system components should be 

inspected periodically. Refer to the “Mainte-

nance Plan” in “Servicing and Maintenance” for 

the proper maintenance intervals.

Master Cylinder — Brake Fluid Level Check 

Check the fluid level in the master cylinder 

immediately if the “Brake Warning Light” indi-

cates system failure.
Check the fluid level in the master cylinder 

when performing underhood services.
Clean the top of the master cylinder area before 

removing the cap. If necessary, add fluid to 

bring the fluid level up to the requirements 

described on the brake fluid reservoir.
Overfilling of fluid is not recommended because 

it may cause leaking in the system.
Fluid level can be expected to fall as the brake 

pads wear. Brake fluid level should be checked 

when pads are replaced. However, low fluid 

level may be caused by a leak and a checkup 

may be needed.
Use only manufacturer's recommended brake 

fluid. Refer to “Fluids And Lubricants” in 

“Technical Specifications” for further 

information.

WARNING!

Riding the brakes can lead to brake failure 

and possibly a collision. Driving with your foot 

resting or riding on the brake pedal can result 

in abnormally high brake temperatures, 

excessive lining wear, and possible brake 

damage. You would not have your full braking 

capacity in an emergency.

WARNING!

Use only manufacturer's recommended 

brake fluid. Refer to “Fluids And Lubri-

cants” in “Technical Specifications” for 

further information. Using the wrong type of 

brake fluid can severely damage your brake 

system and/or impair its performance. The 

proper type of brake fluid for your vehicle is 

also identified on the original factory 

installed hydraulic master cylinder reser-

voir.

To avoid contamination from foreign matter 

or moisture, use only new brake fluid or 

fluid that has been in a tightly closed 

container. Keep the master cylinder reser-

voir cap secured at all times. Brake fluid in 

a open container absorbs moisture from 

the air resulting in a lower boiling point. This 

may cause it to boil unexpectedly during 

hard or prolonged braking, resulting in 

sudden brake failure. This could result in a 

collision.

SERVICING AND MAINTENANCE

239

Automatic Transmission

Selection Of Lubricant 

It is important to use the proper transmission 

fluid to ensure optimum transmission perfor-

mance and life. Use only the manufacturer's 

specified transmission fluid. Refer to “Fluids 

And Lubricants” in “Technical Specifications” 

for fluid specifications. It is important to main-

tain the transmission fluid at the correct level 

using the recommended fluid.

NOTE:

No chemical flushes should be used in any 

transmission; only the approved lubricant 

should be used.

Special Additives

The manufacturer strongly recommends 

against using any special additives in the trans-

mission. Automatic Transmission Fluid (ATF) is 

an engineered product and its performance 

may be impaired by supplemental additives. 

Therefore, do not add any fluid additives to the 

transmission. The only exception to this policy is 

the use of special dyes for diagnosing fluid 

leaks. Avoid using transmission sealers as they 

may adversely affect seals.

Fluid Level Check

Use the following procedure to check the trans-

mission fluid level properly:

1. Park the vehicle on level ground.

2. Run the engine at normal idle speed for at 

least 60 seconds, and leave the engine 

running for the rest of this procedure.

3. Fully apply the parking brake, and press the 

brake pedal.

4. Place the gear selector momentarily into 

each gear position (allowing time for the 

transmission to fully engage in each posi-

tion), ending with the transmission in PARK.

5. Wipe the area around the dipstick clean to 

prevent dirt from entering the transmission.

Overfilling the brake fluid reservoir can 

result in spilling brake fluid on hot engine 

parts, causing the brake fluid to catch fire. 

Brake fluid can also damage painted and 

vinyl surfaces, care should be taken to 

avoid its contact with these surfaces.

Do not allow petroleum based fluid to 

contaminate the brake fluid. Brake seal 

components could be damaged, causing 

partial or complete brake failure. This could 

result in a collision.

WARNING!

 (Continued)

CAUTION!

Using a transmission fluid other than the 

manufacturer’s recommended fluid may 

cause deterioration in transmission shift 

quality and/or torque converter shudder, and 

will require more frequent fluid and filter 

changes. Refer to “Fluids And Lubricants” in 

“Technical Specifications” for fluid 

specifications.

CAUTION!

Do not use chemical flushes in your 

transmission as the chemicals can damage 

your transmission components. Such damage 

is not covered by the New Vehicle Limited 

Warranty.

7

240

SERVICING AND MAINTENANCE


6. Remove the dipstick and determine if the 

fluid is hot or cold. You can also read the 

transmission fluid temperature using the 

instrument cluster. Refer to "Instrument 

Cluster Display" in "Getting To Know Your 

Instrument Panel" for further information. 

Hot fluid is approximately 180°F (82°C), 

which is the normal operating temperature 

after the vehicle is driven at least 15 miles 

(24 km). Hot fluid cannot be held comfort-

ably between the fingertips. Cold fluid is at 

a temperature of approximately 80°F 

(27°C).

7. Wipe the dipstick clean and reinsert it until 

seated. Then, remove the dipstick and note 

the fluid level on both sides. The fluid level 

reading is only valid if there is a solid 

coating of oil on both sides of the dipstick. 

Note that the holes in the dipstick will be full 

of fluid if the actual level is at or above the 

hole.

If the fluid is hot, the fluid level should be 

in the crosshatched area marked “HOT” 

(between the upper two holes in the 

dipstick).

If the fluid is cold, the fluid level should be 

between the lower two holes in the area 

marked “COLD”.

If the fluid level is low, add fluid through the 

dipstick tube to bring it to the proper level. 

Do not overfill. After adding any quantity of 

oil through the dipstick tube, wait at least 

two minutes for the oil to fully drain into the 

transmission before rechecking the fluid 

level.

NOTE:

If it is necessary to check the transmission 

below the operating temperature, the fluid level 

should be between the two COLD (lower) holes 

on the dipstick with the fluid at approximately 

80°F (27°C). If the fluid level is correctly estab-

lished at 80°F (27°C), it should be between the 

HOT (upper) reference holes when the transmis-

sion reaches 180°F (82°C). Remember it is 

best to check the level at the normal operating 

temperature.

8. Check for leaks. Release the parking brake.

Fluid And Filter Changes

Refer to the “Maintenance Plan” in “Servicing 

and Maintenance” for the proper maintenance 

intervals.
In addition, change the fluid and filter if the fluid 

becomes contaminated (with water, etc.), or if 

the transmission is disassembled for any 

reason.

CAUTION!

Using a transmission fluid other than the 

manufacturer’s recommended fluid may 

cause deterioration in transmission shift 

quality and/or torque converter shudder, 

and will require more frequent fluid and 

filter changes. Refer to “Fluids And Lubri-

cants” in “Technical Specifications” for 

fluid specifications.

Dirt and water in the transmission can 

cause serious damage. To prevent dirt and 

water from entering the transmission after 

checking or replenishing fluid, make sure 

that the dipstick cap is re-seated properly.

SERVICING AND MAINTENANCE

241

RAISING THE VEHICLE  

In the case where it is necessary to raise the 

vehicle, go to an authorized dealer or service 

station.

TIRES

Tire Safety Information   

Tire safety information will cover aspects of the 

following information: Tire Markings, Tire Identi-

fication Numbers, Tire Terminology and Defini-

tions, Tire Pressures, and Tire Loading.

Tire Markings 

Tire Markings

NOTE:

P (Passenger) — Metric tire sizing is based on 

US design standards. P-Metric tires have the 

letter “P” molded into the sidewall preceding 

the size designation. 

Example: P215/65R15 95H.

European — Metric tire sizing is based on 

European design standards. Tires designed 

to this standard have the tire size molded 

into the sidewall beginning with the section 

width. The letter "P" is absent from this tire 

size designation.

Example: 215/65R15 96H.

LT (Light Truck) — Metric tire sizing is based 

on US design standards. The size designation 

for LT-Metric tires is the same as for P-Metric 

tires except for the letters “LT” that are 

molded into the sidewall preceding the size 

designation. 

Example: LT235/85R16.

Temporary spare tires are designed for 

temporary emergency use only. Temporary 

high pressure compact spare tires have the 

letter “T” or “S” molded into the sidewall 

preceding the size designation. 

Example: T145/80D18 103M.

High flotation tire sizing is based on US 

design standards and it begins with the tire 

diameter molded into the sidewall. 

Example: 31x10.5 R15 LT.

1 — US DOT Safety Standards Code (TIN)
2 — Size Designation
3 — Service Description
4 — Maximum Load
5 — Maximum Pressure
6 — Treadwear, Traction and 

Temperature Grades

7

242

SERVICING AND MAINTENANCE


Tire Sizing Chart 

EXAMPLE:

Example Size Designation: P215/65R15XL 95H, 215/65R15 96H, LT235/85R16C, T145/80D18 103M, 31x10.5 R15 LT
P = Passenger car tire size based on US design standards, or
"....blank...." = Passenger car tire based on European design standards, or
LT = Light truck tire based on US design standards, or
T or S = Temporary spare tire or
31 = Overall diameter in inches (in)
215, 235, 145 = Section width in millimeters (mm)
65, 85, 80 = Aspect ratio in percent (%) 

Ratio of section height to section width of tire, or

10.5 = Section width in inches (in)
R = Construction code 

"R" means radial construction, or

"D" means diagonal or bias construction

15, 16, 18 = Rim diameter in inches (in)
Service Description:
95 = Load Index 

A numerical code associated with the maximum load a tire can carry

SERVICING AND MAINTENANCE

243

Tire Identification Number (TIN)

The TIN may be found on one or both sides of the tire; however, the date code may only be on one side. Tires with white sidewalls will have the full TIN, 

including the date code, located on the white sidewall side of the tire. Look for the TIN on the outboard side of black sidewall tires as mounted on the 

vehicle. If the TIN is not found on the outboard side, then you will find it on the inboard side of the tire.

H = Speed Symbol 

A symbol indicating the range of speeds at which a tire can carry a load corresponding to its load index under certain operating conditions

The maximum speed corresponding to the speed symbol should only be achieved under specified operating conditions (i.e., tire pressure, vehicle 

loading, road conditions, and posted speed limits)

Load Identification:

Absence of the following load identification symbols on the sidewall of the tire indicates a Standard Load (SL) tire:

XL = Extra load (or reinforced) tire, or

LL = Light load tire or

C, D, E, F, G = Load range associated with the maximum load a tire can carry at a specified pressure

Maximum Load – Maximum load indicates the maximum load this tire is designed to carry
Maximum Pressure – Maximum pressure indicates the maximum permissible cold tire inflation pressure for this tire

EXAMPLE:

EXAMPLE:

DOT MA L9 ABCD 0301
DOT = Department of Transportation 

This symbol certifies that the tire is in compliance with the US Department of Transportation tire safety standards and is approved for highway use

MA = Code representing the tire manufacturing location (two digits)
L9 = Code representing the tire size (two digits)

7

244

SERVICING AND MAINTENANCE


Tire Terminology And Definitions

ABCD = Code used by the tire manufacturer (one to four digits)
03 = Number representing the week in which the tire was manufactured (two digits) 

03 means the 3rd week

01 = Number representing the year in which the tire was manufactured (two digits) 

01 means the year 2001

Prior to July 2000, tire manufacturers were only required to have one number to represent the year in which the tire was manufactured. 

Example: 031 could represent the 3rd week of 1981 or 1991

Term

Definition

B-Pillar

The vehicle B-Pillar is the structural member of the body located behind the front door.

Cold Tire Inflation Pressure

Cold tire inflation pressure is defined as the tire pressure after the vehicle has not been 

driven for at least three hours, or driven less than 1 mile (1.6 km) after sitting for a 

minimum of three hours. Inflation pressure is measured in units of PSI (pounds per 

square inch) or kPa (kilopascals).

Maximum Inflation Pressure

The maximum inflation pressure is the maximum permissible cold tire inflation pressure 

for this tire. The maximum inflation pressure is molded into the sidewall.

Recommended Cold Tire Inflation Pressure

Vehicle manufacturer's recommended cold tire inflation pressure as shown on the tire 

placard.

Tire Placard

A label permanently attached to the vehicle describing the vehicle’s loading capacity, 

the original equipment tire sizes and the recommended cold tire inflation pressures.

EXAMPLE:

SERVICING AND MAINTENANCE

245

Tire Loading And Tire Pressure   

NOTE:

The proper cold tire inflation pressure is listed 

on the driver’s side B-Pillar or the rear edge of 

the driver's side door.

Check the inflation pressure of each tire, 

including the spare tire (if equipped), at least 

monthly and inflate to the recommended pres-

sure for your vehicle.

Example Tire Placard Location (Door)

Example Tire Placard Location (B-Pillar)

Tire And Loading Information Placard

Tire And Loading Information Placard

This placard tells you important information 

about the:

1. Number of people that can be carried in 

the vehicle.

2. Total weight your vehicle can carry.

3. Tire size designed for your vehicle.

4. Cold tire inflation pressures for the front, 

rear, and spare tires.

Loading 

The vehicle maximum load on the tire must not 

exceed the load carrying capacity of the tire on 

your vehicle. You will not exceed the tire's load 

carrying capacity if you adhere to the loading 

conditions, tire size, and cold tire inflation pres-

sures specified on the Tire and Loading Infor-

mation placard in “Vehicle Loading” in “Starting 

And Operating” for further information.

NOTE:

Under a maximum loaded vehicle condition, 

gross axle weight ratings (GAWRs) for the front 

and rear axles must not be exceeded. 

For further information on GAWRs, vehicle 

loading, and trailer towing, refer to “Vehicle 

Loading” in “Starting And Operating” for further 

information.

7

246

SERVICING AND MAINTENANCE


To determine the maximum loading conditions 

of your vehicle, locate the statement “The 

combined weight of occupants and cargo 

should never exceed XXX kg or XXX lbs” on the 

Tire and Loading Information placard. The 

combined weight of occupants, cargo/luggage 

and trailer tongue weight (if applicable) should 

never exceed the weight referenced here.

Steps For Determining Correct Load 

Limit—
(1) Locate the statement “The combined 

weight of occupants and cargo should 

never exceed XXX kg or XXX lbs.” on your 

vehicle's placard.
(2) Determine the combined weight of 

the driver and passengers that will be 

riding in your vehicle.
(3) Subtract the combined weight of the 

driver and passengers from XXX kg or 

XXX lbs.

(4) The resulting figure equals the avail-

able amount of cargo and luggage load 

capacity. For example, if “XXX” amount 

equals 1400 lbs. and there will be five 

150 lb passengers in your vehicle, the 

amount of available cargo and luggage 

load capacity is 650 lbs. (1400-750 

(5x150) = 650 lbs.)
(5) Determine the combined weight of 

luggage and cargo being loaded on the 

vehicle. That weight may not safely 

exceed the available cargo and luggage 

load capacity calculated in Step 4.
(6) If your vehicle will be towing a trailer, 

load from your trailer will be transferred 

to your vehicle. Consult this manual to 

determine how this reduces the avail-

able cargo and luggage load capacity of 

your vehicle.

Metric Example For Load Limit
For example, if “XXX” amount equals 635 kg 

and there will be five 68 kg passengers in your 

vehicle, the amount of available cargo and 

luggage load capacity is 295 kg (635-340 

(5x68) = 295 kg) as shown in step 4.

NOTE:

If your vehicle will be towing a trailer, load 

from your trailer will be transferred to your 

vehicle. The following table shows examples 

on how to calculate total load, cargo/

luggage, and towing capacities of your 

vehicle with varying seating configurations 

and number and size of occupants. This table 

is for illustration purposes only and may not 

be accurate for the seating and load carry 

capacity of your vehicle.

For the following example, the combined 

weight of occupants and cargo should never 

exceed 865 lbs (392 kg).

SERVICING AND MAINTENANCE

247

7


Content      ..     13      14      15      16     ..