Dodge Journey (2020 year). Manual in english - page 3
 

  Index      Manuals     Dodge Journey (2020 year). Manual in english


Search            copyright infringement  


Content      ..     1      2      3      4      ..


Dodge Journey (2020 year). Manual in english - page 3


40

GETTING TO KNOW YOUR VEHICLE


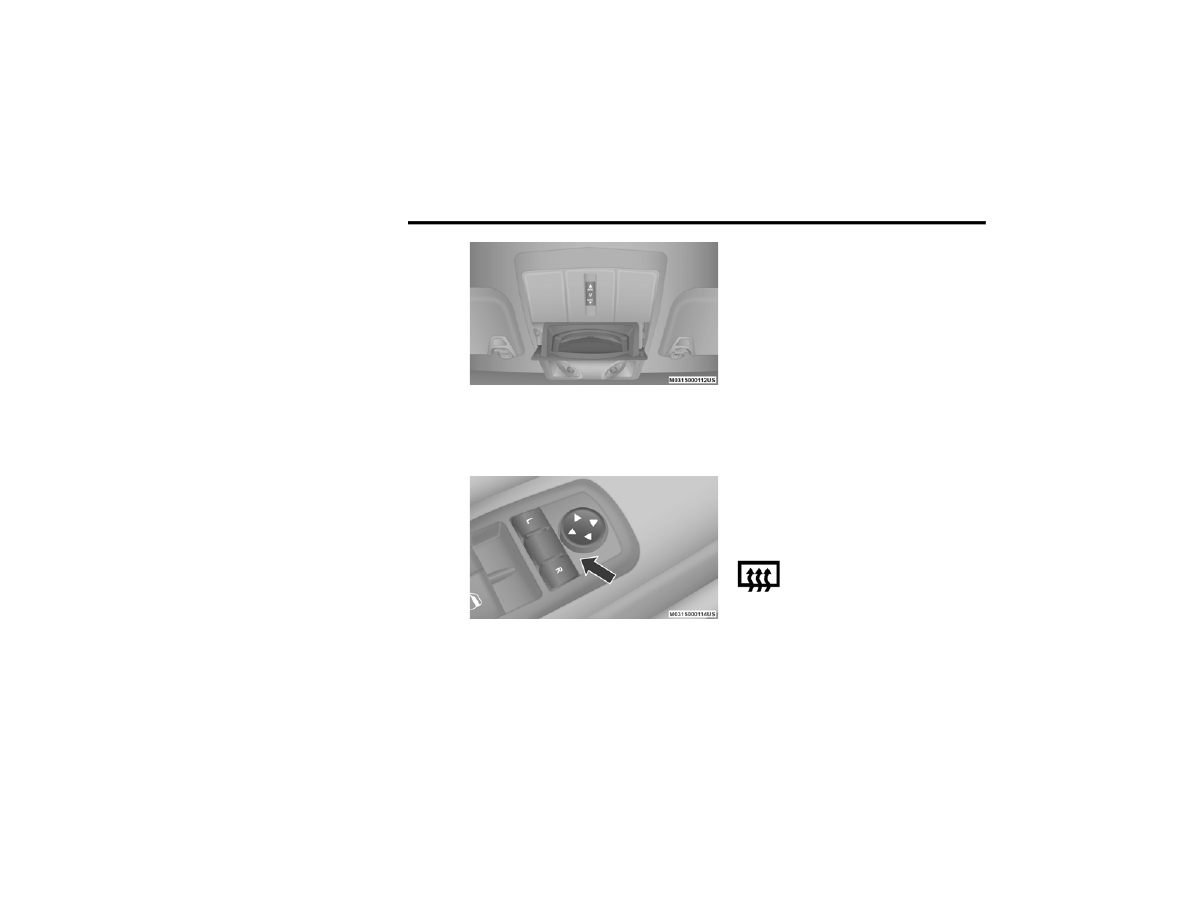
Interior Observation Mirror 

The convex interior observation mirror provides 

the driver and front seat passenger a wide field 

of view to conveniently view passengers sitting 

in the rear passenger seats. To use the interior 

observation mirror, push on the raised bars on 

the compartment door and release (the door 

will swing downward), then raise the door until it 

is almost closed and release. The door will latch 

in position to use the interior observation 

mirror.

NOTE:

From the “observation mirror” position, the door 

can only be closed.

To return to the full open position, the door must 

first be closed and then opened by pushing the 

latch again to release.

Observation Mirror

Power Mirrors  

The power mirror switch is located on the 

driver's door trim panel.

Power Mirror Switches

Models Without Express Window Feature
Push the mirror select button marked L (left) or 

R (right). Then, push one of the four arrow 

buttons to move the mirror in the direction the 

arrow is pointing.
Models With Express Window Feature
Push and release the mirror select button 

marked L (left) or R (right). Then, push one of 

the four arrow buttons to move the mirror in the 

direction the arrow is pointing. The selection 

times out after 30 seconds of inactivity in order 

to guard against accidentally changing a mirror 

position following an adjustment.

NOTE:

A light in the selected button will illuminate indi-

cating the mirror is activated and can be 

adjusted.

Heated Mirrors — If Equipped  

These mirrors are heated to melt frost 

or ice. This feature will be activated 

whenever you turn on the rear window 

defroster (if equipped).
Refer to “Climate Controls” in this chapter for 

further information.

GETTING TO KNOW YOUR VEHICLE

41

Power Folding Mirrors — If Equipped

The switch for the power folding mirrors is 

located between the power mirror switches L 

(left) and R (right). Push the switch once and the 

mirrors will fold in, pushing the switch a second 

time will return the mirrors to the normal driving 

position.

Power Folding Mirror Switch

NOTE:

If the vehicle speed is greater than 10 mph 

(16 km/h), the folding feature will be disabled.

If the mirrors are in the folded position, and 

vehicle speed is equal or greater than 10 mph 

(16 km/h), they will automatically unfold.

Resetting The Power Folding Outside Mirrors
You may need to reset the power folding mirrors 

if the following occurs:

The mirrors are accidentally blocked while 

folding.

The mirrors are accidentally manually 

folded/unfolded.

The mirrors come out of the unfolded posi-

tion.

The mirrors shake and vibrate at normal 

driving speeds.

To reset the power folding mirrors, fold and 

unfold them by pushing the button (this may 

require multiple button pushes). This resets 

them to their normal position.

Illuminated Vanity Mirrors — If Equipped 

An illuminated vanity mirror is on each sun 

visor. To use the mirror, rotate the sun visor 

downward and swing the mirror cover upward. 

The light will turn on automatically. Closing the 

mirror cover will turn off the light.

Illuminated Vanity Mirror

Sun Visor “Slide-On-Rod” Feature — If 

Equipped 

The sun visor “Slide-On-Rod” feature allows for 

additional flexibility in positioning the sun visor 

to block out the sun.

1. Fold down the sun visor.

2. Unclip the visor from the center clip.

3. Pull the sun visor toward the inside rearview 

mirror to extend it.

2

42

GETTING TO KNOW YOUR VEHICLE


EXTERIOR LIGHTS  

Multifunction Lever  

The multifunction lever controls the operation 

of the turn signals, headlight beam selection 

and passing lights. The multifunction lever is 

located on the left side of the steering column.

Multifunction Lever

Headlights  

The headlight switch is located on the left side 

of the instrument panel. This switch controls the 

operation of the headlights, parking lights, 

instrument panel lights, instrument panel light 

dimming, interior lights and fog lights

(if equipped).

Headlight Switch

Rotate the headlight switch clockwise to the 

first detent for parking lights and instrument 

panel light operation. Rotate the headlight 

switch to the second detent for headlight, 

parking light and instrument panel light 

operation.

Daytime Running Lights (DRLs)  

The Daytime Running Lights will turn on the first 

time the vehicle is shifted out of PARK, and 

remain on unless the parking brake is applied. 

Upon returning to the PARK position, the DRLs 

will turn off. DRLs will turn off when the ignition 

is placed in the OFF position.

NOTE:

The DRLs can be turned on and off using the 

Uconnect System, refer to “Uconnect Settings” 

in “Multimedia” for further information.

High/Low Beam Switch  

Push the multifunction lever away from you to 

switch the headlights to high beam. Pull the 

multifunction lever toward you to switch the 

headlights back to low beam.

Flash-To-Pass  

You can signal another vehicle with your head-

lights by lightly pulling the multifunction lever 

toward you. This will cause the high beam head-

lights to turn on, and remain on, until the lever 

is released.

1 — Auto
2 — Rotate Headlight Switch
3 — Push Fog Light
4 — Rotate Dimmer

GETTING TO KNOW YOUR VEHICLE

43

Automatic Headlights 

This system automatically turns the headlights 

on or off according to ambient light levels. To 

turn the system on, rotate the headlight switch 

counterclockwise to the AUTO position. When 

the system is on, the headlight time delay 

feature is also on. This means the headlights 

will stay on for up to 90 seconds after you place 

the ignition in the OFF position. The headlight 

time delay can be programmed

0/30/60/90 seconds.
Refer to “Uconnect Settings” in “Multimedia” 

for further information.
To turn the automatic system off, move the 

headlight switch out of the AUTO position.

NOTE:

The engine must be running before the head-

lights will come on in the automatic mode.

Headlights On With Wipers (Available With 

Automatic Headlights Only) 

When this feature is active, the headlights will 

turn on after the wipers are turned on if the 

headlight switch is placed in the AUTO position 

and programmable feature is set to on. 

In addition, the headlights will turn off when the 

wipers are turned off if they were turned on by 

this feature.

NOTE:

The Headlights On with Wipers feature can be 

turned on or off using the Uconnect System. 

Refer to “Uconnect Settings” in “Multimedia” 

for further information.

Headlight Time Delay 

This feature provides the safety of headlight illu-

mination for up to 90 seconds when leaving 

your vehicle in an unlit area.
To activate the delay feature, place the ignition 

in the OFF position while the headlights are still 

on. Then, turn off the headlights within 

45 seconds. The delay interval begins when the 

headlight switch is turned off.

NOTE:

The lights must be turned off within 45 seconds 

of placing the ignition in the OFF position to acti-

vate this feature.

If you turn on the headlights or parking lights, or 

place the ignition in the ON position again, the 

system will cancel the delay.
If you turn the headlights off before the ignition, 

they will turn off in the normal manner.

NOTE:

The Headlight Time Delay is programmable 

using the Uconnect System, refer to “Uconnect 

Settings” in “Multimedia” for further 

information.

Lights-On Reminder  

If the headlights or parking lights are on after 

the ignition is placed in the OFF position, a 

chime will sound to alert the driver when the 

driver's door is opened.

2

44

GETTING TO KNOW YOUR VEHICLE


Fog Lights — If Equipped  

The front fog light switch is built into the head-

light switch.

Front Fog Light Switch

To activate the front fog lights, turn on 

the parking lights or the low beam 

headlights and push the headlight 

switch. To turn off the front fog lights, either 

push the headlight switch a second time or turn 

off the headlight switch.
An indicator light in the instrument cluster illu-

minates when the fog lights are turned on.

NOTE:

The fog lights will operate when the low beam 

headlights or parking lights are on. However, 

selecting the high beam headlights will turn off 

the fog lights.

Turn Signals   

Move the multifunction lever up or down and 

the arrows on each side of the instrument 

cluster display flash to show proper operation of 

the front and rear turn signal lights.

NOTE:

If either light remains on and does not flash, 

or there is a very fast flash rate, check for a 

defective outside light bulb. If an indicator 

fails to light when the lever is moved, it would 

suggest that the indicator bulb is defective.

A “Turn Signal On” message will appear in the 

instrument cluster display and a continuous 

chime will sound if the vehicle is driven more 

than 1 mile (1.6 km) with either turn 

signal on.

Lane Change Assist — If Equipped

Tap the multifunction lever up or down once, 

without moving beyond the detent, and the turn 

signal (right or left) will flash three times then 

automatically turn off.

INTERIOR LIGHTS

Courtesy/Interior Lighting 

The interior lights come on when a door is 

opened.
To protect the battery, the interior lights will turn 

off automatically 10 minutes after the ignition is 

placed in the OFF position. This will occur if the 

interior lights were switched on manually or are 

on because a door is open. The battery protec-

tion also includes the glove compartment light. 

To restore interior light operation after auto-

matic battery protection is enabled (lights off), 

either place the ignition in the ON/RUN position 

or cycle the light switch.

GETTING TO KNOW YOUR VEHICLE

45

Courtesy Lights

The overhead console has two courtesy lights. 

The lights turn on when a front door, a rear door 

or the liftgate is opened. If your vehicle is 

equipped with Remote Keyless Entry, the lights 

will also turn on when the unlock button on the 

key fob is pushed. The courtesy lights also func-

tion as reading lights. Push in on each lens to 

turn these lights on while inside the vehicle. 

Push the lens a second time to turn each light 

off. You may adjust the direction of these lights 

by pushing the outside ring, which is identified 

with four directional arrows.

Courtesy/Reading Light

Rear Dome Light

Rotate the instrument panel dimmer control 

completely upward to the second detent to turn 

on the rear dome light. The rear dome light will 

remain on when the dimmer control is in this 

position.
Rotate the dimmer control downward to the last 

detent (off position). The rear dome light will 

remain off when the doors are open.

Dimmer Controls  

The dimmer control is part of the headlight 

switch and is located on the driver’s side of the 

instrument panel.

Instrument Panel Dimmer

Rotating the dimmer control upward with the 

parking lights or headlights on will increase the 

brightness of the instrument panel lights.

Interior Light Defeat (Off)

Rotate the instrument panel dimmer control to 

the extreme bottom (O) off position. The interior 

lights will remain off when the doors are open.

Parade Mode (Daytime Brightness Feature) 

Rotate the dimmer control upward to the first 

detent. This feature brightens all text displays 

such as the odometer, instrument cluster 

display, and radio when the parking lights or 

headlights are on.

2

46

GETTING TO KNOW YOUR VEHICLE


WIPERS AND WASHERS   

The windshield wiper/washer control lever is 

located on the left side of the steering column.

Windshield Wiper/Washer Lever

The front wipers are operated by rotating a 

switch, located at the end of the lever. For infor-

mation on using the rear window wiper/washer, 

refer to “Rear Window Wiper/Washer” in this 

section.

Windshield Wiper Operation

Rotate the end of the lever upward, to the first 

detent past the intermittent settings for 

low-speed wiper operation. Rotate the end of 

the lever upward to the second detent past the 

intermittent settings for high-speed wiper

operation.

Front Wiper Control

NOTE:

The wipers will automatically return to the 

“park” position if you place the ignition in the 

OFF position while they are operating. The 

wipers will resume operation when you place 

the ignition in the ON position.

CAUTION!

Turn the windshield wipers off when driving 

through an automatic car wash. Damage to 

the windshield wipers may result if the 

wiper control is left in any position other 

than off.

In cold weather, always turn off the wiper 

switch and allow the wipers to return to the 

park position before turning off the engine. 

If the wiper switch is left on and the wipers 

freeze to the windshield, damage to the 

wiper motor may occur when the vehicle is 

restarted.

Always remove any buildup of snow that 

prevents the windshield wiper blades from 

returning to the off position. If the wind-

shield wiper control is turned off and the 

blades cannot return to the off position, 

damage to the wiper motor may occur.

GETTING TO KNOW YOUR VEHICLE

47

Intermittent Wiper System   

Use the intermittent wiper system when 

weather conditions make a single wiping cycle, 

with a variable pause between cycles, desir-

able. Rotate the end of the windshield

wiper/washer control lever to one of the first 

five detents to select the desired delay interval.

Front Wiper Control

There are five delay settings, which allow you to 

regulate the wipe interval from a minimum of 

one cycle every two seconds to a maximum of 

approximately 36 seconds between cycles at 

vehicle speeds below 10 mph (16 km/h). At 

speeds greater than 10 mph (16 km/h), the 

delay varies from a minimum of one cycle every 

second to a maximum of approximately

18 seconds between cycles.

NOTE:

The wiper delay times depend on vehicle speed. 

If the vehicle is moving less than 10 mph 

(16 km/h), delay times will be doubled.

Windshield Washers  

To use the windshield washer, push the washer 

knob, located on the end of the multifunction 

lever, inward to the second detent.
If you activate the washer while the wiper 

control is in the delay range, the wipers will 

operate in low-speed for two or three wipe 

cycles after releasing the lever and then resume 

the intermittent interval previously selected.
If you activate the washer while the wiper 

control is in the off position, the wipers will 

operate for two or three wipe cycles and then 

turn off.

Mist Feature

Push the washer knob, located on the end of 

the multifunction lever, inward to the first 

detent to activate a single wipe cycle to clear 

the windshield of road mist or spray from a 

passing vehicle. The wipers will continue to 

operate until you release the lever.

NOTE:

The mist feature does not activate the washer 

pump; therefore, no washer fluid will be sprayed 

on the windshield. The wash function must be 

used in order to spray the windshield with 

washer fluid.

WARNING!

Sudden loss of visibility through the 

windshield could lead to a collision. You might 

not see other vehicles or other obstacles. To 

avoid sudden icing of the windshield during 

freezing weather, warm the windshield with 

the defroster before and during windshield 

washer use.

2

48

GETTING TO KNOW YOUR VEHICLE


(Continued)

Rear Window Wiper/Washer   

The rear window wiper/washer control is 

located on the left side of the steering column.

Rear Wiper/Washer

Rotate the switch upward to the first 

detent position for rear wiper

operation.
Rotate the switch upward past the 

first detent position to activate the 

rear washer. The washer pump will 

continue to operate as long as the 

switch is held. Upon release, the wiper will cycle 

three times before returning to the set position.

Rear Wiper/Washer Control

If the rear wiper is operating when the ignition is 

placed in the OFF position, the wiper will auto-

matically return to the “park” position. When 

the vehicle is restarted, the wiper will resume 

function at whichever position the switch is set 

at.

CLIMATE CONTROLS 

The Climate Control system allows you to regu-

late the temperature, air flow, and direction of 

air circulating throughout the vehicle. The 

controls are located on the touchscreen (if 

equipped) and on the instrument panel below 

the radio.

CAUTION!

Turn the windshield wipers off when driving 

through an automatic car wash. Damage to 

the windshield wipers may result if the 

wiper control is left in any position other 

than off.

In cold weather, always turn off the wiper 

switch and allow the wipers to return to the 

park position before turning off the engine. 

If the wiper switch is left on and the wipers 

freeze to the windshield, damage to the 

wiper motor may occur when the vehicle is 

restarted.

Always remove any buildup of snow that 

prevents the windshield wiper blades from 

returning to the off position. If the wind-

shield wiper control is turned off and the 

blades cannot return to the off position, 

damage to the wiper motor may occur.

CAUTION!

 (Continued)

GETTING TO KNOW YOUR VEHICLE

49

Manual Climate Control Overview

Radio 4.3 Manual Tri-Zone Temperature Controls

2

50

GETTING TO KNOW YOUR VEHICLE


Uconnect 3/3 NAV with 8.4–inch display Tri-Zone Manual Temperature Controls

GETTING TO KNOW YOUR VEHICLE

51

Manual Climate Control Descriptions

Icon

Description

MAX A/C Button

Press and release the MAX A/C button on the touchscreen to change the current setting to the coldest output of air. 

The MAX A/C indicator illuminates when MAX A/C is on. Pressing the button again will cause the MAX A/C operation to exit.

NOTE:

The MAX A/C button is only available on the touchscreen.

Faceplate Knob

Touchscreen Buttons

Blower Control

Blower Control regulates the amount of air forced through the climate system. There are seven blower speeds available. 

The speeds can be selected using either the blower control knob on the faceplate or the buttons on the touchscreen.

Faceplate: The blower speed increases as you turn the blower control knob clockwise from the lowest blower setting.

The blower speed decreases as you turn the blower control knob counterclockwise.

Touchscreen:

For Radio 4.3: use the circle around the blower icon by pressing on the circle spot where you want the blower setting to 

be. To increase blower, the circle bar will go clockwise. To decrease the blower, the circle bar will move counter-clockwise.

For Uconnect 3/3 NAV: Use the small blower icon to reduce the blower setting and the large blower icon to increase the 

blower setting. The blower can also be selected by pressing the blower bar area between the icons.

Temperature Control

Provides the driver and passenger with independent temperature control. Push the red button on the faceplate or 

touchscreen or press and slide the temperature bar towards the red arrow button on the touchscreen for warmer 

temperature settings. Push the blue button on the faceplate or touchscreen or press and slide the temperature bar towards 

the blue arrow button on the touchscreen for cooler temperature settings.

2

52

GETTING TO KNOW YOUR VEHICLE


SYNC Button

Press the SYNC button on the touchscreen to toggle the SYNC feature on/off. The SYNC indicator illuminates when SYNC is 

on. SYNC synchronizes the front passenger temperature and rear passenger temperature/mode/blower settings with the 

driver temperature/mode/blower settings. Changing the front passenger temperature or rear passenger 

temperature/mode/blower settings while in SYNC will automatically exit this feature.

NOTE:

The SYNC button is only available on the touchscreen.
Rear Climate Control Button

Press and release this button to access the rear climate controls. The rear climate indicator illuminates when the rear 

climate controls screen is on.

Mode Control

Mode Control

Select Mode by pressing one of the Mode buttons on the touchscreen to change the airflow distribution mode. The airflow 

distribution mode can be adjusted so air comes from the instrument panel outlets, floor outlets, defrost outlets and demist 

outlets. The Mode settings are as follows:

Panel Mode

Panel Mode

Air comes from the outlets in the instrument panel. Each of these outlets can be individually adjusted to direct the flow of 

air. The air vents of the center outlets and outboard outlets can be moved up and down or side to side to regulate airflow 

direction. There is a shut off wheel located below the air vanes to shut off or adjust the amount of airflow from these 

outlets.

Icon

Description

GETTING TO KNOW YOUR VEHICLE

53

Bi-Level Mode

Bi-Level Mode

Air comes from the instrument panel outlets and floor outlets. A slight amount of air is directed through the defrost and 

side window demister outlets.

NOTE:

Bi-Level mode is designed under comfort conditions to provide cooler air out of the panel outlets and warmer air from the 

floor outlets.

Floor Mode

Floor Mode

Air comes from the floor outlets. A slight amount of air is directed through the defrost and side window demister outlets.

Mix Mode

Mix Mode

Air is directed through the floor, defrost, and side window demister outlets. This setting works best in cold or snowy 

conditions that require extra heat to the windshield. This setting is good for maintaining comfort while reducing moisture on 

the windshield.

A/C Button

Press and release this button on the touchscreen, or push the button on the faceplate to change the current setting. 

The A/C indicator illuminates when A/C is on.

Icon

Description

2

54

GETTING TO KNOW YOUR VEHICLE


Recirculation Button

Press and release this button to change the system between recirculation mode and outside air mode. The Recirculation 

indicator and the A/C indicator illuminate when the Recirculation button is pressed. Recirculation can be used when 

outside conditions such as smoke, odors, dust, or high humidity are present. Recirculation can be used in all modes except 

Defrost. Recirculation may be unavailable (button on the touchscreen greyed out) if conditions exist that could create 

fogging on the inside of the windshield. The A/C can be deselected manually without disturbing the mode control selection. 

Continuous use of the Recirculation mode may make the inside air stuffy and window fogging may occur. Extended use of 

this mode is not recommended.
Front Defrost Button

Press and release the Front Defrost button on the touchscreen, or push and release the button on the faceplate, to change 

the current airflow setting to Defrost mode. The Front Defrost indicator illuminates when Front Defrost is on. Air comes from 

the windshield and side window demist outlets. When the defrost button is selected, the blower level may increase. Use 

Defrost mode with maximum temperature settings for best windshield and side window defrosting and defogging. When 

toggling the front defrost mode button, the climate system will return to the previous setting.
Rear Defrost Button

Press and release the Rear Defrost button on the touchscreen, or push and release the button on the faceplate, to turn on 

the rear window defroster and the heated outside mirrors (if equipped). The Rear Defrost indicator illuminates when the 

rear window defroster is on. The rear window defroster automatically turns off after 15 minutes.
Climate Control OFF Button

Press and release the OFF button on the touchscreen, or push the OFF button on the faceplate to turn the Climate Control 

ON/OFF.

Icon

Description

GETTING TO KNOW YOUR VEHICLE

55

Controlling The Rear Climate Controls From 

The Front Manual Temperature Control 

(MTC) Panel  

The rear MTC system has floor air outlets at the 

rear right side of the third row seats and over-

head outlets at each outboard rear seating posi-

tion. The system provides heated air through 

the floor outlets or cool, dehumidified air 

through the headliner outlets.
The rear system climate controls on the touch-

screen are located in the Uconnect touch 

system, located on the instrument panel.
The Three-Zone climate control system allows 

for adjustment of the rear climate controls from 

the front climate panel.

To change the rear system settings:

Press the REAR CLIMATE button to change 

control to rear control mode, the rear display 

appears. Control functions now operate rear 

system.

To return to Front screen, press the FRONT 

CLIMATE button.

Rear Lock

Pressing the Rear Lock button on the 

Uconnect touchscreen illuminates a lock 

symbol in the rear display. The rear climate 

controls are controlled from the front 

Uconnect system.

Rear occupants can only adjust the rear 

controls when the Rear Temperature Lock 

button is turned off.

The rear MTC is located in the headliner, near 

the center of the vehicle.

Radio 4.3 Manual Rear Climate Controls

Uconnect 3/3 NAV Manual Rear Climate Controls

2


Content      ..     1      2      3      4      ..