Dodge Grand Caravan (2020 year). Manual in english - page 19
 

  Index      Manuals     Dodge Grand Caravan (2020 year). Manual in english


Search            copyright infringement  


Content      ..     17      18      19      20     ..


Dodge Grand Caravan (2020 year). Manual in english - page 19


MULTIMEDIA

295

Change A Track
Press the Forward Arrow button   to select the 

next track on the disc.
Press and hold the Forward Arrow button   to 

fast forward through the track.
Press the Back Arrow button   to select the 

start of the current track (while the track is 

playing) or the previous track (if the current 

track has just started).
Press and hold the Back Arrow button   to fast 

rewind through the track.
Press the Pause button to pause the playback 

of the disc.
Press the Play button to resume playback of the 

disc.

Tagging Favorite HDD Songs

When a song is playing that you want 

to add to the Favorite Songs list, press 

the Favorites button.
To view the Favorite Songs list, press 

the Browse button, then press the Favorites 

button, next press the Favorite Songs button.

Press the   All button on the touchscreen to 

play all favorite songs from the top of the list.

Displaying The Elapsed Time
The elapsed time of the current playing track is 

displayed in the left center of the screen.

HDD Menu
While in HDD mode, push the Menu button 

located on the faceplate to access the HDD 

Menu.

Random Playback
The random play function plays random tracks 

from the hard disk drive. Press the Random 

button to switch the random play function on or 

off.
A red check mark indicates the random play 

function is active.

Repeat Track
The repeat track function repeats the currently 

played track. Press the Rpt. TRK button to 

switch the repeat track function on or off.
A red check mark indicates the repeat track 

function is active.

Favorite Playlists On The Hard Disk Drive

You may save links to favorite 

playlists in the Favorite Playlists list.

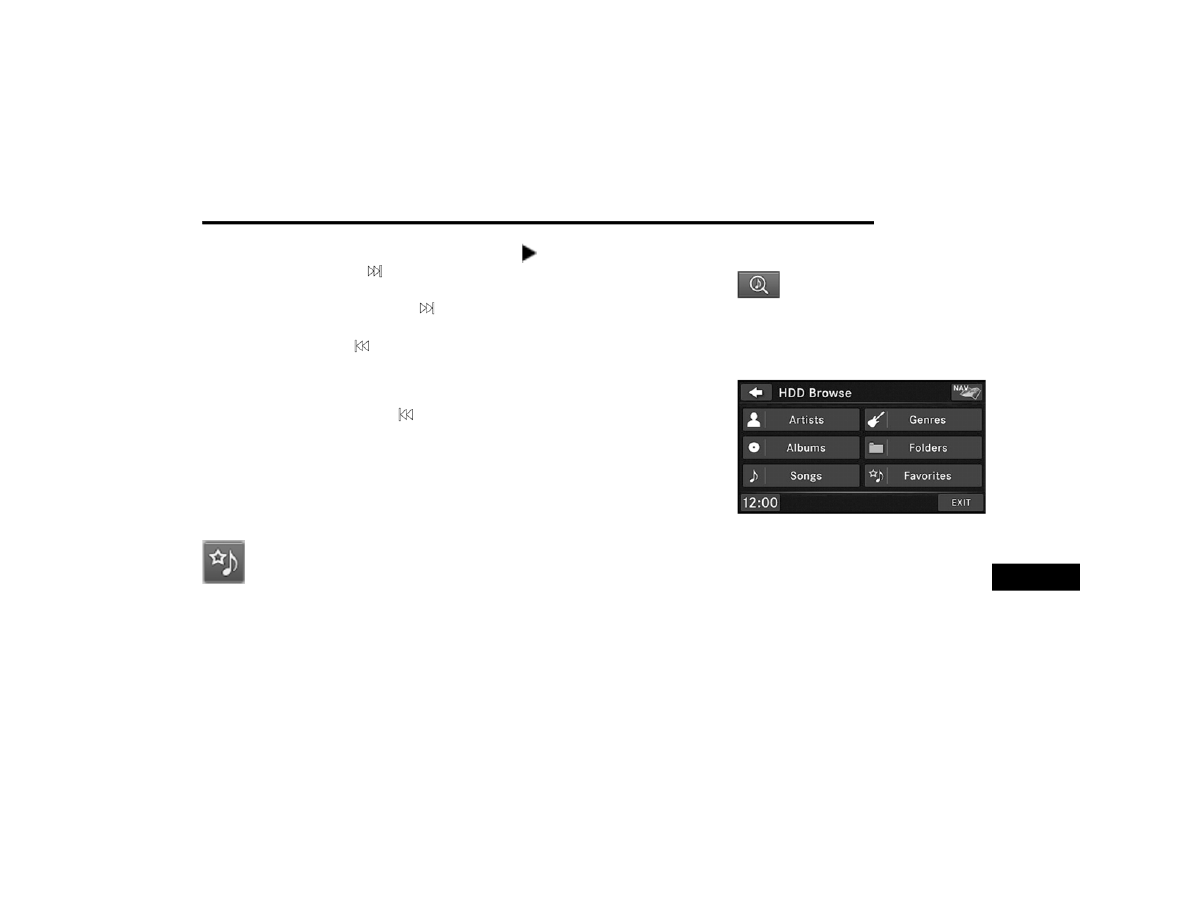
1. While in the HDD mode, press the Browse 

button to access the Browse Categories 

menu.

2. Press the Favorites button to display a list of 

favorite playlists.

9

296

MULTIMEDIA


3. Press one of the Add Favorites buttons.

4. Select the type of favorite (Artist, Album, 

Genre or Folder).
For this example, press the Genres button.

A link to the selected playlist is now saved in the 

Favorite Playlists list.

NOTE:

Depending on the type of Favorite you define, 

the contents of the favorite playlist may change 

as you add tracks to and remove tracks from 

the Hard Disk Drive. Deleting a favorite playlist 

does not remove any files from the hard drive.

You may now edit the list by pressing the Edit 

button or exit the list by pressing the Exit button.

Editing Track Info On The Hard Disk Drive
While a track is playing, press the Edit Info 

button to edit the tag information for the track. 

You can change the artist name, track name, 

album name, album track number, genre, and 

folder name for the track.
To edit an item, press the Change or Order 

button next to the tag item you want to edit. To 

enter new data for the tag, select an item from 

the list or press the New button to type in a new 

name. For track reordering, use the   buttons 

to move the track to the correct position.
If you change tag information that affects how 

your HDD playback is sorted, playback may 

pause briefly and restart from the top of the list.

Editing Folder Names On The Hard Disk Drive

1. Push the My Files button.

2. Select “My Music”.

MULTIMEDIA

297

3. Press the Rename HDD Folders button.

4. Press the folder you want to rename.

5. Spell the name of the folder, then press the 

Save button.

Deleting Tracks From The Hard Disk Drive

1. Push the Menu button located on the 

faceplate.

2. Press the My Music button.

3. Press the Delete Music Files from HDD 

button.

4. Select the folder from which you want to 

delete tracks.

5. Select the tracks you want to delete by 

pressing the track to turn on the red check 

mark. If you want to delete all tracks from 

the folder, press the Check All button.

6. After you have selected all of the tracks to 

delete, press the Delete button to 

permanently remove the files from the Hard 

Disk Drive.

Deleting All Files From The Hard Disk Drive

1. Push the Menu button located on the 

faceplate.

2. Press the System Setup button on the 

touchscreen to access the System Setup 

menu.

3. Press the Manage HDD button to access the 

Manage HDD menu.

This menu displays the available space on the 

Hard Disk Drive and allows you to delete 

pictures and music files.

9

298

MULTIMEDIA


Importing Pictures
It is possible to import display pictures to the 

internal Hard Disk Drive. The pictures can be 

displayed on the right half of the radio screen.

In the default mode, the vehicle brand logo is 

displayed in the right half of the screen. Push 

the Menu button on the right side of the radio to 

access one of the setting menus.
It is recommended to change the picture 

dimensions on a PC or Digital Camera to 240 by 

158 pixels before the import.

NOTE:

USB devices (e.g., camera memory USB 

adaptors, etc.) must comply with the MSD 

(Mass Storage Device) standard. This USB 

terminal can provide power to the inserted 

device. The device's current limitation must be 

less or equal to 500mA.

1. Push the My Files button located on the 

faceplate to go to the Manage My Files 

screen.

2. Insert either a CD or a USB Stick containing 

your pictures.

3. Press the My Pictures button to get an 

overview of the images currently stored on 

the Hard Disk Drive.
The radio can store 23 user pictures.

4. Press the Add button to view the pictures 

stored on the CD or USB memory stick.

NOTE:

Depending on the file size of each picture on the 

CD or USB memory stick, loading the images in 

the screen may take time.

5. Select the type of media inserted.

6. Use the Page Up or Down buttons to page 

through a list of pictures and press the 

picture you would like to import.

7. Select which pictures you want to copy. The 

red check mark indicates a picture file to 

copy.
The imported picture is now available in the 

Manage My Pictures screen.

MULTIMEDIA

299

8. Press the Save button to copy the selected 

pictures to the Hard Disk Drive.

9. Select this picture by pressing the “Set as 

Picture View” button. A check mark 

indicates the currently used picture.
Use the PREV or NEXT button to step 

through the list of available pictures.

Press the Delete button to delete the pic

-

ture from the hard disk drive.

10. Push the Menu button twice and then press 

the Picture View button to enable the 

picture view.

The picture is now displayed on the right half of 

the screen.

Remote Devices

License Agreement

Dolby Digital License Agreement
Manufactured under license from Dolby Labora

-

tories.
Dolby, MLP Lossless and the double-D are 

trademarks of Dolby Laboratories.

Rovi Corporation License Agreement
This product incorporates copyright protection 

technology that is protected by US patents and 

other intellectual property rights. Use of this 

copyright protection technology must be 

authorized by Rovi Corporation, and is intended 

for home and other limited viewing uses only 

unless otherwise authorized by Rovi 

Corporation. Reverse engineering or 

disassembly is prohibited.

USB Connector

It is possible to copy audio files or pictures files 

to the radio Hard Disk Drive, or play audio files 

directly from the USB device just like a music 

disc. The USB connector is covered by a small 

cover, which protects the connector from dust 

or damage.

NOTE:

USB devices (e.g., camera memory USB 

adaptors, etc.) must comply with the MSD 

(Mass Storage Device) standard. This USB 

terminal can provide power to the inserted 

device. The current draw from these devices 

must be limited to 500mA or less.

The transfer speed for this USB connector is 

approximately two megabytes per second.
MP3 player devices cannot be controlled 

through the USB connector. Some player 

devices save music files in other formats, which 

cannot be played in this radio. Some 

copy-protected music (e.g., downloads from the 

internet) cannot be played on this radio.

9

300

MULTIMEDIA


Compatible Devices
Please see your authorized dealer or visit 

DriveUconnect.com

 (US Residents) or 

DriveU

-

connect.ca

 (Canadian Residents) for supported 

devices.

NOTE:

Some MP3 Players do not allow songs to be 

copied into other devices.

How To Open The Cover

1. Place your finger under the pull arrow.

2. Pull forward.

NOTE:

The flap is attached and should not be 

removed! Do not pull off of the frame. Do not 

use a tool (e.g., screw-driver, nail file, etc.) to 

open the flap, as this could cause damage to 

the face of the radio.

How To Close The Cover

1. Using your thumb and index finger, grasp 

the flap. Notice the hooks (1), which must 

first be inserted into the frame.

MULTIMEDIA

301

2. Insert the top hooks (1) into the frame first.

3. Then push on the bottom of the flap to 

secure in place.

Audio Jack (AUX) Mode

The Audio Jack connector allows you to connect 

the headset output of an audio device (e.g., 

MP3 player) to the radio. The audio of the 

connected device will then be played through 

the radio sound system.

Connect a 3.5 mm stereo mini-jack cable as 

shown above (not provided with the radio) to the 

Audio Jack connector on the radio and to the 

earphone connector of your audio device.
The display will switch automatically to the AUX 

mode when a 3.5 mm stereo mini-jack cable 

has been connected. The radio screen will 

revert back to the last tuner mode when the 

cable is unplugged.
To change radio modes while the cable is 

connected to the unit, push the Media button 

located on the faceplate to display the AUX tab. 

Press the AUX tab to return to the AUX mode.
Adjust the volume with the On/Off Volume 

rotary knob or with the volume of the attached 

device.

The control of the external device (e.g., 

selecting playlists, play, fast forward, etc.) 

cannot be provided by the radio; use the device 

controls instead.

NOTE:

Inserting of a mono jack will result in improper 

audio playback.

USB Port — If Equipped
The USB Port in the center console or upper 

glove box (depending on the vehicle) gives you 

access to the audio files on the external USB 

device through the AUX Mode. It functions as a 

remote control for the currently connected 

audio devices mobile digital device, and you can 

play audio from the audio device through the 

vehicle's speaker system.
Before using the AUX mode, you will need to 

connect your audio device to the USB port.

NOTE:

The files will not be stored on the internal 

hard disk drive and cannot be used in the 

HDD mode.

It is recommended you use the latest avail

-

able software for your iPod®/iPhone® and 

iTunes®.

CAUTION!

Never force any connector into the ports of 

your radio. Make sure your connectors are 

the identical shape and size before you 

connect.

9

302

MULTIMEDIA


Playing Audio Files From The Audio Device
You can play songs directly from the external 

USB device.
Press the Tracks button to display a list view.
Press the button with the desired list item to 

select and play the item.

Press the Info button to display the 

track information, press the button a 

second time to close the display.
Press the Browse button to browse by 

categories.

Select An External USB Category
The radio can sort the files by playlists, by song 

names, by artists, by composers, by genres, by 

albums, by podcasts or by audio books, if 

available on your device.

Press the Artists button for this example.
Press a button with the desired artist's name to 

play songs from this artist.
Press the Play All button to play songs from all 

available artists.
Press the Page Up/Down buttons to navigate 

through the list of artists.
Using Voice Command
You can list Artists, Playlists, Albums, Songs, 

Podcasts, Genres, Composers, and Audio 

Books in the main page by using Voice 

Command.
To list categories, press the Voice Recognition 
(VR) button   and wait for the confirmation 

beep and say list Album (or any other category).

List Jump
If you encounter a very long list, it may be 

helpful to press the A<>Z button to go to the List 

Jump menu.
For this example, we entered the first letter of 

the desired artist.
Press the GO button to jump to the desired 

artist.

Press a button with the desired artist's name to 

play songs from this artist.

Change A Track
Press the Forward Arrow button   to select the 

next track on the disc.
Press and hold the Forward Arrow button   to 

fast forward through the track.
Press the Back Arrow button   to select the 

start of the current track (while the track is 

playing) or the previous track (if the current 

track has just started).
Press and hold the Back Arrow button   to fast 

rewind through the track.

Pause
Press the Pause button to pause the playback.

Play
Press the Play button to start the playback.

Displaying The Elapsed Title Time
The elapsed title time of the currently playing 

track is displayed on the left side of the screen.

MULTIMEDIA

303

Scan Search
Press the Scan button.
The first few seconds of each individual track 

will be played in succession for 10 seconds 

each.
Press the Stop Scan button to stop the scan 

function.

Track Info

Press the Info button.
Information on the currently playing 

track, if available, will be displayed on 

the right half of the touchscreen.

AUX Menu
While in AUX mode, push the Menu button on 

the faceplate to access the AUX Menu.

Random Playback
The random playback function plays random 

tracks from the audio device. Press the Random 

button to switch the random play function on or 

off.
A red check mark indicates the random play 

function is active.

Repeat Track
The repeat track function repeats the currently 

played track. Press the Rpt. TRK button to 

switch the repeat track function on or off.
A red check mark indicates the repeat track 

function is active.

Bluetooth® Streaming Audio (BTSA)

Music can be streamed from your cellular 

phone through Uconnect Phone (if equipped) 

and played through the vehicle’s sound system.

Controlling BTSA Using The Radio
To enter BTSA mode, push the Media button 

located on the faceplate then press the Aux 

button located on the touchscreen, or push the 
Voice Recognition   button (if equipped) and 

after the confirmation beep, say 

“Bluetooth Streaming Audio.”

Play Mode
When switching to BTSA mode, some audio 

devices will start playing music directly through 

the vehicle’s sound system. However, some 

devices require the music to be initiated on the 

device before it will stream through Uconnect 

Phone (if equipped).

Selecting A Different Audio Device

1. Push the Uconnect Phone button  .

2. After the “Ready” prompt and the following 

beep, say “Setup,” then “Select Audio 

Devices.”

3. You can say the name of the Audio Device to 

select or say “List Audio Devices” to have 

Uconnect Phone list the available devices.

9

304

MULTIMEDIA


You can also select a different audio device in 

the Select Aux Device screen. Press the icon to 

enter the Select Aux Device screen. The 

currently playing device is highlighted, you can 

push and select a different device.

Uconnect Phone— If Equipped   

Uconnect Phone is a voice-activated, 

hands-free, in-vehicle communications system. 

Uconnect Phone allows you to dial a phone 

number with your mobile phone* using simple 

voice commands (e.g., “Call” … “Mike” … 

“Work” or “Dial” … “248-555-1212”). Your 

mobile phone's audio is transmitted through 

your vehicle's audio system; the system 

automatically mutes your radio when using the 

Uconnect Phone.

NOTE:

Uconnect Phone requires a mobile phone 

equipped with the Bluetooth® “Hands-Free 

Profile,” Version 0.96 or higher. See the 

Uconnect website for supported phones.

For Uconnect customer support:

US residents - visit 

UconnectPhone.com

 or 

call 1-877-855-8400 (24 hours a day 7 days 

a week).

Canadian Residents - visit 

Uconnect

-

Phone.com

 or call 1-800-465-2001 (English) 

or 1-800-387-9983 (French).
Mon. – Fri., 8:00 am – 8:00 pm, ET
Sat., 9:00 am – 5:00 pm, ET
Sun., Closed

Uconnect Phone allows you to transfer calls 

between the system and your mobile phone as 

you enter or exit your vehicle and enables you to 

mute the system's microphone for private 

conversation.

The Uconnect Phone is driven through your 

Bluetooth® “Hands-Free Profile” mobile phone. 

Uconnect features Bluetooth® technology - the 

global standard that enables different 

electronic devices to connect to each other 

without wires or a docking station, so Uconnect 

Phone works no matter where you stow your 

mobile phone (be it your purse, pocket, or 

briefcase), as long as your phone is turned on 

and has been paired to the vehicle's Uconnect 

Phone. The Uconnect Phone allows up to seven 

mobile phones to be linked to the system. Only 

one linked (or paired) mobile phone can be 

used with the system at a time. The system is 

available in English, Spanish, or French 

languages.

WARNING!

ALWAYS drive safely with your hands on the 

wheel. You have full responsibility and 

assume all risks related to the use of the 

Uconnect features and applications in this 

vehicle. Only use Uconnect when it is safe to 

do so. Failure to do so may result in an 

accident involving serious injury or death.

MULTIMEDIA

305

Uconnect Phone Button
The radio or steering wheel controls (if 

equipped) contain the two control buttons 
(Uconnect Phone   button and Voice 
Command   button) that enables you to 

access the system. When you push the button 

you hear the word Uconnect followed by a BEEP. 

The beep is your signal to give a command.

NOTE:

The driver side upper windshield trim contains 

the microphone for the Uconnect Phone.

Voice Command Button

Actual button location may vary with the radio. 

The individual buttons are described in the 

“Operation” section.

The Uconnect Phone can be used with any 

Hands-Free Profile certified Bluetooth® mobile 

phone. See the Uconnect website for supported 

phones. Refer to your mobile service provider or 

the phone manufacturer for details.
The Uconnect Phone is fully integrated with the 

vehicle's audio system. The volume of the 

Uconnect Phone can be adjusted either from 

the radio volume control knob or from the 

steering wheel radio control (right switch), if 

equipped.
The Uconnect display will be used for visual 

prompts from the Uconnect Phone such as 

“CELL” or caller ID on certain radios.

Operation

Voice commands can be used to operate the 

Uconnect Phone and to navigate through the 

Uconnect Phone menu structure. Voice 

commands are required after most Uconnect 

Phone prompts. You will be prompted for a 

specific command and then guided through the 

available options.

Prior to giving a voice command, wait for the 

beep, which follows the “Ready” prompt or 

another prompt.

For certain operations, compound 

commands can be used. For example, 

instead of saying “Setup” and then “Phone 

Pairing,” the following compound command 

can be said: “Setup Phone Pairing.”

For each feature explanation in this section, 

only the compound form of the voice 

command is given. You can also break the 

commands into parts and say each part of 

the command when you are asked for it. For 

example, you can use the compound form 

voice command “Phonebook New Entry,” or 

you can break the compound form command 

into two voice commands: “Phonebook” and 

“New Entry.” Please remember, the Uconnect 

Phone works best when you talk in a normal 

conversational tone, as if speaking to 

someone sitting a few feet/meters away from 

you.

Help Command

If you need assistance at any prompt, or if you 

want to know your options at any prompt, say 

“Help” following the beep. The Uconnect Phone 

will play all the options at any prompt if you ask 

for help.

WARNING!

Any voice commanded system should be 

used only in safe driving conditions following 

all applicable laws. Your attention should be 

focused on safely operating the vehicle. 

Failure to do so may result in a collision 

causing serious injury or death.

9

306

MULTIMEDIA


To activate the Uconnect Phone from idle, 
simply push the Phone button   and follow the 

audible prompts for directions. All Uconnect 

Phone sessions begin with a push of the Phone 

 button on the faceplate.

Cancel Command

At any prompt, after the beep, you can say 

“Cancel” and you will be returned to the main 

menu. However, in a few instances the system 

will take you back to the previous menu.

Pair (Link) Uconnect Phone To A Mobile 

Phone

To begin using your Uconnect Phone, you must 

pair your compatible Bluetooth®-enabled 

mobile phone.
To complete the pairing process, you will need 

to reference your mobile phone Owner's 

Manual. The Uconnect website may also 

provide detailed instructions for pairing.
The following are general phone to Uconnect 

Phone pairing instructions:

Push the Phone   button to begin.

After the “Ready” prompt and the following 

beep, say “Setup Phone Pairing.”

When prompted, after the beep, say “Pair a 

Phone” and follow the audible prompts.

You will be asked to say a four-digit Personal 

Identification Number (PIN), which you will 

later need to enter into your mobile phone. 

You can enter any four-digit PIN. You will not 

need to remember this PIN after the initial 

pairing process.

For identification purposes, you will be 

prompted to give the Uconnect Phone a 

name for your mobile phone. Each mobile 

phone that is paired should be given a unique 

phone name.

You will then be asked to give your mobile 

phone a priority level between one and 

seven, with one being the highest priority. 

You can pair up to seven mobile phones to 

your Uconnect Phone. However, at any given 

time, only one mobile phone can be in use, 

connected to your Uconnect System. The 

priority allows the Uconnect Phone to know 

which mobile phone to use if multiple mobile 

phones are in the vehicle at the same time. 

For example, if priority three and priority five 

phones are present in the vehicle, the 

Uconnect Phone will use the priority three 

mobile phone when you make a call. You can 

select to use a lower priority mobile phone at 

any time (refer to “Advanced Phone Connec

-

tivity” in this section).

NOTE:

Software updates on your phone or the 

Uconnect system may interfere with the 

Bluetooth® connection. If this happens, simply 

repeat the pairing process. However, first, make 

sure to delete the device from the list of phones 

on your Uconnect system. Next, be sure to 

remove Uconnect from the list of devices in your 

phone’s Bluetooth® settings.

Dial By Saying A Number

Push the Phone button   to begin.

After the “Ready” prompt and the following 

beep, say “Dial.”

The system will prompt you to say the number 

you want to call.

For example, you can say “234-567-8901.”

The Uconnect Phone will confirm the phone 

number and then dial. The number will 

appear in the display of certain radios.

MULTIMEDIA

307

Call By Saying A Name

Push the Phone button   to begin.

After the “Ready” prompt and the following 

beep, say “Call.”

The system will prompt you to say the name 

of the person you want to call.

After the “Ready” prompt and the following 

beep, say the name of the person you want to 

call. For example, you can say “John Doe,” 

where John Doe is a previously stored name 

entry in the Uconnect phonebook or down

-

loaded phonebook. To learn how to store a 

name in the phonebook, refer to “Add Names 

To Your Uconnect Phonebook”, in this 

section.

The Uconnect system will confirm the name 

and then dial the corresponding phone 

number, which may appear in the display of 

certain radios.

Phonebook Download – Automatic 

Phonebook Transfer From Mobile Phone

If equipped and specifically supported by your 

phone, Uconnect Phone automatically 

downloads names (text names) and number 

entries from your mobile phone’s phonebook. 

Specific Bluetooth® Phones with Phone Book 

Access Profile may support this feature. See 

Uconnect website for supported phones.

To call a name from downloaded (or 

Uconnect) Phonebook, follow the procedure 

in “Call by Saying a Name” section.

Automatic download and update, if 

supported, begins as soon as the Bluetooth® 

wireless phone connection is made to the 

Uconnect Phone, for example, after you start 

the vehicle.

A maximum of 1,000 entries per phone will 

be downloaded and updated every time a 

phone is connected to the Uconnect Phone.

Depending on the maximum number of 

entries downloaded, there may be a short 

delay before the latest downloaded names 

can be used. Until then, if available, the 

previous downloaded phonebook is available 

for use.

Only the phonebook of the currently 

connected mobile phone is accessible.

Only the mobile phone’s phonebook is down

-

loaded. SIM card phonebook is not part of 

the Mobile phonebook.

This downloaded phonebook cannot be 

edited or deleted on the Uconnect Phone. 

These can only be edited on the mobile 

phone. The changes are transferred and 

updated to Uconnect Phone on the next 

phone connection.

Add Names To Your Uconnect Phonebook

NOTE:

Adding names to the Uconnect Phonebook is 

recommended when the vehicle is not in 

motion.

Push the Phone button   to begin.

After the “Ready” prompt and the following 

beep, say “Phonebook New Entry.”

When prompted, say the name of the new 

entry. Use of long names helps the Voice 

Command system, and it is recommended. 

For example, say “Robert Smith” or “Robert” 

instead of “Bob.”

9

308

MULTIMEDIA


When prompted, enter the number designa

-

tion (e.g., “Home,” “Work,” “Mobile,” or 

“Other”). This will allow you to store multiple 

numbers for each phonebook entry, if 

desired.

When prompted, recite the phone number for 

the phonebook entry that you are adding.

After you are finished adding an entry into the 

phonebook, you will be given the opportunity to 

add more phone numbers to the current entry 

or to return to the main menu.
The Uconnect Phone will allow you to enter up to 

32 names in the phonebook with each name 

having up to four associated phone numbers 

and designations. Each language has a 

separate 32-name phonebook accessible only 

in that language. In addition, if equipped and 

supported by your phone, Uconnect Phone 

automatically downloads your mobile phone’s 

phonebook.

Edit Uconnect Phonebook Entries

Push the Phone button   to begin.

After the “Ready” prompt and the following 

beep, say “Phonebook Edit.”

You will then be asked for the name of the 

phonebook entry that you wish to edit.

Next, choose the number designation (home, 

work, mobile, or other) that you wish to edit.

When prompted, recite the new phone 

number for the phonebook entry that you are 

editing.

After you are finished editing an entry in the 

phonebook, you will be given the opportunity to 

edit another entry in the phonebook, call the 

number you just edited, or return to the main 

menu.

NOTE:

Editing names in the phonebook is recom

-

mended when the vehicle is not in motion.

Automatic downloaded phonebook entries 

cannot be deleted or edited.

“Phonebook Edit” can be used to add another 

phone number to a name entry that already 

exists in the phonebook. For example, the entry 

John Doe may have a mobile and a home 

number, but you can add “John Doe's” work 

number later using the “Phonebook Edit” 

feature.

Delete Uconnect Phonebook Entry

NOTE:

Editing phonebook entries is recommended 

when the vehicle is not in motion.

To delete a Uconnect phonebook entry using 

Voice Commands:

1. Push the Phone button   to begin.

2. After the “Ready” prompt and the following 

beep, say “Phonebook Delete.”

3. After you enter the Phonebook Delete 

menu, you will then be asked for the name 

of the entry that you wish to delete. You can 

either say the name of a phonebook entry 

that you wish to delete, or you can say “List 

Names” to hear a list of the entries in the 

phonebook from which you choose. To 

select one of the entries from the list, push 
the Voice Command   button while the 

Uconnect Phone is playing the desired entry 

and say “Delete.”

MULTIMEDIA

309

4. After you enter the name, the Uconnect 

Phone will ask you which designation you 

wish to delete: home, work, mobile, other, or 

all. Say the designation you wish to delete.

Note that only the phonebook entry in the 

current language is deleted.

NOTE:

Automatic downloaded phonebook entries 

cannot be deleted or edited.

Delete/Erase “All” Uconnect Phonebook 

Entries

NOTE:

ONLY the phonebook in the current language 

is deleted.

Automatic downloaded phonebook entries 

cannot be deleted or edited.

To delete or erase all Uconnect phonebook 

entries using Voice Command:

1. Push the Phone button   to begin.

2. After the “Ready” prompt and the following 

beep, say “Phonebook Erase All.”

The Uconnect Phone will ask you to verify 

that you wish to delete all the entries 

from the phonebook.

3. After confirmation, the phonebook entries 

will be deleted.

List All Names In The Uconnect Phonebook

Push the Phone button   to begin.

After the “Ready” prompt and the following 

beep, say “Phonebook List Names.”

The Uconnect Phone will play the names of 

all the phonebook entries, including the 

downloaded phonebook entries, if available.

To call one of the names in the list, push the 
Voice Recognition button   during the 

playing of the desired name, and say “Call.”

NOTE:

The user can also exercise “Edit” or “Delete” 

operations at this point.

The Uconnect Phone will then prompt you as 

to the number designation you wish to call.

The selected number will be dialed.

Phone Call Features

The following features can be accessed through 

the Uconnect Phone if the feature(s) are 

available on your mobile service plan. For 

example, if your mobile service plan provides 

three-way calling, this feature can be accessed 

through the Uconnect Phone. Check with your 

mobile service provider for the features that you 

have.

Answer Or Reject An Incoming Call — No Call 

Currently In Progress
When you receive a call on your mobile phone, 

the Uconnect Phone will interrupt the vehicle 

audio system, if on, and will ask if you would like 
to answer the call. Push the Phone button   to 

accept the call. To reject the call, push and hold 
the Phone button   until you hear a single 

beep, indicating that the incoming call was 

rejected.

9

310

MULTIMEDIA


Answer Or Reject An Incoming Call — Call 

Currently In Progress
If a call is currently in progress and you have 

another incoming call, you will hear the same 

network tones for call waiting that you normally 

hear when using your mobile phone. Push the 
Phone button   to place the current call on 

hold and answer the incoming call.

NOTE:

The Uconnect Phone compatible phones in the 

market today do not support rejecting an 

incoming call when another call is in progress. 

Therefore, the user can only answer an 

incoming call or ignore it.

Making A Second Call While Current Call Is In 

Progress
To make a second call while you are currently on 
a call, push the Voice Recognition button   

and say “Dial” or “Call” followed by the phone 

number or phonebook entry you wish to call. 

The first call will be on hold while the second call 

is in progress. To go back to the first call, refer 

to “Toggling Between Calls” in this section. To 

combine two calls, refer to “Conference Call” in 

this section.

Place/Retrieve A Call From Hold
To put a call on hold, push the Phone button   

until you hear a single beep. This indicates that 

the call is on hold. To bring the call back from 
hold, push and hold the Phone button   until 

you hear a single beep.

Toggling Between Calls
If two calls are in progress (one active and one 
on hold), push the Phone button   until you 

hear a single beep, indicating that the active 

and hold status of the two calls have switched. 

Only one call can be placed on hold at a time.

Conference Call
When two calls are in progress (one active and 

one on hold):

1. Push and hold the Phone button   until 

you hear a double beep, indicating that the 

two calls have been joined into one 

conference call.

Three-Way Calling
To initiate three-way calling, push the Voice 
Recognition button   while a call is in 

progress, and make a second phone call, as 

described under “Making a Second Call While 

Current Call is in Progress.” After the second 

call has established, push and hold the Phone 
button   until you hear a double beep, 

indicating that the two calls have been joined 

into one conference call.

Call Termination
To end a call in progress:

1. Momentarily push the Phone button  .

Only the active call(s) will be terminated 

and if there is a call on hold, it will 

become the new active call. If the active 

call is terminated by the phone far end, a 

call on hold may not become active 

automatically. This is cell 

phone-dependent.

2. To bring the call back from hold, push and 

hold the Phone button   until you hear a 

single beep.


Content      ..     17      18      19      20     ..