Dodge Grand Caravan (2020 year). Manual in english - page 18
 

  Index      Manuals     Dodge Grand Caravan (2020 year). Manual in english


Search            copyright infringement  


Content      ..     16      17      18      19     ..


Dodge Grand Caravan (2020 year). Manual in english - page 18


MULTIMEDIA

279

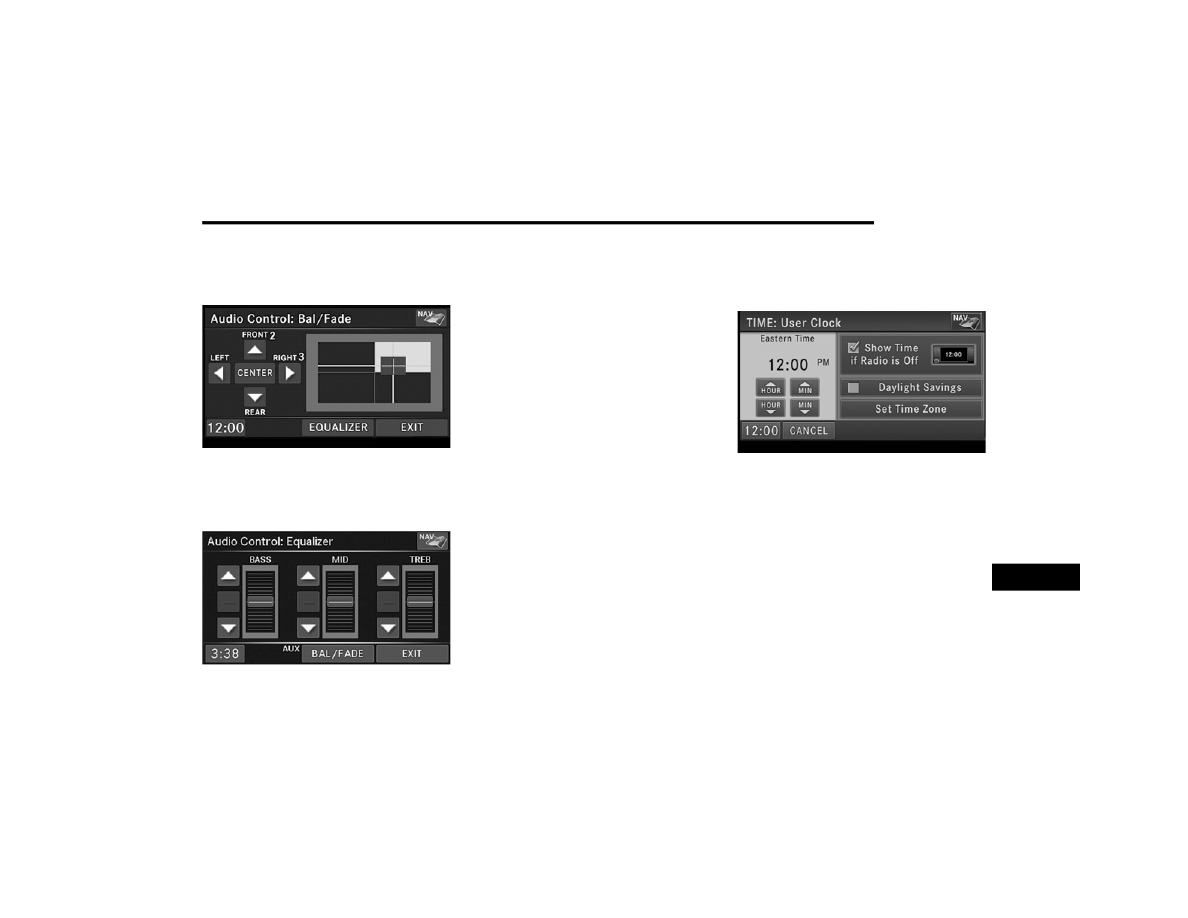
Audio Control Menu
Push the Audio button located on the faceplate 

on the right side of the radio.

Use either of the Arrow buttons or the cross-hair 

on the screen to change the Balance and Fade. 

The Center button resets the settings. Push the 

Equalizer button to change tone settings.

Use either the Arrow buttons or the sliders on 

the screen to adjust Bass, Mid, and/or Treble.

Getting Started

Change The Language

The radio will conform to the vehicle language 

set in the instrument cluster display.
If you change the language in the radio, the 

vehicle will change the language for all display 

information.
To change the language with the radio:

1. Push the Menu button on the right side of 

the radio.

2. Then press the System Setup button to get 

to the System Setup menu.

3. Press the Language Setup button and 

select a language.

4. Press the Save button to activate the new 

language selection.

Set The Time — Radio 430

1. Press the Time Display button in the lower 

left corner of the screen.

2. Adjust the hours and minutes using the Up 

and Down buttons.

3. Press the Set Time Zone button to change to 

the desired time zone.

4. Press the Daylight Savings button to switch 

Daylight Savings on or off.

9

280

MULTIMEDIA


Set The Time — Radio 430 NAV

1. Press the Time Display button in the lower 

left corner of the screen.

The time is automatically set by the GPS sys

-

tem for the time zone selected. The radio 

default is GPS time, where the vehicle time 

is automatically set by the GPS system. If 

the vehicle is not able to receive the GPS 

signals, the vehicle time is only updated 

when the GPS satellite signals are being re

-

ceived (which requires the vehicle to be out

-

side with a clear view to the sky).

2. It is possible to set the time manually 

(ahead or behind actual GPS time), by 

pressing the User Time button.

3. Press the Daylight Savings button to switch 

Daylight Savings on or off.

Store Radio Presets

1. Push the Radio button to display AM, FM, 

or SAT.

2. Select the radio band by pressing either the 

AM, FM, or SAT buttons.

3. Either press the Seek Up/Down buttons or 

press the Scan button, Direct Tune button 

or the Left/Right arrows to change the 

currently playing station.

4. Press and hold one of the Presets buttons in 

the list to the right until you hear a confir

-

mation beep (approximately two seconds).

You can use the Page button to scroll 

through the list of presets.

NOTE:

If the preset list is not displayed, press the 

Presets button located in the bottom line of the 

screen.

You can use the Full Screen button to toggle 

between full and split-screen mode. Long preset 

names are displayed in full-screen mode.

MULTIMEDIA

281

Radio Mode

Overview

The radio is equipped with three different 

tuners:

FM 87.7 MHz - 107.9 MHz (RBDS capable)

AM 530 kHz - 1710 kHz

SiriusXM® Satellite Radio (if equipped)

Push the Radio button. The different tuner 

modes can be selected by pressing the tabs on 

the radio touchscreen.

SiriusXM® Satellite Radio

With over 130 channels, SiriusXM® Satellite 

Radio brings you more of what you love. Get 69 

channels of 100% commercial-free music, plus 

all of your favorite sports, news, talk and 

entertainment. Hear every NFL® game, every 

NASCAR® race, college sports and more. The 

biggest and most compelling names in talk with 

Howard Stern and Martha Stewart, 

laugh-out-loud comedy, plus kids' programming, 

wold-class news, local traffic and weather. All of 

this with crystal clear, coast-to-coast coverage. 

Everything worth listening to is now on 

SiriusXM®. A one-year SiriusXM® Satellite 

Radio subscription is included.
SiriusXM® and all related marks and logos are 

trademarks of SiriusXM® Radio Inc. and its 

subsidiaries. SiriusXM® Radio requires a 

subscription, sold separately after trial 

subscription included with vehicle purchase. 

Prices and programming are provided by 

SiriusXM® and are subject to change. 

Subscriptions governed by Terms & Conditions 

available at 

www.siriusxm.com

. SiriusXM® 

Radio US service only available to those at least 

18 years of age in the 48 contiguous United 

States, D.C., and PR. Service available in 

Canada; see 

www.siriusxm.ca

.

To receive satellite radio, the vehicle needs to 

be outside with a clear view to the sky. If the 

screen shows Acquiring Signal, you might have 

to change the vehicle position to receive a 

signal. In most cases, the satellite radio does 

not receive a signal in underground parking 

garages or tunnels.

Station Presets

There are 12 station presets available for 

storing the radio stations in each tuner range.
To store the desired station, press and hold one 

of the station Presets buttons for two seconds 

and you will see the highlighted button change 

from green to beige. You will also see the radio 

station stored in the highlighted button and you 

will hear a confirmation beep when the station 

is saved. Pressing the Presets buttons in SAT 

mode changes the information shown in the list 

between the Channel Name, name of the Artist 

currently playing on the channel and name of 

the Song currently playing on the channel.

9

282

MULTIMEDIA


Change A Channel Or Frequency

Press the Seek/Tune Down Arrow button   to 

quickly seek down to the next available station 

or channel.
Press and hold the Seek/Tune Down Arrow 
button   to tune down until the button is 

released.
Press the Seek/Tune Up Arrow button   to 

quickly seek up to the next available station or 

channel.
Press and hold the Seek/Tune Up Arrow button 

 to tune up until the button is released.

Select the Direct Tune button to enter a 

frequency or a channel number, and confirm 

your selection by pressing the GO button. If 

there are no more numbers required to enter 

the frequency or channel number, the radio 

automatically tunes to the selection without 

pressing the GO button.
Select “Scan” for a five-second preview of each 

listenable station in the frequency band. Press 

the Scan button again to stop the scan function 

and to select a radio station.

Radio Broadcast Data System (RBDS)

This radio system is capable of receiving RBDS 

signals in the FM band. RBDS is a technology 

used for transmitting textual information about 

the music type, song and artist for FM band 

music. This information is shown on the display.

NOTE:

Not all radio stations support RBDS.

The RBDS information is displayed below the 

frequency reading of the currently playing radio 

station.

Radio Text Information

Press the Info button on the 

touchscreen to display additional 

information about the current audio 

program in the right half of the screen. 

Press the Info button a second time to hide this 

information.

Music Type (Program Type Filter)

Program Type (PTY) is only available in FM and 

SAT mode. Radio stations are grouped 

according to their program (e.g., Soft Rock, 

Rhythm & Blues, etc.).

In SAT mode, the Music Browse 

button allows you to browse through 

all of the SiriusXM® channels and 

genres.
You can use the Back button to switch 

to the previous menu.

MULTIMEDIA

283

Favorite Songs & Artists

The SAT mode Favorites list allows you to tag 

particular artists or songs so you will be notified 

each time that artist or song is playing on 

another SiriusXM® channel.

To tag an artist or song, press the 

Favorites button while the song is 

playing.

NOTE:

Not all SiriusXM® stations allow a song or artist 

to be tagged.

When one of your favorite artists or songs 

begins playing on another SiriusXM® channel a 

message appears (depending on the Song 

Alerts setting) that allows you to tune to the 

station where your favorite is playing.
The Song Alerts setting is accessed in the SAT 

Menu, Favorites screen.
Any time a favorite artist or song is playing, the 

Favorite icon appears in the bottom bar.
If you have set up favorite sports teams and one 

of those teams has a game being broadcast on 

SiriusXM®, the Favorite Sport icon appears in 

the bottom bar anytime the game starts or when 

there is a score update.

When you are in SAT mode, you can change your 

Song and Game Alert settings by pushing the 

MENU button on the faceplate then pressing 

the Favorites button on the touchscreen.

Replay Mode

While you are in SAT mode, you can replay over 

30 minutes of the current SiriusXM® channel 

(when the channel is changed, this audio buffer 

is erased). Press the Replay button to listen to 

the stored audio.
You can press the touchscreen controls to 

pause and rewind audio playback, press the 

Scan button to preview each of the tracks 

stored in the buffer, or select a track from the 

list.

The time displayed below the bar indicates how 

much time is present between the current 

buffer play position and the live broadcast.
Press the Live button to return to the current 

audio being broadcast on the SiriusXM® 

channel.

Radio Settings

AM/FM Menu
There are no specific settings for this mode.

SAT Menu
While in SAT Mode, push the Menu button to 

display the SAT Menu.

9

284

MULTIMEDIA


Channel Lock
Select Channel Lock to enable and/or disable 

desired channels. The Seek and Scan function 

will then only display channels without parental 

lock.

Favorites
When Song Alerts is checked, you will be 

notified every time one of your favorite artists or 

songs begins playing. To turn off these notifi

-

cations, turn off the Song Alerts check mark.

When Game Alerts is checked, you will be 

notified every time one of your favorite teams 

begins playing a game being broadcast on 

SiriusXM® and/or when the score of the game 

changes. The settings you make under Favorite 

Teams determine which alerts you receive.
To disable all sports notifications, turn off the 

Game Alerts check mark.

Favorite Songs & Artists
When an individual song or artist is checked, 

you will receive alerts when that song or artist is 

playing (depending on the Song Alerts setting).
If you do not want to receive alerts for a 

particular song or artist but you want to keep 

that item in the list, turn off the check mark next 

to the item.
To permanently remove the song or artist from 

the list, press the Delete button next to the item.

Favorite Teams
To view which teams will create game or score 

alerts, select the Teams tab.
To set or change the favorite team, press the 

button for the sport and select a new team from 

the list.
To change the alert types you will receive for 

each team (depending on the Game Alerts 

setting), select the Alerts tab. Pressing the 

button next to the team changes the alert type 

between None (no alerts), Game (alert when the 

game broadcast begins), Scores (alert each 

time the game score is updated), or All (both 

game start and score alerts).

MULTIMEDIA

285

Re-Subscribe To SiriusXM® Satellite Radio
New vehicle purchasers or lessees will receive a 

free limited time subscription to SiriusXM® 

Satellite Radio with your radio. Following 

expiration of the free services, it will be 

necessary to access the information on the 

Subscription Information screen to 

re-subscribe.
Press the Subscription button on the 

touchscreen to access the Subscription 

Information screen.

Write down the SiriusXM® ID numbers for your 

receiver. To reactivate your service, either call 

the number listed on the screen or visit the 

provider online.

NOTE:

SiriusXM® Travel Link is a separate 

subscription only available on the 

Radio 430 Nav.

Display Settings
Push the Menu button on the faceplate, and 

press the Display Setting button on the 

touchscreen to access the Display Settings 

menu.

Select the Daytime Colors button to switch to 

manual daytime mode and to adjust the 

brightness of the display using daytime colors.

Select the Nighttime Colors button to switch to 

manual nighttime mode and to adjust the 

brightness of the display using nighttime colors.
Select the Auto Color button to switch to 

automatic daytime/nighttime mode and to 

control the brightness of the display using the 

light switch of the vehicle.
Press the Up or Down arrows to adjust the 

Brightness.
Press the Done button to save your settings and 

to return to the AM/FM/SAT Menu.

Screen Off
To turn off the screen (so only the clock is 

shown, and audio is still heard through the 

vehicle’s speakers), push the Menu button on 

the faceplate and press the Screen Off button 

on the touchscreen.
Once the Screen Off is active, push any button 

on the faceplate or press the touchscreen 

display to deactivate it.

9

286

MULTIMEDIA


View Settings
Push the Menu button on the faceplate and 

press the Default View button on the 

touchscreen to enable the default view mode, 

where the vehicle brand logo is displayed in the 

right half of the screen.
Press the Picture View button to enable the 

picture view mode, where a picture can be 

displayed on the right half of the radio screen. 

Refer to “Hard Disk Drive Mode (HDD)” in this 

section for further information.

ParkView Rear Backup Camera — If Equipped

When equipped with ParkView, the radio display 

shows the rear view camera picture when the 

shift lever is in the REVERSE position.
If available, you can disable the ParkView Rear 

Backup Camera feature by pushing the Menu 

button on the faceplate, then pressing the 

System Setup button on the touchscreen and 

turning off the Backup Camera option.
ParkView Camera Delay
The Rear Backup Camera display will remain on 

the screen for a period of 10 seconds or up to 

8 mph (12.8 km/h).
This feature can be enabled or disabled when 

the ParkView Rear Backup Camera is enabled.

Media Mode

Disc Mode

Overview
The radio is equipped with a CD/DVD player.
To activate Disc Mode push the Media button 

located on the faceplate and select the Disc 

button.

Disc Requirements

The radio is capable of playing compact discs 

(CD), recordable compact discs (CD-R and 

CD+R), rewritable compact discs (CD-RW and 

CD+RW), recordable DVD-R, DVD+R, DVD-RW, 

and DVD+RW compact discs.

CAUTION!

This disc player will accept a 4 3/4 inch

(12 cm) disc only. The use of other sized discs 

may damage the disc player mechanism.

MULTIMEDIA

287

Your radio will play the following formats:
MP3, WMA, AAC, M4A, CD Audio, DVD Audio, 

and DVD Video.
Do not insert anything other than the supported 

CD/DVD formats.
SACD (SACD layer), VCD DualDisc, SVCD, VCD 

format on DVD MPEG-4 are not supported.
A complete list of supported CD/DVD formats is 

available at 

DriveUconnect.com

 (US Residents) 

or 

DriveUconnect.ca

 (Canadian Residents).

Inserting A Disc

1. Push the Load button once.

2. After the screen opens, with the printed side 

upward, insert the disc into the disc slot of 

the radio. The radio pulls the disc automat

-

ically and closes the flip screen. The radio 

selects the appropriate mode after the disc 

is recognized and starts playing the first 

track. The display shows “Reading...” during 

this process.

NOTE:

A faulty CD is NOT automatically ejected. Use 

only standard size discs. Discs that have 

been modified with an adhesive label should 

not be used in the CD/DVD player.

On Data CDs with a large number of songs it 

may take several seconds to read, play and 

display information for all songs on the disc.

Recording your own CD on a home computer 

at a lower write speed will result in a more 

consistent quality.

High definition content and media

(e.g, HD-DVD, Blu-Ray™) is not supported.

If the user does not remove an ejected CD 

within approximately 10 seconds the CD will 

reload.

Removing A Disc

1. Push the Load button.

2. After the display opens the disc is ejected 

and can be removed.

NOTE:

If the disc is not removed within approximately 

10 seconds, the unit pulls it back into the slot 

(park position). The disc may be ejected when 

the ignition is OFF.

3. Push the Load button to close the display. If 

you do not push the Load button or insert a 

new disc, the display will close 30 seconds 

after the display was opened.

Selecting Disc Mode
Activate Disc Mode by pushing the Media 

button located on the faceplate. The disc mode 

can be selected by pressing the Disc button on 

the touchscreen.

NOTE:

When a disc is inserted, the appropriate mode 

is automatically selected once the disc is 

recognized.

Scan Search
Press the Scan button.
The first few seconds of each individual track 

will be played in succession.
Press the Stop Scan button to stop the scan 

function.

9

288

MULTIMEDIA


Change A Track
Press the Forward Arrow button   to select the 

next track on the disc.
Press and hold the Forward Arrow button   to 

fast forward through the track.
Press the Back Arrow button   to select the 

start of the current track (while the track is 

playing) or the previous track (if the current 

track has just started).
Press and hold the Back Arrow button   to fast 

rewind through the track.
Press the Pause button to pause the playback 

of the disc.
Press the Play button to resume playback of the 

disc.

Displaying The Elapsed Title Time
The elapsed title time of the currently playing 

track displays in the left center of the screen.

Select Title From List
Press the Tracks button to display a list of the 

titles of the currently playing disc. Select the 

desired track you wish to play.
Press the Tracks button a second time to hide 

the list.

Disc Info

Press the Info button to display the 

cover art (if available) and track title. 

Press the Info button a second time to 

display the track title, artist, album, 

and genre.
Press the Info button to close the Info panel.

Gracenote® End User License Agreement

This application or device contains software 

from Gracenote®, Inc. of Emeryville, California 

(“Gracenote®”). The software from Gracenote® 

(the “Gracenote® Software”) enables this 

application to perform disc and/or file identifi

-

cation and obtain music-related information, 

including name, artist, track, and title 

information (“Gracenote® Data”) from online 

servers or embedded databases (collectively, 

“Gracenote® Servers”) and to perform other 

functions. You may use Gracenote® Data only 

by means of the intended End-User functions of 

this application or device.

You agree that you will use Gracenote® Data, 

the Gracenote® Software, and Gracenote® 

Servers for your own personal non-commercial 

use only. You agree not to assign, copy, transfer 

or transmit the Gracenote® Software or any 

Gracenote® Data to any third party. YOU AGREE 

NOT TO USE OR EXPLOIT GRACENOTE DATA, 

THE GRACENOTE SOFTWARE, OR GRACENOTE 

SERVERS, EXCEPT AS EXPRESSLY PERMITTED 

HEREIN.
You agree that your non-exclusive license to use 

the Gracenote® Data, the Gracenote® 

Software, and Gracenote® Servers will 

terminate if you violate these restrictions. If your 

license terminates, you agree to cease any and 

all use of the Gracenote® Data, the 

Gracenote® Software, and Gracenote® 

Servers. Gracenote® reserves all rights in 

Gracenote® Data, the Gracenote® Software, 

and the Gracenote® Servers, including all 

ownership rights. Under no circumstances will 

Gracenote® become liable for any payment to 

you for any information that you provide. You 

agree that Gracenote®, Inc. may enforce its 

rights under this Agreement against you directly 

in its own name.

MULTIMEDIA

289

The Gracenote® service uses a unique 

identifier to track queries for statistical 

purposes. The purpose of a randomly assigned 

numeric identifier is to allow the Gracenote® 

service to count queries without knowing 

anything about who you are. For more 

information, see the web page for the 

Gracenote® Privacy Policy for the Gracenote® 

service.
The Gracenote® Software and each item of 

Gracenote® Data are licensed to you “AS IS.” 

Gracenote® makes no representations or 

warranties, express or implied, regarding the 

accuracy of any Gracenote® Data from in the 

Gracenote® Servers. Gracenote® reserves the 

right to delete data from the Gracenote® 

Servers or to change data categories for any 

cause that Gracenote® deems sufficient. No 

warranty is made that the Gracenote® Software 

or Gracenote® Servers are error-free or that 

functioning of Gracenote® Software or 

Gracenote® Servers will be uninterrupted. 

Gracenote® is not obligated to provide you with 

new enhanced or additional data types or 

categories that Gracenote® may provide in the 

future and is free to discontinue its services at 

any time.

GRACENOTE DISCLAIMS ALL WARRANTIES 

EXPRESS OR IMPLIED, INCLUDING, BUT NOT 

LIMITED TO, IMPLIED WARRANTIES OF 

MERCHANTABILITY, FITNESS FOR A 

PARTICULAR PURPOSE, TITLE, AND 

NON-INFRINGEMENT. GRACENOTE DOES NOT 

WARRANT THE RESULTS THAT WILL BE 

OBTAINED BY YOUR USE OF THE GRACENOTE 

SOFTWARE OR ANY GRACENOTE SERVER. IN 

NO CASE WILL GRACENOTE BE LIABLE FOR ANY 

CONSEQUENTIAL OR INCIDENTAL DAMAGES OR 

providers.

NOTE:

Visit 

DriveUconnect.com

 (U.S. Residents) or 

DriveUconnect.ca

 (Canadian Residents) for 

update information.

Copy Disc To Hard-Drive

Press the Copy button to copy the 

current disc to the Hard Disc Drive.

Disc Menu
While in disc mode with inserted audio disc, 

push the Menu button to access the Disc Menu.
Press the Random button to play the titles on 

the disc in random order. Press the Random 

button a second time to turn Random off.
Press the Repeat Folder button to repeat all 

songs in the currently playing folder (MP3/WMA 

disc only). Press the Repeat Folder button a 

second time to stop the repeat mode.

Playing A MP3/WMA Disc

1. Push the Load button once.

2. With the printed side upwards, insert the 

disc into the disc slot of the radio. The radio 

pulls the disc automatically and closes the 

flip screen. The radio selects the 

appropriate mode after the disc is 

recognized, and starts playing the first 

track. The display shows “Reading...” during 

this process.
A MP3/WMA disc may contain audio files in 

a folder structure. The folder, if any, is 

shown in the list view.

Press the Tracks button if the list is not dis

-

played.

9

290

MULTIMEDIA


3. Press a button with a folder symbol to open 

a folder.

4. Press the Folder Up button to close a folder.

Playing A Video DVD

NOTE:

Viewing a DVD video on the radio screen is not 

available in all states, the vehicle must be 

stopped and the shifter must be in the PARK 

position for vehicles with an automatic 

transmission. In vehicles with a manual 

transmission the parking brake must be 

engaged.

First insert a video DVD.

The playback starts automatically after the DVD 

video is recognized by the disc drive.

Press the Chapters button to display a list of 

available chapters or tracks. Press a Chapter or 

Track button in the list to start playback from 

the selected section.
Press the View Video button to view the video on 

the screen.

DVD MENU Controls
If you insert a DVD video disc that contains a top 

menu, a menu may appear.

Press the Cursor Arrow buttons to select the title 

you want to view, then press the Enter button to 

start playback.

Press the DVD Move button to move 

the controls to the right part of the 

screen.

Press the Close button to close the 

DVD MENU Controls.

DVD Playback Controls
In video playback mode, press anywhere on the 

touchscreen to show the DVD Playback 

Controls.

To pause playback, press the Pause button.
To stop playback, press the Stop button.
Press the Fast Reverse (double left arrows) 

button during playback to fast reverse playback.
Press the Fast Forward (double right arrows) 

button during playback to fast forward 

playback.
Press the Next button to locate succeeding 

chapters or tracks.

MULTIMEDIA

291

Press the PREV button to start playback from 

the beginning of the current chapter or track. 

When you press the button twice in quick 

succession, playback starts from the beginning 

of the preceding chapter or track.

DISC Menu
While in Disc Mode, with inserted video DVD, 

press the Menu button to access the Disc 

Menu.

Press the Disc Setup button to access the Disc 

Setup menu.

In the Disc Setup menu, you may select Menu 

Language, Audio Language, Subtitle, Camera 

Angle, Aspect Ratio, and Brightness settings by 

pressing the corresponding button. Some of the 

buttons are disabled if the inserted disc does 

not support the functionality.

Disc Skipping
Skipping is typically caused by a damaged 

(scratched) disc. This will result in a 10-second 

jump forward until the damaged area is passed.

Temperature Protection
If the temperature of the disc reader during 

operation becomes too high, a pop-up message 

informs the user of an over temperature 

situation. The unit switches to radio mode until 

the disc reader temperature has dropped to a 

normal level.

Hard Disk Drive Mode (HDD)

The HDD mode gives you access to the audio 

files on the internal hard disk drive. It functions 

similar to a CD player, with the exception that 

the internal HDD can hold more tracks. It can 

hold approximately 6,700 four-minute 

CD-quality songs (depending on the file size of 

the encoded files).
Before using the HDD mode, you will need to 

copy tracks to the internal hard drive.
The files will be stored on the internal hard disk 

drive and can be used in the HDD mode.

Copy Audio Disc To Hard-Drive
Copy an audio disc to the Hard Disk Drive using 

the following procedure:

1. Insert a disc.

2. Press the Copy button to copy music tracks 

of the inserted disc to the Hard Disk 
Drive.  

9

292

MULTIMEDIA


After a short pause, the copy process begins 

and the audio resumes playback from the start 

of the track. The copy process continues in the 

background while the audio plays. The progress 

is shown in the display. Even if you change to 

another mode (radio, AUX, etc.) or turn the radio 

Off (ignition ON/RUN), the copy process will 

continue in the background.
It is also possible to listen to radio modes during 

this process. Copying time is greater than 4x the 

normal playback rate.

NOTE:

When copying CD-Audio to HDD, audio files are 

converted from CD-Audio to AAC. If available, 

the artist name, album name, cover art, track 

names and genres are stored with the tracks on 

the HDD. DVD-Audio cannot be copied to the 

HDD. If the CD-Audio disc is not recognized by 

the Gracenote® Music Recognition Service, you 

can rip the CD-Audio disc on your 

internet-equipped computer first, then copy the 

resulting compressed audio files to a USB 

memory stick. Then insert the USB memory 

stick in the radio and copy the audio files to the 

HDD mode.

Copy WMA/MP3 Files To Hard-Drive
MP3 and WMA formatted compressed audio 

files from a disc or via USB (e.g., USB stick) can 

be copied to the Hard Disc Drive.
It is recommended to sort music files into 

folders.

Songs located in the root level (top level) of the 

disc or USB device are saved on the Hard Disk 

Drive in a root folder. Songs that are stored in 

folders on the disc or USB devices are saved to 

the same folder name on the Hard Disk Drive. 

Only folders that contain song files are copied to 

the Hard Disk Drive.

For the example above, the list on the HDD will 

show the following:
Disc_Root_Level Songs (Playlist 1)

Song 1.mp3 (First song in playlist 1)

Song 2.mp3 (Second song in playlist 1)

Song 3.wma (Third song in playlist 1)

My Playlist Folder 1 (Playlist 2)

01 Song.mp3 (First song in playlist 2)

02 Song.mp3 (Second song in playlist 2)

03 Song.mp3 (Third song in playlist 2)

Copying Complete Disc
You can copy a complete music disc using the 

following procedure:

1. Insert a disc with MP3/WMA files.

2. Press the Copy button to copy music files of 

the inserted disc to the hard disk drive.

The copy progress is shown in the display.
You can continue listening to any audio source 

during the copy process.

MULTIMEDIA

293

Selective Song Copying From Disc
You can select specific songs on a WMA/MP3 

disc using the following procedure:

1. Push the My Files button located on the 

faceplate.

2. Select “My Music”.

3. Press the Add Music Files to HDD button.

4. Press the From Disc button in the next 

screen.

5. Select the folders or titles you would like to 

copy.
A red check mark indicates the selected 

songs and/or folders. Press the check All 

button to select all files and folders at once.

6. Press the Save button to start the copy 

process.

The copy process is shown on the display. It is 

possible to listen to radio modes during this 

process.
If you unplug or eject the media before the 

copying process is finished, the process will be 

interrupted. You may restart the copying 

process by repeating the steps above.

Copying From USB

1. Insert a USB device.

2. Select “My Music”.

9

294

MULTIMEDIA


3. Press the Add Music Files to HDD button.

4. Press the Front USB button in the next 

screen.

5. Select the folders or titles you would like to 

copy.
A red check mark indicates the selected 

songs and/or folders. Press the All button to 

select all files and folders at once.

6. Press the Save button to start the copy 

process.

Playing Audio Files From The Hard Disk Drive
You can play songs directly from the internal 

hard disk drive. 

1. Press the Browse button to 

select an available category.
 

2. The radio can sort the files by artist, album, 

song title, genre or folder name. You can 

also create links to your favorite songs, 

artists, albums, genres, or folders.

3. For this example, press the Artists button.

4. Press the button for the desired artist to list 

all songs by the artist. Press the   All 

button to play all songs by artist sorted in 

alphabetical order.

5. Press the List button to toggle the list 

contents between all songs by the artist and 

the albums that feature the artist.


Content      ..     16      17      18      19     ..