Dodge Magnum SRT8 (2006 year). Manual - part 7


  Index      Dodge     Dodge Magnum SRT8 (2006 year) - manual in english


Search            copyright infringement  


Content      ..     5      6      7      8     ..


Dodge Magnum SRT8 (2006 year). Manual - part 7


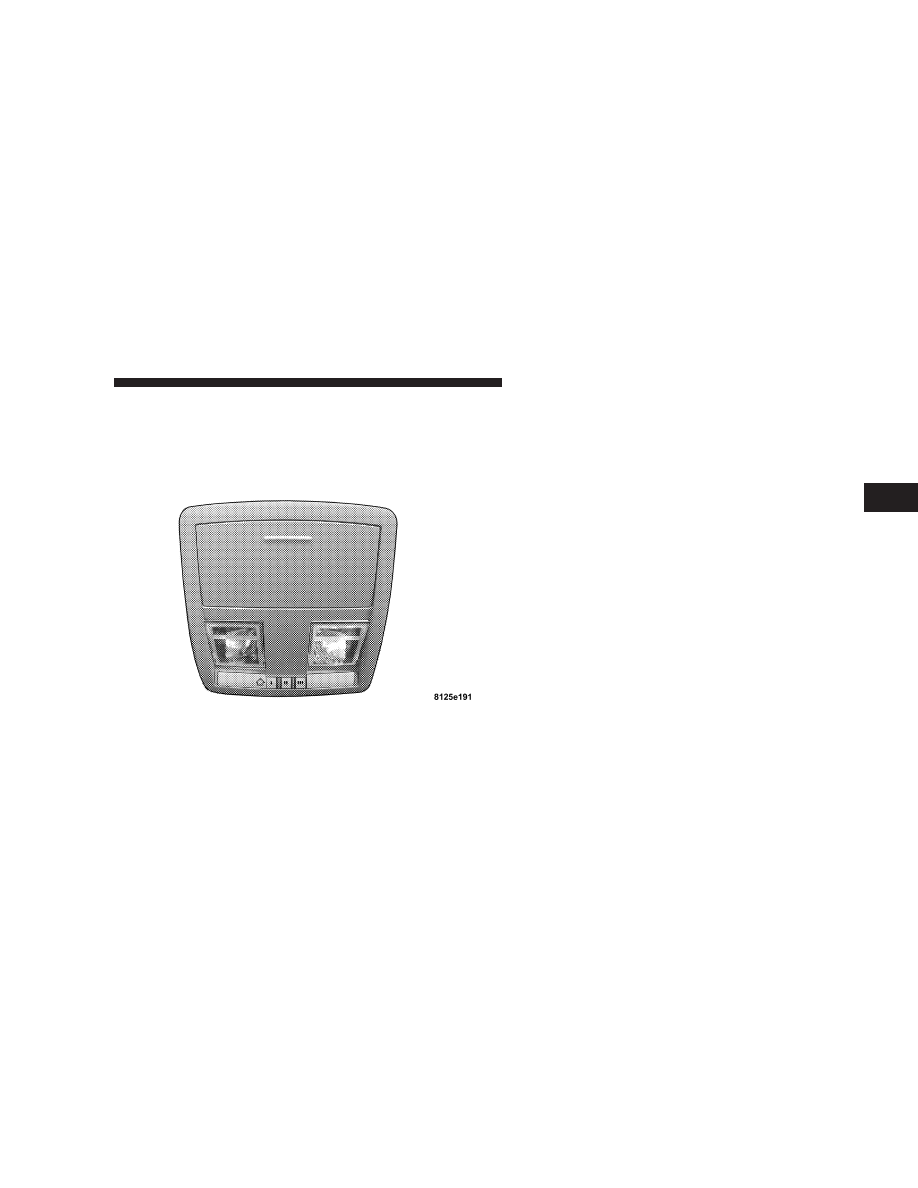
OVERHEAD CONSOLE — IF EQUIPPED
The overhead console contains courtesy/reading lights,
an optional universal garage door opener (HomeLink

威),

storage for sunglasses, and optional power sunroof
switches.

Courtesy/Reading Lights

At the forward end of the console are two courtesy/
reading lights.

Press the lens to turn these lights on. Press a second time
to turn the lights off.

The lights also turn on when a front door, rear door, or
liftgate is opened. The lights will also turn on when the
unlock button on the remote keyless entry transmitter is
pressed.

Sunglasses Storage
At the rear of the console a compartment is provided for
the storage of a pair of sunglasses.

The storage compartment access is a

⬙push/push⬙ design.

Push the finger depression on the overhead console to
open. Push the finger depression to close.

Overhead Console

UNDERSTANDING THE FEATURES OF YOUR VEHICLE

107

3

-------------------------------------------------------------------------------------------------------------------------------------------------------------

GARAGE DOOR OPENER — IF EQUIPPED
The HomeLink

威 Universal Transceiver replaces up to

three remote controls (hand held transmitters) that oper-
ate devices such as garage door openers, motorized
gates, or home lighting. It triggers these devices at the
push of a button. The Universal Transceiver operates off
your vehicle’s battery and charging system; no batteries
are needed.

NOTE:

The HomeLink

威 Universal Transceiver is dis-

abled when the Vehicle Theft Alarm is active.

For additional information on HomeLink

威, call 1–800–

355–3515, or on the internet at www.homelink.com.

WARNING!

A moving garage door can cause injury to people and
pets in the path of the door. People or pets could be
seriously or fatally injured. Only use this transceiver
with a garage door opener that has a “stop and
reverse” feature as required by federal safety stan-
dards. This includes most garage door opener mod-
els manufactured after 1982. Do not use a garage
door opener without these safety features it could
cause injury or death. Call toll-free 1–800–355–3515
or, on the Internet at www.homelink.com for safety
information or assistance.

Programming HomeLink

NOTE:

When programming a garage door opener, it is

advised to park outside the garage. It is also recom-
mended that a new battery be placed in the hand-held
transmitter of the device being programmed to
HomeLink for quicker training and accurate transmis-
sion of the radio-frequency signal.

108

UNDERSTANDING THE FEATURES OF YOUR VEHICLE

-------------------------------------------------------------------------------------------------------------------------------------------------------------

The Electronic Vehicle Information Center (EVIC) fea-
tures a driver-interactive display which includes
HomeLink system messages. The EVIC is located in the
instrument cluster below the speedometer.

1. Press and hold the two outer HomeLink buttons, and
release only when the EVIC display shows “Channels
Cleared” (after 20 seconds). Do not hold the buttons for
longer than 30 seconds and do not repeat step one to
program a second and/or third hand-held transmitter to
the remaining two HomeLink buttons.

WARNING!

Vehicle exhaust contains carbon monoxide, a danger-
ous gas. Do not run the vehicle’s exhaust while
training the transceiver. Exhaust gas can cause seri-
ous injury or death.

Electronic Vehicle Information Center

HomeLink Buttons

UNDERSTANDING THE FEATURES OF YOUR VEHICLE

109

3

-------------------------------------------------------------------------------------------------------------------------------------------------------------

WARNING!

Your motorized door or gate will open and close
while you are training the Universal Transceiver. Do
not train the transceiver if people or pets are in the
path of the door or gate. A moving door or gate can
cause serious injury or death to people and pets or
damage to objects.

2. Position the end of your hand-held transmitter 1-3
inches (3-8 cm) away from the HomeLink buttons.

3. Simultaneously press and hold both the HomeLink
button that you want to train and the hand-held trans-
mitter buttons. Do not release the buttons until step 4
has been completed.

NOTE:

Some gate operators and garage door openers

may require you to replace this Programming Step 3 with
procedures noted in the

⬙Gate Operator/Canadian Pro-

gramming

⬙ section.

4. The EVIC display will show “Channel X Training”
(where X is Channel 1, 2, or 3). Release both buttons after
the EVIC display shows “Channel X Trained”.

NOTE:

If the EVIC display shows “Did Not Train”

repeat steps 2–4.

5. Press and hold the just trained HomeLink button and
observe the EVIC display. If the EVIC display shows
“Channel X Transmit” (where X is Channel 1, 2, or 3),
programming is complete and your device should acti-
vate when the HomeLink button is pressed and released.

NOTE:

To program the remaining two HomeLink but-

tons, begin with

⬙Programming⬙ step two. Do not repeat

step one.

NOTE:

If your hand-held transmitter appears to pro-

gram the universal transceiver, but your garage door
does not operate using the transmitter and your garage
door opener was manufactured after 1995, your garage
door opener may have a multiple security code system
(rolling code system). Please proceed to steps 6–8 to

110

UNDERSTANDING THE FEATURES OF YOUR VEHICLE

-------------------------------------------------------------------------------------------------------------------------------------------------------------

complete the programming of a rolling code equipped
device (most common garage door openers require this
step).

6. At the garage door opener receiver (motor-head unit)
in the garage, locate the

⬙learn⬙ or ⬙smart⬙ button. This

can usually be found where the hanging antenna wire is
attached to the motor-head unit.

7. Firmly press and release the

⬙learn⬙ or ⬙smart⬙ button.

(The name and color of the button may vary by manu-
facturer.)

NOTE:

There are 30 seconds in which to initiate step

eight.

8. Return to the vehicle and firmly press, hold for two
seconds and release

the programmed HomeLink button.

Repeat the

press/hold/releaseⴖ sequence a second time,

and, depending on the brand of the garage door opener
(or other rolling code equipped device), repeat this
sequence a third time to complete the programming.

HomeLink should now activate your rolling code
equipped device.

NOTE:

To program the remaining two HomeLink but-

tons, begin with

⬙Programming⬙ step two. Do not repeat

step one

. For questions or comments, please contact

HomeLink at www.homelink.com or 1-800-355-3515.

Canadian Programming/Gate Programming
Canadian radio-frequency laws require transmitter sig-
nals to

⬙time-out⬙ (or quit) after several seconds of

transmission which may not be long enough for
HomeLink to pick up the signal during programming.
Similar to this Canadian law, some U.S. gate operators are
designed to

⬙time-out⬙ in the same manner.

If you live in Canada or you are having difficulties
programming a gate operator by using the

⬙Program-

ming

⬙ procedures (regardless of where you live), replace

Programming HomeLinkⴖ step 3 with the following:

NOTE:

If programming a garage door opener or gate

operator, it is advised to unplug the device during the

⬙cycling⬙ process to prevent possible overheating.
3. Continue to press and hold the HomeLink button
while you press and release every two seconds (

⬙cycle⬙)

your hand-held transmitter until the frequency signal has
successfully been accepted by HomeLink. The EVIC

UNDERSTANDING THE FEATURES OF YOUR VEHICLE

111

3

-------------------------------------------------------------------------------------------------------------------------------------------------------------

display will show “Channel X Trained” (where X is
Channel 1, 2, or 3). Proceed with

⬙Programming⬙ step

four to complete.

Using HomeLink
To operate, simply press and release the programmed
HomeLink button. Activation will now occur for the
trained device (i.e. garage door opener, gate operator,
security system, entry door lock, home/office lighting,
etc.). For convenience, the hand-held transmitter of the
device may also be used at any time. In the event that
there are still programming difficulties or questions,
contact HomeLink at: www.homelink.com or 1-800-355-
3515

.

Erasing HomeLink Buttons
To erase programming from the three buttons (individual
buttons cannot be erased but can be

⬙reprogrammed⬙ -

note below), follow the step noted:

• Press and hold the two outer HomeLink buttons and

release only when the EVIC display shows “Channels
Cleared” (after 20 seconds). Release both buttons. Do
not hold for longer that 30 seconds. HomeLink is now

in the train (or learning) mode and can be pro-
grammed at any time beginning with

⬙Programming⬙

- step 2.

Reprogramming a Single HomeLink Button
To program a device to HomeLink using a HomeLink
button previously trained, follow these steps:

1. Press and hold the desired HomeLink button. Do
NOT

release the button.

2. The EVIC display will show “Channel X Transmit”
(where X is Channel 1, 2, or 3) for 20 seconds and then
change to “Channel X Training”. Without releasing the
HomeLink button, proceed with

⬙Programming⬙ step 2.

For questions or comments, contact HomeLink at:
www.homelink.com or 1-800-355-3515

.

Security
If you sell your vehicle, be sure to erase the frequencies
by following the “Erasing HomeLink Buttons” instruc-
tions in this section.

112

UNDERSTANDING THE FEATURES OF YOUR VEHICLE

-------------------------------------------------------------------------------------------------------------------------------------------------------------

This device complies with part 15 of FCC rules and with
RSS-210 of Industry Canada. Operation is subject to the
following conditions:

• This device may not cause harmful interference.
• This device must accept any interference that may be

received including interference that may cause undes-
ired operation.

NOTE:

Changes or modifications not expressly ap-

proved by the party responsible for compliance could
void the user’s authority to operate the equipment.

HomeLink

威 is a trademark owned by Johnson Controls,

Inc.

POWER SUNROOF — IF EQUIPPED
The power sunroof switch is located between the sun
visors on the overhead console.

Power Sunroof Controls

UNDERSTANDING THE FEATURES OF YOUR VEHICLE

113

3

-------------------------------------------------------------------------------------------------------------------------------------------------------------

WARNING!

• Never leave children in a vehicle, with the keys in

the ignition switch. Occupants, particularly unat-
tended children, can become entrapped by the
power sunroof while operating the power sunroof
switch. Such entrapment may result in serious
injury or death.

• In an accident, there is a greater risk of being

thrown from a vehicle with an open sunroof. You
could also be seriously injured or killed. Always
fasten your seat belt properly and make sure all
passengers are properly secured too.

• Do not allow small children to operate the sun-

roof. Never allow fingers or other body parts, or
any object to project through the sunroof opening.
Injury may result.

Opening Sunroof - Express
Press the switch rearward and release, and the sunroof
will open automatically from any position. The sunroof
will open fully, then stop automatically. This is called
Express Open. During Express Open operation, any
movement of the sunroof switch will stop the sunroof.

Closing Sunroof - Express
Press the switch forward and release, and the sunroof
will close automatically from any position. The sunroof
will close fully and stop automatically. This is called
Express Close. During Express Close operation, any
movement of the switch will stop the sunroof.

Pinch Protect Feature
This feature will detect an obstruction in the opening of
the sunroof during Express Close operation. If an ob-
struction in the path of the sunroof is detected, the
sunroof will automatically retract. Remove the obstruc-
tion if this occurs. Next, press the switch forward and
release to Express Close.

114

UNDERSTANDING THE FEATURES OF YOUR VEHICLE

-------------------------------------------------------------------------------------------------------------------------------------------------------------

Pinch Protect Override
If a known obstruction (ice, debris, etc.) prevents closing,
press the switch forward and hold for two seconds after
the reversal occurs. This allows the sunroof to move
towards the closed position.

NOTE:

Pinch protection is disabled while the switch is

pressed.

Venting Sunroof - Express
Press and release the

⬙V⬙ button, and the sunroof will

open to the vent position. This is called Express Vent, and
will occur regardless of sunroof position. During Express
Vent operation, any movement of the switch will stop the
sunroof.

Sunshade Operation
The sunshade can be opened manually. However, the
sunshade will open automatically as the sunroof opens.

NOTE:

The sunshade cannot be closed if the sunroof is

open.

Wind Buffeting
Wind buffeting can be described as the perception of
pressure on the ears or a helicopter type sound in the
ears. Your vehicle may exhibit wind buffeting with the
windows down, or the sunroof (if equipped) in certain
open or partially open positions. This is a normal occur-
rence and can be minimized. If the buffeting occurs with
the rear windows open, open the front and rear windows
together to minimize the buffeting. If the buffeting occurs
with the sunroof open, adjust the sunroof opening to
minimize the buffeting or open any window.

Sunroof Maintenance
Use only a non-abrasive cleaner and a soft cloth to clean
the glass panel.

UNDERSTANDING THE FEATURES OF YOUR VEHICLE

115

3

-------------------------------------------------------------------------------------------------------------------------------------------------------------

Ignition Off Operation
The power sunroof switches remain active for 10 minutes
after the ignition switch has been turned off. Opening
either front door will cancel this feature. This feature is
programmable through the Electronic Vehicle Informa-
tion Center (EVIC). Refer to “Delay Power Off to Acces-
sories Until Exit” under “Personal Settings” in the Elec-
tronic Vehicle Information Center section of this manual
for details.

Sunroof Fully Closed
Press the switch forward and release to ensure that the
sunroof is fully closed.

ELECTRICAL POWER OUTLETS
There are three 12-volt electrical outlets on this vehicle.
All of the outlets are protected by an automatic reset
circuit breaker. The automatic circuit breaker restores
power when the overload is removed.

The 12 volt power outlet next to the ash receiver tray (if
equipped with an optional Smoker’s Package) has power
available only when the ignition is on. This outlet will
also operate a conventional cigar lighter unit.

WARNING!

Do not place ashes inside the cubby bin located on
the center console on vehicles not equipped with the
ash receiver tray. A fire leading to bodily injury
could result.

116

UNDERSTANDING THE FEATURES OF YOUR VEHICLE

-------------------------------------------------------------------------------------------------------------------------------------------------------------

NOTE:

If desired, the power outlet next to the ash tray

receiver (if equipped) can be converted by your autho-
rized dealer to provide power with the ignition switch in
the LOCK position.

The center console outlet is powered directly from the
battery (power available at all times). Items plugged into
this outlet may discharge the battery and/or prevent
engine starting.

Front Power Outlet

Center Console Power Outlet

UNDERSTANDING THE FEATURES OF YOUR VEHICLE

117

3

-------------------------------------------------------------------------------------------------------------------------------------------------------------

The auxiliary outlet is also powered directly from the
battery (power available at all times). Items plugged into
this outlet may discharge the battery and/or prevent
engine starting.

Auxiliary Power Outlet

118

UNDERSTANDING THE FEATURES OF YOUR VEHICLE

-------------------------------------------------------------------------------------------------------------------------------------------------------------

Electrical Outlet Use With Engine Off

CAUTION!

• Many accessories that can be plugged in draw

power from the vehicle’s battery, even when not in
use (i.e. cellular phones, etc.). Eventually, if plugged
in long enough, the vehicle’s battery will discharge
sufficiently to degrade battery life and/or prevent
engine starting.

• Accessories that draw higher power (i.e. coolers,

vacuum cleaners, lights, etc.), will degrade the
battery even more quickly. Only use these inter-
mittently and with greater caution.

• After the use of high power draw accessories, or

long periods of the vehicle not being started (with
accessories still plugged in), the vehicle must be
driven a sufficient length of time to allow the
alternator to recharge the vehicle’s battery.

• Power outlets are designed for accessory plugs

only. Do not hang any type of accessory or acces-
sory bracket from the plug. Improper use of the
power outlet can cause damage.

CUPHOLDERS

Front Seat Cupholders
The cupholders are located in the forward edge of the
center console.

Front Seat Cupholders

UNDERSTANDING THE FEATURES OF YOUR VEHICLE

119

3

-------------------------------------------------------------------------------------------------------------------------------------------------------------

Rear Seat Cupholders
The rear seat cupholders are located in the center armrest
between the rear seats. The cup holders are positioned
forward in the armrest and side-by-side to provide
convenient access to beverage cans or bottles while
maintaining a resting place for the rear occupants’ el-
bows.

STORAGE

Console Features
The center console includes a large internal storage bin.
The storage bin has a rubber mat for noise control. The
bin is also large enough to hold a portable AC/DC
converter to power lap tops, games, or other electrical
equipment. Two slots at the top right side of the bin
provide clearance for power cords to pass conveniently
out of the bin with the lid closed. This feature is ideal for
games, laptops, cell phones or other electrical equipment.
A four-slot coin holder can hold US dollar coins or
Canadian one and two-dollar coins, as well as quarters,
dimes and nickels. The bin has a Front-opening lid for
easy access inside by either the driver or front passenger.
There are also two shift bezel cubby bins with rubber
mats for holding small items. For vehicles not equipped
with the navigation radio, an extra storage bin is pro-
vided below the climate controls that holds up to four CD
jewel cases. The inside portion of the arm rest lid contains
a pen holder, a tissue holder, and a tire gauge holder.

Rear Seat Cupholders

120

UNDERSTANDING THE FEATURES OF YOUR VEHICLE

-------------------------------------------------------------------------------------------------------------------------------------------------------------

Cargo Management System — If Equipped

The cargo area has an upper and lower load floor.
Additional innovative features in the cargo area are the
two molded-in bins in the quarter trim panels. Each bin
that hold a gallon of milk and a 2-liter bottle of pop.

A cargo management system that stores on the lower
load floor below the bi-level cargo floor is optional. It
includes the following equipment:

• Waterproof cargo floor liner.
• Folding cargo management container with net separa-

tors.

The bi-level cargo floor includes a removable, tri-fold
load-bearing upper level. Two folds in the panel allow it
to be partially or fully folded for storage flexibility.
Shallow items can be stored underneath the upper load
floor.

The lower load floor is hinged to provide access to the
spare tire, battery and rear electrical power distribution
center.

The 60/40 split-folding rear seat provides cargo-carrying
versatility. The seatbacks fold down easily by pulling
nylon tabs between the seatbacks and the bolsters. When
the seats are folded down, they provide a continuous,
nearly flat extension of the removable tri-fold load floor.

Tri-Fold Upper Load Floor
The removable, tri-fold upper load floor has two sur-
faces, one side is carpeted for a plush appearance and the
other is vinyl for easy cleaning. Folding and/or removing
the load floor adds four inches to the height of the cargo
area for increased utility. It is constructed of a lightweight
material that is sandwiched between the carpeted and
washable-vinyl sides, the panel consists of a strong inner
structure to give it load-bearing strength.

UNDERSTANDING THE FEATURES OF YOUR VEHICLE

121

3

-------------------------------------------------------------------------------------------------------------------------------------------------------------

The load floor can be placed in a partially or fully folded
position, a flat position, or it can be removed. Use the
handle to adjust the position of the load floor. The load
floor positions are shown in the following illustrations.

Load Floor Handle

Load Floor Partially Folded

122

UNDERSTANDING THE FEATURES OF YOUR VEHICLE

-------------------------------------------------------------------------------------------------------------------------------------------------------------


Content      ..     5      6      7      8     ..