Dodge Ram Truck 1500-2500-3500. Manual - part 1502


  Index      Dodge     Dodge Ram Truck 1500-2500-3500 - service repair manual 2005 year


Search            


Content   ..  1500  1501  1502  1503   ..


Dodge Ram Truck 1500-2500-3500. Manual - part 1502


PITMAN SHAFT SEAL

REMOVAL

REMOVAL - GAS ENGINE

1. Seperate the pitman arm from the gear box (Refer to 19 - STEERING/LINKAGE/PITMAN ARM - REMOVAL).

2. Clean exposed end of pitman shaft and housing with a wire brush.

3. Rotate the steering wheel from stop to stop and count the number of turns.

4. Center the steering wheel by rotating it from the stop back 1 1/2 turns to achieve center position.

5. Remove the pitman shaft cover bolts.

NOTE: The pitman shaft will not clear the housing if it is not centered.

6. Remove the pitman shaft from the gear.

7. Remove dust seal from the housing with a special

tool (2).

CAUTION: Use care not to score the housing bore
when prying out seals and washer.

8. Remove retaining ring with snap ring pliers.

9. Remove washer from the housing.

NOTE: Tighten the slide hammer adapter 8990 into
the seal using wrenches, in order to make a tight
fit to pull the seal out. If this is not performed the
seal may tear on the removal making it difficult to
remove.

10. Remove oil seal from the housing with a special

tool 8990 with slide hammer C-3752. (2).

REMOVAL - DIESEL

1. Seperate the pitman arm from the gear box (Refer to 19 - STEERING/LINKAGE/PITMAN ARM - REMOVAL).

2. Remove the steering gear box (Refer to 19 - STEERING/GEAR - REMOVAL).

3. Install the steering gear in a soft jawed bench vise.

4. Clean exposed end of pitman shaft and housing with a wire brush.

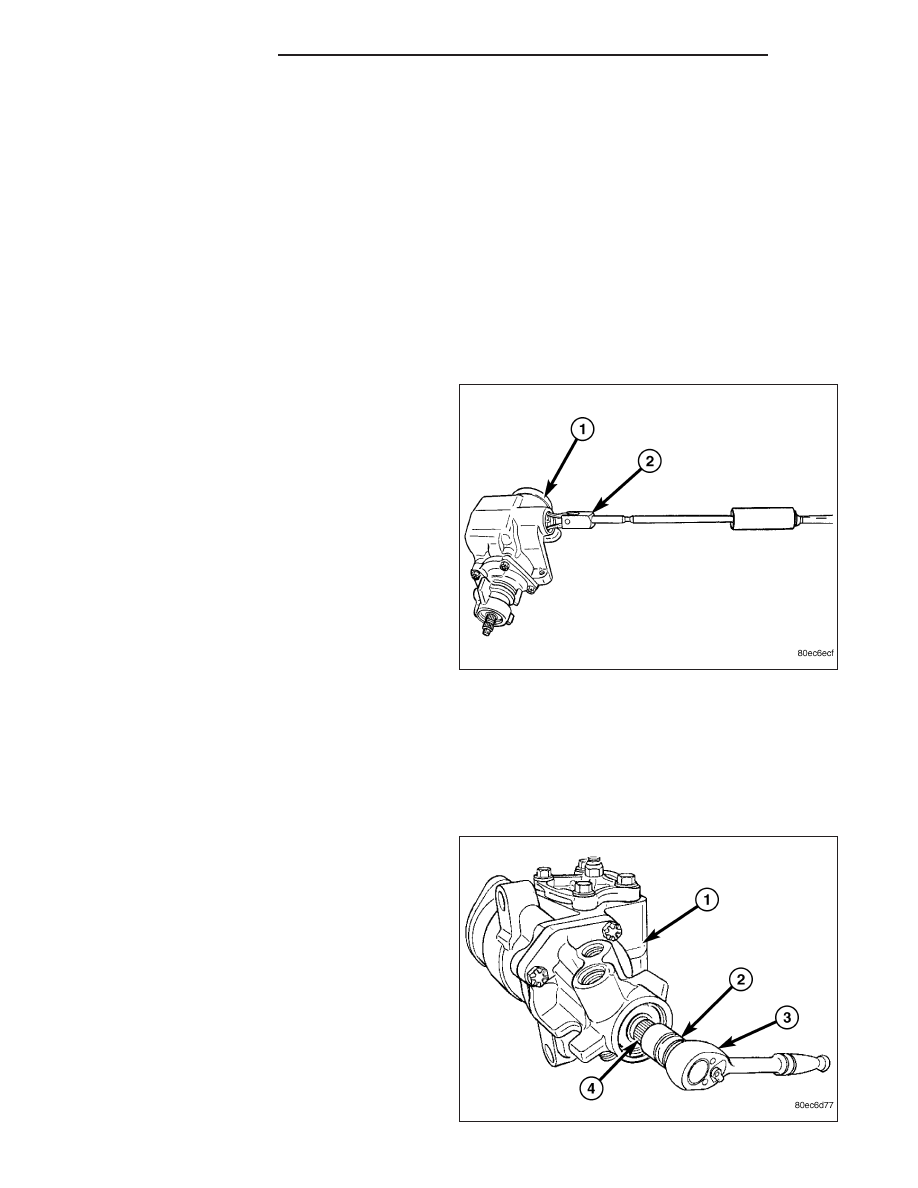
5. Rotate the input shaft with a 12 point socket (2)

from stop to stop and count the number of turns.

6. Center the input shaft (4) by rotating it from the

stop 1/2 of the total amount of turns.

19 - 42

GEAR - LINK/COIL

DR/DH

7. Remove the pitman shaft cover bolts.

NOTE: The pitman shaft will not clear the housing if it is not centered.

8. Remove the pitman shaft from the gear (1).

9. Remove dust seal from the housing with a special

tool 8990 (2).

CAUTION: Use care not to score the housing bore
when prying out seals.

10. Remove retaining ring with snap ring pliers.

11. Remove washer from the housing.

NOTE: Tighten the slide hammer adapter 8990 into
the seal using wrenches, in order to make a tight
fit to pull the seal out. If this is not performed the
seal may tear on the removal making it difficult to
remove.

12. Remove oil seal from the housing with a special

tool 8990 (2) with slide hammer C-3752..

INSTALLATION

INSTALLATION - GAS ENGINE

NOTE: Generous amounts of the high temperature
grease from the seal kit should be applied to areas
between the pitman shaft bearing and oil seals
and also between the dust seals and snap ring.

1. Coat the oil seal and washer with high temp

grease.

NOTE: Install the oil seal with the lip facing
inward. Flat side of the oil seal should be against
the washer.

2. Install the oil seal with special tool 8989 driver (2)

and C-4171 handle (1).

3. Install backup washer.

4. Install the retainer ring with snap ring pliers.

5. Coat the dust seal with high temp grease.

6. Install the dust seal with a driver (2) and handle (1).

DR/DH

GEAR - LINK/COIL

19 - 43

7. Install protective seal protector 8993 (2) over the

shaft (1).

8. Install the pitman shaft into the steering gear until it

fully seats into the bearing.

9. Install the new cover bolts and tighten to 68 N·m

(50 ft. lbs.).

10. Install the pitman arm (Refer to 19 - STEERING/

LINKAGE/PITMAN ARM - INSTALLATION).

INSTALLATION - DIESEL

NOTE: Generous amounts of the high temperature
grease from the seal kit should be applied to areas
between the pitman shaft bearing and oil seals
and also between the dust seals and snap ring.

1. Coat the oil seal and washer with high temp

grease.

NOTE: Install the oil seal with the lip facing
inward. Flat side of the oil seal should be against
the washer.

2. Install the oil seal with special tool 8989 driver (2)

and C-4171 handle (1).

3. Install backup washer.

4. Install the retainer ring with snap ring pliers.

5. Coat the dust seal with high temp grease.

6. Install the dust seal with special tool 8989 driver (2) and C-4171 handle (1).

7. Install protective seal protector 8993 (2) over the

shaft (1).

8. Install the pitman shaft into the steering gear until it

fully seats into the bearing.

9. Install the new cover bolts and tighten to 68 N·m

(50 ft. lbs.).

10. Install the steering gear (Refer to 19 - STEER-

ING/GEAR - INSTALLATION).

11. Install the pitman arm (Refer to 19 - STEERING/

LINKAGE/PITMAN ARM - INSTALLATION).

12. Perform a wheel alignment (Refer to 2 - SUS-

PENSION/WHEEL ALIGNMENT

-

STANDARD

PROCEDURE).

19 - 44

GEAR - LINK/COIL

DR/DH

STEERING GEAR INPUT SHAFT SEAL

REMOVAL

1. Remove the steering gear from the vehicle (Refer to 19 - STEERING/GEAR - REMOVAL).

CAUTION: Do not overtighten the vise on the gear case. This may affect the adjustment

2. Mount the steering gear upside down over a drain pan in a soft jawed vise.

3. Place a drain pan under the gear and rotate the input shaft back and forth several times lock-to-lock to discharge

the fluid from the steering gear

4. Drain all the remaining fluid from the gear.

5. Rotate the input shaft (4) from stop to stop and

count the number of turns using a 12 point socket
(2).

NOTE: The pitman shaft will not clear the housing
if it is not centered.

6. Center the input shaft (4) by rotating it from the

stop back 1 1/2 turns to achieve center position.

7. Remove the pitman shaft (Refer to 19 - STEERING/GEAR/PITMAN SHAFT - REMOVAL).

8. Remove the four bolts securing the valve housing

(1).

9. Remove the valve housing (1) from the steering

gear (3).

DR/DH

GEAR - LINK/COIL

19 - 45


Content   ..  1500  1501  1502  1503   ..