Citroën Berlingo Van (2022 year). Manual in english - page 5
 

  Index      Manuals     Citroën Berlingo Van (2022 year). Manual in english


Search            copyright infringement  


Content      ..     3      4      5      6     ..


Citroën Berlingo Van (2022 year). Manual in english - page 5


66

Ease of use and comfort

low position, you can store it folded by sliding it 

towards the backrests of the rear seats.

►  To deploy it from the boot, grasp it and unfold 

it to the boot pillars.

The maximum authorised weight on the 

luggage cover shelf is 25 kg.

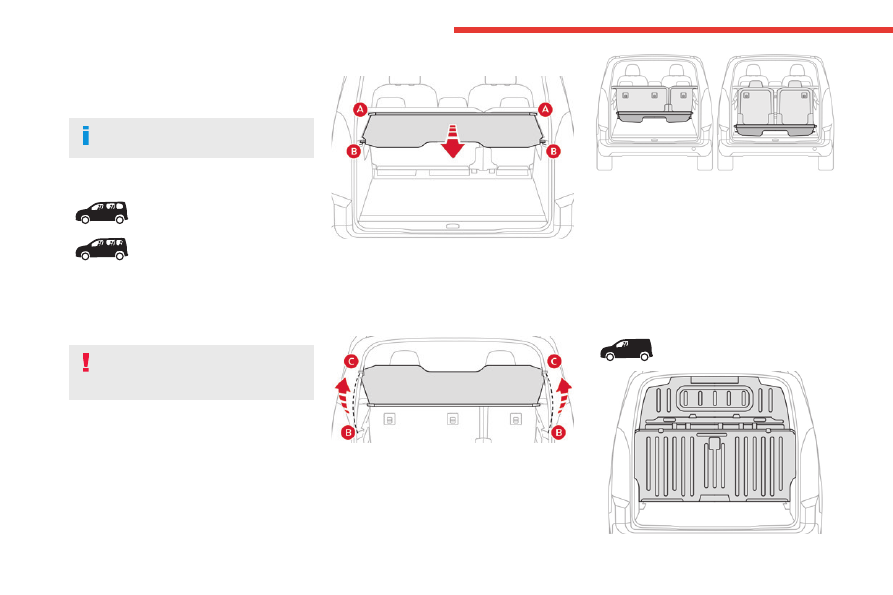
Luggage cover

XL

XL

In the 5-seat configuration, it is installed behind 

the second row seats, with the third row seats 

stored folded away.

In the 7-seat configuration, it is stored behind the 

third row seats.

In the event of sudden deceleration, 

objects placed on the load space cover 

can turn into projectiles.

Installation


►  Position the left and right ends of the roller in 

the cut-outs 

A

.

►  Pull out the roller until it reaches the boot 

pillars.

►  Insert the roller guides into the rails in the 

pillars 

B

.


►  Depending on version, you can access the 

boot by opening the rear screen in the tailgate 

and attaching the roller guides into the rails in 

the pillars 

C

.


►  The roller can be stored behind row 

2

 or 

3

.

Removal

►  Remove the roller guides from the rails in 

pillars 

B

.

►  Guide the roller as it reels in.

►  Unlock the roller by pressing one of the 

handles located at the ends of the roller bracket.

Load retaining partition


-------------------------------------------------------------------------------------------------------------------------------------------------------------

67

Ease of use and comfort

3

On the floor, behind the front seats, a vertical 

partition protects the driver and front passengers 

against the risk of load movement.

Steel or glazed partitions separate the loading 

area from the cab.

When washing your vehicle, never clean 

the inside directly using a water jet.

Stowing rings


Use the stowing rings on the rear floor to secure 

loads.

As a safety precaution in case of sharp braking, 

we recommend placing heavy objects as far 

forwards as possible (i.e. near the cab).

We recommend using the stowing rings on the 

floor to firmly secure the load.

When washing your vehicle, never clean 

the inside directly using a water jet.

Warning triangle


As a safety precaution, before leaving your 

vehicle to set up and install the triangle, always 

switch on the hazard warning lamps and put on 

your high visibility vest.

Storage compartment


There is a compartment in the interior trim of the 

boot in which to store a warning triangle.

Recommendations on 

loading


The weight of the load must comply with 

the Gross Train Weight (GTW).

For more information on 

Engine technical 

data and towed loads

, refer to the 

corresponding section.

If you are using a carrying system (roof 

bars/roof rack), comply with the 

maximum loads associated with this system.

For more information on 

Roof bars/Roof 

rack

, refer to the corresponding section.

-------------------------------------------------------------------------------------------------------------------------------------------------------------

68

Ease of use and comfort

Make sure that the size, shape and 

volume of the loads carried are 

compatible with the highway code and safety 

regulations and do not impair the driver’s field 

of vision.

The load must be evenly distributed in 

the loading area so as not to interfere 

with driving the vehicle.

Place the load close to the side wall panels, 

or push it against the side wall panels 

between the wheel arches.

However, it is recommended that heavy 

objects are placed as close to the cab as 

possible as a precaution in case of sharp 

braking.

Firmly secure all parts of the load using 

the stowing rings on the floor of the 

loading area.

For more information on the 

Interior fittings


and in particular on the stowing rings, refer to 

the corresponding section.

To avoid the risk of injury or accident, the 

load must be made stable so that it 

cannot slide, tip over, fall or be projected. To 

do this, use only retaining straps that conform 

to current standards (DIN, for example).

For more information on putting straps in 

place, refer to the manufacturer’s user guide.

To prevent the load from sliding, there must 

not be any empty spaces between the load 

items and the vehicle wall panels.

As well as the straps, optimise the stability 

of the load with stable handling equipment 

(wedges, rigid blocks of wood or padding).

When washing the vehicle, never clean 

the interior directly with a water jet.

For the Extenso Cab and the 

Crew cab

Do not place sharp or pointed objects in 

the protective cover to avoid damaging it.


Do not place objects on the 

dashboard.

Deactivate the front passenger airbag when 

carrying long objects.

For more information on 

Deactivating 

the front passenger airbag

, refer to the 

corresponding section.

Avoid placing short or heavy loads in the 

protective cover; use the loading area 

whenever possible.


Avoid anchoring loads or hanging items 

on the wall of the partition.

For safety reasons, ensure that small objects 

do not slip through the gaps of about 3 cm 

between the partition and the vehicle's 

bodywork.

Extenso Cab


This assembly comprises the two-seat front 

bench seat and a removable flap.

For more information on the 

two-seat front 

bench seat

, refer to the corresponding section.

A partition located on the floor behind the front 

seats protects the driver and front passengers 

against the risk of load movement.

A movable flap in this partition can be removed 

to allow long items to be loaded.

A protective cover is supplied with the vehicle to 

enable long items to be carried safely.

-------------------------------------------------------------------------------------------------------------------------------------------------------------

69

Ease of use and comfort

3

Removing the flap


►  While holding the flap with one hand, turn the 

control at the top of the flap with the other hand 

to release it.

►  Lower the flap to remove it from its housing.

►  Stow it behind the driver’s seat, turning the 

control at the top of the flap to secure it.

Refitting the flap


►  Tilt the flap, with the yellow hinges pointing 

downwards.

►  Insert the hinges into their housing then press 

down fully (to avoid vibrations).

►  With one hand lift the flap to close it, then 

with the other hand turn the control at the top of 

the flap to secure it.

Positioning the protective 

cover

Whenever the backrest of the outer seat 

is folded down and the partition flap is 

open, the protective cover must be installed.


No passengers must be allowed to sit in 

the central seat if the backrest of the 

right-hand outer seat is lowered and the 

partition flap is open.


When loading long objects, take care to 

install the protective cover correctly.

Read the following procedure carefully.

►  Fold down the outer passenger seat backrest.


►  Install the protective cover by fastening its 

4 snap hooks to the 4 anchor points on the 

partition.

►  Pull out the head restraint rods from the 

folded backrest, leaving two notches visible.

►  Load the desired objects.

The maximum load permitted on the 

folded backrest is 100 kg.


►  Place the strap of the cover around the head 

restraint.

-------------------------------------------------------------------------------------------------------------------------------------------------------------

70

Ease of use and comfort

►  Tighten the strap using the adjustable section 

in order to correctly retain the items that have 

been loaded inside the cover.

The protective cover may be left in place 

after use.

Regularly check the condition of the 

protective cover.

When signs of wear and tear appear, contact 

a CITROËN dealer to have it replaced by a 

protective cover that meets the specifications 

and qualities required by CITROËN and your 

vehicle.

Crew cab


A movable partition that can be placed behind 

the first or second row of seats protects the 

driver and passengers against the risk of load 

movement.

A hatch in the partition can be opened to allow 

long items to be carried.

A protective cover is supplied with the vehicle to 

enable long items to be carried safely.

Lock the movable partition in these 2 

positions only.

Do not lean on the movable partition 

when boarding!

Stay alert if the vehicle is on a steep 

slope, with loads behind the partition and 

passengers on board!


Do not place loads behind the partition 

positioned behind row 2, if the backrest 

of part 2/3 of the bench seat is folded down.


Deactivate the front passenger airbag 

when carrying long objects.

-------------------------------------------------------------------------------------------------------------------------------------------------------------

71

Ease of use and comfort

3

Moving the partition

Moving the partition forwards


►  Fold the backrests of the row 2 seats and 

check that they are properly folded. If necessary, 

adjust the position of the row 1 seats (moving 

them forwards).

►  Release the upper latches 

A

 and 

B

.

►  Check that the latches 

C

 and 

D

 are retracted.

►  Slide the partition forwards.

►  Lock the lower latches 

C

 and 

D

 and then 

check that the locating pins are correctly 

engaged in their housings.

►  Lock the upper latches 

A

 and 

B

.

Moving the partition backwards

►  Release the upper latches 

A

 and 

B

.

►  Release the lower latches 

C

 and 

D

.

►  Slide the partition backwards.

►  Lock the upper latches only 

A

 and 

B

.

►  Return the backrests of the row 2 seats to 

their positions.

The upper stops may be adjusted if:

–  excessive force is needed to operate 

the upper latches 

A

 and 

B

.

–  there is noise while driving, caused by 

excessive play.

When the partition is locked behind the 

row 2 or row 1 seats, an engagement 

noise tells you that the upper and lower 

latches are closed.

Never drive with the partition unlocked. 

The partition must not be moved with the 

latches extended - risk of scratches or 

damage to the plastic trims!

The partition must never be removed to 

convert the vehicle from a commercial 

vehicle to a passenger vehicle.

This would pose a risk to the safety of users 

due to the absence of a child lock on the 

tailgate (mandatory on passenger vehicles).

Pay attention to the loading height 

behind the partition and the size of the 

long load in the protective cover: the driver 

must keep a good field of vision.

Do not place loads between the partition 

and the bench seat backrest.

Opening/closing the hatch


►  Open/close the hatch 

E

 using the latch.

►  Use the stay 

F

 to keep it in the open position.

When carrying a long load, the hatch 

E


must be kept in the open position with 

the stay 

F

.

Systematically close the hatch 

E

, store 

the stay 

F

 in its housing (using the clip) 

and straighten the backrest of the side 

passenger seat(s) (depending on the position 

of the partition) when no long load is being 

transported.

Avoid placing loads on the sill bar of the 

hatch 

E

. Whenever possible, place loads 

on the folded-down seat backrests.

The maximum load on the sill of the hatch 

E


is 20 kg.

-------------------------------------------------------------------------------------------------------------------------------------------------------------

72

Ease of use and comfort

Positioning the protective 

cover


The 

protective cover must be installed


whenever the backrest of the outer seat 

is folded down and the partition hatch is open.


In row 1, no passengers must be allowed 

to sit in the outer seat if the backrest of 

the outer seat located behind them in row 2 is 

lowered and the hatch is open with a long 

load.

In row 2, no passengers must be allowed to 

sit in the central seat if the backrest of the 

outer seat is lowered and the hatch is open 

with a long load.


When loading long objects, take care to 

install the protective cover correctly.

►  Fold the backrest of the outer passenger 

seat(s) (depending on the position of the 

partition).

For more information on the 

Rear bench seat

and especially on folding the backrests, refer to 

the corresponding section.

For more information on the 

Two-seat front 

bench seat

, and especially the retracted position 

of the outer seat, refer to the corresponding 

section.


►  Install the protective cover by fastening its 

4 snap hooks to the 4 anchor points on the 

partition.

►  Pull out the head restraint rods from 

the folded backrest(s) of the outer seat(s) 

(depending on the position of the partition), 

leaving 2 notches visible.

►  Load the desired objects.

Avoid placing heavy loads on the 

folded-down backrest of row 1. 

Whenever possible, place heavy loads on the 

floor.

The maximum load permitted on each of the 

folded backrests of row 2 is 80 kg.

It is normal for surplus protective cover to 

be visible when the partition is positioned 

behind row 1.

►  Tidy this surplus protective cover in the 

space under the glove box.


-------------------------------------------------------------------------------------------------------------------------------------------------------------

73

Ease of use and comfort

3


►  Position the strap(s) around the head 

restraint(s) (depending on the position of the 

partition).

►  Tighten the strap(s) using the adjustable 

section in order to correctly retain the items that 

have been loaded inside the cover.

Do not place any load in the passenger 

compartment outside the protective cover 

(especially over the cover).

Regularly check the condition of the 

protective cover.

When signs of wear and tear appear, contact 

a CITROËN dealer to have it replaced by a 

protective cover that meets the specifications 

and qualities required by CITROËN and your 

vehicle.

Heating and Ventilation

Advice

Using the ventilation and air 

conditioning system

►  To ensure that air is distributed evenly, 

keep the external air intake grilles at the base 

of the windscreen, the nozzles, the vents, the 

air outlets and the air extractor in the boot 

free from obstructions.

►  Do not cover the sunshine sensor located 

on the dashboard; this sensor is used to 

regulate the automatic air conditioning 

system.

►  Operate the air conditioning system for at 

least 5 to 10 minutes once or twice a month to 

keep it in good working order.

►  If the system does not produce cold air, 

switch it off and contact a CITROËN dealer or 

a qualified workshop.

When towing a large load on a steep gradient 

in high temperatures, switching off the air 

conditioning increases the available engine 

power, enhancing the towing capacity.

Avoid driving for too long with the 

ventilation off or with prolonged operation 

of interior air recirculation. Risk of misting and 

deterioration of the air quality!

If the interior temperature is very high 

after the vehicle has stood for a long 

time in the sunshine, air the passenger 

compartment for a few moments.

Put the air flow control at a setting high 

enough to quickly change the air in the 

passenger compartment.

Condensation created by the air 

conditioning results in a discharge of 

water underneath the vehicle. This is perfectly 

normal.

Servicing the ventilation and air 

conditioning system

►  Ensure that the passenger compartment 

filter is in good condition and have the filter 

elements replaced regularly.

We recommend using a composite passenger 

compartment filter. Its specific active additive 

helps protect against polluting gases and bad 

smells.

►  To ensure correct operation of the 

air conditioning system, have it checked 

according to the recommendations in the 

Manufacturer’s service schedule.

-------------------------------------------------------------------------------------------------------------------------------------------------------------

74

Ease of use and comfort

Rapid heating of the passenger 

compartment

►  Press button 

3c

.

►  Set knob 

1

 to a high temperature 

(minimum 21).

►  Set knob 

2

 to at least position 3. In cold 

weather (around 0°C), the heating of the 

passenger compartment is optimal when 

ventilation is at level 5.

►  Press button 

4

 to produce quicker results 

(do not leave air recirculation active for too 

long: risk of misting the windows).

►  Do not press any of the other buttons.


Contains R134A fluorinated 

greenhouse gases

Depending on version and country of sale, the 

air conditioning system may contain R134A 

fluorinated greenhouse gases.

Stop & Start

The heating and air conditioning systems 

only operate when the engine is running.

Temporarily deactivate the Stop & Start 

system to maintain a comfortable temperature 

in the passenger compartment.

For more information on the 

Stop & 

Start

 system, refer to the corresponding 

section.

Heating


Manual air conditioning

The air conditioning system only operates with 

the engine running.


1.

Temperature.

2.

Air flow.

3.

Air distribution.

4.

Interior air recirculation.

5.

Air conditioning on/off.

Air 

flow

►  Turn knob 

2

 to obtain sufficient air flow to 

ensure your comfort.

The maximum level of ventilation is to be 

reserved for defrosting or to cool the 

temperature in the vehicle if it is too high.

If the air flow control knob is set to the 

minimum

 position (system deactivated), 

the temperature in the vehicle will no longer 

be controlled. A slight flow of air can still be 

felt, due to the forward movement of the 

vehicle.

Temperature

►  Turn the thumbwheel 

1

 from "

LO

" (cold) 

to "

HI

" (hot) to adjust the temperature to your 

requirements.

A setting of around 21 provides optimum 

comfort. Depending on your 

requirements, a setting between 18 and 24 is 

normal.

In addition, we recommend avoiding left/right 

setting differences of more than 3.

On entering the vehicle, if the interior 

temperature is significantly colder or 

warmer than the comfort value setting, there 

is no need to alter the value displayed in 

order to reach the required level of comfort. 

The system compensates automatically and 

corrects the temperature difference as quickly 

as possible.

-------------------------------------------------------------------------------------------------------------------------------------------------------------

75

Ease of use and comfort

3

For maximum cooling or heating of the 

passenger compartment, it is possible to 

exceed the minimum value 14 or the 

maximum value 28.

►  Turn control 

1

 to the left until 

"LO"


is displayed or to the right until 

"HI"

 is 

displayed.

Air distribution

Windscreen and side windows (

3a

). 

Central and side air vents (

3b

). 

Footwells (

3c

). 

The air distribution can be adapted by combining 

the corresponding buttons.

For optimum comfort, depending on 

the outside temperature

<15°C: press buttons 

3a

 and 

3c

.

15°C- 25°C: press buttons 

3b

 and 

3c

.

>25°C: press button 

3b

.

Air conditioning

With the engine running, the air conditioning is 

designed to operate effectively in all seasons, 

with the windows closed.

It enables you to:

–  lower the temperature in summer,

–  enhance the effectiveness of the demisting 

function in winter, above 3°C.

On/Off

►  Press button 

5

 to activate/deactivate the air 

conditioning system.

When the air conditioning is in operation, to 

cool the air more quickly, you can use interior 

air recirculation for a few moments by pressing 

button 

4

. Then restore the intake of exterior air.

The air conditioning does not operate 

when the air flow adjustment is set to off.

Switching the system off could result in 

discomfort (humidity, misting).

Dual-zone automatic air 

conditioning


1.

Temperature.

2.

Air flow.

3.

Air distribution.

4.

Recirculation of interior air.

5.

Air conditioning on/off.

6.

Automatic comfort mode.

7.

Visibility programme.

8.

"Mono" function.

Automatic comfort mode

►  Press the "

AUTO

" button 

6

 to toggle the 

mode.

The active mode appears in the display screen, 

as described below:

Ensures soft, quiet operation by limiting 

air flow.

Offers the best compromise between a 

comfortable temperature and quiet 

operation.

Provides dynamic, effective air flow.


When the engine is cold, the air flow will 

only increase to its optimum level 

gradually, to avoid distributing too much cold 

air.

In cold weather, it prioritises the distribution of 

warm air to the windscreen, the side windows 

and the footwells only.

Manual mode

If you wish, you can make a different choice from 

that suggested by the system, by changing a 

setting. The other functions will still be controlled 

automatically. 

The "

AUTO

" symbol disappears if you change 

a setting.

Deactivating the system

►  Press button 

2

 "

-

" until the fan symbol 

disappears.

-------------------------------------------------------------------------------------------------------------------------------------------------------------

76

Ease of use and comfort

This disables all functions of the dual-zone 

automatic air conditioning system.

The temperature is no longer regulated. A slight 

flow of air can still be felt, due to the forward 

movement of the vehicle.

►  Press button 

2

 "

+

" to switch the system on 

again.

Temperature

The driver and front passenger can each set the 

temperature to suit their preferences.

The value shown on the display is a level 

of comfort, not a temperature in Celsius or 

Fahrenheit.

►  Push button 

1

 down to decrease the value or 

up to increase it. 

A setting of around 21 provides optimum 

comfort. Depending on your 

requirements, a setting between 18 and 24 is 

normal.

In addition, we recommend avoiding left/right 

setting differences of more than 3.

On entering the vehicle, if the interior 

temperature is significantly colder or 

warmer than the comfort value setting, there 

is no need to alter the value displayed in 

order to reach the required level of comfort. 

The system compensates automatically and 

corrects the temperature difference as quickly 

as possible.

For maximum cooling or heating of the 

passenger compartment, it is possible to 

exceed the minimum value 14 or the 

maximum value 28.

►  Push button 

1

 down until 

"LO"

 is 

displayed or up until 

"HI"

 is displayed.

"Mono" function

The comfort setting for the passenger side 

can be indexed to the driver's comfort setting 

(mono-zone).

►  Press the corresponding button 

8

 to activate/

deactivate the function.

The indicator lamp in the button comes on when 

the function is activated.

The function is deactivated automatically if a 

passenger uses the temperature control.

Visibility programme

►  Press the "

visibility

" button 

7

 to demist or 

de-ice the windscreen and side windows as 

quickly as possible. 

The system automatically manages the air 

conditioning, air flow and air intake, and provides 

optimum distribution towards the windscreen and 

side windows.

►  Press the "

visibility

" button 

7

 again to stop 

the programme.

Or

►  Press the "

AUTO

" button 

6

 to return to the 

Automatic Comfort programme.

Air conditioning

With the engine running, the air conditioning is 

designed to operate effectively in all seasons, 

with the windows closed.

It enables you to:

–  lower the temperature in summer,

–  enhance the effectiveness of the demisting 

function in winter, above 3°C.

On/Off

► 

Press button 

5

 to activate/deactivate the air 

conditioning system.

When the air conditioning is in operation, to 

cool the air more quickly, you can use interior 

air recirculation for a few moments by pressing 

button 

4

. Then restore the intake of exterior air.

The air conditioning does not operate 

when the air flow adjustment is set to off.

Switching the system off could result in 

discomfort (humidity, misting).

Air distribution

►  Pressing button 

3

 successively directs the air 

flow towards:

–  windscreen, side windows and footwells, 

– footwells,

–  central vents, side vents and footwells,

–  windscreen, side windows, central vents, side 

vents and footwells,

–  central and side vents, 

-------------------------------------------------------------------------------------------------------------------------------------------------------------

77

Ease of use and comfort

3

–  windscreen and side windows (demisting or 

defrosting).

For optimum comfort, depending on 

the outside temperature

<15°C: press button 

3

 until air flow to the 

windscreen, side windows and passenger 

footwells is activated.

15°C-25°C: press button 

3

 until air flow to 

the central and side air vents and passenger 

footwells is activated.

>25°C: press button 

3

 until air flow to the 

central and side air vents is activated.

Air flow

►  Press the buttons 

2

 to increase/decrease the 

air flow.

The air flow symbol (a fan) appears. It is filled in 

or emptied gradually, according to the value set.

Recirculation of interior air

The intake of exterior air helps avoid and 

eliminate misting of the windscreen and side 

windows.

The recirculation of interior air allows the 

passenger compartment to be isolated from 

polluted air in areas of heavy traffic and inside 

tunnels.

When required, this function also allows 

faster heating or cooling of the air in the 

passenger compartment.

►  Press button 

4

 to recirculate the interior air or 

allow the intake of exterior air.

Avoid the prolonged recirculation of 

interior air in order to ensure a good 

supply of fresh air and reduce the risk of 

misting (especially when several passengers 

are on board or when the air is cold/damp, 

etc.).

Front demisting - de-icing

Heating

For optimum demisting/de-icing in winter, carry 

out the following adjustments:


►  Press button 

3a

.

►  Set knob 

1

 to the maximum temperature.

►  Set knob 

2

 to the "demisting/de-icing" 

symbol.

►  Do not press any of the other buttons.

Once demisting/de-icing has been completed, 

modify the settings according to the desired 

conditions.

Manual air conditioning

To demist/prevent misting in high humidity or 

when there is a big temperature difference 

between the outside and inside of the vehicle, 

carry out the following adjustments:


►  Press button 

5

.

►  Press button 

3a

.

►  Set knob 

1

 to a high temperature (minimum 

21).

►  Set knob 

2

 to level 2 or above.

►  Do not press any of the other buttons.

Once demisting has been completed, modify the 

settings according to the desired conditions.

Dual-zone automatic air 

conditioning


►  Press this button to demist or defrost 

the windscreen and side windows more 

quickly.

The system automatically manages the air 

conditioning, air flow and air intake, and provides 

optimum distribution towards the windscreen and 

side windows.

-------------------------------------------------------------------------------------------------------------------------------------------------------------

78

Ease of use and comfort

►  To turn it off, press this button 

again or press "

AUTO"

.

The system restarts with the values in use before 

it was deactivated.

Heated windscreen and washer jets

For more information on the 

Wiper 

control stalk

 and in particular the heated 

windscreen and washer jets, refer to the 

corresponding section.

With Stop & Start, when demisting 

- defrosting has been activated, STOP 

mode is not available.

Heated windscreen


In cold weather, this system heats the bottom of 

the windscreen, as well as the area alongside 

the left-hand windscreen pillar.

Without changing the settings for the air 

conditioning system, it allows faster release 

of the windscreen wiper blades when they 

are frozen to the windscreen and helps avoid 

the accumulation of snow resulting from the 

operation of the windscreen wipers.

Switching on/off


►  With the engine running, press this button to 

activate/deactivate the function (confirmed by an 

indicator lamp).

The period of operation depends on the outside 

temperature.

The function switches off automatically to 

prevent excessive power consumption.

Demisting/de-icing the 

rear screen and/or the 

door mirrors


►  Press one of these buttons to switch on/off 

rear screen and door mirror demisting/de-icing 

(depending on version).

The indicator lamp in the button comes 

on

 when 

the function is 

activated

.

Demisting/de-icing switches off automatically to 

prevent excessive power consumption.

Switch off demisting/de-icing as soon 

as you no longer consider it necessary, 

as decreased power consumption in turn 

reduces energy consumption.

Demisting/de-icing only operates with the 

engine running.

-------------------------------------------------------------------------------------------------------------------------------------------------------------

79

Ease of use and comfort

3

Rear heating and air 

conditioning


If your vehicle is so equipped, the temperature of 

the air distributed by the system is the same as 

the selection for the front.

Air flow

►  Press one of the buttons 

2

 to increase/

decrease the air flow.

Additional heating/

ventilation system

Only available for Diesel vehicles.


Heating

This is an additional and separate system which 

heats the passenger compartment and improves 

defrosting performance.

This indicator lamp is lit while the system 

is programmed or set in operation 

remotely via the remote control.

It flashes during the whole duration of the 

heating and goes off at the end of the heating 

cycle or when stopped using the remote control.

Ventilation

This system allows ventilation of the passenger 

compartment with exterior air to improve the 

temperature experienced on entering the vehicle 

in summer.

Programming

With CITROËN Connect Radio

Press 

Connect-App

 to display the main 

page.

Then press "

Programmable heating/

ventilation

".

►  Select the "

Status

" tab to activate/deactivate 

the system.

►  Select the "

Other settings

" tab to choose 

the "

Heating

" mode, to heat the engine and 

passenger compartment, or "

Ventilation

" to 

ventilate the passenger compartment.

►  Then set/save the time at which the 

preheating temperature will be reached for each 

selection.

Press this button to save. 

With CITROËN Connect Nav

►  Press the "

Applications

" menu. 

►  Press the "

Vehicle Apps

" tab.

►  Press "

Temperature programming

". 

►  Press the "

Status

" tab to activate/deactivate 

the system.

►  Press the "

Parameters

" tab to select 

"

Heating

" mode to heat the engine and 

passenger compartment or "

Ventilation

" mode 

to ventilate the passenger compartment.

►  Then set/save the activation time for each 

selection.

►  Press "

OK

" to confirm.

You must allow at least 60 minutes 

between programming operations.

-------------------------------------------------------------------------------------------------------------------------------------------------------------

80

Ease of use and comfort

Depending on the outside temperature, a 

certain amount of pre-conditioning time is 

necessary in order to reach the programmed 

temperature by the stored activation time.

This pre-conditioning time lasts up to 45 min. 

with a Diesel engine and up to 30 min. with a 

petrol engine.

Long range remote control

(Depending on version.)

This enables you to switch the heating in 

the passenger compartment on or off from a 

distance.

The remote control has a range of about 0.6 

miles (1 km) in open country.


On

►  Pressing and holding this button starts 

the heating immediately (confirmed by the 

green indicator lamp coming on briefly).

Off

►  Pressing and holding this button stops 

the heating immediately (confirmed by the 

red indicator lamp coming on briefly).

The indicator lamp in the remote control 

flashes for about 2 seconds if the vehicle 

has not received the signal, in which case

you should move to a different location and 

repeat the command.

Changing the battery

The indicator lamp in the remote control will 

change to orange if the battery charge is low.

If the indicator lamp is not on, the battery is 

discharged.


►  Use a coin to unscrew the cap and replace 

the battery.

If the system is switched on using the 

long-range remote control, the maximum 

heating duration is around 45 min. with a 

Diesel engine, and around 30 min. with a 

petrol engine.

The ventilation is activated provided that 

the battery is sufficiently charged. 

The heating is activated provided that: 

–  the battery charge and the fuel level are 

sufficient,

–  the engine has been started since the 

previous heating cycle,

–  60 minutes have elapsed between two 

heating requests.

Programmable heating is supplied by the 

vehicle fuel tank. Before use, make sure 

that you have sufficient fuel. If the fuel tank is 

on reserve, you are strongly recommended 

not to programme the heating.

The additional heating must always be 

switched off while refuelling to avoid any risk 

of fire or explosion.

To avoid the risk of poisoning or 

asphyxia, the programmable heating 

must not be used, even for short periods, in a 

closed environment such as a garage or 

-------------------------------------------------------------------------------------------------------------------------------------------------------------

81

Ease of use and comfort

3

workshop which is not equipped with an 

exhaust gas extraction system.

Do not park the vehicle on a flammable 

surface (dry grass, dead leaves, paper, etc.) 

- Risk of fire!

Glazed surfaces such as the rear screen 

or windscreen can become very hot in 

places.

Never put objects on these surfaces; never 

touch these surfaces - Risk of burns!

Do not throw remote control batteries 

away, as they contain metals that are 

harmful to the environment. Take them to an 

approved disposal point.

Temperature conditioning 

(Electric)

This function allows you to programme the 

temperature in the passenger compartment to 

reach a pre-defined, non-modifiable temperature 

(approx. 21°C) before you enter the vehicle, on 

the days and at the times of your choice.

This function is available when the vehicle is 

connected or not connected.

Programming

Programming can be carried out from a 

smartphone using the 

MyCitroën App


application.

For more information on 

Remote functions

refer to the corresponding section.

With CITROËN Connect Nav system

In the 

Applications

 menu: 

Press "

Car Apps

" to display the applications 

home page.

Select 

Temperature conditioning

►  Press 

+

 to add a programme.

►  Select the time of entry into the vehicle and 

the desired days. Press 

OK

.

►  Press 

ON

 to activate this programme.

The temperature pre-conditioning sequence 

begins approximately 45 minutes before the 

programmed time when the vehicle is connected 

(20 minutes when it is not connected) and is 

maintained for 10 minutes after.

You can set multiple programmes.

Each one is saved in the system.

To optimise the driving range, we recommend 

starting a programme while the vehicle is 

connected.

The fan noise that occurs during 

temperature pre-conditioning is perfectly 

normal.

Operating conditions

–  The function is only activated when the 

ignition is switched off

 and the 

vehicle 

locked

.

–  When the vehicle is not connected, the 

function is only activated if the battery charge 

level is greater than 50%.

–  When the vehicle is not connected and a 

recurring programme is active (e.g. from Monday 

to Friday), if two temperature pre-conditioning 

sequences are run without the vehicle being 

used, the programme will be deactivated.

Courtesy lamp

Automatic switching on/off

The front courtesy lamp comes on when the key 

is removed from the ignition switch.

All courtesy lamps come on when the vehicle is 

unlocked, when one of the corresponding doors 

is opened and when locating the vehicle using 

the remote control. 

They fade to off after the ignition is switched on 

and when the vehicle is locked.

Take care not to allow objects to come 

into contact with the courtesy lamp.

-------------------------------------------------------------------------------------------------------------------------------------------------------------


Content      ..     3      4      5      6     ..