Citroën C5 X (2022 year). Manual in english - page 6
 

  Index      Manuals     Citroën C5 X (2022 year). Manual in english


Search            copyright infringement  


Content      ..     4      5      6      7     ..


Citroën C5 X (2022 year). Manual in english - page 6


82

Safety


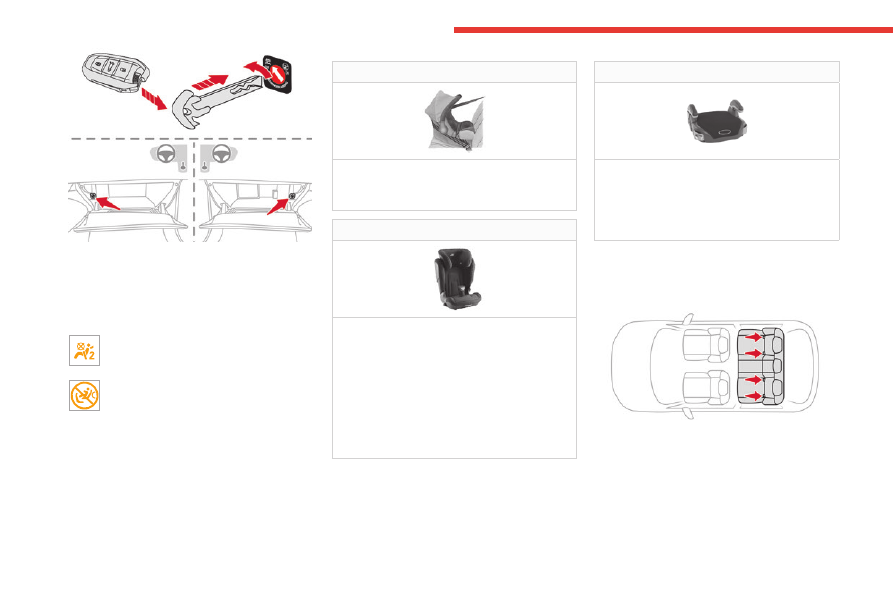
With the ignition off:

►  To deactivate the airbag, turn the key in the 

switch to the "

OFF

" position. 

►  To reactivate it, turn the key to the "

ON

position.

When the ignition is switched on:

This warning lamp comes on and remains 

lit to signal deactivation.

Or

This warning lamp comes on for about 1 

minute to signal activation.

Recommended child seats

Range of child seats secured using a 

three-

point seat belt

.

Group 0+: from birth to 13 kg


L1

"RÖMER Baby-Safe"

Installed in the "rearward facing" position.

Groups 2 and 3: from 15 to 36 kg


L5

"RÖMER KIDFIX 2R"

Can be fitted to the vehicle's ISOFIX 

mountings.

The child is restrained by the seat belt.

Only suitable for installation on the side rear 

seats.

The head restraint on the vehicle seat must 

be removed.

Groups 2 and 3: from 15 to 36 kg


L6

"GRACO Booster"

The child is restrained by the seat belt.

Only suitable for installation on the front 

passenger seat or on the rear side seats.

"ISOFIX" mountings

The seats shown below are fitted with ISOFIX 

compliant mountings:


The mountings comprise three rings for each 

seat, indicated by a marking:

–  Two rings 

A

, located between the vehicle seat 

backrest and cushion.


-------------------------------------------------------------------------------------------------------------------------------------------------------------

83

Safety

5


These rings are located behind zips.

The 2 latches on 

ISOFIX child seats

 are 

secured to them.

–  One ring 

B,

 located behind the seat, called the 

TOP TETHER

, for attaching seats fitted with an 

upper strap.


This system prevents the child seat from tipping 

forwards in the event of a front impact.

This ISOFIX mounting system provides fast, 

reliable and safe fitting of the child seat in the 

vehicle.

To secure the child seat to the 

TOP TETHER

:

►  Remove and stow the head restraint before 

installing the child seat on this seat (refit it once 

the child seat has been removed).

►  Pass the strap of the child seat behind the 

seat backrest, centring it between the openings 

for the head restraint rods.

►  Secure the upper strap hook to ring 

B

.

►  Tighten the upper strap.

When fitting an ISOFIX child seat to the 

left-hand rear seat of the bench seat, 

before fitting the seat, first move the centre 

rear seat belt towards the middle of the 

vehicle, so as to avoid the seat interfering 

with the operation of the seat belt.

An incorrectly installed child seat in a 

vehicle compromises the child's safety in 

the event of an accident.

Strictly observe the fitting instructions 

provided in the user guide supplied with the 

child seat.

For information about the options for 

fitting ISOFIX child seats in your vehicle, 

refer to the summary table.

Recommended ISOFIX child seats

Also consult the user guide from the child 

seat’s manufacturer to find out how to 

install and remove the seat.

"RÖMER Baby-Safe and its ISOFIX base"

(size category: 

E

)

Group 0+: from birth to 13 kg


Installed "rearward facing" using an ISOFIX 

base which is attached to rings 

A

.

The base has a support leg, height-

adjustable, which rests on the vehicle's floor.

This child seat can also be secured with a 

seat belt. In this case, only the shell is used 

and attached to the vehicle seat using the 

three-point seat belt.

"

RÖMER Duo Plus ISOFIX

"

(size category: 

B1

)

Group 1: from 9 to 18 kg


-------------------------------------------------------------------------------------------------------------------------------------------------------------

84

Safety

"

RÖMER Duo Plus ISOFIX

"

(size category: 

B1

)

Group 1: from 9 to 18 kg

Suitable for forward-facing installation only.

Attached to rings 

A

 and ring 

B

, referred to as 

TOP TETHER, using an upper strap.

Three seat body angles: sitting, reclining, 

lying down.

This child seat can also be used in seat 

positions not equipped with ISOFIX 

mountings. In this case, it must be secured to 

the vehicle's seat by the three-point seat belt. 

Adjust the front seat of the vehicle so that the 

child's feet do not touch the backrest.

i-Size child seats

i-Size child seats have two latches that engage on the two rings 

A

.

These i-Size child seats also have:

–  either an upper strap that is attached to ring 

B

.

–  or a support leg that rests on the vehicle floor, compatible with the approved i-Size seat position.

Their role is to prevent the child seat from tipping forward in the event of a collision.

For more information on the 

ISOFIX mountings

, refer to the corresponding section.

-------------------------------------------------------------------------------------------------------------------------------------------------------------

85

Safety

5

Installing universal, ISOFIX and i-Size child seats

In compliance with European regulations, this table indicates the possibilities for installing child seats secured using the seat belt and universally approved 

(a)

 as well as the largest 

ISOFIX

 and 

i-Size

 child seats for the seat positions fitted with 

ISOFIX

 anchorage points in the vehicle.

Seat number

Front seats

(b)

Rear seats

(b)


1

3

4

5

6


3

1

4

5

6

Front passenger airbag

Deactivated “OFF” 

(c)

Activated “ON” 

(d)

Position compatible with a 

universal (a)


child seat

no

yes 

(e)(h)

yes 

(f)(h)

yes

yes 

(j) 

yes

Position compatible with an 

i-Size

 child 

seat

no

no

yes

no

yes

Position equipped with a 

TOP TETHER


hook

no

no

yes

no

yes

"

Carrycot

" type child seat

no

no

no

no

no

"Rearward facing" 

ISOFIX

 child seat

no

no 

no 

R3 

(g)(i)

no

R3 

(g)(i)

"Forward facing" 

ISOFIX

 child seat

no

no

F3

no

F3

Booster child seat

no

B3

B3

no

B3

-------------------------------------------------------------------------------------------------------------------------------------------------------------

86

Safety

Rules:

–  A position that is 

i-Size

 compatible is also 

compatible with 

R1

R2

 and 

F2X

F2

B2

.

–  A position that is 

R3

 compatible is also 

compatible for 

R1

 and 

R2

.

–  A position that is 

F3

 compatible is also 

compatible for 

F2X

 and 

F2

.

–  A position that is 

B3

 compatible is also 

compatible with 

B2

.

(a)

Universal child seat: child seat that can be 

installed in all vehicles using the seat belt.

(b)

Depending on version, refer to the 

legislation in force in your country before 

installing a child in this seat position.

(c)

To install a "

rearward facing

" child seat at 

this seat position, the front passenger airbag 

must be deactivated ("

OFF

").

(d)

Only a "

forward facing

" child seat is 

authorised at this seat position with the front 

passenger airbag activated ("

ON

").

(e)

For a "

rearward facing

" and/or "

forward 

facing

" universal child seat (U) in groups 0, 

0+, 1, 2 or 3.

(f)

For a "

forward facing

" universal child seat 

(UF) in groups 1, 2 or 3.

(g)

Adjust the front passenger seat to the 

middle longitudinal position with the 

backrest straightened.

(h)

For a seat with height adjustment, set it 

to the highest and fully back longitudinal 

position.

(i)

Adjust the height-adjustable front driver seat 

to the maximum height position.

(j)

A child seat with a support leg must never 

be installed on the centre rear passenger 

seat.


Key

Seat position where the installation of a 

child seat is forbidden.

Front passenger airbag 

deactivated

Front passenger airbag 

activated

Seat position suitable for the installation 

of a child seat secured using the seat belt 

-------------------------------------------------------------------------------------------------------------------------------------------------------------

87

Safety

5

and 

universally approved "rearward facing" 

and/or "forward facing" (U) for all sizes and 

weight groups.

Seat position suitable for the installation 

of a child seat secured using the seat belt 

and 

universally approved "forward facing" 

(UF) for groups 1, 2 & 3 only.

Seat position where securing an 

i-Size


child seat is authorised.

Seat position not suitable for the 

installation of a child seat with support 

leg.

Presence of a 

TOP TETHER

 mounting at 

the rear of the backrest, authorising the 

attachment of a 

"forward facing" universal 

ISOFIX child seat

.

"Rearward facing" 

ISOFIX

 child seat: 

– 

R1

ISOFIX

 child seat for 

baby

.

– 

R2

ISOFIX reduced size

 child seat.

– 

R3

ISOFIX large size

 child seat.

"Forward facing" 

ISOFIX

 child seat: 

– 

F2X

ISOFIX

 child seat 

for toddlers

.

– 

F2

ISOFIX reduced height

 child seat.

– 

F3

ISOFIX full height

 child seat.

Child 

booster

 seat: 

– 

B2

reduced height

 child 

booster seat

.

– 

B3

full height

 child 

booster seat

.

Seat position where the installation of an 

ISOFIX

 child seat is forbidden.

For seat adjustments, refer to the table 

"

Installing universal, ISOFIX and i-Size child 

seats

".

Manual child lock

The system prevents a rear door from being 

opened using its interior handle.

The control is located on the edge of each rear 

door (marked by a label on the bodywork).

Activation/Deactivation


►  To activate, turn the built-in key until it stops:

•  To the right on the left-hand rear door.

•  To the left on the right-hand rear door.

►  To deactivate, turn it in the opposite direction.

-------------------------------------------------------------------------------------------------------------------------------------------------------------

88

Driving

Driving recommendations

►  Observe the driving regulations and remain 

vigilant whatever the traffic conditions.

►  Monitor your environment and keep your 

hands on the wheel to be able to react to 

anything that may happen any time.

►  Drive smoothly, anticipate the need for 

braking and maintain a longer safety distance, 

especially in bad weather.

►  Stop the vehicle before performing operations 

that require sustained attention (e.g. settings).

►  During long trips, take a break every 2 hours.

Important!

Never leave the engine running in a 

closed space without sufficient 

ventilation.

 Internal combustion engines emit 

toxic exhaust gases such as carbon 

monoxide. Danger of poisoning and death!

In very severe wintry conditions 

(temperature below -23°C), let the engine 

run for 4 minutes before moving off, to ensure 

the correct operation and durability of the 

mechanical components of your vehicle 

(engine and gearbox).

Never drive with the parking brake 

applied

. Risk of overheating and 

damaging the braking system!

Do not park the vehicle or leave the 

engine running on a flammable 

surface (e.g. dry grass, dead leaves).

The 

vehicle exhaust system is very hot, even 

several minutes after the engine stops. Risk 

of fire!

Never drive on surfaces covered with 

vegetation (e.g. tall grass, 

accumulated dead leaves, crops, debris) 

such as a field, a country lane overgrown 

with bushes or a grassy verge. 

This vegetation could come into contact with 

the vehicle's exhaust system or other systems 

which are very hot. Risk of fire!

Make sure you do not leave any item in 

the passenger compartment which could 

act like a magnifying glass under the effect of 

the sun's rays and cause a fire. Risk of fire or 

damage to interior surfaces!

Never leave the vehicle unattended, 

with the engine running

. If you have to 

leave your vehicle with the engine running, 

apply the parking brake and put the automatic 

gearbox into position 

N

 or 

P

.

Never leave children inside the vehicle 

unsupervised

.

On flooded roads

We strongly advise against driving on flooded 

roads, as this could cause serious damage to 

the internal combustion engine or electric motor, 

the gearbox and the electrical systems of the 

vehicle.


If the vehicle absolutely must drive through a 

flooded section of road:

►  Check that the depth of the water does not 

exceed 15 cm, taking account of waves that 

might be generated by other users.

►  Deactivate the Stop & Start function.

►  Drive as slowly as possible without stalling. In 

all cases, do not exceed 6 mph (10 km/h).

►  Do not stop and do not switch off the motor.

On leaving the flooded road, as soon as safety 

conditions allow, make several light brake 

applications to dry the brake discs and pads.

If in doubt about the state of your vehicle, 

contact a CITROËN dealer or a qualified 

workshop.

-------------------------------------------------------------------------------------------------------------------------------------------------------------

89

Driving

6

Towing

Driving with a trailer places greater 

demands on the towing vehicle and 

particular care must be taken.

Do not exceed the maximum towable 

weights.

At altitude:

 reduce the maximum load by 

10% per 1,000 metres of altitude; the lower 

air density at high altitudes decreases engine 

performance.

New vehicle:

 do not tow a trailer until the 

vehicle has driven at least 620 miles 

(1,000 kilometres).

If the outside temperature is high, let the 

engine idle for 1 to 2 minutes after the 

vehicle comes to a stop, to help it to cool.

Before setting off

Nose weight

►  Distribute the load in the trailer so that the 

heaviest items are as close as possible to the 

axle and the nose weight (at the point where it 

joins your vehicle) approaches the maximum 

permitted without exceeding it.

Tyres

►  Check the tyre pressures of the towing 

vehicle and of the trailer, observing the 

recommended pressures.

Lighting

►  Check the electrical signalling on the trailer 

and the headlamp beam height of your vehicle.

If a genuine CITROËN towing device is 

used, the rear parking sensors will be 

deactivated automatically to avoid the audible 

signal.

When driving

Cooling

Towing a trailer uphill causes the coolant 

temperature to increase. The maximum towable 

load depends on the gradient and the exterior 

temperature. The fan’s cooling capacity does not 

increase with engine speed.

►  Reduce speed and lower the engine speed to 

limit the amount of heating produced.

►  Pay constant attention to the coolant 

temperature.

If this warning lamp and the 

STOP


warning lamp come on, stop the 

vehicle and switch off the engine as soon as 

possible.

Brakes

Using the engine brake is recommended to limit 

the overheating of the brakes. Braking distances 

are increased when towing a trailer.

Side wind

Bear in mind that the vehicle will be more 

susceptible to wind when towing.

Anti-theft protection

Electronic immobiliser

The keys contain a code, which must be 

recognised by the vehicle before starting is 

possible.

If the system malfunctions, indicated by the 

display of a message, the engine will not start.

Contact a CITROËN dealer.

Starting/Switching off the 

engine with Keyless Entry 

and Starting

The electronic key must be present in the 

passenger compartment.

If the electronic key is not detected, a 

message is displayed.

Move the electronic key so that the engine 

can be started or switched off.

-------------------------------------------------------------------------------------------------------------------------------------------------------------

90

Driving

For versions fitted with Proximity Keyless 

Entry and Start, the electronic key is also 

detected in the boot.

If there is still a problem, refer to the "Key 

not detected - Back-up starting or Back-up 

switch-off" section.

Starting

►  Select mode 

P

 or 

N

 on the automatic 

gearbox, then depress the brake pedal.


►  Press the "

START/STOP

" button while 

maintaining pressure on the pedal until the 

engine starts.

In all circumstances, if one of the starting 

conditions is not met, a message is displayed.

In some circumstances, a message indicates 

that it is necessary to turn the steering wheel 

while pressing the "

START/STOP

" button to 

assist unlocking of the steering column.

Petrol engines

With Petrol engines, after a cold start, 

pre-heating the catalytic converter can cause 

noticeable engine vibrations, for anything up 

to 2 minutes (accelerated idle speed).

Starting rechargeable hybrid 

vehicles

►  Fully depress the brake pedal and press 

the 

START/STOP

 button for approximately 2 

seconds.

►  Keep your foot on the pedal until this 

indicator lamp comes on, indicating the 

activation of the rechargeable hybrid system 

(confirmed by an audible signal).

To exit Park mode, wait for the READY 

indicator lamp to come on.

By default, the system starts in 

Electric

 mode.

Depending on certain parameters (battery 

charge level or outside temperature), the system 

determines whether it is necessary to start the 

petrol engine.

It is possible to change the driving mode at any 

time using the mode selector.

When the vehicle starts in electric mode, 

it makes no noise. 

Pay particular attention to pedestrians and 

cyclists who may not hear the vehicle coming 

despite the pedestrian horn.

Switching off

►  Deactivate cruise control alone or Highway 

Driver Assist (depending on version).

►  Immobilise the vehicle using the parking 

brake.

►  Select mode 

P

 on the automatic gearbox.

►  Press the "

START/STOP

" button.

►  For rechargeable hybrid vehicles, before 

leaving the vehicle, check that the 

READY


indicator lamp is switched off.

The automatic gearbox locks in mode 

P

.

If the vehicle is not immobilised, the 

engine will not stop.

With the engine off, the braking and 

steering assistance systems are also cut 

off - risk of loss of control of the vehicle!

Never leave your vehicle with the 

electronic key still inside.

Switching on the ignition 

without starting the engine

With the electronic key in the passenger 

compartment, pressing the "

START/STOP

button, 

without depressing any of the pedals

allows the ignition to be switched on without 

starting the engine.

►  Press this button again to switch off the 

ignition and allow the vehicle to be locked.

Key not detected

Back-up starting

A back-up reader is fitted to the steering column, 

to enable the engine to be started if the system 

-------------------------------------------------------------------------------------------------------------------------------------------------------------

91

Driving

6

fails to detect the key in the recognition zone, or 

if the battery in the electronic key is flat.


►  Place and hold the remote control against the 

back-up reader.

►  Select mode 

P

 on the automatic gearbox, 

then depress the brake pedal.

►  Press the "

START/STOP

" button.

The engine starts.

Back-up switch-off


If the electronic key is not detected or is no 

longer in the recognition zone, a message 

appears in the instrument panel when closing a 

door or trying to switch off the engine.

►  To confirm the instruction to switch off the 

engine, press the "

START/STOP

" button for 

approximately 5 seconds.

In the event of a fault with the electronic key, 

contact a CITROËN dealer or a qualified 

workshop.

Emergency switch-off

In case of emergency only, the engine can be 

switched off without conditions (even when 

driving).

►  Press the "

START/STOP

" button for about 

5 seconds.

Electric parking brake

In automatic mode, this system applies the 

parking brake when the engine is switched off 

and releases it when the vehicle moves off.


At any time, with the engine running:

►  To apply the parking brake, briefly pull the 

control.

►  To release it, briefly push the control while 

pressing the brake pedal.

Automatic mode is activated by default.

This automatic operation can be deactivated in 

certain situations.

Indicator lamp

This indicator lamp comes on both on the 

instrument panel and on the control to 

confirm that the parking brake has been applied, 

accompanied by display of the message 

"

Parking brake applied

".

The indicator lamp goes out to confirm the 

release of the parking brake, accompanied by 

the display of the message "

Parking brake 

released

".

The indicator lamp flashes in response to a 

manual request to apply or release the brake. 

In the event of a battery failure, the 

electric parking brake will not operate. 

As a safety measure, if the parking brake is 

not applied, immobilise the vehicle by placing 

the supplied chock against one of the wheels.

Contact a CITROËN dealer or a qualified 

workshop.


-------------------------------------------------------------------------------------------------------------------------------------------------------------

92

Driving


Before leaving the vehicle, check that the 

parking brake is applied: the parking 

brake indicator lamps on the instrument panel 

and the control must be on fixed.

If the parking brake is not applied, there is an 

audible signal and a message is displayed on 

opening the driver's door.

Never leave a child alone inside the 

vehicle, as they could release the parking 

brake.

When the vehicle is parked: on a 

steep slope, heavily loaded or during 

towing

Turn the wheels toward the pavement and 

select mode 

P

 on the automatic gearbox.

When towing, the vehicle is approved for 

parking on slopes of up to 12%.

Manual operation

Manual release

With the ignition on or engine running:

►  Press the brake pedal.

►  While maintaining pressure on the brake 

pedal, briefly push the control.

If the brake pedal is not depressed, the 

parking brake is not released and a 

message is displayed.

Manual application

With the vehicle stationary:

►  Briefly pull the control.

The control indicator lamp flashes to confirm the 

application request.

Automatic operation

Automatic release

First ensure that the engine is running and that 

the driver's door is closed.

The electric parking brake gradually releases 

automatically as the vehicle moves off.

With an automatic gearbox

►  Depress the brake pedal.

►  Select mode 

D

M

 or 

R

.

►  Release the brake pedal and depress the 

accelerator pedal.

If the brake does not release 

automatically, check that the front doors 

are fully closed.

When stationary with the engine running, 

do not depress the accelerator pedal 

unnecessarily. Risk of parking brake release.

Automatic application

With the vehicle stationary, the parking brake 

is applied automatically when the engine is 

switched off.

It is not applied automatically if the 

engine stalls or enters STOP mode with 

Stop & Start.

In automatic mode, the parking brake 

can be manually applied or released at 

any time using the control.

Special cases

Immobilising the vehicle with the 

engine running

To immobilise the vehicle with the engine 

running, briefly pull the control.

Parking the vehicle with the brake 

released

In very cold conditions (ice), applying the 

parking brake is not recommended.

To immobilise the vehicle, place the chock 

against one of the wheels.

-------------------------------------------------------------------------------------------------------------------------------------------------------------

93

Driving

6

Mode 

P

 is automatically selected when 

the ignition is switched off. The wheels 

are blocked.

For more information on 

Free-wheeling

, refer 

to the corresponding section.

While mode 

N

 is selected, opening the 

driver’s door triggers an audible signal 

and selection of mode 

P

.

The audible signal stops when the driver's 

door is closed.

Deactivating automatic 

operation

In some situations, for example when it is 

extremely cold or when towing (e.g. caravan, 

breakdown), it may be necessary to deactivate 

automatic operation of the system.

►  Start the engine.

►  Use the control to apply the parking brake, if 

it is released.

►  Take your foot fully off the brake pedal.

►  Keep the control pushed in the release 

direction for 10 to a maximum of 15 seconds.

►  Release the control.

►  Depress and hold the brake pedal.

►  Pull the control in the application direction for 

2 seconds.

This indicator lamp on the instrument 

panel comes on to confirm deactivation of 

the automatic functions.

►  Release the control and the brake pedal.

From this point onwards, only the manual 

functions, using the control, allow the parking 

brake to be applied and released.

►  Follow this procedure again to reactivate 

automatic operation (confirmed by the indicator 

lamp on the instrument panel going out).

Emergency braking

If depressing the brake pedal fails to provide 

effective braking or in exceptional circumstances 

(e.g. driver unwell, assisted driving), the vehicle 

can be braked by sustained pulling on the 

electric parking brake control. Braking continues 

for as long as the control is kept pulled, and 

ceases when the control is released.

The ABS and DSC systems stabilise the vehicle 

during emergency braking.

If emergency braking malfunctions, the message 

"

Parking brake fault

" will be displayed on the 

instrument panel.

If the ABS and DSC systems 

malfunction, indicated by the 

lighting of one or both warning lamps on the 

instrument panel, the vehicle’s stability is no 

longer ensured.

►  In this case, ensure the vehicle's stability by 

successive and repeated "pull-release" actions 

on the electric parking brake control until the 

vehicle comes to a complete stop.

Automatic gearbox

With petrol engine

Automatic 8-speed gearbox with push selector. 

It also offers a manual mode with gear changes 

via control paddles located behind the steering 

wheel.

With rechargeable hybrid 

engine

Automatic 8-speed gearbox with push selector 

and regenerative braking function.

With the exception of the manual mode and 

regenerative braking function, its operation is 

identical to that of other EAT8 gearboxes.

Push selector


-------------------------------------------------------------------------------------------------------------------------------------------------------------

94

Driving

P.

Auto Park

Press this button to switch to Parking mode.

For parking the vehicle: the front wheels are 

blocked.

R.

Reverse

N.

Neutral

To free-wheel and move the vehicle, with the 

ignition off.

For more information on 

Free-wheeling

, refer 

to the corresponding section.

D.

Driving in automatic mode

The gearbox manages gear changes 

according to the style of driving, the road 

profile and the vehicle load.

M.

Driving in manual mode

Press this button to switch to manual mode.

The driver changes gear using the steering-

mounted controls.

B.

Driving in automatic mode with regenerative 

braking function (Rechargeable hybrid)

Press this button to activate the regenerative 

braking function.

The gearbox also manages braking when the 

accelerator pedal is released.

►  In mode 

N

, with your foot on the brake pedal, 

push without passing the point of resistance:

•  Forwards, mode 

R

 is selected.

•  Backwards, mode 

D

 is selected.

Release the selector fully after each push; it 

will then return to its initial position.

Special cases:

To avoid mode 

N

 (quick change from 

D

 to 

R

 and 

back again):

►  In mode 

R

, push backwards past the point of 

resistance, mode 

D

 is selected.

►  In mode 

D

, push forwards past the point of 

resistance, mode 

R

 is selected.

►  To return to mode 

N

, push without passing 

the point of resistance.

Steering-mounted controls

(Depending on equipment)

In mode 

M

 or 

D

, the steering-mounted control 

paddles can be used to change gear manually.

They cannot be used to select neutral or to 

engage or disengage reverse gear.


►  Pull the "

+

" or "

-

" paddle towards you and 

release to shift up or down a gear, respectively.

Information displayed on 

the instrument panel

When the ignition is switched on, the gearbox 

status is displayed on the instrument panel:

P

Parking

R

Reverse

N

Neutral

D1...8

Automatic forward gear

B1...8

Automatic forward gear with 

regenerative braking function activated

M1...8

Manual forward gear

In all-electric driving, the gear engaged is not 

indicated.

The state of the gearbox remains displayed on 

the instrument panel for a few seconds after 

switching off the ignition.

Operation

Only appropriate mode change instructions are 

validated.

With the engine running, if it is necessary to 

depress the brake pedal to change modes, 

an alert message will be displayed on the 

instrument panel.

With the engine running and the brakes 

released, if 

R

D

 or 

M

 is selected, the 

vehicle moves off, even without pressing the 

accelerator pedal.

Never depress the accelerator and brake 

pedals at the same time - risk of damage to 

the gearbox!

-------------------------------------------------------------------------------------------------------------------------------------------------------------

95

Driving

6

If you open the driver's door while mode 

N

 is engaged, an audible signal will 

sound and mode 

P

 will be selected. The 

audible signal stops when the driver's door is 

closed.

If the speed drops below 3 mph (5 km/h), 

opening the driver's door triggers 

selection of mode 

P

 - risk of sudden braking!

In the event of battery failure, it is 

essential to place the chock(s) supplied 

with the tool kit against one of the wheels to 

immobilise the vehicle.

Special aspects of automatic mode

The gearbox selects the gear that provides 

optimal performance based on ambient 

temperature, road profile, vehicle loading and 

driving style.

For maximum acceleration, press the accelerator 

fully down (kick-down). The gearbox changes 

down automatically or holds the selected gear 

until the maximum engine speed is reached.

Steering mounted controls allow the driver to 

temporarily select a gear, if the vehicle speed 

and engine speed conditions permit.

Special aspects of manual mode

The gearbox only changes from one gear to 

another if the vehicle speed and engine speed 

conditions permit.

Regenerative braking (Brake function)

The regenerative braking function emulates 

engine braking, slowing the vehicle with no need 

to depress the brake pedal. When the driver 

releases the accelerator pedal, the vehicle slows 

down more quickly.

The energy recovered when the accelerator 

pedal is released is used to partially recharge the 

traction battery.

This partial recharging has no effect on 

the charge level indicator.

The resulting deceleration of the vehicle 

does not cause the brake lamps to come 

on.

►  From mode 

D

, press button 

B

 to activate/

deactivate the function.

D

 on the instrument panel is replaced with 

B

.

In some situations (e.g. battery full, 

extreme temperatures), the amount of 

regenerative braking may be temporarily 

limited, resulting in less deceleration.

The driver must remain alert to traffic 

conditions and must always be ready to use 

the brake pedal.

Regenerative braking using the brake 

pedal

Energy recovery can also be produced 

by depressing the brake pedal in order to 

partially recharge the traction battery, without 

affecting the charge level indicator.

Starting the vehicle

►  Fully depress the brake pedal.

►  Start the engine.

►  With your foot on the brake pedal, push once 

or twice backwards to select automatic mode 

D

or forwards to shift into reverse gear 

R

.

►  Release the brake pedal.

►  Accelerate gradually to automatically release 

the electric parking brake.

The vehicle moves off immediately.

Never try to start the engine by pushing 

the vehicle.

Switching the vehicle off

Regardless of the current gearbox mode, mode 

P

 is immediately engaged automatically when 

the ignition is switched off.

However, in mode 

N

, mode 

P

 will be engaged 

after a delay of 5 seconds (time to enable free-

wheeling mode).

Check that mode 

P

 has been engaged and 

that the electric parking brake was applied 

automatically; if not, apply it manually.

The corresponding indicator lamps on the 

gear selector and the electric parking 

brake control must be on, as well as the 

indicator lamps on the instrument panel.

-------------------------------------------------------------------------------------------------------------------------------------------------------------

96

Driving

Gearbox malfunction

This warning lamp comes on, 

accompanied by an audible signal and 

the display of a message.

Visit a CITROËN dealer or a qualified workshop.

Do not drive faster than 62 mph (100 km/h), 

keeping to the speed limit.

Switching of the gearbox to back-up mode

Mode 

D

 locks in third gear.

The paddles on the steering wheel do not work 

and mode 

M

 is no longer accessible.

You may feel a significant jolt on engaging 

reverse gear. This will not damage the gearbox.

Selector malfunction

Minor malfunction

This warning lamp comes on, 

accompanied by the display of a message 

and an audible signal.

Drive carefully.

Visit a CITROËN dealer or a qualified workshop.

In some cases, the selector indicator lamps may 

no longer come on, but the gearbox state is still 

displayed on the instrument panel.

Major malfunction

This warning lamp comes on, 

accompanied by the display of a 

message.

You must stop the vehicle.

Stop as soon as it is safe to do so and 

switch off the ignition.

Contact a CITROËN dealer or a qualified 

workshop.

Citroën Advanced 

Comfort active 

suspension

This suspension system with progressive 

hydraulic cushions improves driving comfort by 

filtering out the imperfections and demands of 

the road surface.

Each shock absorber is equipped with a 

hydraulic compression stop (at the base) and a 

hydraulic rebound stop (at the top).

Depending on the intensity of the shock to be 

absorbed, these stops provide the vehicle with a 

greater freedom of movement or gradually slow 

down the amount of movement in order to avoid 

any sudden jolts at the end of travel.

Unlike conventional suspension which absorbs 

the energy but then partially returns some of 

it, this suspension absorbs and dissipates this 

energy, without producing any rebound.

Malfunction

In the event of a malfunction, this warning 

lamp lights up on the instrument panel.

Have it checked by a CITROËN dealer or a 

qualified workshop.

Driving modes

The driving modes available depend on the 

engine and equipment of the vehicle.

Driving modes are selected using the following 

control:


►  Press the control to display the modes on the 

instrument panel.

►  Press the control again to change mode.

When the message disappears, the selected 

mode is activated and remains indicated on the 

instrument panel (except 

Normal mode).

The selected mode is activated immediately.

With petrol engine

Whenever the ignition is switched on, 

Normal

 driving mode is selected by default.

-------------------------------------------------------------------------------------------------------------------------------------------------------------

97

Driving

6

Eco

To reduce energy consumption by reducing the 

performance of the heating and air conditioning, 

without deactivating them.

Normal

To restore the default settings.

Sport

To obtain more dynamic driving with action on 

the power steering, accelerator, gear changes, 

display of the vehicle's dynamic settings on the 

instrument panel (depending on version), and 

activation/deactivation of the display colour 

(depending on version).

Coasting mode

Depending on version or engine, with 

the gear selector in mode 

D

, in 

Eco

 and 

Normal

 modes, fully releasing the accelerator 

pedal allows free-wheeling which can save 

fuel.

A drop in engine speed is normal (rev counter 

at idle, drop in engine noise).

With rechargeable hybrid 

engine

Whenever the ignition is switched on, 

Electric


driving mode is selected by default.

Electric

Allows driving using 100% electrical energy. 

The maximum speed is approximately 84 mph 

(135 km/h).

When starting the vehicle, if the conditions do 

not allow the activation or retention of 

Electric


mode, the message "

Electric mode currently 

unavailable

" is displayed on the instrument 

panel. The vehicle automatically changes to 

Hybrid

 mode.

If a blue LED comes on under the interior rear 

view mirror, visible from outside the vehicle, this 

confirms that you are driving in 

Electric

 mode 

(depending on country of sale).

The LED can be turned off by inserting 

the tip of a paper clip or other accessory 

into the hole under the interrior mirror.

Conditions of activation

–  Adequate battery charge level. Charging 

the vehicle after each drive is therefore 

recommended. 

Electric

 mode is available as 

long as there is power left in the battery.

–  Outside temperature between approximately 

-5°C and 45°C. 

Manually exiting the mode

►  Fully depress the accelerator pedal, or

►  Select another mode.

In case of non-use of the vehicle for a 

long period (several months), a restart of 

the petrol engine may occur even if the 

battery is charged.

In the event of multiple starts of the 

internal combustion engine without a 

sufficient rise in 

temperature, 

Electric

 mode may be 

temporarily unavailable (natural phenomenon 

of dilution of fuel in oil). A message "

Electric 

mode unavailable: automatic operation in 

progress

" is then displayed on the instrument 

panel.

To regain normal electrical operation, drive 

approximately 50 miles (80 km) in "motorway" 

conditions or approximately 125 miles (200 

km) in urban conditions.

This phenomenon does not cause any 

mechanical or electrical damage. It can occur 

several times in the life of the vehicle.

Hybrid

To optimise the vehicle's fuel consumption by 

managing the 

alternating or simultaneous 

operation of the two types of engine

depending on driving conditions and driving 

style.

In 

Hybrid

 mode, it is possible to drive in 100% 

electric mode if the battery charge level is 

sufficient and acceleration requirements are 

moderate.

Sport

To obtain more dynamic driving in order to 

benefit from the maximum performance of the 

vehicle.

-------------------------------------------------------------------------------------------------------------------------------------------------------------


Content      ..     4      5      6      7     ..