Citroen C3 (2017 year). Instruction - part 16
 

  Index      Citroen     Citroen C3 - instruction 2017 year in english


Search            


Content   ..  14  15  16  17   ..


Citroen C3 (2017 year). Instruction - part 16


239

8

In the event of a breakdown

B618_en_Chap08_En-cas-de-panne_ed01-2016

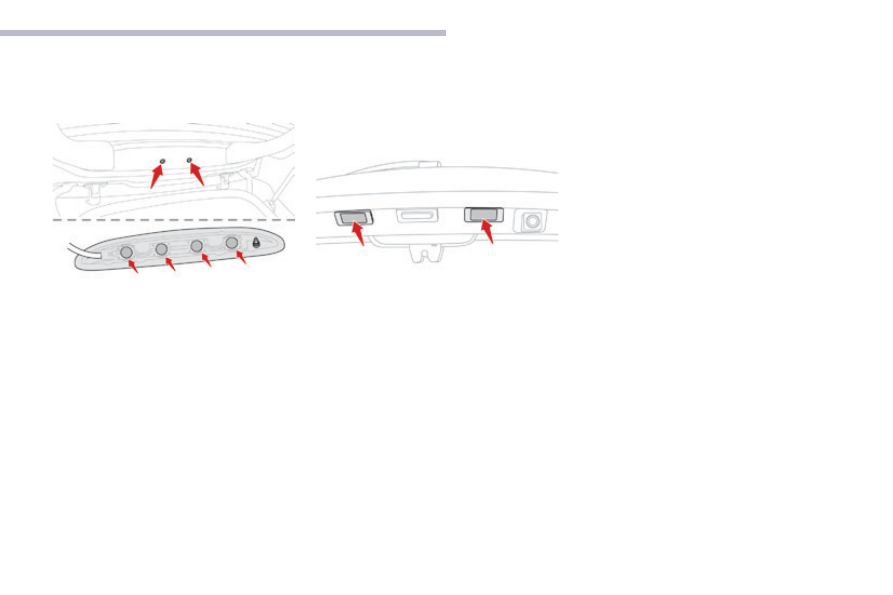
Third brake lamp (4 T10 W5W 
bulbs)

F  With the boot open, unclip the plastic 

covers.

F

  Push on the two lugs using a screwdriver.

F

  Remove the lamp via the exterior of the 

tailgate.

F

  Disconnect the connector.

F

  Turn the bulb-holder corresponding to 

the failed bulb a quarter of a turn and 
remove it.

F

  Pull the bulb and change it.

Number plate lamps (W5W)

To facilitate the removal of the lamp, carry out 
this operation with the tailgate half open.
F  Insert a thin screwdriver into the lens cut-

out.

F

  Lift it to unclip it.

F

  Remove the lens.

F

  Change the faulty bulb.

To refit, press on the lens to clip it in place.

To refit, carry out these operations in reverse 
order, checking that the screen wash nozzle is 
on the left-hand side.

240

In the event of a breakdown

B618_en_Chap08_En-cas-de-panne_ed01-2016

Courtesy lamp (W5W)

F

  Using a small flat blade screwdriver, unclip 

the console assembly surrounding the 
courtesy lamp.

F

  Remove the failed bulb and change it.

F  Refit the console around the courtesy 

lamp, ensuring that it is clipped in correctly.

Boot (W5W)

F

  Unclip the lamp by pushing the body from 

behind.

F

  Remove the bulb and change.

F

  Refit the lamp.

Interior lighting

Courtesy lamp with LEDs

For the replacement of the light-emitting 
diodes (LEDs), contact a CITROËN dealer or a 
qualified workshop.

241

8

In the event of a breakdown

B618_en_Chap08_En-cas-de-panne_ed01-2016

To replace a fuse, you must:
F

  use the special tweezer to extract the fuse 

from its housing and check the condition of 
its filament.

F  always replace the failed fuse with a fuse 

of the same rating (same colour); using a 
different rating could cause faults (risk of 
fire).

If the fuse fails again soon after replacement, 
have the vehicle's electrical system checked by 
a CITROËN dealer or a qualified workshop.

Good

Failed

The replacement of a fuse not shown in 
the tables below may cause a serious 
malfunction of your vehicle. Contact 
a CITROËN dealer or a qualified 
workshop.

Tweezer

Changing a fuse

Changing a fuse

Before changing a fuse:
F

  the cause of the failure must be identified 

and rectified,

F

  all electrical consumers must be switched 

off,

F

  the vehicle must be immobilised with the 

ignition off,

F

  identify the failed fuse using the tables and 

layout drawings in the following pages.

The extraction tweezer is fitted to the back of 
the cover of the dashboard fuseboxes.

Access to the tools

F

  Unclip the cover by pulling at the top left, 

then right.

F

  Disengage the cover completely and turn it 

over,

F

  Remove the tweezer from the back of the 

cover.

242

In the event of a breakdown

B618_en_Chap08_En-cas-de-panne_ed01-2016

CITROËN will not accept responsibility 
for the cost incurred in repairing your 
vehicle or for rectifying malfunctions 
resulting from the installation of 
accessories not supplied and not 
recommended by CITROËN and 
not installed in accordance with its 
instructions, in particular when the 
combined consumption of all of the 
additional equipment connected 
exceeds 10 milliamperes.

Installing electrical 
accessories

Your vehicle's electrical system is 
designed to operate with standard or 
optional equipment.
Before installing other electrical 
equipment or accessories on your 
vehicle, contact a CITROËN dealer or a 
qualified workshop.

243

8

In the event of a breakdown

B618_en_Chap08_En-cas-de-panne_ed01-2016

Dashboard fuses

The 2 fuseboxes are placed in the lower 
dashboard, below the steering wheel.

Fuse

Rating

(A)

Functions

F29

-

Not used.

F30

30

Heated rear screen.

F31

10

Heated mirrors.

F32

-

Not used.

F33

40

Front electric windows.

F34

40

Rear electric windows.

F35

30

Heated front seats.

F36

-

Not used.

F37

-

Not used.

F38

-

Not used.

F39

-

Not used.

F40

-

Not used.

Access to the fuses

F

  Unclip the cover by pulling at top left, then 

right.

Upper fusebox

244

In the event of a breakdown

B618_en_Chap08_En-cas-de-panne_ed01-2016

Lower fusebox

Fuse

Rating

(A)

Functions

F1

10

Electrochromatic interior mirror, heated rear screen, 
particle filter pump (Diesel), parking sensors, power steering, 
LPG system, clutch pedal switch, exterior mirror adjustment.

F10(+) - 

F11(Gnd)

30

Locking / unlocking of the doors and fuel filler flap (depending 
on engine).

F13

10

Rain and sunshine sensor, air conditioning, front camera.

F14

5

Alarm, telematic unit.

F16

3

Automatic gearbox gear selector, brake pedal switch,  
Stop & Start system.

F17

5

Instrument panel, driving school module.

F18

5

Air conditioning, gear selector position indicator (automatic 
gearbox).

F19

3

Steering mounted controls.

F21

3

START/STOP switch or button.

F23

5

Seat belts not fastened warning lamps display.

245

8

In the event of a breakdown

B618_en_Chap08_En-cas-de-panne_ed01-2016

Fuse

Rating

(A)

Functions

F24

5

Parking sensors, rear camera, telematic screen.

F25

5

Airbags control unit.

F29

20

Audio-telematic system.

F31

15

Audio system (accessory).

F32

15

Front 12 V socket.

F35

5

Headlamp height adjustment, diagnostic socket, additional 
heating (depending on equipment).

F36

5

Front map reading lamp.

F4

15

Horn.

F6(+) -  

F5(Gnd)

20

Front and rear screen wash pump.

F8

20

Rear wiper.

F9

5

Front courtesy lamp.

246

In the event of a breakdown

B618_en_Chap08_En-cas-de-panne_ed01-2016

Engine compartment fuses

Access to the fuses

F

  Unclip the cover.

F

  Change the fuse.

F  When you have finished, close the cover 

carefully to ensure correct sealing of the 
fusebox.

Fuse

Rating

(A)

Functions

F1

40

Air conditioning.

F10

15

Engine management.

F11

20

Engine management.

F12

5

Engine management.

F13

5

Engine management.

F14

5

Battery charge status unit (depending on engine).

F15

5

Not used.

F16

20

Front foglamp.

F17

5

Engine management.

F18

10

Right-hand main beam headlamp.

F19

10

Left-hand main beam headlamp.

F2

60

ABS/ESP.

F20

30

Engine management.

F21

30

Starter motor (depending on engine).

F22

30

Not used.

F23

40

Starter unit (with Stop & Start and depending on engine).

F24

40

Passenger compartment fusebox.

The fusebox is placed in the engine 
compartment near the battery.

247

8

In the event of a breakdown

B618_en_Chap08_En-cas-de-panne_ed01-2016

Fuse

Rating

(A)

Functions

F25

40

Towbar pre-equipment.

F26

15

Automatic gearbox or LPG system.

F27

25

Built-in systems interface (BSI).

F28

30

Diesel emissions control system (AdBlue

®

).

F29

40

Windscreen wipers.

F3

50

Passenger compartment fusebox.

F30

40

Diesel pre-heating unit.

F31

80

Additional heating (depending on equipment).

F32

80

Power steering.

F4

30

ABS/ESP.

F5

70

Built-in systems interface (BSI).

F6

60

Cooling fan assembly.

F7

80

Built-in systems interface (BSI).

F8

15

Engine management.

F9

15

Engine management.

248

In the event of a breakdown

B618_en_Chap08_En-cas-de-panne_ed01-2016

12 V battery

The battery is located under the bonnet.
For access to the (+) terminal:
F

  release the bonnet using the interior lever, 

then the exterior catch,

F

  raise the bonnet and secure it with its stay.

Access to the battery

Procedure for starting the engine using another battery or charging a discharged battery.

Protect your eyes and face before 
handling the battery.
All operations on the battery must be 
carried out in a well ventilated area and 
away from naked flames and sources 
of sparks, so as to avoid the risk of 
explosion or fire.
Wash your hands afterwards.

If your vehicle has an automatic 
gearbox, do not try to start the engine 
by pushing the vehicle.

General points

Lead-acid starter batteries

Batteries contain harmful substances 
such as sulphuric acid and lead.
They must be disposed of in 
accordance with regulations and must 
not, in any circumstances, be discarded 
with household waste.
Take used remote control batteries and 
vehicle batteries to a special collection 
point.

(+)

 Positive terminal.

It has a quick-release clamp.

(-)

 Negative terminal.

As the battery negative terminal is not 
accessible, a remote earth point is located on 
the structure of the front right wing.

249

8

In the event of a breakdown

B618_en_Chap08_En-cas-de-panne_ed01-2016

When your vehicle's battery is discharged, the 
engine can be started using a slave battery 
(external or on another vehicle) and jump lead 
cables or a battery booster.

Starting using another battery

F

  Raise the plastic cover on the (+) terminal, 

if your vehicle has one.

F  Connect the red cable to the positive 

terminal (+) of the flat battery A (at 
the metal elbow) then to the positive 
terminal (+) of the slave battery B or the 
booster.

F

  Connect one end of the green or black 

cable to the negative terminal (-) of the 
slave battery B or the booster (or earth 
point on the other vehicle).

F

  Connect the other end of the green or black 

cable to the earth point C

 on the broken 

down vehicle.

F

  Start the engine of the vehicle with the 

good battery and leave it running for a few 
minutes.

F

  Operate the starter on the broken down 

vehicle and let the engine run.


If the engine does not start straight away, 
switch off the ignition and wait a few 
moments before trying again.

Never try to start the engine by 
connecting a battery charger.
Never use a 24 V or higher battery 
booster.
First check that the slave battery has a 
nominal voltage of 12 V and a capacity 
at least equal to that of the discharged 
battery.
The two vehicles must not be in contact 
with each other.
Switch off the electrical consumers on 
both vehicles (audio system, wipers, 
lighting, ...).
Ensure that the jump lead cables do 
not pass close to moving parts of the 
engine (cooling fan, belts, ...).
Do not disconnect the (+) terminal when 
the engine is running.

F

  Wait until the engine returns to idle then 

disconnect the jump lead cables in the 
reverse order.

F

  Refit the plastic cover to the (+) terminal, if 

your vehicle has one.

F

  Allow the engine to run for at least 

30 minutes, by driving or with the vehicle 
stationary, so that the battery reaches an 
adequate state of charge.

Some functions, including Stop & Start, 
are not available if the battery is not 
sufficiently charged.

250

In the event of a breakdown

B618_en_Chap08_En-cas-de-panne_ed01-2016

Charging the battery using a battery charger

For optimum service life of the battery, it is 
essential to maintain an adequate state of 
charge.
In some circumstances it may be necessary to 
charge the battery:

if you use your vehicle essentially for short 
journeys,

-  if the vehicle is to be taken off the road for 

several weeks.

Contact a CITROËN dealer or a qualified 
workshop.

It is not necessary to disconnect the 
battery.

Never try to charge a frozen battery.
If the battery has been frozen, have 
it checked by a CITROËN dealer or a 
qualified workshop, who will check that 
the internal components have not been 
damaged and the casing is not cracked, 
which could cause a leak of toxic and 
corrosive acid.

If you envisage charging your vehicle's 
battery yourself, use only a charger 
compatible with lead-acid batteries of a 
nominal voltage of 12 V.

If this label is present, it is essential 
to use only a 12 V charger, to avoid 
causing irreversible damage to the 
electrical components related to the 
Stop & Start system.

Follow the instructions for use provided 
by the manufacturer of the charger.
Never reverse polarities.

F

  Switch off the ignition.

F

  Switch off all electrical consumers (audio 

system, lighting, wipers, ...).

F

  Switch off the charger B before connecting 

the cables to the battery, so as to avoid any 
dangerous sparks.

F

  Ensure that the charger cables are in good 

condition.

F  Raise the plastic cover, if your vehicle has 

one, on the (+) terminal.

F

  Connect the charger B cables as follows:

-  the positive (+) red cable to the (+) 

terminal of the battery A,

-  the negative (-) black cable to the earth 

point C

 on the vehicle.

F

  At the end of the charging operation, switch 

off the charger B before disconnecting the 
cables from the battery A.

251

8

In the event of a breakdown

B618_en_Chap08_En-cas-de-panne_ed01-2016

Do not force the lever as locking will 
not be possible if the clamp is not 
positioned correctly; start the procedure 
again.

Quick-release terminal clamp

Disconnecting the (+) terminal
F  Raise the lever A fully to release the 

clamp B.

F

  Remove the clamp B by lifting it off.

The Stop & Start system may not be 
operational during the trip following the 
first engine start.
In this case, the system will only be 
available again after a continuous 
period of immobilisation of the vehicle, 
a period which depends on the exterior 
temperature and the state of charge of 
the battery (up to about 8 hours).

In order to maintain an adequate state 
of charge for starting the engine, it is 
recommended that the battery be disconnected 
if the vehicle is taken out of service for a long 
period.
Before disconnecting the battery:
F

  close all openings (doors, boot, windows),

F

  switch off all electrical consumers (audio 

system, wipers, lighting, etc.),

F

  switch off the ignition and wait for 

four minutes.

At the battery, it is only necessary to 
disconnect the (+) terminal.

Disconnecting the battery

After reconnecting the battery, switch on the 
ignition and wait 1 minute before starting to 
allow initialisation of the electronic systems.
However, if minor problems persist following 
this operation, contact a CITROËN dealer or a 
qualified workshop.
Referring to the corresponding section, you 
must yourself initialise or reset certain systems, 
such as:
-  the remote control or electronic key 

(depending on version),

the electric windows,

-  the date and time,
-  the radio preset stations.

Following reconnection of the battery

Reconnecting the (+) terminal
F  Raise the lever A

 fully.

F

  Refit the open clamp B on the (+) terminal.

F

  Push the clamp B fully down.

F  Lower the lever A

 to lock the clamp B.

252

In the event of a breakdown

B618_en_Chap08_En-cas-de-panne_ed01-2016

Towing

General recommendations

Observe the legislation in force in your country.
Ensure that the weight of the towing vehicle is higher than that of the towed vehicle.
The driver must remain at the wheel of the towed vehicle and must have a valid driving licence.
When towing a vehicle with all four wheels on the ground, always use an approved towing arm; 
rope and straps are prohibited.
The towing vehicle must move off gently.
When towing a vehicle with the engine off, there is no longer any power assistance for braking or 
steering.
In the following cases, you must always call on a professional recovery service:

vehicle broken down on a motorway or fast road,

four-wheel drive vehicle,

when it is not possible to put the gearbox into neutral, unlock the steering, or release the 
parking brake,

towing with only two wheels on the ground,

where there is no approved towing arm available...

Procedure for having your vehicle towed or for towing another vehicle using the towing eye.

Access to the tools

The towing eye is installed in the boot under 
the floor.
To gain access to it:
F  open the boot,
F

  lift the floor and remove it,

F

  remove the towing eye from its housing.

253

8

In the event of a breakdown

B618_en_Chap08_En-cas-de-panne_ed01-2016

Towing another vehicle

F

  On the rear bumper, unclip the cover by 

pressing at the bottom.

F

  Screw the towing eye in fully.

F

  Install the towing bar.

F

  Switch on the hazard warning lamps on 

both vehicles.

F

  Move off gently, drive slowly and for a short 

distance.

F

  On the front bumper, unclip the cover by 

pressing on the left.

F

  Screw the towing eye in fully.

F

  Install the towing bar.

F

  Place the gear lever in neutral (position N 

with an automatic gearbox).

Towing your vehicle

Failure to observe this instruction could 
result in damage to certain components 
(braking, transmission, etc.) and the 
absence of braking assistance the next 
time the engine is started.

F

  Unlock the steering by turning the key 

in the ignition one notch and release the 
parking brake.

F

  Switch on the hazard warning lamps on 

both vehicles.

F

  Move off gently, drive slowly and for a short 

distance.

254

Technical data

B618_en_Chap09_caracteristiques-techniques_ed01-2016

Engines

Engine characteristics

The engine characteristics (capacity, maximum 
power, maximum engine speed, fuel, CO

2


emissions, etc.) for your vehicle are given in 
the registration document, as well as in sales 
brochures.
These characteristics correspond to the 
values type-approved on a test bed, under 
conditions defined in European legislation 
(Directive 1999/99/EC).
For more information, contact a CITROËN 
dealer or a qualified workshop.

Weights

Weights and towed loads

The maximum weights and towed loads for your 
vehicle are given are given in the registration 
document, as well as in sales brochures.
These values are also present on the 
manufacturer's plate or label.
For more information, contact a CITROËN 
dealer or a qualified workshop.

The kerb weight is equal to the unladen 
weight + driver (75 kg).
The GTW and towed load values indicated 
apply up to a maximum altitude of 
1 000 metres; the towed load mentioned 
must be reduced by 10 % for every additional 
1 000 metres.
The weight of the braked trailer can be 
increased, within the GTW limit, on condition 
that the GVW of the towing vehicle is reduced 
by the same amount.
The recommended nose weight is the vertical 
load on the towbar ball (removable with or 
without tools).
GVW:

 gross vehicle weight, the maximum 

authorised vehicle weight.
GTW:

 gross train weight, the maximum 

authorised weight of vehicle plus trailer.

High exterior temperatures may result 
in a reduction in the performance of 
the vehicle to protect the engine; when 
the exterior temperature is higher than 
37 °C, limit the towed weight.

Towing with a lightly loaded vehicle can 
adversely affect roadholding.
Braking distances are increased when 
towing a trailer.
Never exceed 60 mph (100 km/h) when 
towing (comply with the legislation in 
force in your country).

If the exterior temperature is high, it 
is recommended that the engine be 
allowed to idle for 1 to 2 minutes after 
the vehicle comes to a stop, to facilitate 
its cooling.


Content   ..  14  15  16  17   ..