Citroen C6 Dag (2008 year). Instruction - part 11


  Index      Citroen     Citroen C6 Dag - instruction 2008 year in english


Search            


Content   ..  9  10  11  12   ..


Citroen C6 Dag (2008 year). Instruction - part 11


164

VII

B

C

1
2
3
4
5

A

A

D

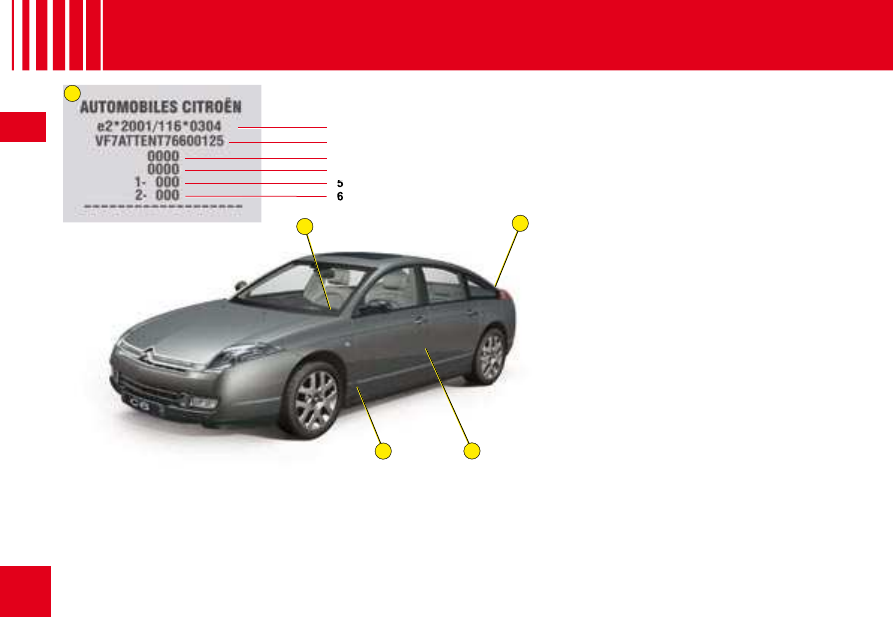
V E H I C L E   I D E N T I F I C A T I O N

A  Chassis number plate

On the left hand door centre 
pillar.

1. EU type approval number.
2. 

Vehicle identifi cation No. (VIN).

3. 

Gross vehicle weight.

4. 

Groos train weight.

5. 

Maximum weight on front axle.

6. 

Maximum weight on rear axle.

B  Body serial number
C  Serial number on dashboard
D  Paint colour code
 

Tyre reference


Tyre pressures
On front pillar.

The vehicle type and the identifi cation number are also indicated on the registration document.
All CITROËN original replacement parts are available exclusively within the dealer network.
For your safety and in order to remain within the terms of the guarantee, you are advised to use only CITROËN 
replacement parts.

2

2

W H AT   I S   N A V I D R I V E   ?

N

AVI

D

RIVE


IS


A


SYSTEM


WHICH


ENABLES


YOU

 :

To navigate to the destination of your choice (european map on hard disc), with account taken of the state of the traffi c.
To listen to the radio.
To listen to CDs / MP3 CDs.
To copy CDs into your Jukebox source (10 Go's available on the hard disc).
To telephone hands-free.
To enjoy access to CITROËN services according to the country you are in (Citroën Emergency, Citroën Assistance, Citroën On line and 
NaviDrive services).


Your NaviDrive is coded so as to function only on your particular vehicle.
It cannot be used on any other vehicle.
The anti-theft system is automatic and requires no action on your part.
Your NaviDrive can operate without the ignition on for a maximum of 30 minutes depending on the level of charge of the vehicle bat-
tery.

3

3

1

7

5

6

4

3

2

8

9

10

D E S C R I P T I O N   O F   T H E   C O N T R O L S

It is recommended that you do not use the NaviDrive controls while your vehicle is moving. In some countries, certain commands may be 
deactivated to comply with national regulations.

A U D I O

Infrared port

rared p

1

Press: On / Off.
Rotate: Volume adjust.

2

Short press: Selection of the audio source (Radio, CD, CD changer, Juke-
box).
Long press: Copy of a CD on Jukebox source.

3

Audio adjustments:
Sound  ambiences,  bass,  treble,  loudness,  fade,  balance,  speed-sensitive 
volume.

4

Radio sources:

Short press: Automatic search of lower frequencies.

CD or CD changer source:

Short press: Search of previous track.
Long press: Rapid reverse with accelerated sound.


Jukebox source:

Short press: Search of previous track.

5

CD aperture.

6

Short press: Display of the list of radio stations available (60 maximum) or of 
the list of CD tracks in Jukebox source.
Long press: Update of the list of radio stations available.

7

Radio sources:

Short press: Automatic search of higher frequencies.

CD or CD changer source:

Short press: Search of the next track.
Long press: Fast forward with accelerated sound.


Jukebox source:

Short press: Search of the next track.

8

Short press: Selection of frequency bands and memory banks.
Long press: Automatic memorisation of FM stations available (Autostore).

9

Short press:

 On/Off for TA traffi c information (Traffi c Annoucements).

Long press: On/Off for PTY programme type (Program Type).

10

CD eject.

4

4

13

12

14

17

18

19

21

20

22

23

16 15

11

D E S C R I P T I O N   O F   T H E   C O N T R O L S

11

Short press: Answer call.
Display of telephone menu.

12

SIM card eject button.

13

SIM card slot.

14

Other functions of the alphanumeric keypad:

Radio source:

Short press: Recall of pre-set stations.
Long press: Pre-setting of stations.
CD changer source: Selecting a CD.

-

-

-

Any  alphanumeric  entry  (telephone,  address,  adjustment  of  date/time, 
etc.).
Rapid selection of a name commencing with the letter chosen, in the direc-
tory and in the SIM card.

15

Short press: Access to the CITROËN services menu.
Long press: Direct call to the CITROËN assistance service

16

Call in progress:
Short press: End a call.

17

Long press (between 2 and 8 seconds): Emergency call

18

Permanent display of information relating to audio sources.

19

Permanent display of information relating to navigation.

20

Give short presses:

One press: Only the top part of the display remains lit.
Two presses: Display off (blank display).
Three presses: Return to the standard display.

Long press (more than 10 seconds: Re-initialisation of the system.


21

Permanent display of information relating to the air conditioning.

22

Permanent display of information relating to the telephone.

23

Permanent display of trip computer information.

T E L E P H O N E   / 

A L P H A N U M E R I C   K E Y P A D

D I S P L AY

5

5

25

24

31 30 29

28

27

26

D E S C R I P T I O N   O F   T H E   C O N T R O L S

27

Radio source: Manual search of lower frequencies.

CD changer/Jukebox source: Selection of next CD/next album.

Other sources: Moving in the menus.
In “Selection - Move on map” mode: move downwards.

28

Rotate:

Movement in the screen for choosing a function, a parameter or a value.
Decrease or increase of data in the case of an adjustment.
Scrolling of the elements to select from a list.

Modifi cation of the scale of the map on the screen.


Short press:

Access to the contextual menu (shortcuts).

Validation of the function chosen or of the value modifi ed.
Selection of an “adjustment” or “list

” type parameter for modifi cation.

Activation/Deactivation of a function.

Long press: List of voice commands.


29

Movement in the menus and movement of the cursor in an entry zone.
In “Select - Move on map” mode, move to the left.

30

Deletion of the last character entered (short press) or of the entire line (long 
press).

31

Short press: Access to the Main Menu.
Long press: Access to the Voice Commands menu, to the description of your 
equipment, to the démonstration of Navigation, to the status of services and 
to the level of charge of the reserve battery.
In certain countries, this control is deactivated while the vehicle is moving.

E X P L O R A T I O N

24

Short  press:  Cancel  the  current  operation  or  delete  a  superimposed  dis-
play.
Long press: Close main menu and return to the welcome screen.

25

Short press: Manual search of higher frequencies.

CD  changer/Jukebox  source:  Selection  of  the  previous  CD  /  previous 
album

Other sources: Moving in the menus.
In “Select - Move on map” mode, move upwards. 

26

Movement in the menus and movement of the cursor in an entry zone.
In “Select - Move on map” mode, move to the right.

6

6

32

34

36

33

37

35

38

D E S C R I P T I O N   O F   T H E   C O N T R O L S

32

Radio source:

Scrolling of pre-set stations.

CD changer source:

Selection of next or previous CD.

Jukebox source:

Selection of the next or previous album.

Other:

Selection of the next or previous elements of a menu in a screen, a list, 
an alphabet.

33

Radio source:

Short press: Automatic search of higher frequencies.

CD or CD changer source:

Short press: Search of the next track.
Long press: Fast forward with accelerated sound.


Jukebox source:

Short press: Search of the next track.
Long press: Rapid scrolling of following tracks.


34

Volume increase.

35

Short press: Change of audio source (Radio, CD, CD changer, Jukebox).
Long press: Display of the telephone contextual menu (excluding num-
bers).


Other cases: 

Incoming call, telephone communication:

Short press: Answer call, end call.

In a menu, a list, an alphabet:

Short  press:  Validation  of  the  function,  the  element  or  the  value 
chosen.

-

-

36

Volume decrease

34

+

36

Simultaneous press on both buttons:
Mute (temporary sound pause.

37

Radio source:

Short press: Automatic search of lower frequencies.

CD or CD changer source:

Short press: Search of previous track.
Long press: Rapid scrolling of previous tracks.


Jukebox source: 

Short press: Search of previous track.
Long press: Rapid scrolling of previous tracks.


38

Lighting control stalk: 

Short press on the end: Activation/Deactivation of the Voice Commands 
function.
Long press: Recall of the last guidance instruction.

UNDER THE STEERING WHEEL

(rear face)

(rear face)

7

7

V O I C E   C O M M A N D S

You  can  operate  Navidrive  using  your 
voice.
NaviDrive  lets  you  access  certain  func-
tions  by  pronouncing  the  corresponding 
voice label:

Using  pre-recorded  words  and  expres-
sions, for example: “Radio”, “Help”.
Using a label recorded by the user.

To associate a voice label to a directory fi le, 

select this fi le.

Record a voice label for this fi le (e.g. “

Offi ce” 

or “Home”).

Press on the end of the lighting control stalk.

Activation of the function is confi rmed by a 

beep and by the opening of a window on the 
display.
The system is then listening:

If the word pronounced is understood by 
the system, it is displayed in the window 
and you hear a beep.
If the word pronounced has not been under-
stood, the system displays and announces 
Sorry”.
You must then repeat the words.

To enhance the effi ciency of recogni-

tion of the labels in your directory fi les, 

it is recommended to record them with 
different intonations.
The  voice  commands  function  in  a 
logical  sequence.  A  word  voiced  at 
one level must be recognised before 
another word at the next level can be 
recognised.

Press  button ESC  or  on  the  end  of  the 
lighting control stalk to deactivate voice 
recognition.

Note: Voice recognition deactivates auto-
matically:

following an action using voice commands 
(emission of a double beep).
after a few seconds with no voice com-
mands  (the  system  says  “End  of  rec-
ognition
”).

or

Example
To  call  a  number  in  your  telephone  direc-
tory:

Press on the end of the lighting control stalk.
Pronounce the word “Telephone”,
Wait for the system to answer with a beep,
Pronounce the word “Directory”,
Wait for the system to answer with a beep,
Finally  pronounce  for  example  the  label 
Home”.

After the double beep, the desired action is 
performed.
Say  the  key  words  that  correspond  to  the 
action that you wish carried out.


If you say the word “Help” and “What can 
I say
”, you will see displayed all the com-
mands that are available at the moment 
of this request.
If you should lose your way in the different 
levels  of  the  voice  command  structure, 
say the word “Cancel” to bring you back 
to  the  voice  commands  at  the  previous 
level of the structure.
However  careful  the  user  may  be,  the 
pre-recorded  words  or  expressions  will 
always be more easily recognised than 
words recorded by the user.

W

HAT


IS


A


VOICE


COMMAND

 ?

H

OW


TO


ACTIVATE


VOICE


RECOGNI

-

TION

 ?

H

OW


TO


DEACTIVATE


VOICE


RECOGNI

-

TION

 ?

8

8

L I S T   A N D   S T R U C T U R E   O F   V O I C E 

C O M M A N D S

H

OW


TO


ACCESS


THE


LIST


OF


VOICE


COMMANDS

 ?

Press on the end of the lighting control stalk to start voice recognition.

CD player

Detail page 33

CD player

Random

Detail page 36

List
Track number

1-20

Previous track
Next track
Scan

Detail page 36

Folder

Repeat
Next
Previous

Jukebox

Detail page 38

Jukebox

Random

Detail page 36

List
Track number

1-20

Previous track
Next track
Scan

Detail page 36

Folder

Repeat
Next
Previous

CD changer

Detail page 42

CD changer

Disc number

1-6

Detail page 42

Previous disc
Next disc
Random

Detail page 36

List
Track number

1-20

Detail page 42

Previous track

Detail page 42

Next track

Detail page 42

Repeat
Scan

Detail page 36

Display

Audio

Detail page 35

Navigator

Detail page 12

Trip computer
Air conditioning 
Telephone

Detail page 45

Telephone

Voice mail

Detail page 45

Redial

Adress book

“Pre-recorded label”

Detail page 45

Call

“Pre-recorded label”

Detail page 47

Message

Display

Detail page 48

Read

Detail page 48

Navigator

Stop

Detail page 12

Adress book

“Pre-recorded label”

Detail page 13

Restart

Detail page 12

Show

Destination

Detail page 21

Vehicle

Detail page 21

Zoom out

Detail page 22

Zoom in

Detail page 22

Guide to

“Pre-recorded label”

Traffi c Info

Display

Detail page 21

Read

Detail page 21

Radio

Detail page 28

Radio

Autostore

Detail page 29

List

Detail page 29

Memory

1-6

Detail page 28

Previous

Detail page 28

Next

Detail page 28

At any time, you can voice “Help” or “What can I say” to display the list of voice commands that are available.

9

9

M A I N   M E N U

To keep the display clean, it is recommended to wipe with a soft, non-abrasive cloth (e.g. for spectacles) without any cleaning 
product added.

H

OW


TO


ACCESS


THE

 M

AIN

 M

ENU

 ?

Press on the MENU button.

MAP:  orientation,  details,  display, 
etc.

NAVIGATION  -  GUIDANCE:  GPS, 
stages, options, etc.

AIR CONDITIONING: on/off, adjust-
ments, etc. (see vehicle handbook).

VEHICLE DIAGNOSIS: log of alerts, 
etc.

VIDEO: activation, parameters, etc.

CONFIGURATION:  vehicle  param-
eters, display, time, languages, voice, 
auxiliary socket, etc.

T E L E M A T I C S :   t e l e p h o n e , 
directory, SIM, services, etc.

AUDIO: radio, CD, Jukebox source 
, options, etc.

TRAFFIC INFORMATION: TMC in-
formation, messages, etc.

10

10

10

I

N A V I G AT I O N / G U I D A N C E

W

HAT


YOU


NEED


TO


DO


IN


ORDER


TO


USE


THE

 N

AVIGATION


SYSTEM

 ?

You  have  to  initialise  the  navigation  sys-
tem:

when you fi rst use the navigation
following a battery disconnection.

Park the vehicle in the open air so that it can 
make contact with a satellite.
Place the ignition key in the “Ignition” position 
for 15 minutes.

If the navigation system has diffi culty in 

receiving its GPS positioning from satel-
lites, this may be caused by the presence 
of bridges, underground carparks, etc., 
which may temporarily interfere with vehi-
cle location or guidance calculation.


W

HAT


IS


THE

 N

AVIGATION


SYSTEM

 ?

The on-board navigation system uses audible 
and visual instructions to guide you towards 
the destination of your choice.
The system uses GPS and a mapping data-
base stored on a hard disc
The  GPS  system  enables  your  position 
to be plotted via contact with a number of 
satellites.
The navigation system is composed of the 
following elements:

A synthesised voice for enunciating the 
guidance instructions during navigation.
A multifunction display.
A GPS aerial.
Controls  on  your  NaviDrive  system  as 
well as at the steering wheel.


The demonstration gives you a simulation 
of the Navigation function.
The  demonstration  only  works  if  the 
Navigation display function is operating 
(press on the NAV button).

Keep the MENU button pressed.
Enter  a  destination  (see  “How  to  enter 
an address ?”).
Launch  Navigation  to  start  the  demon-
stration.

The departure point will be either the current 
location  of  the  vehicle  or  the  last  location 
known.


If your NaviDrive should malfunction, press for at least 10 seconds on the DARK button to re-initialise the system.

H

OW


TO


ACTIVATE


A


NAVIGATION


SYSTEM


DEMONSTRATION

 ?

You can use the demonstration menu to enter a different point of departure to where you are now.
This lets you plan a trip that you are wishing to make.

11

11

11

I

j

e

a

b

c

f

g

h

d

i

N A V I G AT I O N / G U I D A N C E

Head-up Display (according to model)

This facility projects in the driver's fi eld of 

vision all the important types of information, 
notably the navigation instructions j.
when  navigation  is  in  operation,  direction 

arrows will fl ash.
See vehicle handbook.

The Multifunction screen
During a guidance, you have access to the 
following types of information:
a  Manœuvre to be made, or direction to be 

taken.

b  Distance to the next manoeuvre.
c  Next manoeuvre to be made.
d  Next  road  to  be  taken  and  name  of 

town.

Symbol concerning Traffi c information or 

the services that are in proximity.

f  Road you are currently on, name of the 

town.

g  Estimated  time  of  arrival  at  destination 

(based on fl owing traffi c).

Distance to fi nal destination.

i  Altitude.

Apart from on the screen, the manœuvres 
to  be  made  are  announced  by  a  voice 
synthesiser.

Repeating the last piece of voice infor-
mation
A few seconds after enunciation of a guid-
ance  voice  instruction,  you  have  the  pos-
sibility of hearing it again.
Keep  the  end  of  the  lighting  control  stalk 
pressed.

How to adjust the volume for the voice 
instructions ?
During  enunciation  of  a  voice  instruction, 
press  on  the  volume  adjustment  buttons 
either on the control panel or at the steer-
ing wheel.

Adjustment is also possible in the “Confi gu-

ration” menu.

D

ESCRIPTION


OF


THE


TYPES


OF


INFORMATION


DISPLAYED


DURING

 N

AVIGATION

T

HE

 V

OICE

 S

YNTHESIS

Depending on the situation of the 
vehicle  and  the  reception  of  the 
GPS information, this information 
may  temporarily be  absent  from 
the screen.

12

12

12

I

B

C

D

E

F

A

C
D

B

E
F

H

OW


TO


ACCESS


THE

 N

AVIGATION

/G

UIDANCE


MENU

 ?

N A V I G AT I O N / G U I D A N C E

A C C E S S I N G   T H E   M E N U

H

OW


TO


ACCESS


THE

 N

AVIGATION


MENU


SHORTCUTS

 ?

The shortcut options available allow you:

to resume or stop the guidance towards the last destination entered

to divert an itinerary according to the number of kilometres (or miles) that you will have indicated
to defi ne or modify the calculation criteria for the itinerary (shortest way, quickest way. etc.),
to access the list of Traffi c information messages,
to move the pointer on the Map.

Press button MENU.

Rotate the control to select the Navigation/Guidance icon (A).
Press on the control to validate.


When the Navigation function is displayed (by pressing on button NAV), the Navigation menu shortcuts give you access to the principal Navigation 
fouctions.

Press on the control. A window opens.

Rotate the control to select the option of your choice.
Press on the control to validate.


13

13

13

I

B1

B2

B3

B4

C1

C2

C3

C4

C5

A1

A2

A3

A4

B1

B2

B3

B4

C1

C2

C3

C4

C5

D

A

B

C

A

B

C

D

A1

A2

A3

A4

N A V I G AT I O N / G U I D A N C E

M E N U   S T R U C T U R E

W

HAT


ARE


THE


FUNCTIONS


OF


THE

 N

AVIGATION

/G

UIDANCE


MENU

 ?

C

HOOSE


A


DESTINATION

Enter a city name, a street name, a street no. or inter-
section.
Enter the GPS coordinates for a location.

Select a location that is stored in the directory.

Select a location from among the last twenty destina-
tions requested.

E

NTER


STAGES


AND


ITINERARY

Add a stage to an itinerary after starting a guidance.

Order or delete stages when creating an itinerary.

Divert an itinerary according to the number of kilome-
tres  (or  miles)  you  will  have  indicated  (for  example  to 

avoid a traffi c hold-up).
Alter the destination initially chosen.

S

ET


PARAMETERS


FOR


THE


GUIDANCE


OPTIONS

Defi ning the route calculation criteria.

Adjust the volume of the voice synthesis.

Activate/Deactivate the pronunciation of a street name 
in the voice instructions.
View  the  types  of  navigation  information  available  on 
the hard disc.
Delete the last destinations automatically memorised.

S

TOP

/

RESUME


THE


CURRENT


GUIDANCE

14

14

14

I

A

B

D

E

F

G

C

H

OW


TO


ENTER


AN


ADDRESS

 ?

N A V I G AT I O N / G U I D A N C E

E N T E R   A N   A D D R E S S   ( 1 / 2 )

To go faster, enter the postcode instead of the name of the town.

In the Navigation/Guidance menu:

Rotate the control to select the menu A.
Press on the control to validate.


Rotate the control to select the menu B.
Press on the control to validate.


Rotate the control to select the fi eld C.
Press on the control to validate.

Rotate the control or use the alphanumeric keypad to select the letters composing the name of the 
town.
Press on the control to validate each letter.


Press on button “C” on the control panel to correct the entry.

The last guidance address is displayed.

After the fi rst letter has been validated, only those letters that can complete an existing 

name in the database will be displayed.
At the time of the entry you can select the following functions:

D to see list of the towns commencing with or comprising the same letters (when the 
list contains only 6 names of towns, these display automatically),
E to display the address corresponding to the vehicle's current position,
F to select a Centre of interest (POI): the address displays automatically,
G

 to store the displayed address in a directory fi le.

Rotate the control to select the option desired.
Press on the control to validate.

-

-

-

-


15

15

15

I

I

H

N A V I G AT I O N / G U I D A N C E

E N T E R   A N   A D D R E S S   ( 2 / 2 )

If you only indicate a town name, you will be automatically guided towards the town centre.

In  the  same  way  enter  the  name  of  the  road  without  indicating  the  type  of  road  (street,  avenue, 
etc.).

Rotate the control to select the fi eld H.
Press on the control to validate.

Rotate the control or use the alphanumeric keypad to select the fi gures that make up the street 

number.

Press on the control to validate each fi gure.


When the complete address has been entered:

Rotate the control to select the fi eld OK.
Press on the control to validate.


Rotate the control to defi ne the calculation criterion you prefer:

Quickest route
shortest route
route offering the optimum distance/time relationship.

Note: If you modify one of the criteria during a guidance, the itinerery can be altered.

You can also select routes favouring:

toll roads (motorways, bridges)

traffi c information with the possibility of diverting the route according to the messages (See “Traf-

fi c information”) (advised).

Press on the control to validate.
Start the guidance by selecting OK and press on the control to validate.

Note: After starting a guidance, a display informs you on the precautions in force concerning the use 
of navigation.

If you accept its content, press on the control

Respect the road regulations that are in force.

-

-

-

-

-


The fi rst is the last street no. fi gure displayed.

When the street nos. are not recorded in the database, your NaviDrive automatically 
offers you a list of the streets intersecting with that named.

You also have access to the list of intersections by selecting the fi eld I

16

16

16

I

A

A

B

C

D

E

H

OW


TO


ADD


A


STAGE


TO


AN


ITINERARY

 ?

N A V I G AT I O N / G U I D A N C E

A D D I N G   A   S T A G E

H

OW


TO


CHANGE


THE


SEQUENCE


OF


STAGES

 ?

During guidance, in the menu Navigation/Guidance:

Rotate the control to select the menu A.
Press on the control to validate.


Rotate the control to select the menu C.
Press on the control to validate.


Rotate the control to select the stage to be moved.
Press on the control to validate.

Rotate the control to select:

D to move the selected stage higher in the list.
E to move the selected stage lower in the list


-

-

The stage has to be either reached or deleted in order for you to be able to continue 
beyond this stage.

The itinerary is recalculated automatically according to the sequence of stages.

During guidance, in the menu Navigation/Guidance:

Rotate the control to select the menu A.
Press on the control to validate.


Rotate the control to select the menu B.
Press on the control to validate.


Enter the address of the additional stage. See “How to enter an address ?”.
Press on the control to validate.


Content   ..  9  10  11  12   ..