Chrysler Voyager (2022 year). Manual in english - page 2
 

  Index      Manuals     Chrysler Voyager (2022 year). Manual in english


Search            copyright infringement  


Content      ..      1      2      3      ..


Chrysler Voyager (2022 year). Manual in english - page 2


24

GETTING TO KNOW YOUR VEHICLE


A

UTOMATIC

 U

NLOCK

 D

OORS

 O

N

 E

XIT

 — 

I

F

 E

QUIPPED

The Unlock Doors Automatically On Exit feature 

unlocks all of the vehicle doors when any door is 

opened. This will occur only after the gear selector 

has been placed into the PARK position, after the 

vehicle has been driven (the gear selector has 

been placed out of PARK and all doors closed).
The Unlock Doors Automatically On Exit feature will 

not operate if there is any manual operation of the 

door locks (lock or unlock).
This feature can be turned on or off in the 

Uconnect system  

Ú

page 141.

M

ANUAL

 S

LIDING

 S

IDE

 D

OOR

The sliding door may be opened from the inside or 

the outside. Pull outward on the exterior handle to 

open the sliding door. The sliding door inside 

handle functions by rocking forward and back. 

Rocking the handle backwards opens the door and 

rocking forward releases the hold open latch in 

order to close the door.

Side Door Handle And Lock Functions

To keep your door operating properly, observe the 

following guidelines:

Always open the door smoothly.

Avoid high impacts against the door stop when 

opening the door. This is very important when 

your vehicle is parked on an incline as the door 

will slide faster in the downhill direction.

There is a hold-open latch that is activated when 

the sliding door is fully opened. This latch will 

keep your sliding door open on any incline. To 

close the sliding door after the hold-open latch 

is activated, you must rock the inside handle 

forward or pull outward on the exterior handle.

Always make sure that the sliding door is fully 

latched anytime the vehicle is in motion.

NOTE:

The left side sliding door cannot be opened while 

the fuel door is open.

P

OWER

 S

LIDING

 S

IDE

 D

OOR

 — 

I

F

 E

QUIPPED

The power sliding door may be power opened or 

closed in several ways:

Key fob

Inside or outside handles

Buttons located:

In the overhead console

Just inside the sliding door

On the outside handle

Push the button on the key fob twice 

within five seconds to open, close, or 

reverse a power sliding door.

The key fob and the overhead console button will 

operate the door when the door is locked. All other 

ways require the sliding door to be unlocked. If the 

vehicle is equipped with Passive Entry, pressing 

the button on the outside handle will unlock and 

open the sliding door, with a valid Passive Entry key 

fob within 5 ft (1.5 m) of the door handle.

1 — Door Handle
2 — Door Lock

GETTING TO KNOW YOUR VEHICLE

25

Overhead Console Power Switches

There are power sliding side door switches located 

on the B-pillar trim panel, just in front of the power 

sliding door for the rear seat passengers.
To operate the sliding door manually with the 

handles or to avoid unintentional operation of the 

power sliding doors from the rear seats, push the 

power sliding door power off button, located in the 

overhead console, to remove power to the handles 

and buttons just inside the sliding doors. The 

power off LED, in the overhead console, will be lit 

when the handles are manual. When the LED is lit, 

pushing the power sliding door power off button 

will return the handles to power operation.

NOTE:

If anything obstructs the power sliding side door 

while it is closing or opening, the door will auto

-

matically reverse to the closed or open position 

and an audible tone will sound, provided it 

meets sufficient resistance. The turn signals will 

flash with sliding door movements.

If the power sliding door stops in the middle due 

to obstacles, it will power open on the next 

command.

Power Sliding Side Door Switch (Left Side Shown)

C

HILD

 P

ROTECTION

 D

OOR

 L

OCK


S

YSTEM

 — R

EAR

 D

OORS

To provide a safer environment for small children 

riding in the rear seats, the sliding doors are 

equipped with a Child Protection Door Lock 

system.

1 — Liftgate
2 — Left Sliding Door
3 — Sliding Door Power Off
4 — Right Sliding Door

WARNING!

Personal injury or cargo damage may occur if 

caught in the path of the sliding door. Make 

sure the door path is clear before closing the 

door.

Before driving off, check the instrument 

cluster for a sliding door or door open 

message or warning indicator. Failure to do 

this could result in unintentionally leaving the 

sliding door open while driving.

2

26

GETTING TO KNOW YOUR VEHICLE


To Engage The Child Protection Door Lock
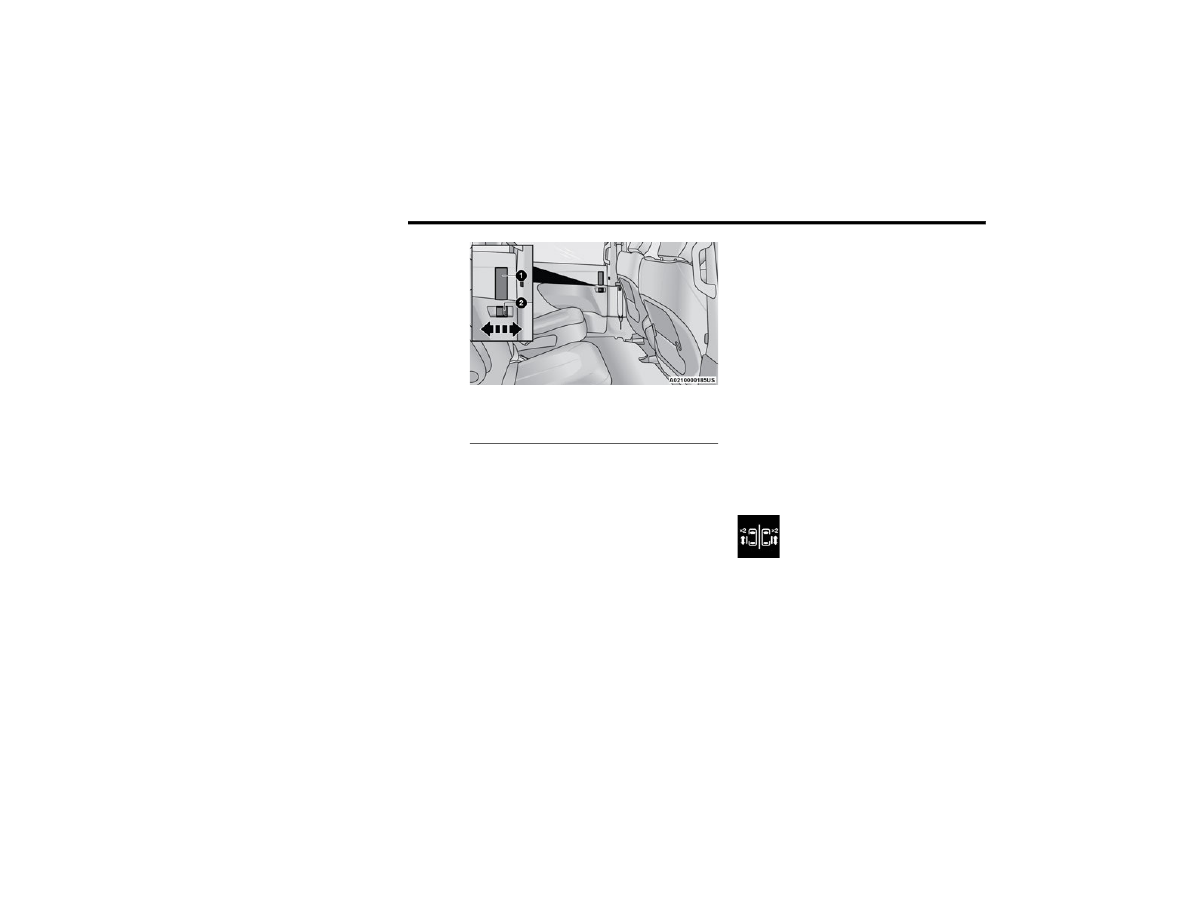
1. Open the sliding side door.
2. On the rear of the sliding door, slide the Child 

Protection Door Lock control inward (toward 

the vehicle) to engage the Child Protection 

Door Lock.

Child Protection Door Locks

3. Repeat Steps 1 and 2 on the opposite sliding 

door.

NOTE:

After engaging the Child Protection Door Lock, 

always test the inside door handle with the 

sliding door closed to make certain the Child 

Protection Door Lock is in the locked position.

After disengaging the Child Protection Door 

Lock, always test the inside door handle with the 

sliding door closed to make certain the Child 

Protection Door Lock is in the unlocked position.

The inside door handle will not open the sliding 

door when the Child Protection Door Lock is 

engaged.

The power sliding door will operate from the 

switch located just inside the sliding door, 

regardless of the Child Protection Door Lock 

lever position.

To avoid unintentional operation of the power 

sliding door from the rear seats, push the 

Sliding Door Power Off button, located in the 

overhead console. When the overhead console 

power OFF LED is lit, the sliding door may not be 

power opened or closed when pushing the 

buttons just inside the sliding doors, or when 

pulling on the handles.

To Disengage The Child Protection Door Lock
1. Open the sliding side door.
2. Slide the Child Protection Door Lock control 

outward (away from the vehicle) to disengage 

the Child Protection Door Lock.

3. Repeat Steps 1 and 2 on the opposite sliding 

door.

NOTE:

After disengaging (or engaging) the Child 

Protection Door Lock, always test the inside door 

handle with the sliding door closed to make certain 

the Child Protection Door Lock is in the desired 

position. The inside door handle will open the 

sliding door when the Child Protection Door Lock is 

disengaged.

STEERING WHEEL   

T

ILT

/T

ELESCOPING

 S

TEERING

 C

OLUMN

This feature allows you to tilt the steering column 

upward or downward. It also allows you to lengthen 

or shorten the steering column. The tilt/

telescoping lever is located left of the steering 

wheel at the end of the steering column.

WARNING!

Avoid trapping anyone in the vehicle in a 

collision. Remember that the sliding doors 

cannot be opened from the inside door handle 

when the Child Protection Door Locks are 

engaged.

GETTING TO KNOW YOUR VEHICLE

27

(Continued)

Tilt/Telescoping Lever

To unlock the steering column, push the lever 

downward (toward the floor). To tilt the steering 

column, move the steering wheel upward or 

downward as desired. To lengthen or shorten the 

steering column, pull the steering wheel outward 

or push it inward as desired. To lock the steering 

column in position, push the lever upward until 

fully engaged.

H

EATED

 S

TEERING

 W

HEEL

 — 

I

F

 E

QUIPPED

The steering wheel contains a heating 

element that helps warm your hands in 

cold weather. The heated steering wheel 

has only one temperature setting. Once 

the heated steering wheel has been turned on, it 

will stay on for an average of 80 minutes before 

automatically shutting off. This time will vary based 

on environmental temperatures. The heated 

steering wheel can shut off early or may not turn on 

when the steering wheel is already warm.
The heated steering wheel button is located within 

the Uconnect system. You can access the button 

through the Comfort screen.

Press the heated steering wheel button once to 

turn the heating element on.

Press the heated steering wheel button a 

second time to turn the heating element off.

NOTE:

The engine must be running for the heated 

steering wheel to operate.
For information on use with the Remote Start 

system, see  

Ú

page 18.

SEATS    

Seats are a part of the Occupant Restraint system 

of the vehicle.

WARNING!

Do not adjust the steering column while driving. 

Adjusting the steering column while driving or 

driving with the steering column unlocked, could 

cause the driver to lose control of the vehicle. 

Failure to follow this warning may result in 

serious injury or death.

WARNING!

Persons who are unable to feel pain to the 

skin because of advanced age, chronic illness, 

diabetes, spinal cord injury, medication, 

alcohol use, exhaustion, or other physical 

conditions must exercise care when using the 

steering wheel heater. It may cause burns 

even at low temperatures, especially if used 

for long periods.

Do not place anything on the steering wheel 

that insulates against heat, such as a blanket 

or steering wheel covers of any type or mate

-

rial. This may cause the steering wheel heater 

to overheat.

WARNING!

It is dangerous to ride in a cargo area, inside 

or outside of a vehicle. In a collision, people 

riding in these areas are more likely to be seri

-

ously injured or killed.

2

28

GETTING TO KNOW YOUR VEHICLE


M

ANUAL

 A

DJUSTMENT

 (F

RONT

 S

EATS

— I

F

 E

QUIPPED

Manual Front Adjuster

Both front seats are adjustable forward or 

rearward. The manual seat adjustment handle is 

located under the seat cushion at the front edge of 

each seat.

Manual Seat Adjustment

While sitting in the seat, pull up on the handle and 

slide the seat forward or rearward. Release the bar 

once you have reached the desired position. Then, 

using body pressure, move forward and rearward 

on the seat to be sure that the seat adjusters have 

latched.

Manual Seat Height Adjustment

The driver’s seat height can be raised or lowered 

by using a lever, located on the outboard side of 

the seat. Pump the lever upward to raise the seat 

height or pump the lever downward to lower the 

seat height.

Manual Front Seat Recline Adjustment

For models equipped with manual seats, the 

recline lever is located on the outboard side of the 

seat.
To recline, lean forward slightly, lift the lever and 

push back to the desired position and release the 

lever. Lean forward and lift the lever to return the 

seatback to its normal position. Using body 

pressure, lean forward and rearward on the seat to 

be sure the seatback has latched.

Do not allow people to ride in any area of your 

vehicle that is not equipped with seats and 

seat belts. In a collision, people riding in these 

areas are more likely to be seriously injured or 

killed.

Be sure everyone in your vehicle is in a seat 

and using a seat belt properly.

WARNING!

Adjusting a seat while the vehicle is moving is 

dangerous. The sudden movement of the seat 

could cause you to lose control. The seat belt 

might not be adjusted properly and you could 

be injured. Adjust the seat only while the 

vehicle is parked.

Do not ride with the seatback reclined so that 

the shoulder belt is no longer resting against 

your chest. In a collision you could slide under 

the seat belt and be seriously or even fatally 

injured. Use the recliner only when the vehicle 

is parked.

WARNING!

1 — Forward/Rearward Adjustment Handle
2 — Height Adjustment
3 — Recline Lever

WARNING!

Adjusting a seat while driving may be 

dangerous. Moving a seat while driving could 

result in loss of control which could cause a 

collision and serious injury or death.

Seats should be adjusted before fastening the 

seat belts and while the vehicle is parked. 

Serious injury or death could result from a 

poorly adjusted seat belt.

GETTING TO KNOW YOUR VEHICLE

29

M

ANUAL

 A

DJUSTMENT

 (R

EAR

 S

EATS

)

Manual Forward/Rearward Adjustment — 

Quad Seats (If Equipped)

Both second row seats are adjustable forward or 

rearward. The manual seat adjustment handle is 

located under the seat cushion at the front edge of 

each seat.

Manual Rear Seat Adjuster

While sitting in the seat, pull up on the handle and 

slide the seat forward or rearward. Release the bar 

once you have reached the desired position. Then, 

using body pressure, move forward and rearward 

on the seat to be sure that the seat adjusters have 

latched.

Manual Recline — Quad Seats

Recline Lever

WARNING!

Do not ride with the seatback reclined so that 

the shoulder belt is no longer resting against 

your chest. In a collision you could slide under 

the seat belt, which could result in serious injury 

or death.

WARNING!

Adjusting a seat while the vehicle is moving is 

dangerous. The sudden movement of the seat 

could cause you to lose control. The seat belt 

might not be adjusted properly and you could 

be injured. Adjust the seat only while the 

vehicle is parked.

Do not ride with the seatback reclined so that 

the shoulder belt is no longer resting against 

your chest. In a collision you could slide under 

the seat belt and be seriously or even fatally 

injured. Use the recliner only when the vehicle 

is parked.

WARNING!

Adjusting a seat while driving may be 

dangerous. Moving a seat while driving could 

result in loss of control which could cause a 

collision and serious injury or death.

Seats should be adjusted before fastening the 

seat belts and while the vehicle is parked. 

Serious injury or death could result from a 

poorly adjusted seat belt.

2

30

GETTING TO KNOW YOUR VEHICLE


To recline, lean forward slightly, lift the lever, and 

push back to the desired position and release the 

lever. Lean forward and lift the lever to return the 

seatback to its normal position. Using body 

pressure, lean forward and rearward on the seat to 

be sure the seatback has latched.

Second Row Bench Seat — If Equipped

The second row bench seat can accommodate two 

passengers, while providing easy access to the 

third row seats without any folding of the second 

row seats.
To recline the seatback, lean forward slightly, lift 

the recline lever located on the outboard side of 

the seat cushion, and push back to the desired 

position and release the lever. Lean forward and 

lift the lever to return the seatback to its normal 

position. Using body pressure, lean forward and 

rearward on the seat to be sure the seatback has 

latched.

Recline Lever

The bench seat does not stow in the floor, but is 

removable for added cargo space.
Removing The Bench Seat
1. Adjust the driver and passenger seats 

forward to allow room for the bench seat 

removal.

2. Raise the armrest completely, then lift the 

recline lever located on the outboard side of 

the seat to fold the seatback flat against the 

seat cushion.

Folded Position

3. Pull the release strap located behind the seat, 

in the center near the floor to release the 

latches.

Release Strap Location

WARNING!

Do not ride with the seatback reclined so that 

the shoulder belt is no longer resting against 

your chest. In a collision you could slide under 

the seat belt, which could result in serious injury 

or death.

GETTING TO KNOW YOUR VEHICLE

31

4. Once the latches are released, tilt the entire 

seat toward the front of the vehicle. The seat 

can now be removed through either sliding 

side door, or through the liftgate.

Tilt Bench Seat Forward

NOTE:

Due to the weight of the bench seat, it is recom

-

mended that two people are utilized for its 

removal.

When storing the removed bench seat, it is 

important to keep the seatback in the folded 

position.

Reinstalling The Bench Seat
1. To reinstall the bench seat, align the seats 

front attachments into the detent positions 

on the floor.

2. Tilt seat rearward to lock the seatback into its 

original position.

NOTE:

Push downward to ensure the rear latches are in 

the locked position.
3. Lift the recline handle and return the seatback 

to the seating position.

Second Row Removable 8th Seat —

If Equipped

While the 8th seat does not stow in the floor, it is 

foldable and removable for added cargo space.

Second Row 8th Seat Fold Flat Strap

The release strap is located on the front of the 

seat, near the floor. To remove the seat, pull the 

release strap to release the rear latches. The seat 

assembly can now be removed from the vehicle by 

moving it in a rearward direction from the detent 

positions in the floor.

Release Strap

WARNING!

If not properly latched, the seat could become 

loose. Personal injuries could result.

2

32

GETTING TO KNOW YOUR VEHICLE


NOTE:

Seat can be removed easier with one outboard 

seat stowed in the load floor.
To reinstall the seat, align the seat into the detent 

positions on the floor. Tilt seat rearward to lock the 

seatback into its original position.

In Floor Detent Guides

Fold-Flat — Quad Seats

To fold the seat, lift the recliner lever to the full 

upward position and push the seatback forward 

until it rests on the seat cushion.

Fold-Flat Seat Recline Lever

NOTE:

The seatback may lock into the fold-flat position. 

Use the recline lever to unlock the seatback.

If equipped with Stow ‘n Go seating: when 

returning the seat to the original position, the 

headrest must be folded back to the original 

position.

Stow ‘n Go Seating Head Restraint

Easy Entry

Easy Tilt Seat — With Or Without Child Seat 

Installed
The second row seats can be tilted forward for easy 

entry into the third row with or without a child seat 

installed.
1. Located in the seatback of the second row 

seat is a lever (or handle for Stow ‘n Go seats) 

that provides easier access to the third row by 

tilting the seat forward.

2. Slide the lever upwards, or if equipped, pull the 

handle forward, to unlock the seatback.

WARNING!

If not properly latched, the seat could become 

loose. Personal injuries could result.

GETTING TO KNOW YOUR VEHICLE

33

Lift Easy Tilt Seat Lever (If Equipped)

Pull Easy Tilt Seat Handle (If Equipped)

3. Push on seatback to slide seat forward to 

access the third row.

Easy Tilt Seat

Easy Tilt With Child Seat Installed

4. To put the seat back into original position, just 

pull back on the seatback and lock the seat 

into position.

Easy Entry — With The Seat Folded Flat
The seats can be folded and tilted for more 

accessibility for passengers to enter and exit the 

third row.
1. Without a child seat installed, you can fold the 

seat by pulling the recliner handle on the 

bottom part of the seat. Before pulling the 

recliner lever, make sure the arm rests are 

folded up.

Recliner Lever

WARNING!

Do not use this feature with a child in seat. 

Serious injury or death may occur.

2

34

GETTING TO KNOW YOUR VEHICLE


2. To put it back into position, pull back on the 

folded seat and make sure that it locks into 

position. Then, pull the seatback toward the 

back and fold down the arm rests.

Exit For Third Row Passengers — Stow ‘n Go Seats 

Only
If the second row is equipped with Stow ‘n Go, third 

row passengers can pull the strap and push the 

seat forward to fold the seatback down and tilt the 

seat to the floor for an easy exit.

Pull Strap For Third Row Passengers

NOTE:

This process is for when there is no child seat 

installed. Use the easy entry lever if a child seat is 

installed.

Second Row Removable Quad Seat

The second row quad seats, not equipped with the 

Stow ‘n Go feature, are removable for added cargo 

space.
Removing Seat
1. Adjust seat to the full rearward position.
2. Lift the recline lever to fold the seatback flat 

against the seat cushion.

Fold-Flat Seat Recline Lever

NOTE:

Push downward on the seatback to make sure it is 

in the locked position.
3. The release strap is located on the front of the 

seat, near the floor.

Seat Release Strap

4. To remove the seat, pull the release strap to 

release the rear latches.

5. Tilt the back of the seat to the upward position.

Tilt Seat Forward

GETTING TO KNOW YOUR VEHICLE

35

6. The seat assembly can now be removed from 

the vehicle. Grab the front seatback edge 

located near the head restraint and the grab 

the bar on the rear side of the seat cushion for 

easy removal.

Seat Removal

Reinstalling Seat
1. To reinstall the seat: With the seat tilted 

forward, align the seat’s front attachments 

into the detent positions on the floor.

In Floor Seat Detents

Installing Seat

2. Tilt seat rearward to lock the seat back into its 

original position.

NOTE:

Push downward to ensure the rear latches are in 

the locked position.

3. Lift the recline handle and return the seat back 

to the seating position.

Manually Folding Third Row Seats — 

If Equipped

1. Lower the center head restraint down to the 

seatback by pushing the button on the guide 

and pushing the head restraint down.

2. Pull release strap marked “1” to release the 

anchors.

Release Strap “1”

WARNING!

If not properly latched, the seat could become 

loose. Personal injuries could result.

2

36

GETTING TO KNOW YOUR VEHICLE


3. Pull release strap marked “2” and tumble the 

seat rearward into the storage bin.

Release Strap “2”

Stowed Third Row Seat

To Unfold Third Row Seats

1. Pull up on the assist strap to lift the seat out 

of the storage bin and push the seat forward 

until the anchors latch.

Assist Straps

2. Pulling strap “2” releases the seatback to 

return to its full upright position.

Strap “2”

3. Raise the head restraint to its upright position.

Stow 'n Go Seating 

On vehicles equipped with Stow 'n Go seating, the 

second and third row seats can be folded into the 

floor for convenient storage.

AUTO ADVANCE ‘N RETURN — IF EQUIPPED

On vehicles equipped with the Auto Advance ‘n 

Return feature, the front seat will move forward 

automatically to a location that will allow the 

second row Stow ‘n Go seat movement, without 

interference by the front seat. After the second row 

seat is stowed, the front seat will move back to the 

previous location once the Auto Advance ‘n Return 

button is pushed again.

WARNING!

In a collision, you or others in your vehicle 

could be injured if seats are not properly 

latched to their floor attachments. Always be 

sure the seats are fully latched.

Sitting in a seat with the head restraint in its 

lowered position could result in serious injury 

or death in a collision. Always make sure the 

head restraints are in their upright positions 

when the seat is to be occupied.

GETTING TO KNOW YOUR VEHICLE

37

The Auto Advance ‘n Return feature is available to 

the front driver power seats.

A one-touch Auto Advance ‘n Return button is 

located on the B-pillar trim panel, just in front of 

the power sliding door.

Auto Advance ‘n Return Button

Using the Auto Advance ‘n Return Feature

NOTE:

The button is only functional when the power 

sliding door is open and the vehicle is in PARK. 

If the door is not open or the vehicle is not in 

PARK when the button is pushed, the front seat 

will not move and a message will be displayed in 

the instrument cluster display.

If the power sliding door is closing when the 

button is pushed, the front seat will not move 

and a message will be displayed in the instru

-

ment cluster display.

The Auto Advance ‘n Return feature will not 

function if the front doors are open.

1. Push and release the Auto Advance ‘n Return 

button.

2. Perform the second row Stow ‘n Go seat 

movement. Refer to “Second Row Stow ‘n Go” 

in this section for further information.

3. Push and release the Auto Advance ‘n Return 

button a second time. The front seat cushion 

and seatback will return to the original starting 

location.

NOTE:

To abort seat operation while seat is in motion, 

push the Auto Advance ‘n Return button, or 

push the front power seat button to stop the 

seat movement. Pushing the Auto Advance ‘n 

Return button again will return the front seat to 

the original starting location.

The Auto Advance ‘n Return system includes 

obstacle detection. When the system detects an 

obstacle, the seat will stop, reverse direction, 

and return to the previous location. A message 

will be displayed in the instrument cluster indi

-

cating that an obstacle has been detected.

If the front seat is already in a location that will 

allow space for Stow ‘n Go of the second row 

seat, the front seat will not move and a message 

will be displayed in the instrument cluster.

If calibration of the front seat is lost, the seat will 

automatically recalibrate when the Auto 

Advance ‘n Return button is pushed. This may 

result in the seat cushion moving forward and 

downward, before moving to the location that 

will allow space for the second row Stow ‘n Go 

seat movement.

WARNING!

During power seat operation, personal injury or 

cargo damage may occur. Ensure the front seat 

is not occupied and the seat travel path is clear 

when operating the power seat.

2

38

GETTING TO KNOW YOUR VEHICLE


SECOND ROW STOW 'N GO

To stow the seat in the floor, move the front seat all 

the way forward using the manual seat adjustment 

bar. Move the seatback all the way forward using 

the recliner handle located on the outboard side of 

the cushion. Move the seat height to at least mid 

position using the height adjuster handle in the 

outboard side of the cushion.
1. To access the storage area, remove the floor 

mat (if equipped) and place the lock rod in the 

locked position.

Lock Rod

NOTE:

Push the lock rod inward for the locked 

position.

Pull outward on the lock rod for the 

unlocked position.

For information on storage bin function with 

the seats rearward  

Ú

page 67.

2. Pull the latch located near the second row seat 

to open the floor panel.

Floor Latch

3. Pull the floor panel and position it toward the 

front seats while folding the top half down and 

rest it against the front seats.

Push Panel Forward

4. Remove the plastic storage bin from the 

storage area, and store in a safe location.

5. Fold the armrest upward and stow the seat by 

grabbing the strap on the lower part of the 

seatback, and guide the seat into the storage 

area.

Pull Strap

GETTING TO KNOW YOUR VEHICLE

39

6. Push down on the seatback to lock the seat 

into the storage area.

Push To Lock

7. Close the floor by pulling the floor panel 

backwards by the bottom corner edge of the 

panel.

Extend Floor Panel

8. Push down on floor panel to lock into place.

Push To Lock

9. Readjust the front seat as needed, and 

replace the floor mat (if equipped).

TO UNSTOW SECOND ROW SEATS

To unstow the seat from the floor, move the front 

seat all the way forward using the manual seat 

adjustment bar.
1. To access the storage area, remove the floor 

mat (if equipped) and place the lock rod in the 

locked position.

Lock Rod

WARNING!

In a collision, serious injury could result if the 

seat storage bin covers are not properly latched:

Do not drive the vehicle with the storage bin 

covers open.

Keep the storage bin covers closed and 

latched while the vehicle is in motion.

Do not use a storage bin latch as a tie down.

CAUTION!

The storage bin cover must be latched and flat 

to avoid damage from contact with the front 

seat tracks, which have minimal clearance to 

the cover.

Do not sit on the second row seat when it is in 

the stowed position with the seatback upright 

otherwise damage to the seat may occur.

2


Content      ..      1      2      3      ..