Chrysler PT Cruiser. Manual - part 394
LOWER BALL JOINT SEAL
BOOT
REMOVAL
(1) Remove steering knuckle from vehicle. (Refer
to
2
-
SUSPENSION/FRONT/KNUCKLE
-
REMOVAL)
(2) Using a screwdriver or other suitable tool, pry
seal boot off of ball joint (Fig. 19).
INSTALLATION
(1) Wipe off used grease around ball joint stem.
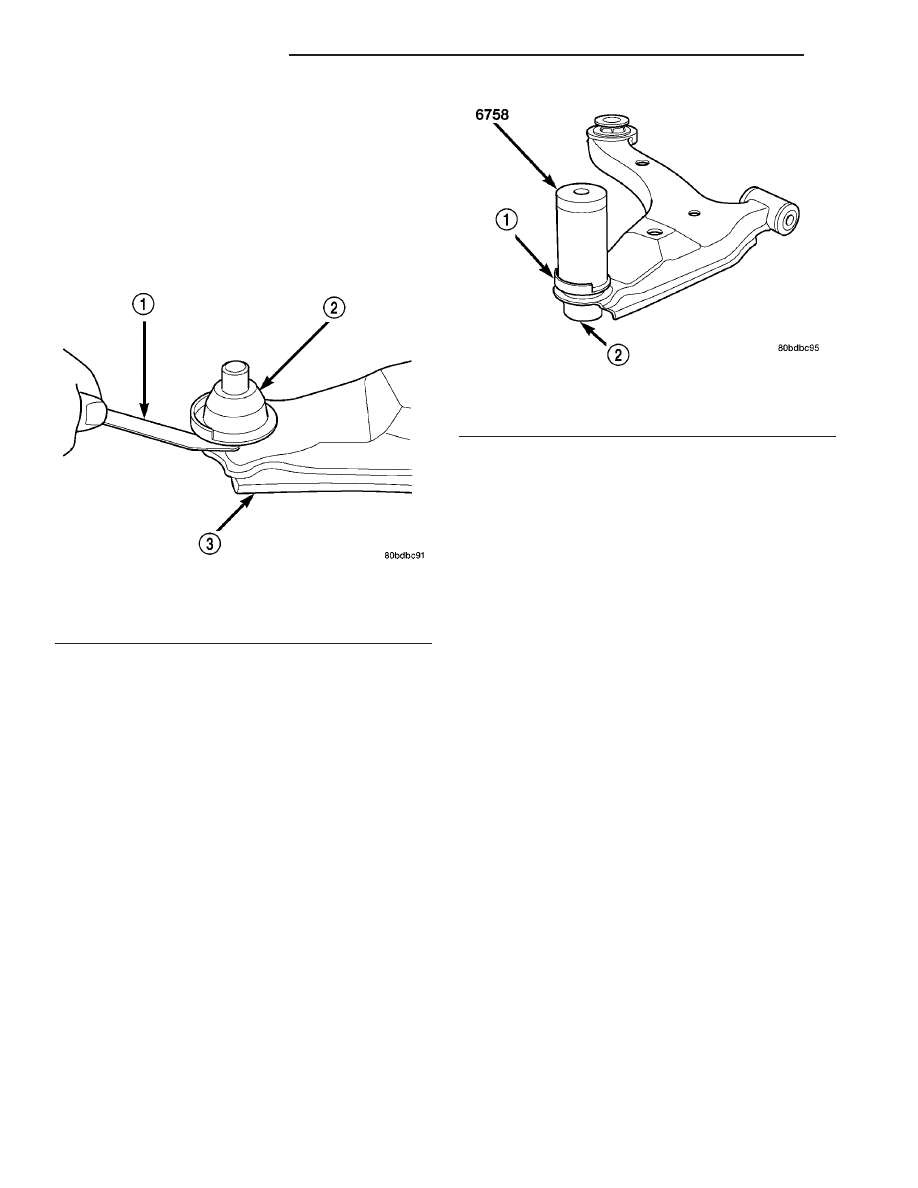
CAUTION: When installing the sealing boot on the
ball joint, position the upward lip on the seal boot
outside perimeter outward, away from the control
arm once installed (Fig. 20). It is there to help shield
heat from the sealing boot.
(2) Place NEW ball joint seal boot over ball joint
stem. Upward lip located on outside perimeter of seal
boot must point outward, away from control arm
once installed (Fig. 20).
(3) By hand, start sealing boot over sides of the
ball joint.
(4) Position Installer, Special Tool 6758, over seal-
ing boot outer diameter as shown (Fig. 20). By hand,
apply pressure to top of Installer until seal boot is
pressed squarely down against top surface of lower
control arm.
(5) Remove tool.
(6) Remove headless grease fitting on ball joint
and replace it with standard zirc-type grease fitting.
Do not discard headless grease fitting.
CAUTION: It is important to lubricate the ball joint
before installation of steering knuckle to allow
proper venting when the seal is filled. If the ball
joint is lubricated after installation to knuckle, dam-
age to the seal can occur.
(7) Using a hand operated pump grease gun, fill
the ball joint seal boot with Mopar
t Multi-Mileage
Lube or equivalent until grease pushes out past ball
joint stem. Wipe off overfill.
(8) Remove standard zirc-type grease fitting and
reinstall headless grease fitting on ball joint to pre-
vent future lubricating. See above caution.
(9) Install steering knuckle. (Refer to 2 - SUSPEN-
SION/FRONT/KNUCKLE - INSTALLATION)
LOWER CONTROL ARM
DESCRIPTION
There is one lower control arm on each side of the
vehicle. Each lower control arm is a stamped steel
unit using rubber isolated pivot bushings to isolate it
from the front suspension crossmember and frame of
the vehicle (Fig. 1). The rear bushing can be serviced
separately.
The front of the lower control arm is bolted to the
front crossmember using a bolt through the center of
the rubber pivot bushing. The rear of the lower con-
trol arm is mounted to both the front crossmember
and the frame rail of the vehicle using a thru-bolt.
The thru-bolt goes through both the crossmember
and rear lower control arm bushing, threading
directly into a caged nut in the frame rail of the vehi-
cle.
The left and right lower control arms are intercon-
nected through a linked rubber isolated stabilizer
bar.
Fig. 19 Seal Boot Removal
1 - TOOL
2 - SEAL BOOT
3 - LOWER CONTROL ARM
Fig. 20 Seal Boot Installation
1 - SEAL BOOT UPWARD LIP
2 - BALL JOINT
2 - 12
FRONT SUSPENSION
PT