Chrysler Stratus Convertible. Manual - part 204


  Index      Chrysler     Chrysler Stratus Convertible - service repair manual 1995-2000 year


Search            


Content   ..  202  203  204  205   ..


Chrysler Stratus Convertible. Manual - part 204


The HCU controls the flow of brake fluid to the
brakes using a series of valves and accumulators. A
pump/motor is mounted on the HCU to supply build
pressure to the brakes during an ABS stop.

The HCU on a vehicle equipped with ABS and

traction control has a valve block housing that is
approximately 1 inch longer on the low pressure fluid
accumulators side than a HCU on a vehicle that is
equipped with only ABS.

For more information, see INTEGRATED CON-

TROL UNIT in this section.

OPERATION

The operation of the HCU can be found in

HYDRAULIC CIRCUITS AND VALVE OPERATION
which can be found elsewhere in this section. The fol-
lowing topics explain how the different components
within the HCU operate.

VALVES AND SOLENOIDS

The valve block contains four inlet valves and four

outlet valves. The inlet valves are spring-loaded in
the open position and the outlet valves are spring-
loaded in the closed position during normal braking.
The fluid is allowed to flow from the master cylinder
to the wheel brakes.

During an ABS stop, these valves cycle to maintain

the proper slip ratio for each wheel. The inlet valve
closes preventing further pressure increase and the
outlet valve opens to provide a path from the wheel
brake to the HCU accumulators and pump/motor.
This releases (decays) pressure from the wheel brake,

thus releasing the wheel from excessive slippage.
Once the wheel is no longer slipping, the outlet valve
is closed and the inlet valve is opened to reapply
(build) pressure.

On vehicles with traction control, there is an extra

set of valves and solenoids. The ASR valves, mounted
in the HCU valve block, are normally in the open
position and close only when the traction control is
applied.

These isolator valves are used to isolate the rear

(non-driving) wheels of the vehicle from the hydraulic
pressure that the HCU pump/motor is sending to the
front (driving) wheels when traction control is being
applied. The rear brakes need to be isolated from the
master cylinder when traction control is being
applied so the rear wheels do not drag. For more
information, see TRACTION CONTROL SYSTEM in
this section.

BRAKE FLUID ACCUMULATORS

There are two fluid accumulators in the HCU–one

for the primary hydraulic circuit and one for the sec-
ondary hydraulic circuit (Fig. 4). Each hydraulic cir-
cuit uses a 5 cc accumulator.

The fluid accumulators temporarily store brake

fluid that is removed from the wheel brakes during
an ABS cycle. This stored fluid is used by the pump/
motor to provide build pressure for the brake hydrau-
lic system. When the antilock stop is complete, the
accumulators are drained by the pump/motor.

On ABS-only vehicles, there is a mini-accumulator

on the secondary hydraulic circuit that protects the
master cylinder seals during an ABS stop, and there
is a noise dampening chamber on the primary circuit.

On ABS with traction control vehicles, there are

two noise dampening chambers in the HCU.

PUMP/MOTOR

There are two pump assemblies in the HCU–one

for the primary hydraulic circuit and one for the sec-
ondary hydraulic circuit. Both pumps are driven by a
common electric motor (Fig. 4). This DC-type motor
is integral to the HCU and is controlled by the CAB.

The pump/motor provides the extra amount of

brake fluid needed during antilock braking. Brake
fluid is released to the accumulators when the outlet
valve is opened during an antilock stop. The pump
mechanism consists of two opposing pistons operated
by an eccentric camshaft. In operation, one piston
draws fluid from the accumulators, and the opposing
piston pumps fluid to the master cylinder circuits.
When the antilock stop is complete, the pump/motor
drains the accumulators.

The CAB may turn on the pump/motor when an

antilock stop is detected. The pump/motor continues
to run during the antilock stop and is turned off after

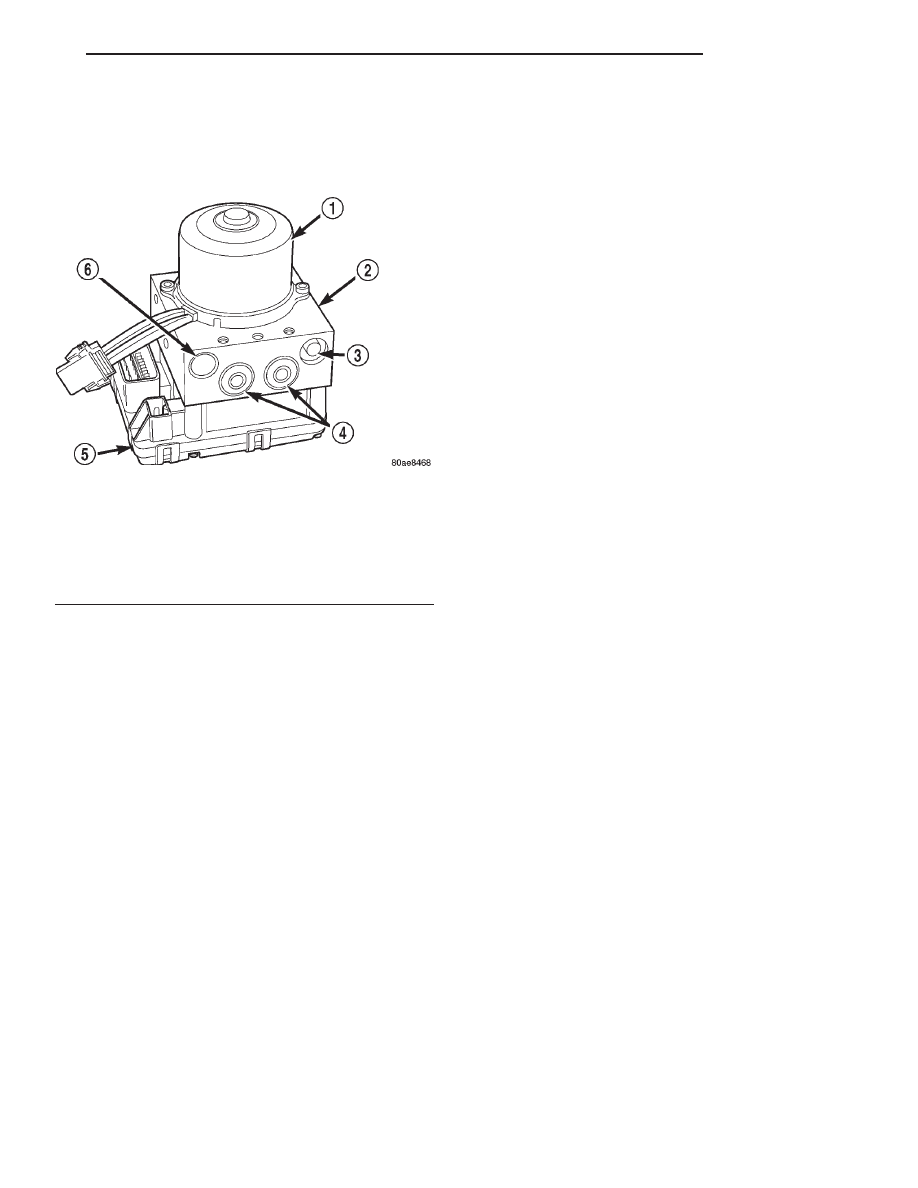
Fig. 4 Integrated Control Unit (ICU)

1 – PUMP MOTOR
2 – HYDRAULIC CONTROL UNIT (HCU)
3 – NOISE DAMPENING CHAMBER
4 – LOW PRESSURE FLUID ACCUMULATORS
5 – CAB
6 – LIP SEAL SAVER

JX

BRAKES

5 - 79

DESCRIPTION AND OPERATION (Continued)

the stop is complete. Under some conditions, the
pump/motor runs to drain the accumulators during
the next drive-off.

The pump/motor is not a serviceable item; if it

requires replacement, the HCU must be replaced.

PROPORTIONING VALVE

DESCRIPTION

There are two proportioning valves (Fig. 5) used in

the antilock brake system. One proportioning valve is
located in the chassis brake tube leading to each rear
wheel brake hydraulic circuit. They can be found to
the inside of the right frame rail (Fig. 6). The propor-
tioning valve can be identified by its bar code label
and stamp. Be sure a replacement proportioning
valve has the same stamp as the proportioning valve
being replaced.

OPERATION

The ABS proportioning valves function the same as

the proportioning valves in the base brake system.

ABS FUSES

DESCRIPTION

The ABS fuses and the ABS pump/motor fuse are

located in the power distribution center (PDC). Refer
to the sticker on the inside of the PDC cover for the
location of these fuses or use the following figure
(Fig. 7). The PDC is located on the driver’s side of
the engine compartment between the radiator and
the brake master cylinder.

ABS RELAYS (SOLID STATE)

DESCRIPTION

Two internal relays are used to control the antilock

brake system. The two relays are the pump/motor
relay and the system relay. The pump/motor relay
and the system relay are located in the CAB. If
either the pump/motor relay or the system relay is
diagnosed as not functioning properly, the CAB must
be replaced. Refer to INTEGRATED CONTROL
UNIT in the DISASSEMBLY AND ASSEMBLY sec-
tion in this section of this service manual group for
the procedure to remove the CAB from the HCU.

Fig. 5 Proportioning Valve

1 – FROM MASTER CYLINDER
2 – O. RING SEAL
3 – TO REAR BRAKES

Fig. 6 Proportioning Valve Location In Vehicle

1 – CHASSIS BRAKE TUBES
2 – RIGHT REAR BRAKE PROPORTIONING VALVE
3 – RIGHT FRAME RAIL
4 – LEFT REAR BRAKE PROPORTIONING VALVE
5 – CHASSIS BRAKE TUBES
6 – FUEL TUBES

Fig. 7 Fuse Location

1 – ABS FUSE
2 – PCM, ABS FUSE
3 – ABS PUMP FUSE

5 - 80

BRAKES

JX

DESCRIPTION AND OPERATION (Continued)

AMBER ABS WARNING LAMP

DESCRIPTION

The amber ABS warning lamp is located on the left

side of the instrument cluster. The purpose of the
warning lamp is discussed in detail below.

OPERATION

When the ignition key is turned to the ON posi-

tion, the amber ABS warning lamp is lit until the
CAB completes its self-tests and turns off the lamp
(approximately 4 seconds). The amber ABS warning
lamp will illuminate when the CAB detects a condi-
tion that results in the shutdown of ABS function or
when the mechanical instrument cluster (MIC) does
not receive messages from the CAB. The CAB turns
on the amber ABS warning lamp by grounding the
circuit.

Under most conditions, when the amber ABS warn-

ing lamp is on, only the ABS function of the brake
system is affected; the base brake system and the
ability to stop the vehicle are not affected.

WHEEL SPEED SENSOR (WSS) AND TONE WHEEL

DESCRIPTION

One wheel speed sensor (WSS) and one tone wheel

are located at each front (Fig. 8) and rear (Fig. 9)
(Fig. 10) wheel. Each front wheel speed sensor is
attached to a boss in the steering knuckle. The front
tone wheel is part of the outboard constant velocity
joint. The rear wheel speed sensor on rear drum
brake applications is mounted to the brake support
plate. The rear wheel speed sensor on rear disc brake
applications is mounted to the rear disc brake
adapter. The rear tone wheel is an integral part of
the rear wheel hub and bearing.

OPERATION

The wheel speed sensor sends a small AC signal to

the CAB. This signal is generated by magnetic induc-
tion created when a toothed sensor ring (tone wheel)
(Fig. 8) (Fig. 9) (Fig. 10) passes the stationary mag-
netic wheel speed sensor. The CAB converts the AC
signal into a digital signal. If a wheel locking ten-
dency is detected by the CAB, it will then modulate
hydraulic pressure via the HCU to prevent the
wheel(s) from locking.

Correct ABS operation is dependent on accurate

wheel speed signals. The vehicle’s tires and wheels
all must be the same size and type to generate accu-
rate signals. Variations in tire and wheel size can
produce inaccurate wheel speed signals.

Improper speed sensor-to-tone wheel clearance can

cause erratic speed sensor signals. The speed sensor
air gap is not adjustable, but should be checked when
applicable. Wheel speed sensor-to-tone wheel clear-
ance specifications can be found in the SPECIFICA-
TIONS section in this section of this service manual
group.

Fig. 8 Front Wheel Speed Sensor

1 – STEERING KNUCKLE
2 – TONE WHEEL
3 – WHEEL SPEED SENSOR CABLE
4 – DRIVESHAFT
5 – ATTACHING BOLT
6 – WHEEL SPEED SENSOR

Fig. 9 Rear Wheel Speed Sensor With Drum Brakes

1 – BRAKE SUPPORT PLATE
2 – HUB/BEARING ASSEMBLY
3 – WHEEL SPEED SENSOR
4 – TONE WHEEL

JX

BRAKES

5 - 81

DESCRIPTION AND OPERATION (Continued)

TRACTION CONTROL SYSTEM

DESCRIPTION

Traction control reduces wheel slip and maintains

traction at the driving wheels at speeds below 80 kph
(50 mph) when road surfaces are slippery. The trac-
tion control system reduces wheel slip by braking the
wheel that is losing traction.

TRACTION CONTROL FUNCTION LAMP

The traction control function lamp illuminates dur-

ing a traction control cycle, displaying TRAC on the
instrument panel signifying the ABS is in traction
control mode.

OPERATION

The CAB monitors wheel speed. During accelera-

tion, if the CAB detects front (drive) wheel slip and
the brakes are not applied, the CAB enters traction
control mode. Traction control operation proceeds in
the following order:

(1) Close the normally open traction control (TC)

ASR valves.

(2) Start the pump/motor and supply volume and

pressure to the front (drive) hydraulic circuit. (The

pump/motor runs continuously during traction con-
trol operation.)

(3) Open and close the build and decay solenoid

valves to maintain minimum wheel slip and maxi-
mum traction.

The cycling of the build and decay valves during

traction control is similar to that during antilock
braking, except the valves work to control wheel spin
by applying the brakes, whereas the ABS function is
to control wheel skid by releasing the brakes.

The traction control system is enabled at each igni-

tion cycle. It may be turned off by depressing the
traction control switch button.

TRACTION CONTROL FUNCTION LAMP

The traction control function lamp illuminates dur-

ing a traction control cycle, displaying TRAC on the
instrument panel.

The traction control function lamp (TRAC OFF)

illuminates immediately upon depressing the TRAC
OFF button. Pressing this button again, or turning
off and restarting the vehicle will enable the traction
control system.

If the CAB calculates that the brake temperatures

are high, the traction control system becomes inoper-
ative until a cool-down period has elapsed. During
this “thermo-protection mode,” the traction control
function lamp illuminates TRAC OFF; note that no
trouble code is registered.

HYDRAULIC SHUTTLE VALVES

Two pressure relief shuttle valves allow pressure

and volume to return to the master cylinder reservoir
when not consumed by the build and decay valves.
These valves are necessary because the pump/motor
supplies more volume than the system requires.

If the brakes are applied at anytime during a trac-

tion control cycle, the brake lamp switch triggers the
control module to switch off traction control.

HYDRAULIC CIRCUITS AND VALVE OPERATION

The hydraulic fluid control valves control the flow

of pressurized brake fluid to the wheel brakes during
the different modes of ABS braking. The following
paragraphs explain how this works. For purposes of
explanation only, it is assumed that only the right
front wheel is experiencing antilock braking; the fol-
lowing diagrams show only the right front wheel in
an antilock braking operation.

Fig. 10 Rear Wheel Speed Sensor With Disc Brakes

1 – PARKING BRAKE SHOES
2 – HUB/BEARING ASSEMBLY
3 – DISC BRAKE ADAPTER
4 – WHEEL SPEED SENSOR
5 – TONE WHEEL
6 – DISC SHIELD

5 - 82

BRAKES

JX

DESCRIPTION AND OPERATION (Continued)


Content   ..  202  203  204  205   ..