Chrysler Stratus Convertible. Manual - part 91
 

  Index      Chrysler     Chrysler Stratus Convertible - service repair manual 1995-2000 year


Search            


Content   ..  89  90  91  92   ..


Chrysler Stratus Convertible. Manual - part 91


CAUTION: Always

use

new

retaining

bolt,

old

retaining bolt may not be reused.

(9) Install the new retaining bolt and washer (Fig.

311). Tighten to 271 N·m (200 ft. lbs.) (Fig. 312).

(10) Using an inch-pound torque wrench, check the

turning torque (Fig. 313). The torque should be
between 3 and 8 inch-pounds.

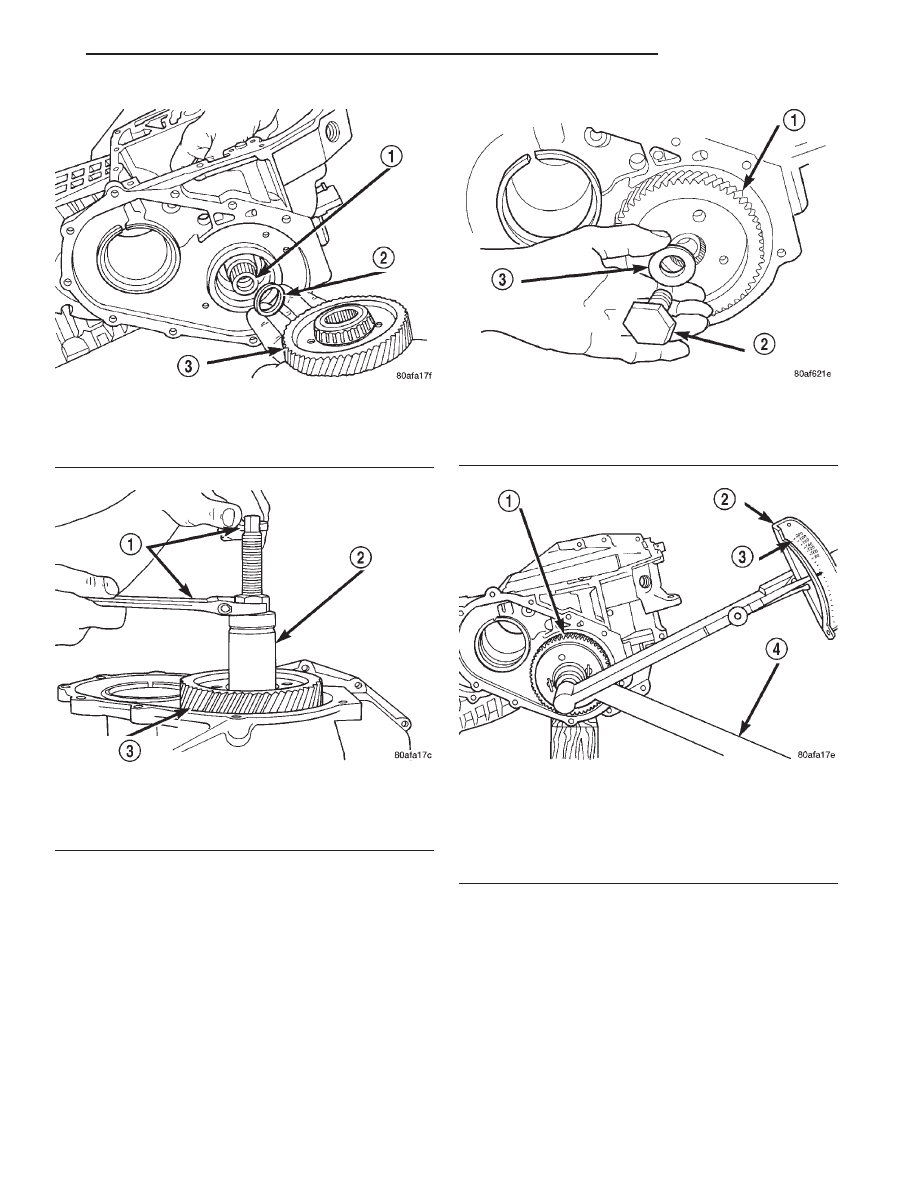
Fig. 309 Output Gear and (Select) Shim

1 – REAR CARRIER ASSEMBLY
2 – SHIM (SELECT)
3 – OUTPUT GEAR

Fig. 310 Install Output Gear

1 – WRENCHES
2 – TOOL 6261 WITH STUD
3 – OUTPUT GEAR

Fig. 311 Install Output Gear Bolt and Washer

1 – OUTPUT GEAR
2 – BOLT
3 – CONED LOCK WASHER

Fig. 312 Tighten Output Gear to 271 N

m (200 ft.

lbs.)

1 – OUTPUT GEAR
2 – TORQUE WRENCH
3 – 200 FT. LBS.
4 – TOOL 6259

JX

TRANSAXLE

21 - 103

DISASSEMBLY AND ASSEMBLY (Continued)

If the turning torque is too high, install a 0.04 mm

(0.0016 inch) thicker shim. If the turning torque is
too low, install a 0.04 mm (0.0016 inch) thinner shim.
Repeat until the proper turning torque is 3 to 8 inch
pounds.

NOTE: Install output gear stirrup and strap bolts.

All transaxles utilize a stirrup and retaining strap

that is attached to the output gear. The stirrup pre-
vents the output gear retaining bolt from turning
and backing out of the rear carrier. The strap is used
to hold the stirrup to the output gear and prevent
the stirrup retaining bolts from backing out.

Fig. 313 Check Output Gear Bearings Turning

Torque

1 – INCH-POUND TORQUE WRENCH
2 – OUTPUT GEAR

Fig. 314 Output Gear Retaining Bolt Stirrup

(Serration Side Out)

1 – STIRRUP
2 – OUTPUT GEAR RETAINING BOLT

Fig. 315 Stirrup Strap (Align Strap Holes With

Tapped Gear Holes)

1 – OUTPUT GEARBOLT
2 – RETAINING STRAP
3 – STIRRUP

Fig. 316 Install Strap Bolts

1 – RETAINING STRAP
2 – STIRRUP
3 – RETAINING STRAP BOLTS

21 - 104

TRANSAXLE

JX

DISASSEMBLY AND ASSEMBLY (Continued)

NOTE: Screw

Tool

5049-A onto

transfer

shaft.

Install transfer shaft.

Fig. 317 Turn Stirrup Clockwise Against Flats Of

Output Gear Retaining Bolt

1 – RETAINING STRAP
2 – STIRRUP

Fig. 318 Tighten Stirrup Strap Bolts To 23 N·m (200

in.) lbs.)

1 – RETAINING STRAP
2 – STIRRUP

Fig. 319 Bend Tabs On Strap Up Against Flats Of

Bolts

1 – RETAINING STRAP TABS
2 – RETAINING STRAP
3 – STIRRUP

Fig. 320 Install Transfer Shaft Bearing Cone

1 – TOOL 6052
2 – NEW BEARING CONE
3 – TRANSFER SHAFT
4 – ARBOR PRESS RAM

JX

TRANSAXLE

21 - 105

DISASSEMBLY AND ASSEMBLY (Continued)

Fig. 321 Install Bearing Cup To Shaft

1 – BEARING CUP
2 – BEARING CONE
3 – TRANSFER SHAFT
4 – OIL BAFFLE
5 – O-RING

Fig. 322 Install Transfer Shaft

1 – SPECIAL TOOL 5049–A
2 – TRANSFER SHAFT
3 – OUTPUT GEAR

Fig. 323 Install Transfer Shaft Bearing Snap Ring

1 – SNAP RING PLIERS TOOL 6051
2 – TRANSFER SHAFT BEARING SNAP RING
3 – TRANSFER SHAFT

Fig. 324 Install Transfer Shaft Bearing Cup Into

Retainer

1 – ARBOR PRESS RAM
2 – HANDLE C-4171
3 – TOOL 6061
4 – TRANSFER SHAFT BEARING CUP RETAINER
5 – USE REMOVED BEARING CUP TO SUPPORT RETAINER

21 - 106

TRANSAXLE

JX

DISASSEMBLY AND ASSEMBLY (Continued)


Content   ..  89  90  91  92   ..