Chrysler Stratus Convertible. Manual - part 55
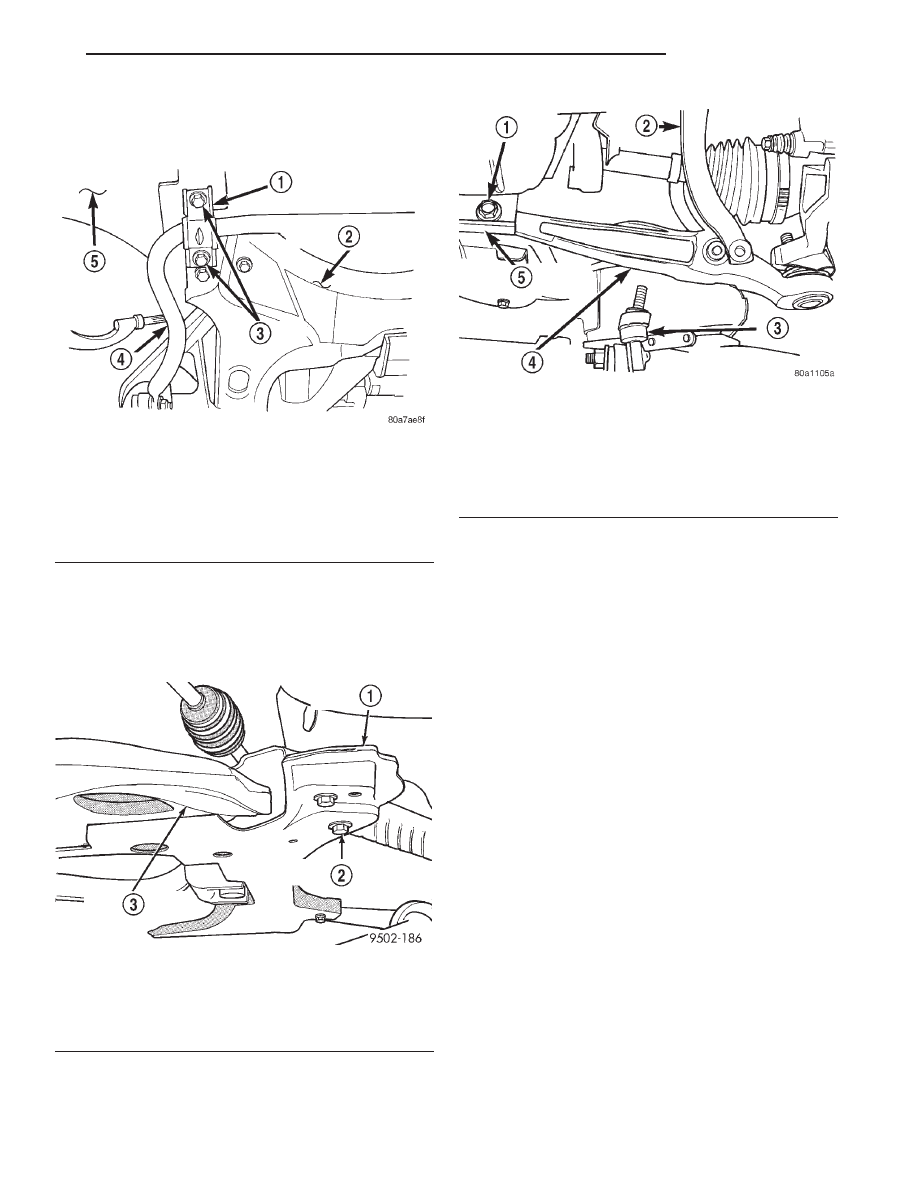
(9) Remove the bolts (Fig. 49) attaching the one
stabilizer bar bushing clamp to the front suspension
crossmember and the body of the vehicle.
(10) Lower the one side of the stabilizer bar away
from the lower control arm and body of vehicle.
(11) Remove the nut and bolt (Fig. 50) attaching
the rear of the lower control arm to the front suspen-
sion crossmember.
(12) Remove nut and bolt attaching the front of
the lower control arm to the front suspension cross-
member (Fig. 51).
CAUTION: When removing lower control arm from
crossmember care must be taken to prevent hitting
lower ball joint seal against steering knuckle, caus-
ing damage to the ball joint seal.
(13) Remove the front of the lower control arm
from the front suspension crossmember first.
(14) Then, remove the rear of the lower control
arm from the front suspension crossmember. When
removing rear of lower control arm from crossmem-
ber, keep control arm as level as possible. This will
keep rear bushing from binding on crossmember
making it easier to remove control arm from cross-
member.
INSTALLATION
(1) Position rear of lower control arm into front
suspension crossmember first. Then install front of
lower control arm in front suspension crossmember.
Install bolts and nuts (Fig. 51) and (Fig. 50) attach-
ing the front and rear of lower control arm to front
suspension crossmember. Do not tighten front
attaching bolt at this time.
(2) Tighten lower control arm rear attaching nut
and bolt (Fig. 50) to a torque of 95 N·m (70 ft. lbs.).
(3) Install the lower control arm ball joint stud
into
the
steering
knuckle.
Install
the
steering
knuckle to ball joint stud castle nut (Fig. 45).
(4) Install the tie rod end into the steering
knuckle. Start the tie rod end to steering knuckle
attaching nut onto stud of tie rod end. While holding
stud of tie rod end stationary, tighten tie rod end to
steering knuckle attaching nut (Fig. 43). Then using
Fig. 49 Stabilizer Bar Bushing Clamp Attachment To
Vehicle
1 – STABILIZER BAR BUSHING CLAMP
2 – FRONT SUSPENSION CROSSMEMBER
3 – ATTACHING BOLTS
4 – STABILIZER BAR
5 – VEHICLE BODY
Fig. 50 Lower Control Arm Attachment To Front
Suspension Crossmember
1 – FRONT SUSPENSION CROSSMEMBER
2 – LOWER CONTROL ARM ATTACHING BOLT AND NUT
3 – LOWER CONTROL ARM
Fig. 51 Attaching Front Of Lower Control Arm To
Suspension Crossmember
1 – ATTACHING BOLT AND NUT
2 – SHOCK CLEVIS
3 – STABILIZER BAR
4 – LOWER CONTROL ARM
5 – FRONT SUSPENSION CROSSMEMBER
JX
SUSPENSION
2 - 29
REMOVAL AND INSTALLATION (Continued)