Chery S11 / Chery QQ. Manual - part 257
 

  Index      Chery     Chery S11 / Chery QQ - service repair manual


Search            


Content   ..  255  256  257  258   ..


Chery S11 / Chery QQ. Manual - part 257


Chery    QQ    Maintenance Manual                        Transmission System


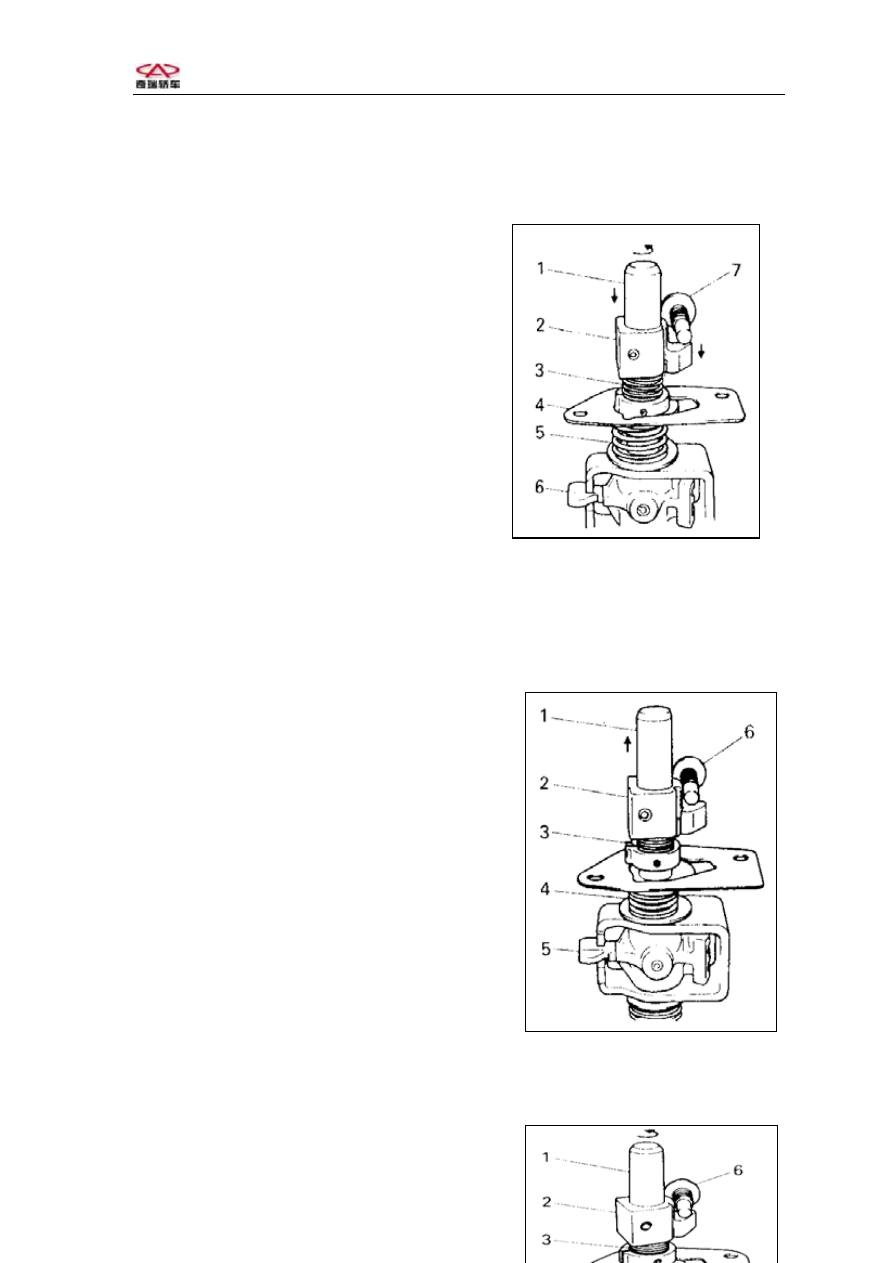
1,When gear shift 5th,the reverse,5th shift cam turns 
clockwise with the shift and select lever shaft, under the 
effect of the shift cam return spring, the cam contacts reverse,5th Interlock bolt and 
prevent reverse. 
 

1- Shift and select lever shaft

2-Reverse、5th shift cam  

3- Shift cam Return spring  

4-Bracket 

5-Reverse、5th Return spring  

6-Select lever shaft(5th) 

7-Reverse、5th restrict bolt 


fig.1-6 


2,It is allowed to shift from 5th to the middle position, but is not allowed to shift to 

reverse. However, when the shift and select lever    shaft moves to neutral of 3rd,4th, the 
shift restrict bolt cam can not effect as the Figure 16. 
3,shift select  lever  shaft to  5th  or  reverse, shift  cam  and bolt fixup. 


-40-  


1- Shift and select lever shaft 

2-Reverse  5th shift cam  

3- Shift cam Return spring   

4-Reverse  5th return spring  

5- Select lever shaft 

6-Reverse  5th restrict bolt 


                          Fig.1-7 


Chery    QQ    Maintenance Manual                        Transmission System


4,Shift to reverse do not connect shift cam. 
 

1- Shift and select lever shaft 

2-Reverse、5th  shift  cam 

3-Shift cam Return spring   

4-Reverse、5th Return spring   

5- Select lever shaft   

6-Reverse、5th  restrict  bolt


fig.1-8 

5,Fault Diagnosis   

Condition Cause 


Measure 

 
Joggle is in 
version 

 The shift fork shaft has been 

frayed. 

 The shift fork and synchronizer 

ring have been frayed   

   The spring has been destroyed. 
   Input shaft/outputshaft bearing 

have been frayed. 

   The gear has been frayed. 

Replace 
Replace 
 
Replace 
 
Replace 
 
Replace the gear   

   
Difficult to shift 

   Lubricant is not enough. 
   The clutch pedal freeplay is not 

correct 

   The clutch disc has been broken
   The clutch pressure plate has 

been broken. 

   The synchronizer has been 

frayed. 

   The gear has been frayed. 
   The gear shift lever has been 

frayed. 

   The shift lever has bee broken. 

 Refill 
 Adjust 
 Replace 
   
  Replace clutch cover 
assembly 
 
 
Replace the gear   
Replace 
 
Replace 

 
Noise 

 Lubricant is not enough 
 The bearing has been frayed or 

broken. 

 The gear has been frayed or 

broken 

 The synchronizer has been 

frayed or broken. 

Refill 
Replace 
Replace 
Replace 


-41-  


Chery    QQ    Maintenance Manual                        Transmission System


Section 2 Transaxle Maintenance on Car 

I,Exchange of Oil 


1- Drive shaft 

2- Drain plug 

3- Filler plug


                              Fig.2-1 
1,Before checking and changing the    transaxle    gear    oil, be sure the engine has 

stopped and the vehicle stops on a plane surface.   

2,Lift the vehicle, check the oil level and if there is any leakage. 
3,Let out all the used    transaxle oil, fill 2.1 L synthetic 18# gear oil    (the oil level is 

equal with the foot of the    filler plug). 

4,Before installation, spread oil on the whorl of the filler plug and    drain plug .   
     

Item Torque 

Filler plug 

18~23N·m 

Drain plug 

18~23N·m 


II,Differential  oil  seal 

Replacement: 

1, Lift the vehicle, let out all the used transaxle oil. 
2, Remove the cotter    pin    and the    lock cap    at the end of tie rod. 
3,  Disjoin the  steering  and  the  end  of  tie rod. 


-42-  


Chery    QQ    Maintenance Manual                        Transmission System


1-The end of Tie rod 

2- Steering   

3- Lock cap   

4- Cotter pin   

5-Special tool


                            Fig.2-2 
4,Remove the two bracket. 
5, Remove Ball    joint bolt    and disjoin the Suspension    arm from the steering. 


1- Steering 

2- Ball joint bolt 

3- Suspension arm


                              Fig.2-3 
 
6, Insert a  big screwdriver   into the connection of the drive  shaft  to release 

the    snap ring    from the keyway of the differential . 


1- Drive shaft 

2-Screw driver


                                  Fig.2-4 


7, Remove the used differential oil    seal , fix the new    oil    seal. 

-43-  


Content   ..  255  256  257  258   ..