Chery S11 / Chery QQ. Manual - part 249
 

  Index      Chery     Chery S11 / Chery QQ - service repair manual


Search            


Content   ..  247  248  249  250   ..


Chery S11 / Chery QQ. Manual - part 249


Chery  QQ  Maintenance Manual         465 Engine Mechanical System


    Chapter 10 Rplacement of 


1 Steps of removal
 
See content of relevant chapters for 
reference 
1. Take off cylinder head accordingly. 
2 Wipe residue and dust of cylinder head 
away with rag. 
3 Loosen the oil drainage bolt of oil pan to 
let oil drop out. 
4 Take off oil pan 

- 29 – 

5 Take off oil pan gasket. 
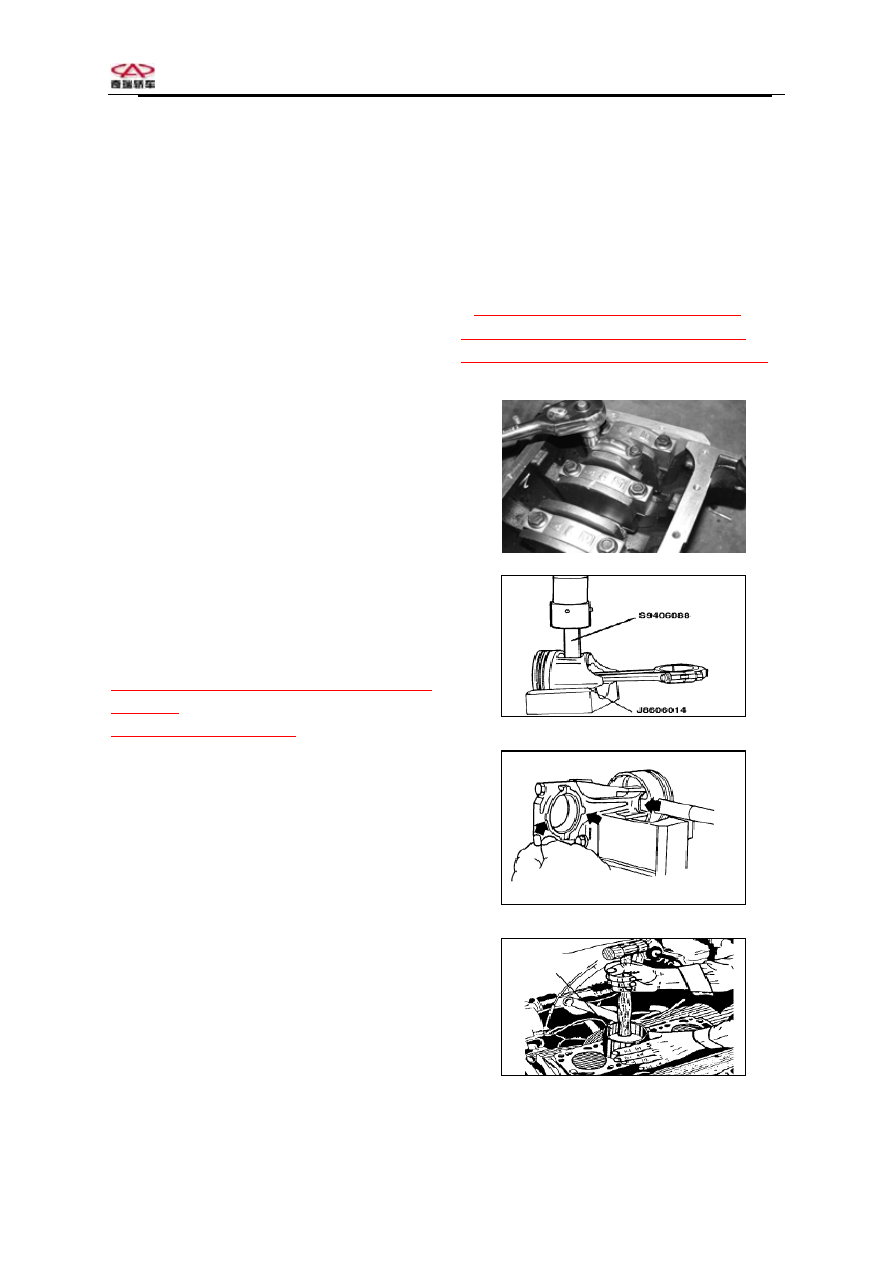
6 Disconnect the connecting rod bearing 
cover and bearing. 
Notice: Ensure bearing and bearing cover of   
every connecting rod being in 
correspondence with each other. 
7 Take the piston connecting rod assembly 
off the cylinder.   
8 Put the piston on SST, take off piston pin 
from assembly with remover. 
9 Remove connecting rod from piston. 
10 Measure the distance between piston and 
cylinder   
standard:0.040-0.050 mm 
Notice: It is necessary to prepare enlarged 
standard sized piston of 0.25 mm and 0.50 
mm. 
2 Procedures of installation 
1 Install connecting rod to piston 
2 Install piston and piston pin according to 
the following steps: 
Heat the connecting rod in piston pin hole at 
the temperature between 280℃ and 320℃,it 
is best for you to put the rod in the oil to 
carry out this procedure,cool the piston pin 
in dry ice, tighten the heated connecting rod 
with pincer pliers 
3 Install one side of piston pin by means of   


Piston


making the piston lean agaist the connecting 
rod,then stuff the piston pin properly with 
SST,you must make sure the installation of   
piston pin ring is correct. 
4 Connect connecting rod assembly to 
cylinder body with SST, arrow head of 
piston should face the front side of engine. 


Chery  QQ  Maintenance Manual         465 Engine Mechanical System


Notice: Put oil to surface of piston ring and 
cylinder hole,at the same time,install 
connecting rod. 
6 Install connecting rod upper bearing 
halfshell, put oil only on the side which is 
facing the crank, push the connecting rod 
until it is in the right position of the crank. 
7 Install connecting rod cap on the lower 
bearing halfshell,put oil on the side which is 
facing the crank for lubricating. 

- 30 – 

8 Put new bolt on the connecting rod ,it is 
not necessary to screw the bolt 
9 Rotate the crankshaft for several 
circles,make alignment of the connecting 
rod totally,then tighten the connecting rod 
bolt and fix the connectingt rod bolt. 
27.46-31.38 N.m 
10 Install oil pan, you shall be sure to keep 
in mind to use fixing glue for tightening the 
oil pan bolt 10N.m 
11 Install oil drainage bolt 
12 Install cylinder head accordingly 
Notice: Use oil of SAE 10W30 for the 
engine. 
3 Replacement of piston ring   
Steps of removal
 
1 Take the connecting rod assembly of the 
piston away accordingly 
2 Take piston ring out. 
3 Clean the smooth surface of piston, get rid 
of the grease remained in pin hole and 
fillisters with suitable knife. 
Check and measure 
1 Check stem of fillisters of the piston or 
skirt of the piston to see whether or not 
there are some fractures. 
2 Check piston ring 
3 Check piston crown to see whether or not 
there are some deformation,damage or rust. 


4. Put the clip spring in the cylinder and use 
the piston to push it in cylinder wall at a 
bank angle of 90 degree,in accordance with 
corresponding measured distance between 
piston ring ends. 

Item         

Standard  Limit 

No.1 

0.03~

0.07 ㎜ 

0.12


Inside 

Ring 

gap 

No.2 

0.02~

0.06 ㎜ 

0.10


5 Install the piston ring on the piston 
according to the sequence of location of 
clearance,that is to say the split of every 
ring should be staggered at a angle of 180 
degrees. 
6 Measure the distance between ring and 
groove of ring to see whether or not the 
following data is true: 
upper comperession ring 0.05mm 
lower comprssion ring 0.04mm   
7 Measure the distance between piston ring 
end,put the piston in the cylinder hole,push 
it to the bottom of cylinder,it is necessary to 
replace the piston ring if the measuring 
value exceed the limit. 
Procedures of installation 
Install the piston accordingly 

Item 

Standard 

(mm) 

Limit

Air 
ring

0.15-0.35 0.7mm

Piston ring
Open 
gap 

Oil 
ring

0.30-0.90 1.8mm


Chery  QQ  Maintenance Manual         465 Engine Mechanical System


CHAPTER 11  Replacement  

1 Steps of removal 

- 31 – 

1 Take off timing gear of camshaft, shown 
as the illustration. 
2 Take off crankshaft timing gear. 
3 Take off set bolt of timing belt rear cover. 
4 Take off rear cover of timing belt. 
5 Take the oil drainage bolt of oil pan away 
and let oil flow out. 
6 Remove oil pressure indication switch. 
7 Remove exhaust pipe. 
8 Remove oil pan. 
9 Take suction oil pipe of oil pump away. 
10 Remove the oil pump by means of 
loosening the bolt of oil pump. 
11 Remove oil pump head. 
12 Take off inside teeth gear. 
13 Take off outside teeth gear. 
 
2 Inspection of oil pump 
Standard of radial clearance between inside 
wheel gear and crescent caliper: 0.60~
0.80mm 
Standard of radial clearance between ouside 
wheel gear and crescent caliper: 0.25~
0.40mm 
Outside wheel gear and pump body 
clearance 
limit:0.3mm 


of Oil Pump


Chery  QQ  Maintenance Manual         465 Engine Mechanical System


Side clearance 

- 32 – 

Use thickness gauge,make sure the side 
clearance,in accordance with data between 
thickness gauge and gear,shown as blow: 
limit:0.17mm 
 
3 Installation of oil pump 

Parts of resolution should be cleaned, 

you should satisfy the following requests 
when installing the oil pump: 
1) There is a dot mark ① on the outside 
wheel gear.The dot mark should face 
outwards when installing the outside wheel 
gear to the pump body.Shown as blow: 
2) You should use new sealing gasket when 
installing the oil pump to the 
crankcase.You should smear the 
HZ-1213,sealing agent.The surface should 
be cleaned before you smear. 
Notice: You should lubricate the oil seal 
mouth before installation. 
 
4 Steps of installation
 
1 Install oil pump and tighten bolt 
2 Install oil pump suck oil pipe and make it 
fastened. 
3 Install oil pan and oil drainage bolt 
4 Install exhaust pipe 
5 Install oil pressure switch and tighten it. 
6 Install timing belt rear cover 
7 Install crankshaft timing gear 
8 Install camshaft timing gear according to 
the illustration. 
Attention: Align the oil level,fill SAE 10 W 
30 oil in the engine. 


Content   ..  247  248  249  250   ..