Chery B11. Manual - part 138
 

  Index      Chery     Chery B11 - service repair manual


Search            


Content   ..  136  137  138  139   ..


Chery B11. Manual - part 138


Chery Eastar Service Manual                    Body Dimension and Accessories 


Chapter One Engine hood and Luggage Boot 

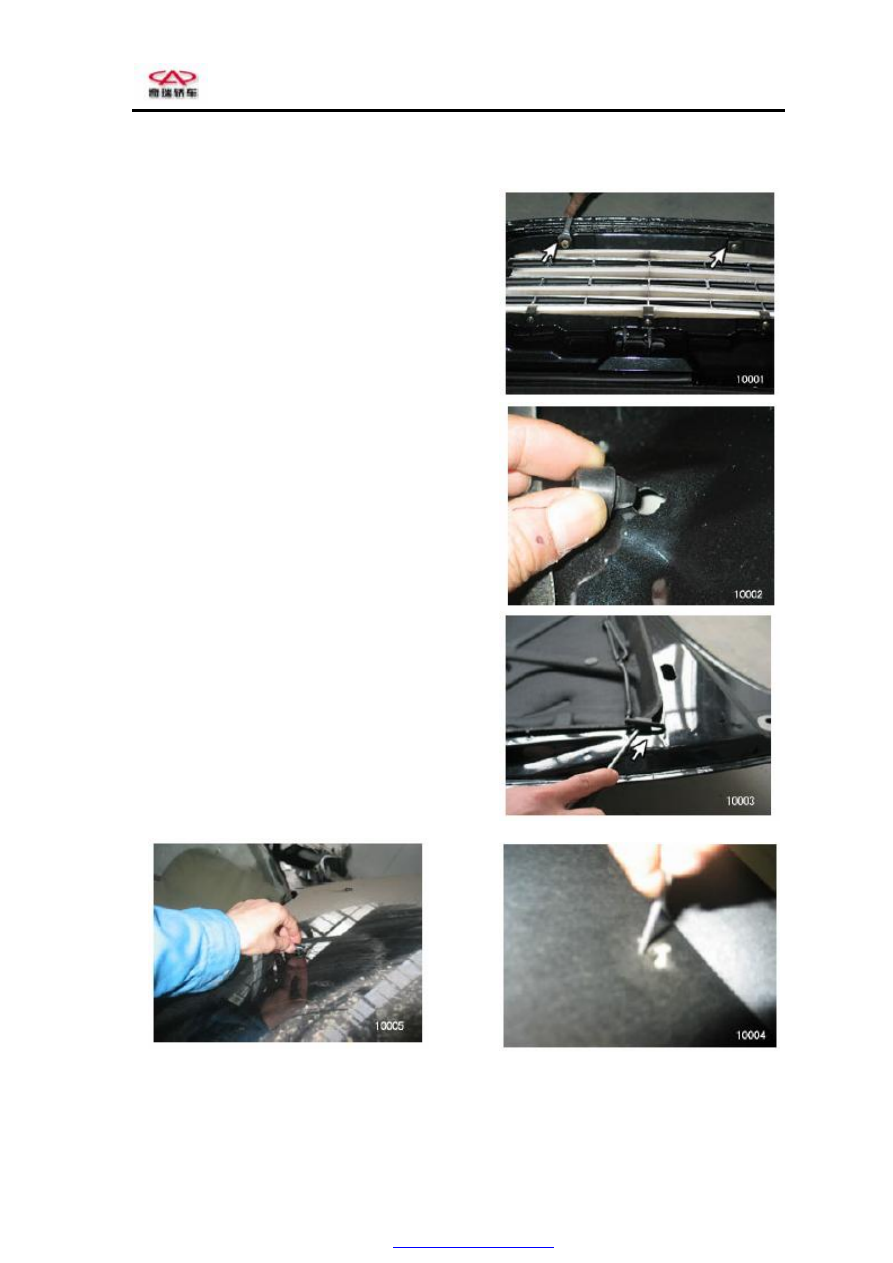
I. Disassembly of Engine hood 

1.


Unfasten  the  fixing  nut  on  the  radiator  grille  and 

take out the radiator grille outwards. 


2.


Screw out the spring cushion of engine hood. 


3.


Loosen the cleaning hose. 


4.


Pry out the water spray nozzle. 


PDF created with pdfFactory Pro trial version 

www.pdffactory.com

Chery Eastar Service Manual                    Body Dimension and Accessories 


5. Apply  the  special  tool  to  pry  out  12  fixing  clips,  and 

remove the heat shield. 


Assemble in the reverse order of disassembly. 


Adjustment of engine hood 

As  the  centering  bolts  are  the  engine  hood  hinge  fixing 

bolts,  it  is  necessary  to  replace  them  with  the  bolts  with 

washer, or it will be difficult to adjust the engine hood.   

Adjust the engine hood in the forward,   

backward and vertical direction 

Unscrew  the  hinge  bolts  in  the  side  of  engine  hood,  and 

adjust the hood. 

Adjust the engine hood lock 

Unscrew  the  fixing  bolts  on  the  hood  lock,  and  adjust  the 

engine hood lock. 

Disassembly of Hood Lock Control Cable:   

1. 

Disassemble  the  lower  trim  of  instruments  in  the  left 

side  of  vehicle.  (See  Disassembly  of  Instrument 

Panel

2. 

Disassemble  the  lining  of  left  fender.  (See 

Disassembly of Fender

3. 

Remove the hood lock, loosen and take out the cable. 

Assemble in the reverse order of disassembly. 

Assembling  requirements:  The  adjustment  of  front  hood 

lock shall ensure that the clearances around the front  hood 

are uniformly 9±l mm, with uniform height: 

The tightening torque of front hood lock bolts is 14±2 N·m. 


PDF created with pdfFactory Pro trial version 

www.pdffactory.com

Chery Eastar Service Manual                    Body Dimension and Accessories 


Disassembly of Luggage Compartment Door 

1.


Pull out the car floor mat. 


2.


Unclip the clip of left side shroud. 


3.


Apply the clip remover to disassemble the wiring 

clip, and uncouple the wiring harness. 


4.


Remove four bolts and the door. 

For assembly, its procedure is opposite to that of 

disassembly. 


PDF created with pdfFactory Pro trial version 

www.pdffactory.com

Chery Eastar Service Manual                    Body Dimension and Accessories 


Replacement of Luggage Boot and Hinge 

1.


Remove the rear seat assy. (See Disassembly 

/Assembly of Seat). 

2.


Disassemble the rear package tray assy. (See 

Disassembly of Rear Blind--Brake Lamp). 

3.


Remove 

the 

four 

bolts 

of 

luggage 

compartment  door,  and  support  the  boot 

door. 

4.


Remove  the  six  fixing  bolts  from  the  rear 

package tray. 


Disassembly  of  Luggage  Compartment 
Door 

1.


Disassemble the lock core   


Disconnect the connecting rod from the lock 

core. 


Loosen


the  fixing  bolts,  and  take  out  the 

lock core. 


2.


Disassemble the luggage boot lock 


Take  out  the  clip  and  detach  the  connector 

plug of motor 


PDF created with pdfFactory Pro trial version 

www.pdffactory.com


Content   ..  136  137  138  139   ..