Chery B11. Manual - part 116


  Index      Chery     Chery B11 - service repair manual


Search            


Content   ..  114  115  116  117   ..


Chery B11. Manual - part 116


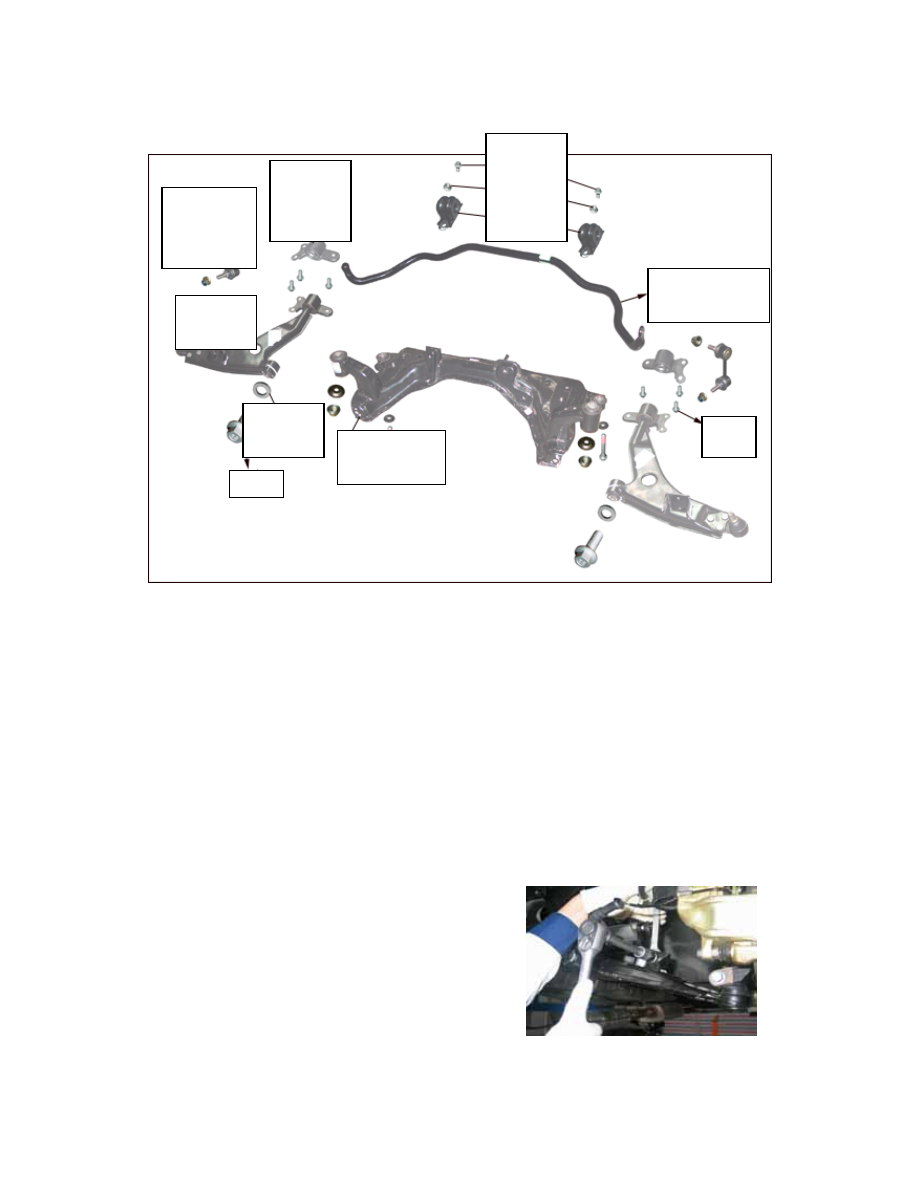
Two. Structure drawing of front axle 
 

Bolt 
 
Nut 
Clamp

Joint 
plate 
assembl

Connecti
ng rod 
assembly 

Stabilizer bar 
assembly 

Control 
arm 

Bowl 
washer 

Bolt

 Front axle 
assembly 

Bolt

 
Three. Fixing and unfixing of front 
wheel rocker arm 
 
Tools required: 13#, 15# and 8# sockets, 
15# spanner, short joint bar, torque 
spanner, quick spanner.  
Unfixing steps:  
1. Jack up the auto with a jack and 
dismantle the wheel. 
 
2. Release the set bolts connecting the 
front connecting rod and the rocker arm 
and take out the front connecting rod.  
 
3. Release the set bolts for the rocker 
arm and the horn.  
 
4. Release the set bolts for the rear gum 
cover of rocker arm and the front axle. 
 
5. Release the set bolts for the gum 
cover of lower rocker arm and front axle. 

Release the three joint bolts of rear 


bracket.  

Avoid detaching the lower rocker arm 


while releasing the bolt.  
 
6. Unfix the lower lever off the auto.  
 
Fixing steps:  
1. Fix with reference to the unfixing 
steps. 
2. Note:  

Released set bolts which are 

subject to 

yielding limit in terms of torque + angle  


fixing during bolting must be replaced.  

Fasten the bolts with the required 


torque.  


Four. Fixing and unfixing of front 
connecting rod of front wheel 
equalizer bar 

Tools required: 15# socket, quick 
spanner 
Unfixing steps:  
1. Release the set bolts for the 
connecting rod and the equalizer bar.  
2. Release the set bolts for the front 
connecting rod and the rocker arm.  
 
Fixing steps:  
1. Fix with reference to the unfixing 
steps. 
2. Note:  

Released set bolts which are subject to 


yielding limit in terms of torque + angle 
fixing during bolting must be replaced.  


Fasten the bolts with the required 


torque.  
 
Five. Fixing and unfixing of front 
connecting rod bushing 
Tools required: 15# and 18# spanners, 
hammer 
1. Release the set bolts which connect 
the left and right front connecting rods 
with the equalizer bar.  
2. Release the set bolts for the left and 
right connecting rod bushings. 
3. Release the fixing jaw of equalizer bar 
bushing and move the equalizer bar 
forward to take out the bushing.  
 
Fixing steps:  
1. Fix with reference to the unfixing 
steps. 
2. Note:  

Released set bolts which are subject to 


yielding limit in terms of torque + angle 
fixing during bolting must be replaced.  

Fasten the bolts with the required 


torque 


Six. Fixing and unfixing of front 
connecting rod 
Unfixing steps:  
1. Unfix the front axle (refer to Fixing 
and Unfixing of Front Axle) 
2. Release the four set bolts on equalizer 
bar bushing and take down the equalizer 
bar.  
Fixing steps:  
1. Fix with reference to the unfixing 
steps. 
2. Note:  

Released set bolts w

hich are subject to 

yielding limit in terms of torque + angle 
fixing during bolting must be replaced.  

Fasten the bolts with the required 


torque 
 
Seven. Fixing and unfixing of front 
axle assembly 
Tools required: 18, 19, 21 # sockets, 15# 
spanner, short connecting rod, torque 
spanner 
Unfixing steps:  


1. Release the three set bolts for the front 
exhaust pipe and engine manifold 
exhaust pipe.  
2. Release the 
two set bolts for 
the front 
exhaust pipe 
and three-way 
catalytic 
converter.  
3. Release the 
two fixing lugs of the exhaust pipe and 
take out the front exhaust pipe.  
 
4. Release the set bolts for the front 
connecting rod and equalizer bar.  
5. Unfix left and right rocker arm (refer 
to Fixing and Unfixing of Rocker Arm). 
6. Release the four set bolts of the 
steering gear and the front axle.  


7. 
Release t
gear and the engine bracket in the 
front axle.  

he set bolts for the steering 


8. Release the four set bolts of the front 
axle.  

Screw off the set bolts

 of the front 

axle (1) (2) (3) (4). 

 Take down the front axle.


Content   ..  114  115  116  117   ..