Chery A18. Manual - part 100
 

  Index      Chery     Chery A18 - service repair manual


Search            


Content   ..  98  99  100  101   ..


Chery A18. Manual - part 100


10 

Section 3    Disassembly and assembly of rear brake assembly 


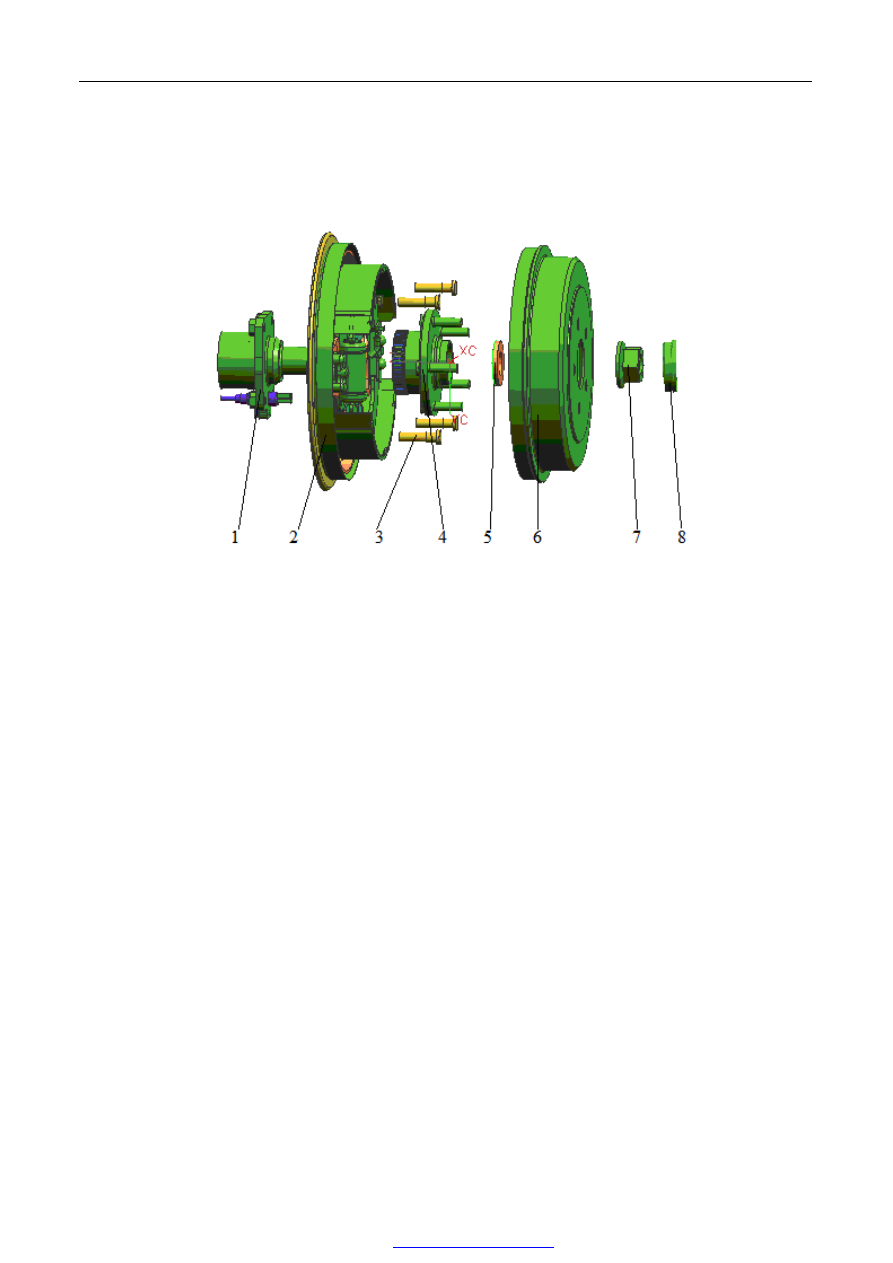
1.  Assembly diagram of rear wheel brake 


1-Half axle    2-Rear brake    3-Bolt    4-Bearing unit of rear wheel hub 

5-Spacer    6-Brake drum    7-Nut    8-End housing 


2.  Preparation 


Tools:  Ratchet  wheel,  ratchet  pole,  8#,  13#,  15#,  20#  sleeve,  13#,  14#,  17#,  19#  box  wrench,  jaw  vice,  torque 

wrench, flatheaded screwdriver. 

Supplementary materials: Brake fluid 


3.  Precautions 


3.1 

Please wear necessary appliances for labor protection to avoid of accident. 

3.2 

Brake fluid is poisonous liquid, in case that contacts it with skin or eye in careless, please clean with lots of 

water, if necessary take medical treatment in time. 

3.3 

Dumped  brake  fluid  should  be  loaded  into  container.  Do  not  empty  it  into  water  drain  or  pile  up  with 

consumption residues. 

3.4 

Do not tread the brake pedal and move the vehicle during working of disassembly and assembly. 

3.5 

Never  bring  friction  wafer  or  friction  disk  in  contact  with  material  of  fat  liquor  style,  it  can  reduce  brake 

performance. 


11 

4.  Disassembling step 


4.1 

Disassemble  rear  wheel  (refer  to  disassembling  step 

of front wheel). 


4.2 

Shake brake drum and take it down. 


4.3 

Observe structure of rear brake   


4.4 

Disassemble  backstay  cable  of  manual  brake  with 

calipers. 


4.5 

Disassemble  upper  reposition  tension  spring  with 

calipers 


12 

4.6 

Disassemble  lower  reposition  tension  spring  with 

calipers. 


4.7 

Press spring leaf  of localized slide rod  of brake shoe 

with  hands  (wear  glove)  and  rotate  clockwise  or 

anticlockwise  for  90°,  disassemble  localized  slide 

rods of the two brake shoes. 


4.8 

Take out two brake shoes. 


4.9 

Take  down  tension  spring  and  disassemble  brake 

shoe. 


13 

4.10  In  case  that  condition  of  “rear  brake  is  too  tight”  is 

found  during  running,  please  adjust  pusher  length: 

Rotate clockwise to eliminate friction. 


4.11  Disassemble  bolts  on  these  three  positions  shown  in 

figure with 10# box wrench. 


4.12  Take  down brake  wheel cylinder and check if it is in 

good condition. 


4.13  If  it  is  necessary  to  check  bearing  of  brake  drum, 

please disassemble jam nut shown in figure with 30# 

sleeve  and  torque  wrench  and  take  down  bearing  of 

brake drum. 

Moment of force: 230-260 N.m 


5.  Assembling step 


Content   ..  98  99  100  101   ..