Chery A series. Manual - part 95
 

  Index      Chery     Chery A series - service repair manual


Search            copyright infringement  


Content   ..  93  94  95  96   ..


Chery A series. Manual - part 95


DOORS & WINDOWS 

REMOVAL & INSTALLATON OF DOORS 

REMOVAL 


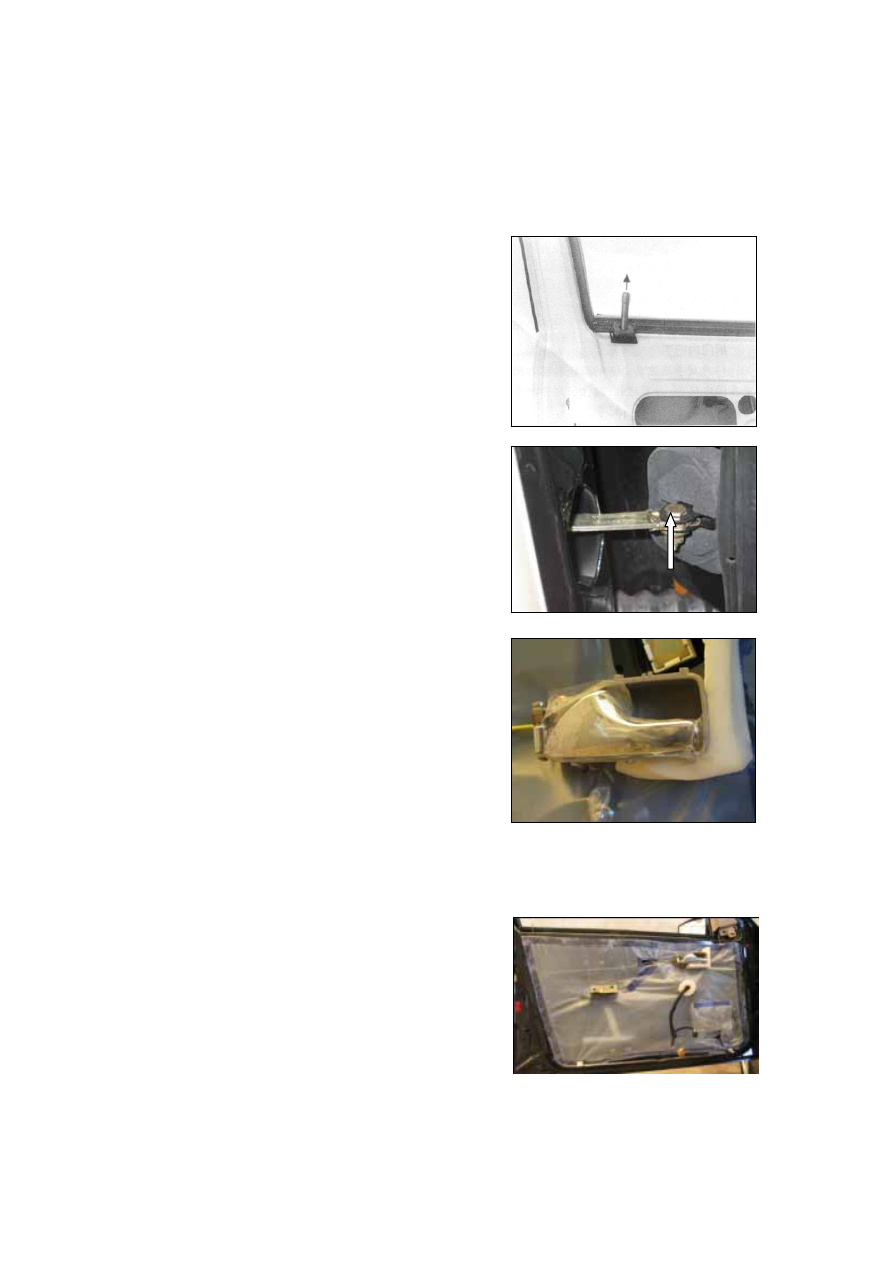
----Remove two-side screws of door trim 

panel.  

 
----Turn the door lock knob off in a counter 

clockwise way.   


----Loosen the nut of retainer gasket and the 

bolt pin.   


----Removal of inside door handle. Unscrew 

the screw which secures the handle on 
door trim panel. Press and push the handle 
forward to remove it. 


----Remove the waterproof film between door 

panels. 

 
----SPECIAL ATTENTION 
Install the waterproof film correctly. The top 
part, the two sides, and the bottom part shall 
all be pasted in place, thus to enable a correct 
water outflow, and to prevent water leakage 
into car or damage of door panel.


S-31

----Remove electrical wiring connector, and 

pull out the bolts between door and the 
hinge on front column, door check, while 
another operator remove the door. 
Tightening torque is 56 N·m. 

----A layer of protective material shall be 

added between the door and the surface on 
which the front door is to be placed.   


----Perform spray coating as per “Steel plate spray coating process”.   
----If adjust the door vertically or horizontally, the hinge joint bolts shall be loosened at a 

rated pressure with specified adjustment tool for inner hinge, slowly in a paralleled plain 
direction, otherwise it would lead to material fatigue. Don’t move the tool vertically, 
which would result in damage and can only be corrected through re-welding the hinge, to 
prevent the already spray coated vehicle paint from generation of cracks. Sealing wax 
should be applied to the coat.   

----After the door has been adjusted, tighten the bolts at a tightening torque of 56 N.m. 
 
NOTE:  
When door is closed, the sealing ability is assured through the seal around the door 
opening. If the seal is not perforated for easy entry of air, or the pressure is too large 
when door is shut, it would most possibly fail for door shut due to an abnormal pressure. 
If any following parts on the door are to be removed, the door trim panel must be 
removed first as per the instruction on “Lining & Trim”.


----Removal of lock control unit. During the 

removal of lock, remove the clip of control 
unit and lock. The lock is secured on the 
door through two screws for which the 
tightening torque is 20±2 N·m as shown 
in the right figure. 

 
NOTE 
Red thread adhesive shall be applied when 
installing the two bolts.   

----Remove the bolt between outside handle 

and doorframe, and rock the handle 
forward, and the handle is to be removed 
when 90° is reached. Tightening torque for 
the bolt is 7.2±0.2N·m. 

----For any model with central locking system, 

electrical wires shall be removed too.   


S-32

----Loosen the bolts between central locking 

unit and doorframe. Disconnect the lock 
rod with lock to remove cable and 
servomotor. 


INSTALLATION 
Install in the reverse order of removal. 


ADJUSTMENT 
----If adjust door lock striker erroneously, 

which normally causes a failure in closing 
the door, position of lock striker shall be 
adjusted. The adjusting operation means 
that the lock striker is to be loosened with 
15mm spanner, and then move as per 
requirement. Tightening torque is 
50±5N·m.


REMOVAL & INSTALLATON OF 

TRUNK LID


REMOVAL, INSTALLATION & 
ADJUSTEMENT OF TRUNK LID 
------In removing trunk lid, it is needed to 

remove the flexible hanging strap and the 
rear bracket. 


S-33

------Remove the gas spring which raises and 

supports the trunk lid. Its one end is fixed 
on the door, while the other end is fixed 
on the drain channel of the strut.   


------In removing gas spring, screwdriver is to 

be used to move the lock hook to take out 
the gas spring from swivel pin of the bolt. 
If this gas spring is to be further used, the 
lock hook shall not be completed moved 
out, otherwise the lock hook would be 
damaged.  


------ Another operator shall pull off the bolt, 

remove the trunk lid, and put it on a 
surface on which a suitable layer of 
protective material shall be placed 
beforehand.  


If the lid is to be replaced, before removing 
fixing bolts of door, the rear windscreen 
shall be removed. Install in the reverse 
order of removal.   
Spray coating process has been described in 
the “Steel plate spray coating process”.


------Any necessary adjustment for the edge of 

trunk lid can be performed through 
movement of hinges, on which there are 
slots designed for adjustment.   


S-34


Content   ..  93  94  95  96   ..