Chery A series. Manual - part 68
 

  Index      Chery     Chery A series - service repair manual


Search            copyright infringement  


Content   ..  66  67  68  69   ..


Chery A series. Manual - part 68


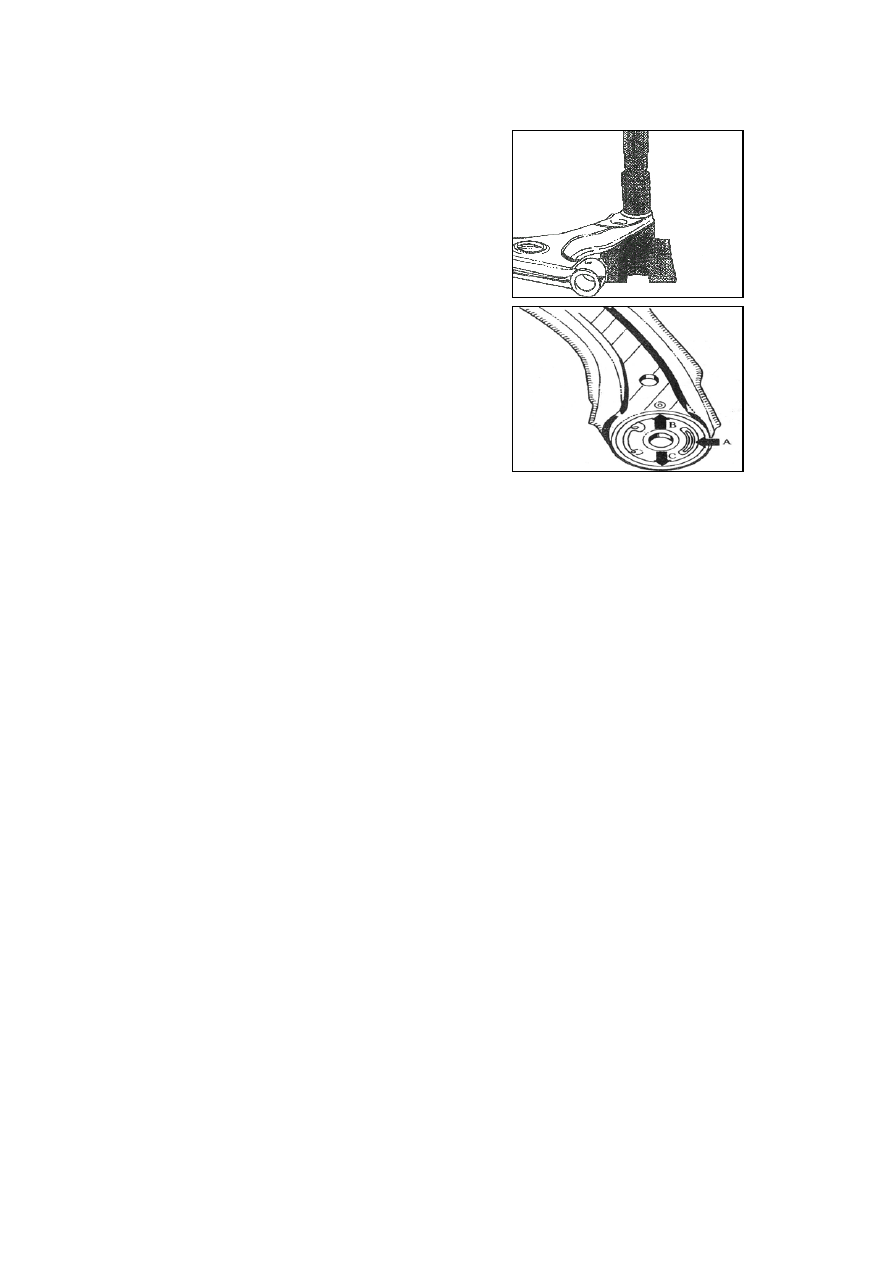
Replace the rear housing of the lower control 
arm 

----When pressing out the rear housing of the 

lower control arm, if the elastic housing 
locks due to rust, please cut away the rubber 
on outer circle, saw off the steel cover, and 
then press out the elastic housing. (shown as 
illustration) 

----The installing position of the elastic housing 

of control arm is shown as the illustration. 
The arrow B or C points at the upper pit on 
the lower control arm, and the kidney-shaped 
interspace on the housing (arrow A) points to 
the vehicle center. 

----Use the special purpose tools to press in the 

rear housing of the control arm. 


M-21

REAR AXLE AND REAR SUSPENSION 

Longitudinal bracket rear axle and rigid axle suspension are employed in Chery. The wheels 
on both sides are connected with the vehicle body by an integrated rear axle. The metal 
rubber holder for the rear axle is a type of holder which the trace is adjustable. It is almost 
the rigid connection in longitude and can only deform in lateral which ensures that the rear 
axle cannot turn in axial direction. Therefore, the rear axle processes the function of 
preferable control of the vehicle stability at high speed. 

REMOVAL AND INSTALLATION OF THE REAR AXLE ASSY


Illustration. Rear axle assy 

1. Rear axle welding assy      2. Metal rubber holder      3.Rear brake hose 
4. Hand brake cable clip      5. Left brake pipe assy of rear axle      6.Hand brake cable 
7. Braker      8. Brake drum      9. Tire set bolt (110 N·m) 
10. Rear axle bracket      11. Nut (60 N·m)    12. Bolt (70 N·m) 

M-22

Installation of the rear axle assy: 

----Installation of the metal rubber holder: 

press the metal rubber bush 2 into the 
axle body, and apply pressure till the 
edge of metal rubber bush reaches the 
solid axle. 

----Use the bolt for hole 13 of the metal 

rubber holder to connect the two rear axle 
brackets. The standard tightening torque 
of the nut is 60 N·m; (shown as the 
picture) 


----Install the braker, the brake drum and the 

axle shaft well; 


----Connect the left and the right brake pipe 

assy of the rear axle with the left and the 
right braker assy respectively, and then 
use the pipeline clip to fix them on the 
rear axle. Meanwhile, maintain the 
connection between the reed and the rear 
brake hose by the rear axle bracket. The 
tightening torque is 13-19 N·m; (shown 
as the picture) 


----Use the clip and the brake cable clip set on 

the rear axle to fix the hand brake cable. 
(shown as the picture) 


M-23

Precaution: Before the procedure below, the 
careless pull may lead the disconnection of the 
harness if the ABS vehicle speed sensor is not 
removed first. Therefore, before the following 
procedure, remove the ABS vehicle speed 
sensor (the axle side) first and fix it in a 
proper position in order to keep the sensor 
untouched during the vehicle maintaining. 


Caution: The removal of the rear axle is 
extremely dangerous. The drop of the rear 
axle could cause severe damage or even death. 
Please make sure that the jack has supported 
fully the rear axle before the removal. 


M-24


Content   ..  66  67  68  69   ..