Acura RDX (2021 year). Manual in english - page 17
 

  Index      Manuals     Acura RDX (2021 year). Manual in english


Search            copyright infringement  


Content      ..     15      16      17      18     ..


Acura RDX (2021 year). Manual in english - page 17


uu

Audio System Basic Operation

u

System Updates

270

Features

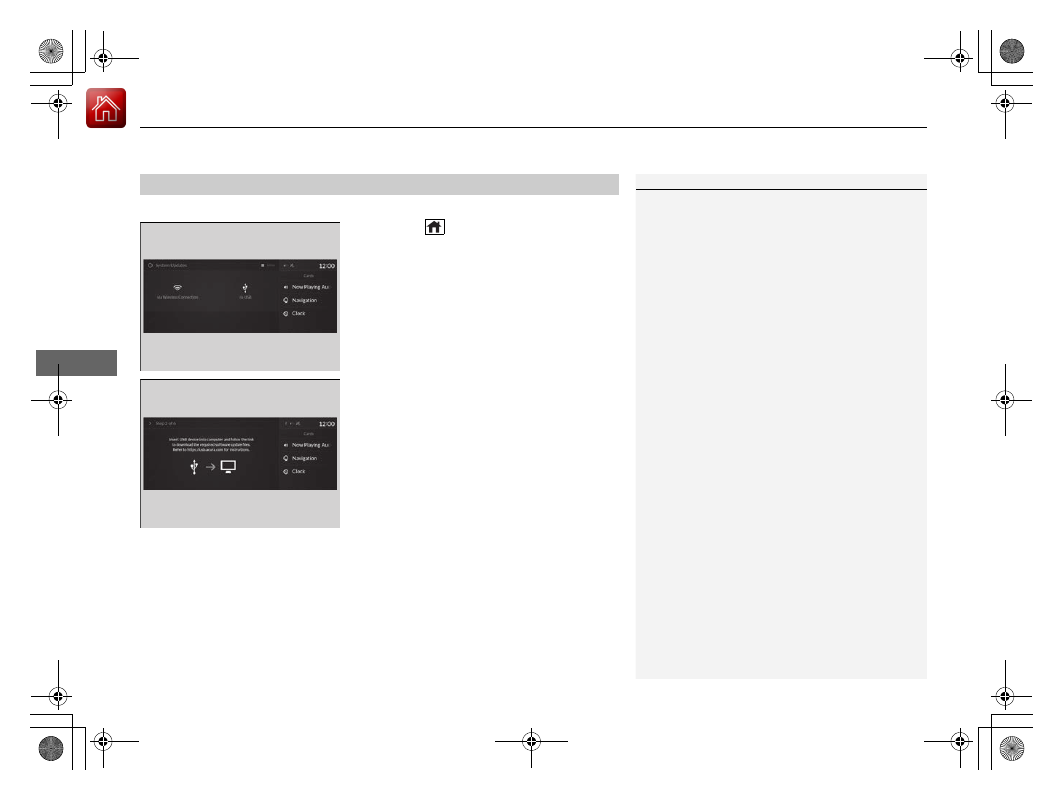
Download the update files from the server

1.

Press the 

 (home) button.

2.

Select 

System Updates

.

3.

Select 

via USB

.

u

A notification appears on the screen.

4.

Connect a USB device into the USB port in 
the console compartment.

u

The inventory data is copied into the USB 
device.

2

USB Ports

 P. 243

5.

Remove the USB device from the USB port.

6.

Connect the USB device into your 
computer, and then download the update 
files.

u

Follow the link to download the required 
software update files. Refer to 

https://usb.acura.com

 for instructions.

How to Update with a USB Device

1

How to Update with a USB Device

A USB device with a minimum of 8 GB of free space 
or more is recommended.

Be sure to delete any previous inventory or update 
files from the USB device before starting the USB 
update process.

-------------------------------------------------------------------------------------------------------------------------------------------------------------

271

uu

Audio System Basic Operation

u

System Updates

Features

Update the audio system

1.

Press the 

 (home) button.

2.

Select 

System Updates

.

3.

Select 

via USB

.

u

A notification appears on the screen.

4.

Connect the USB device with the update 
files into the USB port.

u

A notification appears on the screen.

2

USB Ports

 P. 243

5.

Select 

Install Now

 or 

Install while 

Vehicle OFF

.

u

A notification appears on the screen if 
the update is successful when 

Install 

Now

 is selected.

u

When you select 

Install while Vehicle 

OFF

 go to step 6.

6.

Set the power mode to VEHICLE OFF 
(LOCK).

u

A notification appears on the screen. If 
you select 

Postpone Update

, the 

update is postponed.

7.

Exit from your vehicle.

u

The system will start the firmware 
update.

u

A notification appears on the screen if 
the update is successful at the next time 
you set the power mode to ON.

1

Update the audio system

The system may stop the firmware update when 
battery is low on power, even when you selected 

Install while Vehicle OFF

.

If you want to install the updated data, recharge the 
battery or select 

Install Now

.

-------------------------------------------------------------------------------------------------------------------------------------------------------------

272

uu

Audio System Basic Operation

u

Adjusting the Sound

Features

Adjusting the Sound

1.

Press the 

 (home) button.

2.

Select an audio source icon.

3.

Select 

SOUND

.

4.

Select the setting you want.

3.

Select 

MENU

.

4.

Select 

Sound Settings

.

5.

Select the setting you want.

Select an item from the following choices:

Bass / Treble

: Treble, Midrange, Bass

Roof / Center Volume

*

/

Center Volume

*

Roof speaker

*

, center speaker

Audio Zones & Balance / Fader

*

: Driver 

Only, Front Only, Rear Only, Full Vehicle, 
Balance, Fader

Balance / Fader

*

: Balance, Fader

Speed Volume Compensation

: Speed 

Volume Compensation (SVC)

DTS Neural Surround

*

: DTS Neural 

Surround

TM

Compressed Audio Enhancement

*

Enhancement for compressed audio quality

1

Adjusting the Sound

The SVC adjusts the volume level based on the vehicle 
speed. As you go faster, audio volume increases. As 
you slow down, audio volume decreases.

You can also adjust the sound the following 
procedure.
1. Press the 

 (home) button.

2. Select 

Settings

.

3. Select 

Sound

.

Audio Zones & Balance / Fader

You can change where the sound comes from by 
selecting one of the speaker options below:

Full Vehicle

: All the speakers emit sound.

Driver Only

: Allows driver to listen to the audio 

system while maintaining a quieter environment 
for the other occupants.

Front Only

: Allows front seat occupants to listen 

to the audio system while maintaining a quieter 
environment for occupants in the rear.

Rear Only

: Allows rear seat occupants to listen to 

the audio system while maintaining a quieter 
environment for occupants in the front.

Reset to Default

Select to reset the following settings from the pop-up 
menu to their factory default.

Bass / Treble

Roof / Center Volume

*

Center Volume

*

Audio Zones & Balance / Fader

*

Balance / Fader

*

USB Audio, AUX Input mode

FM Radio, AM Radio, SiriusXM, Bluetooth Audio mode

* Not available on all models

-------------------------------------------------------------------------------------------------------------------------------------------------------------

273

uu

Audio System Basic Operation

u

Display Setup

Features

Display Setup

You can change the brightness of the audio/information screen.

1.

Press the 

 (home) button.

2.

Select 

Settings

.

3.

Select 

Display

.

4.

Select 

Day Mode

 or 

Night Mode

.

5.

Select the setting you want.

u

When you adjust the 

Contrast

 and 

Black Level

, select 

More Settings

.

Certain manual functions are disabled or inoperable while the vehicle is in motion.
You cannot select a grayed-out option until the vehicle is stopped.

Changing the Screen Brightness

1

Changing the Screen Brightness

You can change the 

Contrast

 and 

Black Level


settings in the same manner.

To reset the settings, select 

Reset to Default

.

Reset to Default

 is only applicable to the settings in 

the current mode.

Limitations for Manual Operation

*

* Not available on all models

-------------------------------------------------------------------------------------------------------------------------------------------------------------

274

uu

Audio System Basic Operation

u

Voice Control Operation

Features

Voice Control Operation

Your vehicle has a voice control system that allows hands-free operation.
The voice control system uses the 

 (talk) and 

 (back) buttons on the steering 

wheel and a microphone near the map lights on the ceiling.

To achieve optimum voice recognition when using the voice control system:

The system recognize a natural language and accept your free form voice 
command.
An example of voice commands:

2

Voice Recognition Screen

 P. 275

Close the windows and panoramic roof.

Adjust the dashboard and side vents so air does not blow onto the microphone 
on the ceiling.

Speak clearly in a clear, natural speaking voice without pausing between words.

Reduce any background noise if possible. The system may misinterpret your 
command if more than one person is speaking at the same time.

Voice Recognition

1

Voice Control Operation

When you press the 

 button, the system beeps and 

the display changes to the voice recognition screen.

Press the 

 (home) button, 

 (back) button on 

the True Touchpad Interface or 

APPS

 button on the 

steering wheel to cancel a voice recognition function.

-------------------------------------------------------------------------------------------------------------------------------------------------------------

275

uu

Audio System Basic Operation

u

Voice Control Operation

Continued

Features

When the 

 (talk) button is pressed, the 

voice control screen appears.
For a complete list of commands, say 

“Help”


after the beep.

The system accepts free form voice 
commands.
See the following examples for 
recommended voice commands.

Voice Recognition Screen

This can be only used when the phone is 
connected.

Phone Commands

Dial by number

Call <Phone Number>

Dial <Phone Number> please

Phone <Phone Number>

Redial

Redial

Redial last number

Call last number

Voicemail

Call voicemail

Dial voicemail

Check voicemail

Check mailbox

Contact by voice

Call <your contact name>

Call <your contact name> on his/her 
<category name> please

Make a call to <your contact name>

Make a call to <your contact name> on 
her/his <category name>

Phone Commands

The system recognizes an only contact 
name in the stored phonebook of your 
phone.

Phone commands are not available if using 
Apple CarPlay.

FM Commands

Play FM radio

Tune to <87.7-107.9> FM

I want to listen to FM <87.7-107.9>

Play FM <87.7-107.9>

AM Commands

Play AM radio

Tune to <530-1710> AM

I want to listen to AM <530-1710>

Play AM <530-1710>

Audio Commands

-------------------------------------------------------------------------------------------------------------------------------------------------------------

276

uu

Audio System Basic Operation

u

Voice Control Operation

Features

Sirius XM Commands

Play XM radio

Play XM <channel number>

Listen to <channel name> on XM

Play XM Channel <channel number>

Tune to <channel name>

Listen to <channel number> on the 
satellite radio

USB Commands

Play USB

Play iPod

Play genre <genre name>

Play <artist name>

Play <album name>

Play <song name>

Play <playlist name>

Bluetooth

®

 Audio Commands

Play Bluetooth

AUX Commands

Play AUX

2

Refer to the Navigation System Manual

Help

Cancel

Repeat

Voice Help are readout voice guidance for 
Help on current screen.

You can search for the desired item on each 
search screen with your voice.

Next Page

Previous Page

Back

Go to <number>

Select <number>

*1: Models with navigation system

Navigation Commands

*1

Standard Commands

Letter Input Commands

List Commands

-------------------------------------------------------------------------------------------------------------------------------------------------------------

277

uu

Audio System Basic Operation

u

Playing AM/FM Radio

Continued

Features

Playing AM/FM Radio

Tune

Select to display the manual 
input screen of radio frequency.

MENU

Select to display the menu 
screen.

Station List

Select to display the station list 
screen.

Tune Up/Down Icons

Select 

 or 

 to search up 

and down the selected band 
for a station with a strong 
signal.

Favorite Station Icons, Add 
Favorite

Tune the radio frequency for 
favorite station. Select 

Add 

Favorite

 to store the station.

Swipe left or right the A-zone 
touchpad to display the next or 
previous favorite station list.

 VOL/AUDIO (Volume/

Power) Knob

Push to turn the audio system 
on and off. Turn to adjust the 
volume.

/

 (Seek/Skip) Buttons

Press 

 or 

 to search up 

and down the selected band for a 
station with a strong signal.

Scan

Select to scan each station 
with a strong signal.

 Icon

Select to display the 
subchannel list screen.

-------------------------------------------------------------------------------------------------------------------------------------------------------------

uu

Audio System Basic Operation

u

Playing AM/FM Radio

278

Features

To add a favorite station:

1.

Tune to the selected station.

2.

Select 

Add Favorite

, then select 

Current Station

.

u

When you select 

From Station List

, you can store a station from the station 

list.

Editing a favorite station

Select and hold to desired favorite station icon.

The following items are available:

Remove Favorite

: Delete the favorite station icon from the favorite station list.

Replace with

 (number): Replace the stored favorite station icon.

Add to Home Page

: Add the shortcut icon of the stored favorite station to the 

home screen.

Add to Heads-Up Display

*

: Add the shortcut item of the stored favorite station 

to the head-up display menu.

Favorite Station

1

Favorite Station

The 

ST

 indicator appears on the display indicating 

stereo FM broadcasts.
Stereo reproduction in AM is not available.

Switching the Audio Mode
Press the 

APPS

 button on the steering wheel, then 

select an item or select the audio source icon on the 
home screen.

2

Audio Remote Controls

 P. 247

You can store 12 AM/FM stations into favorite 
station.

HD Radio Technology manufactured under license 
from iBiquity Digital Corporation. U.S. and Foreign 
Patents. For patents see 

http://dts.com/patents

. HD 

Radio, Artist Experience, and the HD, HD Radio, and 
“ARC” logos are registered trademarks or 
trademarks of iBiquity Digital Corporation in the 
United States and/or other countries.

* Not available on all models

-------------------------------------------------------------------------------------------------------------------------------------------------------------

Continued

279

uu

Audio System Basic Operation

u

Playing AM/FM Radio

Features

Lists the strongest stations on the selected band.

1.

Select 

Station List

 to display a list.

2.

Select the station.

Manual update

Updates your available station list at any time.

1.

Select 

Station List

 to display a list.

2.

Select 

Refresh

.

1.

Select 

Tune

.

2.

Select   or   to tune the radio frequency.

Samples each of the strongest stations on the selected band for 10 seconds. To turn 
off scan, select 

Stop

 or press the 

 (back) button.

Station List

Radio Frequency Manual Tune Screen

1

Station List

Provides text data information related to your 
selected RDS-capable FM station.

When you select an RDS-capable FM station, the RDS 
automatically turns on, and the frequency display 
changes to the station name. However, when the 
signals of that station become weak, the display 
changes from the station name to the frequency.

1

Radio Frequency Manual Tune Screen

You can tune the range of FM frequency between 
87.7 to 107.9MHz and range of AM frequency 
between 530 to 1710kHz.

Select 

, then trace the numbers of the radio 

frequency on the A-zone touchpad. When 

KEYPAD


is selected, the on-screen keyboard appears.

Scan

-------------------------------------------------------------------------------------------------------------------------------------------------------------

280

uu

Audio System Basic Operation

u

Playing AM/FM Radio

Features

Displays the subchannel list when an HD Radio

TM

 station is selected while listening to 

an FM station.

1.

Select  

icon.

2.

Select the channel number.

Change the AM/FM settings.

1.

Select 

MENU

.

2.

Select 

HD Radio Setting

.

3.

Select 

Automatic

 or 

Analog Only

.

HD Subchannel

AM/FM Settings

-------------------------------------------------------------------------------------------------------------------------------------------------------------

281

uu

Audio System Basic Operation

u

Playing SiriusXM

®

 Radio

Continued

Features

Playing SiriusXM

®

 Radio

Channel Up/Down Icons

Select   or   to the previous or 
next channel.
Select and hold to rapidly skip 
10 channels at a time.

MENU

Select to display the menu 
screen.

Channels

Select to display the channel 
list screen.

More

Select to display the additional 
function items.
Select 

Less

 to close the 

additional function items.

Favorite Channel Icons, Add 
Favorite

Tune the channel for favorite 
channel. Select 

Add Favorite


to store the channel.
Swipe left or right the A-zone 
touchpad to display the next 
or previous favorite channel 
list.

 VOL/AUDIO (Volume/

Power) Knob

Push to turn the audio system 
on and off. Turn to adjust the 
volume.

/

 (Seek/Skip) Buttons

Press 

 or 

 to the 

previous or next channel.
Press and hold to rapidly skip 
10 channels at a time.

Album Art

Category Icons

Select   or   to change the 
category.

-------------------------------------------------------------------------------------------------------------------------------------------------------------

uu

Audio System Basic Operation

u

Playing SiriusXM

®

 Radio

282

Features

1.

Select 

MENU

.

2.

Select 

SiriusXM Settings

.

3.

Select 

Tune Mode

.

4.

Select 

All Channels

 or 

Within Category

.

To Change the Tune Mode

1

Playing SiriusXM

®

 Radio

In the channel mode, all available channels are 
selectable. In the category mode, you can select a 
channel within a category (Jazz, Rock, Classical, etc.).

There may be instances when SiriusXM

®

 Radio does 

not broadcast all the data fields (artist name, title). 
This does not indicate a problem with your audio 
system.

SiriusXM

®

 Radio stations load in ascending order, 

which can take about a minute. Once they have 
loaded you will be able to scroll up or down to make 
your selections.

Switching the Audio Mode
Press the 

APPS

 button on the steering wheel, then 

select an item or select the audio source icon on the 
home screen.

2

Audio Remote Controls

 P. 247

Tune Start:

When you change to a favorite channel, a song being 
played on that channel restarts from the beginning 
with this function. This can be turned on or off by the 
following procedure.
1. Select 

MENU

.

2. Select 

SiriusXM Settings

.

3. Select 

Tune Start

.

4. Select 

On

 or 

Off

.

To change a category, select 

Category

 icons, or 

select 

Channels

 and then select category item.

-------------------------------------------------------------------------------------------------------------------------------------------------------------

Continued

283

uu

Audio System Basic Operation

u

Playing SiriusXM

®

 Radio

Features

To add a favorite channel:

1.

Tune to the selected channel.

2.

Select 

Add Favorite

, then select 

CURRENT CHANNEL

.

u

When you select 

From Channels

, you can store a channel from the channel 

list.

Editing a favorite channel

Select and hold to desired favorite channel.

The following items are available:

Remove Favorite

: Delete the favorite channel from the favorite channel list.

Replace with Ch

 (number): Replace the stored favorite channel.

Create TuneMix

: Create a favorite multi-channel.

Add to Home Page

: Add the shortcut icon of the stored favorite channel to the 

home screen.

Add to Heads-Up Display

*

: Add the shortcut item of the stored favorite channel 

to the head-up display menu.

Favorite Channel

1

Favorite Channel

You can store 12 SiriusXM

®

 channels in the favorite 

channel list.

* Not available on all models

-------------------------------------------------------------------------------------------------------------------------------------------------------------

uu

Audio System Basic Operation

u

Playing SiriusXM

®

 Radio

284

Features

Favorite multi-channel (for music channels only)

You can store up to 20 of your preferred music channels per favorite channel.

To create a favorite multi-channel:

1.

Tune a channel.

2.

Select and hold a number that you want to 
use as a favorite multi-channel.

3.

Select 

Create TuneMix

.

u

The number you have selected will be 
registered as a favorite multi-channel 
number, and the channel that you have 
tuned will be registered with this 
number.

To add a channel to a favorite multi-channel:

1.

Tune a channel.

2.

Select and hold a favorite multi-channel 
number.

3.

Select 

Edit TuneMix

.

4.

Select 

Add Channel

.

u

Current channel is added to the 
TuneMix.

u

A message appears if the current channel 
cannot be added to the TuneMix.

1

Favorite multi-channel (for music channels only)

When you want to replace the channel, select 

Replace with Ch

 (number).

If you want to delete a channel, select 

Edit TuneMix

and then select the channel you want to delete.

-------------------------------------------------------------------------------------------------------------------------------------------------------------

Continued

285

uu

Audio System Basic Operation

u

Playing SiriusXM

®

 Radio

Features

Suggested channel listing received from SiriusXM

®

 can be displayed and selected.

1.

Select 

Channels

.

2.

Select featured channel category.

3.

Select featured channel.

Listening to Featured Channels

1

Listening to Featured Channels

Up to eight featured channels by SiriusXM

®

 can be 

displayed.

Select 

SEARCH LIST

, then trace the letters and/or 

numbers of the channel on the A-zone touchpad. 
When 

KEYBOARD

 is selected, the on-screen 

keyboard appears.

-------------------------------------------------------------------------------------------------------------------------------------------------------------


Content      ..     15      16      17      18     ..