Acura RDX (2021 year). Manual in english - page 15
 

  Index      Manuals     Acura RDX (2021 year). Manual in english


Search            copyright infringement  


Content      ..     13      14      15      16     ..


Acura RDX (2021 year). Manual in english - page 15


Continued

237

uu

Climate Control System

u

Co
ntrols

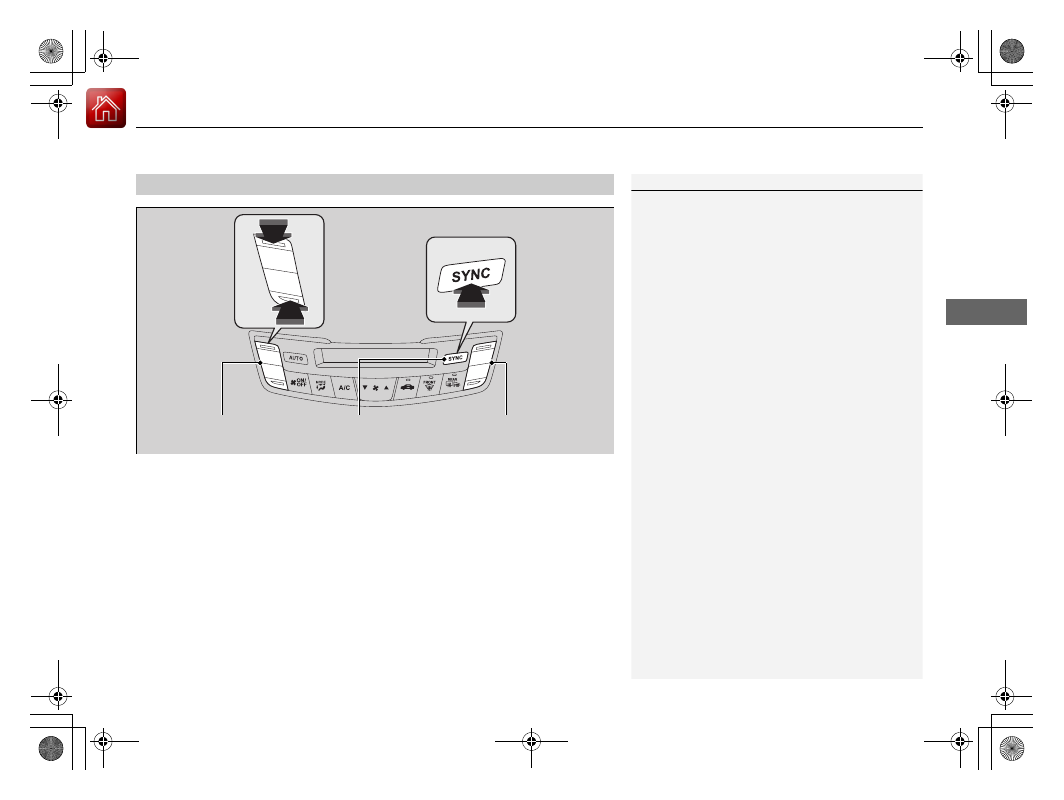
You can set the temperature synchronously for the driver’s side and the passenger’s 
side in synchronization mode.

1.

Press the 

SYNC

 button.

u

The 

SYNC

 indicator will come on.

u

The system switches to synchronization mode.

2.

Adjust the temperature using the driver’s side temperature control buttons.

Press the 

SYNC

 button or adjust the interior temperature using the passenger’s side 

temperature control buttons to return to dual mode.

Synchronization Mode

1

Synchronization Mode

When the system is in dual mode, the driver’s side 
temperature and the passenger’s side temperature 
can be set separately.

Driver’s Side Temperature 
Control Buttons

Passenger’s Side Temperature 
Control Buttons

SYNC

 Button

-------------------------------------------------------------------------------------------------------------------------------------------------------------

uu

Climate Control System

u

238

Co
ntrols

You can set the rear passenger compartment 
temperature different than the driver’s, using 
the rear temperature control dial.

Rear Temperature Control Dial

*

1

Rear Temperature Control Dial

*

The rear temperature can be adjusted when the 
climate control system is on.

Dial up to 
raise the 
temperature.

Dial down to 
lower the 
temperature.

Rear 
Temperature 
Control Dial

Position of 
driver’s 
temperature

* Not available on all models

-------------------------------------------------------------------------------------------------------------------------------------------------------------

239

uu

Climate Control System

u

Automatic Climate Control Sensors

Co
ntrols

Automatic Climate Control Sensors

The automatic climate control system is 
equipped with sensors. Do not cover or spill 
any liquid on them.

Sensor

Sensor

-------------------------------------------------------------------------------------------------------------------------------------------------------------

241

Features

This chapter describes how to operate technology features.

Audio System

About Your Audio System................ 242
USB Ports ......................................... 243
Auxiliary Input Jack .......................... 245
Audio System Theft Protection ......... 246
Audio Remote Controls.................... 247

Audio System Basic Operation

........ 249

True Touchpad Interface .................. 250
Audio/Information Screen ................ 253
System Updates ............................... 266
Adjusting the Sound ........................ 272
Display Setup ................................... 273

Voice Control Operation .................. 274
Playing AM/FM Radio....................... 277
Playing SiriusXM

®

 Radio ................... 281

Playing an iPod ................................ 294
Playing a USB Flash Drive ................. 297
Playing 

Bluetooth

®

 Audio................. 300

Wi-Fi Connection ............................. 303
AT&T Hotspot .................................. 305
Siri Eyes Free .................................... 306
Apple CarPlay .................................. 307
Android Auto................................... 311

Audio Error Messages

...................... 315

General Information on the Audio 

System

............................................. 318

Customized Features

........................ 341

HomeLink

®

 Universal Transceiver

... 364

Bluetooth

®

 HandsFreeLink

®

............. 367

AcuraLink

®

........................................ 396

-------------------------------------------------------------------------------------------------------------------------------------------------------------

242

Features

Audio System

About Your Audio System

The audio system features AM/FM radio and SiriusXM

®

 Radio service. It can also play 

USB flash drives, and iPod, iPhone, iPad and 

Bluetooth

®

 devices.

You can operate the audio system from the True Touchpad Interface, buttons and 
knobs on the panel, or the remote controls on the steering wheel.

1

About Your Audio System

iPod

®

, iPad

®

, iPhone

®

 and iTunes are trademarks of 

Apple Inc.

State or local laws may prohibit the operation of 
handheld electronic devices while operating a 
vehicle.

SiriusXM

®

 Radio is available on a subscription basis 

only. For more information on SiriusXM

®

 Radio, 

contact a dealer.

2

General Information on the Audio System


P. 318

SiriusXM

®

 Radio is available in the United States and 

Canada, except Hawaii, Alaska, and Puerto Rico.

SiriusXM

®

 is a registered trademark of SiriusXM 

Radio, Inc.

After you turn the power mode to VEHICLE OFF 
(LOCK) with the driver’s door closed, you can use the 
audio system for up to 30 minutes per driving cycle. 
However, whether you can continue using the audio 
system depends on the battery condition. Repeatedly 
using this feature may drain the battery.
The audio system turns off when you open the 
driver’s door.

Remote Controls

iPod

USB Flash Drive

-------------------------------------------------------------------------------------------------------------------------------------------------------------

243

uu

Audio System

u

USB Ports

Continued

Features

USB Ports

Install the device USB connector or the USB flash drive to the USB port.

In the console compartment

The USB port (2.5A) is for charging devices, 
playing audio files and connecting compatible 
phones with Apple CarPlay or Android Auto.

u

To prevent any potential issues, be sure 
to use an Apple MFi Certified Lightning 
Connector for Apple CarPlay, and for 
Android Auto, the USB cables should be 
certified by USB-IF to be compliant with 
USB 2.0 Standard.

1

USB Ports

Do not leave the iPod or USB flash drive in the 
vehicle. Direct sunlight and high temperatures may 
damage it.

We recommend using an extension cable with the 
USB port.

Do not connect the iPod or USB flash drive using a 
hub.

Do not use a device such as a card reader or hard 
disk drive, as the device or your files may be 
damaged.

We recommend backing up your data before using 
the device in your vehicle.

Displayed messages may vary depending on the 
device model and software version.

If the audio system does not recognize the iPod, try 
reconnecting it a few times or reboot the device. To 
reboot, follow the manufacturer’s instructions 
provided with the iPod or visit 

www.apple.com/ipod

.

The USB port can supply up to 2.5A of power. It does 
not output 2.5A unless the device requests.
For amperage details, read the operating manual of 
the device that needs to be charged.
Set the power mode to ACCESSORY or ON first.

Under certain conditions, a device connected to the 
port may generate noise in the radio you are listening 
to.

USB charge

-------------------------------------------------------------------------------------------------------------------------------------------------------------

uu

Audio System

u

USB Ports

244

Features

On the front panel

The USB port (2.5A) is only for charging 
devices.

On the back of the console 
compartment

*

The USB ports (2.5A) are only for charging 
devices.

1

On the front panel

This port is for battery charge only. You cannot play 
music even if you have connected music players to 
them.

Under certain conditions, a device connected to the 
port may generate noise in the radio you are listening 
to.

1

On the back of the console compartment

*

These ports are for battery charge only. You cannot 
play music even if you have connected music players 
to them.

Under certain conditions, a device connected to the 
port may generate noise in the radio you are listening 
to.

* Not available on all models

-------------------------------------------------------------------------------------------------------------------------------------------------------------

245

uu

Audio System

u

Auxiliary Input Jack

Features

Auxiliary Input Jack

Use the jack to connect a standard audio device.

1.

Open the 

AUX

 cover.

2.

Connect a standard audio device to the 
input jack using a 1/8 inch (3.5 mm) stereo 
miniplug.

1

Auxiliary Input Jack

You can return to the AUX mode by selecting 

AUX 

Input

 on the home screen.

-------------------------------------------------------------------------------------------------------------------------------------------------------------

246

uu

Audio System

u

Audio System Theft Protection

Features

Audio System Theft Protection

The audio system is disabled when it is disconnected from the power source, such as 
when the battery is disconnected or goes dead. In certain conditions, the system 
may display a code entry screen. If this occurs, reactivate the audio system.

Reactivating the audio system

1.

Set the power mode to ON.

2.

Turn on the audio system.

3.

Press and hold the audio system power knob for more than two seconds.

u

The audio system is reactivated when the audio control unit establishes a 
connection with the vehicle control unit. If the control unit fails to recognize 
the audio unit, you must go to a dealer and have the audio unit checked.

-------------------------------------------------------------------------------------------------------------------------------------------------------------

247

uu

Audio System

u

Audio Remote Controls

Continued

Features

Audio Remote Controls

Allow you to operate the audio system while driving. The information is shown on 
the multi-information display or head-up display

*

.

VOL

(

+

/VOL

(

-

 (Volume) Switch

Press Up: 

To increase the volume.

Press Down: 

To decrease the volume.

 (Power) Button

Press to turn the audio system on and off.

Left Selector Wheel

When selecting the audio mode
Press the 

APPS

 button, then roll up or down to select an item on the multi-

information display or head-up display

*

, and then press the left selector wheel.

Move the left selector wheel to the right to display the 

Recents

 list, then scroll to 

an item selected in the past and press the wheel.

1

Audio Remote Controls

Some modes appear only when an appropriate 
device or medium is used.

Depending on the 

Bluetooth

®

 device you connect, 

some functions may not be operated.

Press the 

 (back) button for the multi-

information display or head-up display

*

 to go back to 

the previous screen or cancel a command.

Press the 

APPS

 button to go back to the menu screen 

of the multi-information display or head-up display

*

.

Recents

 list is available when the following audio 

mode is selected.

FM Radio

AM Radio

SiriusXM

USB Audio

Models with head-up display

 (Power) Button

VOL

(

+

/

VOL

(

-


(Volume) Switch

 (back) Button

Left Selector 
Wheel

APPS

 Button

Models with head-up display

* Not available on all models

-------------------------------------------------------------------------------------------------------------------------------------------------------------

uu

Audio System

u

Audio Remote Controls

248

Features

Roll up or down:

To cycle through each modes, roll up or down and then press the left selector 
wheel:

After an audio mode is selected, the left selector wheel can be operated for the 
following functions.

When listening to the radio

Move to the right: 

To select the next favorite radio station or channel.

Move to the left: 

To select the previous favorite radio station or channel.

When listening to an iPod, USB flash drive, 

Bluetooth

®

 Audio, or Smartphone 

Connection

Move to the right: 

To skip to the next song.

Move to the left: 

To go back to the beginning of the current or previous song.

1

Audio Remote Controls

You can customize the items on multi-information 
display or the head-up display

*

.

2

Customizing the Meter or Head-Up 
Display

*

 P. 264

You cannot operate the audio functions while the 
following functions are being operated on the multi-
information display or head-up display

*

.

Mode selection by pressing 

APPS

 button

Navigation

*

Phone

Select Driving View

*

Customize Apps

Navigation

*

Phone

Audio Modes (

FM Radio

USB 

Audio

, etc)

Select Driving View

*

Customize Apps

* Not available on all models

-------------------------------------------------------------------------------------------------------------------------------------------------------------

249

Features

Audio System Basic Operation

You can use the audio system for 30 minutes when the power mode to VEHICLE OFF 
(LOCK) with the driver’s door closed, the system will then turn off automatically.
If you want to keep using it, we recommend that you turn the power mode to 
ACCESSORY or ON.

 VOL/AUDIO (Volume/Power) Knob: 

Push to turn the audio system on and off. Turn 
to adjust the volume when audio system is on.

/

 (Seek/Skip) Buttons: 

Press to 

change station, channel, song or file.

 (Back) Button: 

Press to go back to the 

previous display when it is displayed.

 (Home) Button: 

Press to go to the home 

screen.

 (Cards List) Button: 

Press to display the 

cards list of the B-zone on the audio/
information screen.

2

B-Zone

 P. 255

A-Zone Touchpad: 

Click or swipe the pad 

with your finger, or move your finger along 
the pad to operate the A-zone on the audio/
information screen.

B-Zone Touchpad: 

Click or swipe the pad 

with your finger to operate the B-zone on the 
audio/information screen.

1

Audio System Basic Operation

True Touchpad Interface

2

True Touchpad Interface

 P. 250

A-Zone

2

A-Zone

 P. 253

B-Zone

2

B-Zone

 P. 255

 (Home) Button

 (Back) Button

A-Zone Touchpad

 (Cards List) Button

Audio/Information Screen

/

 (Seek/

Skip) Buttons


VOL

/

AUDIO

 (Volume/

Power) Knob

B-Zone Touchpad

-------------------------------------------------------------------------------------------------------------------------------------------------------------

250

uu

Audio System Basic Operation

u

True Touchpad Interface

Features

True Touchpad Interface

You can operate the system using True Touchpad Interface.

Click

Lightly press A-zone touchpad to select an 
item.

Press and hold

Press and hold to initiate edit mode 
throughout the system.

Swipe

Swipe or drag your finger in various directions 
to operate each screen.

A-Zone Touchpad Operation

1

True Touchpad Interface

True Touchpad Interface

Some items may be grayed out during driving to 
reduce the potential for distraction.

You can select them when the vehicle is stopped or 
use voice commands.

Wearing gloves may limit or prevent True 
Touchpad Interface response.

Some electronics like inverters may cause slow 
response while using the True Touchpad Interface.

You can operate the True Touchpad Interface using 
gloves when you set the 

Touchpad Sensitivity


setting to 

High

. However, the True Touchpad 

Interface cannot be operated with insulated gloves.

2

Customized Features

 P. 341

-------------------------------------------------------------------------------------------------------------------------------------------------------------

251

uu

Audio System Basic Operation

u

True Touchpad Interface

Continued

Features

Flick

Flick (or drag) your finger up/down or left/
right to scroll in lists or change pages 
throughout the system.

Hand-writing a character

Move your finger quickly to trace a character 
on the A-zone touchpad.

Swipe with two fingers

Swipe (or drag) two fingers across the screen 
to move the map.

Models with navigation system

-------------------------------------------------------------------------------------------------------------------------------------------------------------

252

uu

Audio System Basic Operation

u

True Touchpad Interface

Features

Click

Lightly press (click) the B-zone touchpad to 
select a card.

Swipe

Swipe or drag your finger up or down to select 
an item.

Flick

Flick up or down to cycle through card 
displayed in the B-zone.

B-Zone Touchpad Operation

-------------------------------------------------------------------------------------------------------------------------------------------------------------

253

uu

Audio System Basic Operation

u

Audio/Information Screen

Continued

Features

Audio/Information Screen

Displays each mode status. From this display, you can go to various setup options.

Switching the display 

Press the 

 (home) button to go to the home screen.

Select the following icons on the home screen or 

All Apps

 list.

Navigation

*

Displays the navigation screen.

2

Refer to the Navigation System Manual

Phone

Displays the HFL information.

2

Bluetooth

®

 HandsFreeLink

®

 P. 367

FM Radio/AM Radio/SiriusXM/USB Audio/Bluetooth Audio/AUX Input

Displays the audio information for each.

A-Zone

1

Audio/Information Screen

All Apps

 list

You can select any of the apps from the 

All Apps

 list. 

To display the 

All Apps

 list, place your finger on the 

True Touchpad Interface and swipe right.

2

Home Screen

 P. 257

You can add or remove any of the apps in the home 
screen through the 

All Apps

 list.

2

To add app icons to the home screen and 
the head-up display

*

 P. 258

Home Screen

A-Zone

* Not available on all models

-------------------------------------------------------------------------------------------------------------------------------------------------------------


Content      ..     13      14      15      16     ..