Acura RLX HYBRID (2020 year). Manual in english - page 24
 

  Index      Manuals     Acura RLX HYBRID (2020 year). Manual in english


Search            copyright infringement  


Content      ..     22      23      24      25     ..


Acura RLX HYBRID (2020 year). Manual in english - page 24


uu

When Driving

u

Shifting

386

Driving

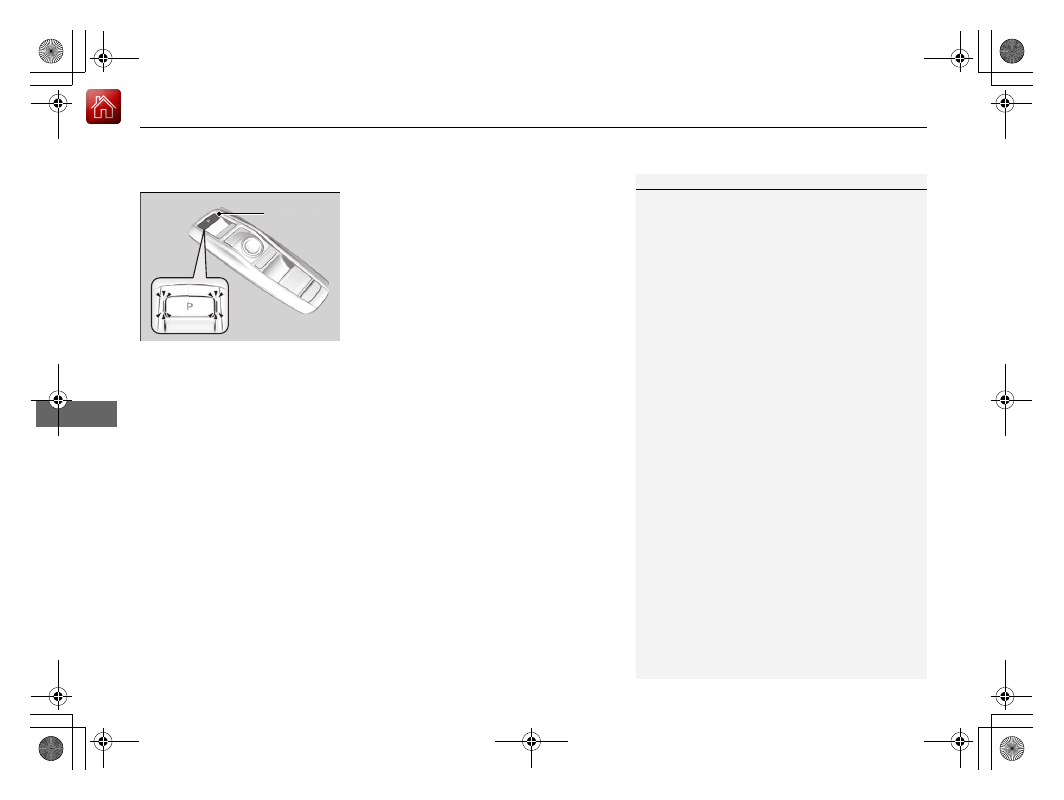
(

P

 (parking) button

The gear position changes to 

(

P

 when you 

press the 

(

P

 button while the vehicle is 

parked with the power mode in ON.
The indicators on the sides of the 

(

P

 button 

come on.

1

Shifting

The beeper sounds and a message appears on the 
multi-information display when you depress the 
accelerator pedal with the gear position in 

(

N

.

Change the gear position to 

(

D

 or 

(

R

 with the brake 

pedal depressed.

When shifting gears in extremely low temperatures 
(-22°F/-30°C), there may be a short delay before the 
gear position is indicated in the display. Always 
confirm you are in the correct gear before driving.

(

P

 Button

-------------------------------------------------------------------------------------------------------------------------------------------------------------

Continued

387

uu

When Driving

u

Shifting

Driving

Shift Operation

1

Shift Operation

NOTICE

When you change 

(

D

 to 

(

R

 and vice versa, come to 

a complete stop and keep the brake pedal depressed.
Operating the shift button before the vehicle has 
come to a complete standstill can damage the 
transmission.

Use the gear position indicator and the shift button 
indicator to check the gear position before selecting 
a shift button.

If the indicator of the currently selected gear position, 
or all the gear position indicators are blinking 
simultaneously, there is a problem with the 
transmission.
Avoid sudden acceleration and have the transmission 
checked by a dealer as soon as possible.

The fuel supply may be cut off if you drive at engine 
speeds in or over the tachometer’s red zone (engine 
speed limit). If this happens, you may experience a 
slight jolt.

When the engine speed is increased while the 
transmission is in 

(

N

(

P

 or 

(

R

, the fuel supply may 

be cut off even without the engine speed entering 
the tachometer’s red zone.

The beeper sounds once when you change to 

(

R

.

2

Customized Features

 P. 295

Gear Position Indicator 
(Transmission System Indicator)

Tachometer’s red zone

Press the 

(

P

 button.

Press back the 

(

R

 button.

Press the 

(

N

 button.

Press the 

(

D

 button.

Shift Button 
Indicator

M

 (sequential mode) 

Indicator

Sequential Mode Gear 
Selection Indicator

-------------------------------------------------------------------------------------------------------------------------------------------------------------

uu

When Driving

u

Shifting

388

Driving

When opening the driver’s door

If you open the driver’s door under the following conditions, the gear position 
automatically changes to 

(

P

;

The vehicle is in stationary with the power mode in ON, or moving at 1 mph (2 
km/h) or slower.

The transmission is in other than 

(

P

.

You have unfastened the driver side seat belt.

u

If you manually change the gear position from 

(

P

 with the brake pedal 

depressed, the gear position will automatically return to 

(

P

 once you release 

the brake pedal.

When turning off the power mode

If you turn the power system off while the vehicle is stationary, and the transmission 
is in other than 

(

P

, the gear position automatically changes to 

(

P

.

1

When opening the driver’s door

While the system is designed to automatically change 
the gear position to 

(

P

 under the described 

conditions, in the interest of safety you should always 
select 

(

P

 before opening the driver’s door.

Make sure to park the vehicle in a safe place.

2

When Stopped

 P. 466

If you want to drive the vehicle after the gear position 
has automatically changed to 

(

P

 under the described 

conditions, close the door, fasten the seat belt, 
depress the brake pedal, then change the gear 
position.

If you leave the vehicle, turn off the power system 
and lock the doors.

-------------------------------------------------------------------------------------------------------------------------------------------------------------

Continued

389

uu

When Driving

u

Shifting

Driving

If you want to keep the transmission in 

(

N

 position (car wash mode)

With the power system on:

1.

Press and hold the brake pedal.

2.

Press and release the 

(

N

 button.

u

(

N

 (Neutral) hold mode will appear on the multi-information display.

3.

Press the 

(

N

 button again and hold it for two seconds.

u

The vehicle will enter car wash mode, which must be used when your vehicle 
is pulled through a conveyor type automatic car wash where you or an 
attendant do not remain in the vehicle.

If the 

POWER

 button is pressed after car wash 

mode has been activated, the power mode 
will change to ACCESSORY and a message 
will be displayed on the multi-information 
display.

u

For 15 minutes the gear position remains 
in 

(

N

 and the power mode will remain in 

ACCESSORY. After that, the position 
automatically changes to 

(

P

 and the 

power mode changes to OFF.

u

Manually changing to 

(

P

 cancels 

ACCESSORY mode. The 

(

P

 indicator 

comes on and the power mode changes 
to OFF. You must always shift to 

(

P


when car wash mode is no longer 
needed.

1

If you want to keep the transmission in 

(

N

 position (car wash 

mode)

To keep the vehicle in 

(

N

 position, you can also 

follow this procedure:
While the power system is on, select 

(

N

, and then 

within five seconds, press the 

POWER

 button.

Note that the transmission may not stay in 

(

N


position while any of the following indicators is on:

Transmission system indicator.

Malfunction indicator lamp.

Charging system indicator.

-------------------------------------------------------------------------------------------------------------------------------------------------------------

390

uu

When Driving

u

Shifting

Driving

Restriction on selecting a gear position

You cannot select a gear position under certain circumstances that may lead to a crash.

When the 
transmission is in:

1. Under the circumstances 
of that:

2. You cannot select:

3. The gear position 
remains in/changes to:

How to change the 
gear position

(

P

The brake pedal is not 
depressed.

Other gear position

(

P

Release the accelerator 
pedal and depress the 
brake pedal.

The accelerator pedal is 
depressed.

(

N

The vehicle is moving at low 
speed without the brake pedal 
depressed.

(

N

The vehicle is moving at low 
speed with the accelerator 
pedal depressed.

(

N

 or 

(

D

The vehicle is moving forward.

(

R

Park your vehicle in a 
safe place.

(

R

 or 

(

N

The vehicle is moving backward.

(

D

(

R

(

N

, or 

(

D

The vehicle is moving.

(

P

(

P

 or 

(

N

The 

READY

 indicator is not on.

A gear position other than 

(

P


or 

(

N

(

P

 or 

(

N

Make sure that the 

READY

 indicator 

comes on.

-------------------------------------------------------------------------------------------------------------------------------------------------------------

Continued

391

uu

When Driving

u

Shifting

Driving

Use the paddle shifters to change between 1st and 7th gears without removing your 
hands from the steering wheel. The transmission will switch to the sequential mode.

When the transmission is in 

(

D

:

The vehicle will go into the sequential mode momentarily, and the sequential mode 
gear selection indicator will come on.
Once you start traveling at a constant speed, the sequential mode will automatically 
switch off, and the sequential mode gear selection indicator will go off.

Hold the 

(

+

 paddle shifter for two seconds to return to normal drive.

When the transmission is in 

(

D

 with SPORT mode:

The vehicle will go into the sequential mode, and the 

M

 (sequential mode) indicator 

and sequential mode gear selection indicator will come on.
If the vehicle speed increases and the engine speed reaches near the tachometer’s 
red zone, the transmission automatically shifts up to 6th.
You can cancel this mode by pulling the 

(

+

 paddle shifter for two seconds. When 

the sequential mode is canceled, the sequential mode indicator and sequential 
mode gear selection indicator will go off.

Sequential Mode

1

Sequential Mode

The vehicle is engine operated when SPORT mode is 
on.

-------------------------------------------------------------------------------------------------------------------------------------------------------------

uu

When Driving

u

Shifting

392

Driving

Sequential Mode Operation

1

Sequential Mode Operation

Each paddle shift operation makes a single gear 
change.
To change gears continuously, release the paddle 
shifter before pulling it again for the next gear.

If the sequential mode gear selection indicator blinks 
when you try to shift up or down, this means your 
vehicle speed is not in its allowable gear range or the 
protection of transmission system is necessary.
Slightly accelerate to shift up and decelerate to shift 
down while the indicator is blinking.

In SPORT mode, to prioritize the engine performance 
enhancement, the transmission may not allow for 
shifting up while the engine speed is low.

Downshifting when pulling 
the 

 paddle shifter. 

(Changes to a lower gear)

Upshifting when pulling 
the 

 paddle shifter. 

(Changes to a higher gear)

Paddle Shifter 
(Shift down)

Paddle Shifter 
(Shift up)

-------------------------------------------------------------------------------------------------------------------------------------------------------------

393

uu

When Driving

u

SPORT Mode

Driving

SPORT Mode

To turn the SPORT mode on and off, press the 

SPORT

 button.

The SPORT mode increases engine performance and handling.
This mode is not recommended for fuel economy enhancement, but suitable for 
driving on hills or through curves on mountain roads.

The SPORT mode is turned off every time you start the power system, even if you 
turned it on the last time you drove the vehicle.

SPORT

 Button

SPORT

 Mode 

Indicator

-------------------------------------------------------------------------------------------------------------------------------------------------------------

394

uu

When Driving

u

Reactive Force Pedal

Driving

Reactive Force Pedal

The system increases the accelerator pedal 
resistance force when you depress the 
accelerator pedal. This gives you the feeling 
that the vehicle's acceleration is in response to 
your pedal operation.

At the same time, a slight increase in the accelerator pedal resistance force helps to 
modify your driving style to be in an efficient manner especially when you apply 
more force to the pedal than is necessary.

The Reactive Force Pedal is designed also to help prevent your wheels from possibly 
spinning out due to excessive throttle, and help make the vehicle start smoothly 
when roads are slippery due to ice, snow, excessive rainfall, etc.

1

Reactive Force Pedal

The Reactive Force Pedal system in no way restricts or 
limits your ability to operate the accelerator pedal to 
accelerate the vehicle.

If the Collision Mitigation Braking System

TM

 (CMBS

TM

detects a possible collision, you may feel an opposing 
force from the accelerator pedal.

2

Collision Mitigation Braking System

TM


(CMBS

TM

)

 P. 458

You can change the amount of the accelerator pedal 
resistance force.

2

Customized Features

 P. 295

The Reactive Force Pedal system is deactivated when 
SPORT mode is on.

Accelerator Pedal

-------------------------------------------------------------------------------------------------------------------------------------------------------------

395

uu

When Driving

u

Acoustic Vehicle Alerting System

Driving

Acoustic Vehicle Alerting System

Alerts pedestrians when a vehicle is propelled solely by electricity, approaching at 
speeds around 12 mph (20 km/h) or less.

Press the button to turn the system on and 
off.

u

The indicator in the button comes on 
when the system is off.

The system is turned on every time you turn 
the power system on, even if you turned it off 
the last time you drove the vehicle.

Acoustic Vehicle Alerting System OFF Button

Canadian models

-------------------------------------------------------------------------------------------------------------------------------------------------------------

396

uu

When Driving

u

AcuraWatch

TM

Driving

AcuraWatch

TM

AcuraWatch

TM

 is a driver support system which employs the use of two distinctly 

different kinds of sensors, a radar sensor located in the front grille and a front sensor 
camera mounted to the interior side of the windshield, behind the rearview mirror.

AcuraWatch

TM

 has the following functions:

Functions that do not need to be activated by the driver

Road Departure Mitigation (RDM) System 

2

 P. 416

Collision Mitigation Braking System

TM

 (CMBS

TM

2

 P. 458

Functions that need to be activated by the driver

Adaptive Cruise Control (ACC) with Low Speed Follow 

2

 P. 402

Lane Keeping Assist System (LKAS) 

2

 P. 421

Traffic Jam Assist 

2

 P. 428

-------------------------------------------------------------------------------------------------------------------------------------------------------------

397

uu

When Driving

u

AcuraWatch

TM

Continued

Driving

MAIN Button

Press to activate standby mode for ACC with 
Low Speed Follow, LKAS, and Traffic Jam 
Assist. Or press to cancel these systems.

LKAS Button

Press to activate or cancel the LKAS and Traffic 
Jam Assist.

RES/+/SET/− Switch

Press 

RES/+

 to resume the ACC with Low 

Speed Follow or increase the vehicle speed.
Press 

SET/−

 to set the ACC with Low Speed 

Follow or decrease the vehicle speed.

Interval Button

Press the   (interval) button to change the 
ACC with Low Speed Follow following-
interval.

CANCEL Button

Press to cancel ACC with Low Speed Follow.

Operation Switches for the ACC with Low Speed Follow/
LKAS/Traffic Jam Assist

MAIN

 button

Interval 
Button

CANCEL


Button

LKAS Button

RES/+

/

SET/−


Switch

-------------------------------------------------------------------------------------------------------------------------------------------------------------

uu

When Driving

u

AcuraWatch

TM

398

Driving

You can see the current state of ACC with 
Low Speed Follow, LKAS and Traffic Jam 
Assist.

a

Indicates that ACC with Low Speed Follow, 
Traffic Jam Assist, and LKAS are ready to be 
activated.

b

Indicates that LKAS and Traffic Jam Assist 
are activated and whether or not traffic 
lane lines are detected.

c

Indicates whether or not a vehicle is 
detected ahead.

d

Shows the set vehicle speed.

e

Shows the set vehicle interval.

Multi-Information Display Content

1

Multi-Information Display Content

You can have the head-up display show you the 
current state of each function.

2

Head-Up Display

 P. 119

-------------------------------------------------------------------------------------------------------------------------------------------------------------

399

uu

When Driving

u

AcuraWatch

TM

Driving

To activate ACC with Low Speed Follow, LKAS, and Traffic Jam Assist, carry out the following steps:

How to Operate the Buttons on the Steering Wheel

Press the 

MAIN

 button

MAIN


Button

RES/+

/

SET/−


Switch

LKAS 
Button

ACC with Low Speed 
Follow

The vehicle icon, interval 
bars and set speed 
appear on the multi-
information display.

Press 
the 
LKAS 
Button

Press the 

RES/+

/

SET/−


Switch 
down

Press the 
LKAS 
Button

Traffic Jam Assist

Keep your vehicle near the center of the lane while driving.
Keep vehicle speed under 45mph (72 km/h).

Lane outlines appear on the 
multi-information display.
Traffic Jam Assist is ready to 
use.

The dotted outer lines change to 
solid ones once the system starts 
operating after detecting the 
left and right lane markings.

LKAS

Keep your vehicle near the center of the lane while driving.
Keep vehicle speed over 45mph (72 km/h).

Lane outlines (dotted outer lines) 
appear on the multi-information 
display. LKAS is activated.

The dotted outer lines change to solid ones 
once the system starts operating after 
detecting the left and right lane markings.

Press the 

RES/+

/

SET/−

 Switch down

-------------------------------------------------------------------------------------------------------------------------------------------------------------

400

uu

When Driving

u

Front Sensor Camera

Driving

Front Sensor Camera

The camera, used in systems such as LKAS, RDM, ACC with Low Speed Follow, 
Traffic Jam Assist, and CMBS

TM

, is designed to detect an object that triggers any of 

the systems to operate its functions.

This camera is located behind the rearview 
mirror.

To help reduce the likelihood that high interior 
temperatures will cause the camera’s sensing 
system to shut off, when parking, find a shady 
area or face the front of the vehicle away from 
the sun. If you use a reflective sun shade, do 
not allow it to cover the camera housing. 
Covering the camera can concentrate heat on 
it.

Camera Location and Handling Tips

1

Front Sensor Camera

Never apply a film or attach any objects to the 
windshield, the hood, or the front grille that could 
obstruct the camera’s field of vision and cause the 
system to operate abnormally.
Scratches, nicks, and other damage to the windshield 
within the camera’s field of vision can cause the 
system to operate abnormally. If this occurs, we 
recommend that you replace the windshield with a 
genuine Acura replacement windshield. Making even 
minor repairs within the camera’s field of vision or 
installing an aftermarket replacement windshield 
may also cause the system to operate abnormally.
After replacing the windshield, have a dealer 
recalibrate the camera. Proper calibration of the 
camera is necessary for the system to operate 
properly.

Do not place an object on the top of the instrument 
panel. It may reflect onto the windshield and prevent 
the system from detecting lane lines properly.

Front Sensor 
Camera

-------------------------------------------------------------------------------------------------------------------------------------------------------------

401

uu

When Driving

u

Front Sensor Camera

Driving

1

Front Sensor Camera

If the 

Some Driver Assist Systems Cannot 

Operate: Camera Temperature Too High

 message 

appears:

Use the climate control system to cool down the 
interior and, if necessary, also use defroster mode 
with the airflow directed towards the camera.

Start driving the vehicle to lower the windshield 
temperature, which cools down the area around 
the camera.

If the 

Some Driver Assist Systems Cannot 

Operate: Clean Front Windshield

 message 

appears:

Park your vehicle in a safe place, and clean the 
windshield. If the message does not disappear after 
you have cleaned the windshield and driven for a 
while, have your vehicle checked by a dealer.

-------------------------------------------------------------------------------------------------------------------------------------------------------------


Content      ..     22      23      24      25     ..